
Cookbook #96: Sunset Recipe Annual, 1992 Edition, Sunset Publishing Corporation, Menlo Park, CA, 1992.
 January 1, 2015. A new year! And what to cook? Something for New Year’s Day, something a little less calorie-laden than the last two weeks of slight overindulgence. I pull several cookbooks from the shelf, but as soon as I open Sunset Recipe Annual, I know I’ve found the book I want!
Southwestern accents, lots of vegetables and fruits, light and practical . . . hey, I’ve written about this cookbook before! A quick search of my own blog pulls up Sunset All-Time Favorite Recipes, an entry I made in 2012 for a quite-similar Sunset cookbook published in 1993. Like for that book, I want to try at least half of the recipes. Nuff said. I’ll keep this cookbook out for a while and sample some of its attractive recipes.
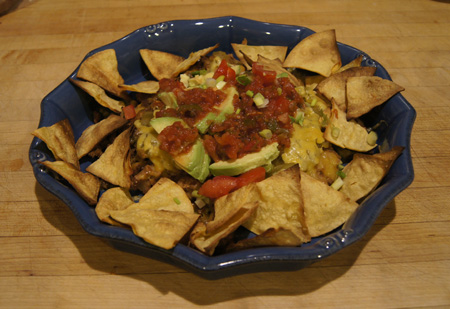
I settle on “Supper Nachos” for this blog. This recipe is in the “January” chapter, and quite appropriate for New Years Day, casual and tasty, great for serving while the football games play. And lower in fat than most nacho recipes.
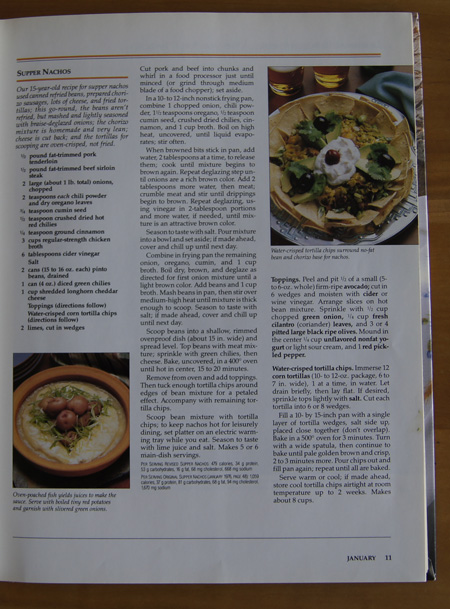
This cookbook has a pleasing layout. Note the lengthy directions for Supper Nachos.
This recipe utilizes the technique of “braise-deglaze” to bump up the flavor while eliminating cooking oil (and associated calories). Briefly, the vegetables (onions in this case) are mixed with a little broth or water and cooked over high heat until the liquid evaporates and brown bits begin to stick to the pan. More liquid is added in small amounts and the process repeated until the vegetables have a rich brown color. I am familiar with this technique, but don’t use it a whole lot, and usually only with wine as the deglazing liquid.
Calories are reduced by using pork tenderloin and lean beef instead of store-purchased hamburger. These meats are mixed with the cooked onions and spices to make a chorizo-like mixture. (Chorizo is a Mexican sausage available nearly everywhere here in Colorado. I have found that each brand I purchase is different, but most are pretty fatty. Sometimes it is formed into sausages, sometimes sold in bulk.)
Calories are further reduced by substituting mashed, seasoned pinto beans for traditional refried beans. And, instead of bagged tortilla chips, I will be baking wedges cut from tortillas.
I changed a few things (beef broth instead of chicken, less cider vinegar, more spices); my version is below.
Light Nachos with Homemade Chorizo
serves about 4 as a meal
for the chorizo:
- 1/2 pound pork tenderloin (trim off any visible fat)
- 1/2 pound lean beef (trim off any visible fat)
- 1 onion, chopped
- 2 teaspoons chile powder
- 1 1/2 teaspoons oregano (use Mexican oregano if you have it)
- 1/2 teaspoon cumin
- 1/2 teaspoon hot chile flakes
- 1/4 teaspoon cinnamon
- 1 cup chicken or beef broth
- 2 tablespoons cider vinegar
for the beans:
- 2 cans pinto beans (15-16 oz.), drained
- 1 onion, chopped
- 1 teaspoon oregano (Mexican if possible)
- 1/2 teaspoon cumin
- 2 cups chicken or beef broth
for the chips:
- 12 corn tortillas
for putting the baked nachos together:
- 1 4-oz. can diced green chiles
- 1 cup grated cheddar cheese
for toppings:
- avocado, chopped
- chopped green onion
- fresh cilantro
- black olives
- prepared salsa
- tomatoes
- low-fat sour cream or plain yogurt
Directions: chorizo
Chop the pork and beef into big chunks and process in a food processor until just minced. (Do not grind it to a pulp, you want some texture.) Set aside.
Combine the onion, spices, and broth in a pan. I suggest a stainless steel pan rather than a non-stick pan (see my discussion below). Stirring a lot, heat the onion mixture over fairly high heat, uncovered, until the liquid evaporates and brown bits stick in the pan. Then, add a couple tablespoons of water and cook until the mixture begins to brown again. Repeat adding water and boiling it off – “deglazing” – until the onions are a rich brown color.
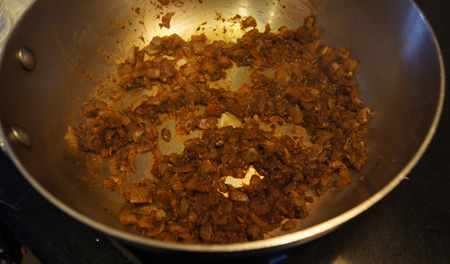 Add the minced meat mixture and a couple tablespoons water and stir until the liquid is again evaporated and the meat is beginning to brown. Deglaze once with 2 tablespoons cider vinegar and then several times with water until the mixture is an “attractive brown color”.
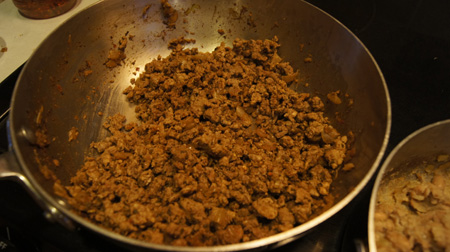 Check the seasoning of the chorizo mixture, adding salt and/or additional seasonings to your own taste. Set aside. The chorizo mixture can be prepared ahead and stored refrigerated or frozen.
Directions: beans
Combine the onion, oregano, cumin, and 1 cup of broth and boil dry, brown, and deglaze as directed for the chorizo onion mixture until the onions are a light brown color. Add the pinto beans and another cup of broth to the onion mixture. Mash the beans in the pan, then stir and heat until the mixture is as thick as refried beans. Check the seasonings, add salt to taste. These beans can be prepared ahead and stored refrigerated or frozen.
Directions: chips
Dip each corn tortilla in water and drain briefly. Lay all the water-dipped tortillas out flat on your work surface and sprinkle the tops with salt. Cut each tortilla into 6 wedges.
Heat your oven to 500˚.
Lay the tortilla wedges on a half-sheet pan or cookie sheet. (I lined my pan with parchment for easy clean-up.) Put them in a single layer – you may need two pans to do this, or, bake in batches.
Bake the tortilla wedges for 3 minutes in a 500˚ oven. Turn with a spatula, then put them back in the oven for another 2-4 minutes, until the chips are “pale golden brown and crisp”. Watch carefully so that they don’t burn. (These will sit for about 15 minutes while the nachos bake. If you want to serve them warm, put them back in the oven with the nachos during the last minute or two of baking.)
Directions: baking the nachos
Turn the oven down to 400˚.
Put the beans on a large, ovenproof dish. Mound them a bit in the center. Top the beans with the chorizo mixture, then the green chiles and the cheese. Bake at 400˚ for 15-20 minutes, until the beans and meat are hot and the cheese melted.
Serving
Arrange the tortilla wedges around the baked nachos. Top the beans with avocado, green onions, tomatoes, salsa, olives, and sour cream. Feel free to experiment!
 Comments
These took a lot of time to make. In the midst of all the preparation, I thought, what the heck did I get myself into so much work for! Well, the answer came when we ate them. They were yummy. Definitely. The meat mixture was especially good. And the chips.
I made a full recipe of the meat mixture for the two of us and I froze half of it for a future meal. I made a half recipe of the beans and the amount was perfect for two people as a meal.
The beans were good, but they really didn’t “stand out”. The main advantage to this bean recipe is the low-calorie aspect. To save time, I suggest canned low-fat refried beans. Don’t get me wrong, the beans in this recipe tasted fine, it’s just not really worth the time to make them unless you are in the mood.
The chips? They were very good. They taste better than any of the bagged “baked” tortilla chips that I have purchased. I will make them again!
In summary, the chorizo is the star of this dish. The finished nachos are excellent because they are baked in the oven; the presentation is special because I served them on a pretty platter with the chips and toppings.
A note on pan choice
I started cooking the onions for the chorizo in a non-stick pan, specifically, a Zwilling J.A. Henckels Sol Thermolon sauce pan. Total disaster. When the first broth boiled off, the onion-spice mixture stuck in a film to the bottom of the pan. It started to blacken to a dark tar and I quickly transferred the mixture to a stainless all-clad pan.
You could try the deglazing in a different type of non-stick pan, it might work. But the all-clad worked great, and clean-up was easy.
I love-hate the Henckels Thermolon pans. I had to send my first Thermolon frying pan back for replacement because after a year, everything stuck to it and it was impossible to clean. I do praise the customer service at Henckels. They responded quickly and told me that I should never have this pan at a temperature higher than medium. Well heck, it’s a frying pan! I often browned meats in this pan over medium-high heat.
Nothing sticks to my new replacement Thermolon frying pan, but I treat it with the utmost care, never heating it on a burner that is set higher than medium. (I guard this pan!)