Paprika Covered Casserole

My sixth of seven pandemic-inspired recipes! This one is in my handwriting on an index card, so I may have added it to my repertoire any time before a computer came into my life, which was the mid-1980s.

I don’t remember making this particular casserole, but I do have a recipe that I make a lot even now called “Sour Cream Noodle Bake”. Both have noodles, sour cream, cottage cheese, cheddar cheese, and hamburger. Sour Cream Noodle Bake includes tomato sauce, while Paprika Covered Casserole does not. Also, the Paprika Covered Casserole turns the hamburger into meatballs.

So I will make the Paprika Covered Casserole, and see if I like it better than my usual casserole, and/or if I can learn anything from the recipe.

Paprika Covered Casserole

  • 1/2 pound broad noodles
  • 8 ounces creamed cottage cheese
  • 1/2 cup grated Tilamook cheese (cheddar)
  • 1 cup sour cream
  • 1/2 cup milk
  • 2 1/2 teaspoons paprika
  • 1 pound ground beef
  • 3 tablespoons bread crumbs
  • 1 egg
  • 1 teaspoon salt
  • 2 tablespoons instant chopped onion (or 1 teaspoon granulated onion)
  • 1/8 teaspoon garlic powder
  • 1/8 teaspoon pepper
  • grated cheddar cheese and more paprika for top (optional)

Cook noodles in boiling water; drain. Combine cottage cheese and cheddar cheese. Blend sour cream with the milk and 2 teaspoons of the paprika.

Prepare meatballs by combining the ground beef, bread crumbs, egg, 1/2 teaspoon of the paprika, and the salt and pepper. If using instant chopped onions, let them stand in 2 tablespoons water for 8 minutes; if using granulated onion, just add it directly to the ground beef mixture. Shape into 1-inch meatballs (I suggest even smaller meatballs, perhaps 1/2 to 3/4 inch). Brown the meatballs in a skillet.

Place in a buttered casserole layers of noodles, cheese mixture, sour cream mixture, and meatballs. Repeat, ending with meatballs. (If you like, sprinkle additional cheddar cheese and some paprika on top. I did this, even though it was not in the original version.)

Bake at 350˚ 30 minutes, or until nice and bubbly. Serves 6-8.


This was good, but I doubt I’ll make it again. Making the meatballs was time-consuming, and in my opinion, not worth the trouble. Below is my favorite recipe for Sour Cream Noodle Bake, that I have decided I still like better.

Sour Cream Noodle Bake

  • 8 oz. egg or spinach noodles, cooked
  • 1 pound ground meat
  • 1 teaspoon salt, 1/4 teaspoon garlic salt, 1/8 teaspoon pepper
  • 8 oz. can tomato sauce
  • 1 cup cottage cheese
  • 1 cup sour cream (or yogurt)
  • 6 green onions, chopped
  • 3/4 cup grated cheddar cheese

Brown the meat, add spices and tomato sauce and simmer 5 minutes. Mix noodles, cottage cheese, sour cream, and onions.

In a greased 8″ square pan, layer half of the noodle mixture, then half of the meat mixture; repeat. Top with cheddar cheese. Cover lightly with foil and bake at 375˚ for 15 minutes, then remove the foil and bake 5-10 minutes more, until the cheese melts and browns.

Tamale Cheese Pie

Tamale Cheese Pie is another one of the seven old recipe cards I gathered during an hour of pandemic boredom spent perusing my ancient recipe box. I was making tamale pie way back in my earliest cooking days! It is still one of my favorite casseroles.

Tamale pie was a common type of casserole in the sixties and seventies in Southern California. A can of this, a can of that, some hamburger . . . bake in the oven for half an hour. This recipe, in my own handwriting, lists 15 ingredients, and this list and the directions cover the entire front and back of the card in tiny handwriting. What, did I really used to make tamale pie by consulting this lengthy recipe card? Nowadays I usually make this as a no-recipe recipe.

What’s a “no-recipe recipe”? It’s when you just cook from memory and substitute ingredients and spices according to your whim of the day. Kudos to Sam Sifton of the NY Times cooking site for labeling this way of cooking. I know I cook this way a lot, now it’s nice to know it is “okay”!

Here is my no-recipe recipe for tamale pie. First I cook the meat, sometimes hamburger and sometimes chicken or pork. I add onions and garlic and cumin and chili powder, fresh or canned tomatoes or Rotel, olives if I remember, bell peppers if I have them, maybe a can of green chiles, maybe some corn, and always cheese. I bring some water to a boil and add a half cup of cornmeal, then spread it on top of the meat mixture in a casserole dish. Top with cheese and bake until it looks done. (I might consult the recipe in this 2012 blog post.)

Now that I have my old Tamale Cheese Pie recipe card in hand, I think it will be fun to make it according to this fifty year old recipe. Take care of some more pandemic boredom!

And, maybe I’ll learn something!

Tamale Cheese Pie

  • 1 tablespoon oil
  • 1/3 cup chopped onion
  • 1/4 cup chopped green pepper
  • 1/2 teaspoon chopped garlic
  • 1 pound ground beef
  • 1 15 ounce can of tomatoes
  • 1/2 to 1 cup chopped olives
  • 1 to 1 1/2 tablespoon chili powder
  • 1 teaspoon salt
  • 1/2 to 1 teaspoon cumin
  • 1/2 teaspoon ground coriander
  • 1 1/2 cup water (*see note)
  • 10.5 ounce can condensed beef broth (*see note)
  • 1 cup cornmeal
  • 1 3/4 cup grated cheddar cheese

Cook the onions, green pepper, and garlic in the oil until soft, then add the ground beef and brown. Add the tomatoes and their liquid, olives, chile powder, salt, cumin, and coriander. Simmer 20 minutes.

Meanwhile, combine the water and beef broth with the cornmeal and cook 7-8 minutes over moderate heat, stirring, until very thick.

To assemble, spread half of the the cornmeal mixture over the bottom and sides of a 11 3/4 x 7 1/2 x 1 3/4 inch dish. Add the meat mixture and 1 1/2 cup cheese. Top with the remaining cornmeal mixture, then the remaining 1/2 cup cheese.

Bake at 350˚ 40-45 minutes, until cheese is melted and the cornmeal lightly browned. Serves 6-8.

*Note: I don’t keep condensed beef broth in my pantry. Instead, I make and freeze my own stocks, and that’s what I used when I made this tamale cheese pie. The 1 1/2 cups water plus a 10 ounce can of beef broth is 2 1/8 cups of liquid. I used broth plus water to total 2 1/8 cups.

**Note: Actually, I halved the recipe for the two of us, and baked it in a 9-inch pie pan. Why not? It’s Tamale Cheese Pie, after all! A full recipe calls for a pan that is 11 3/4 x 7 1/2 x 1 3/4 inches. Here is a great reference page for pan sizes, that helped me choose the proper size of pan for my modified recipe: Joy of Baking website.


Did I learn anything from the recipe card? Yes! We really liked this version of tamale pie. My no-recipe version usually turns out with a lot more liquid, and we both liked it better this new (old) way. I also liked the way the cornmeal mush is on both the top and the bottom of the dish. And, I liked the flavor of beef stock in the cornmeal mush.

Mexi-Chili Casserole

For the last several weeks, I have bought Fritos at the store in anticipation of making Mexi-Chili Casserole, the next recipe in my “pandemic seven”. Each of these weeks, when I went to make the casserole, the Fritos were gone.

The first bag disappeared during a spontaneous outdoor socially-distanced family gathering. I hadn’t been to the grocery store in over a week and suddenly had many mouths to feed. I prowled my pantry and freezer and found enough hot dogs and buns and dessert to feed us all, but I needed chips. Aha! I had bought a bag of Fritos for Mexi-Chili Casserole! So as we were grilling hot dogs, I produced the bag of Fritos . . .

. . . my husband’s eyes lit up. And a little later, my pregnant daughter has the bag of Fritos and is sitting on the couch, munching steadily away. She said, “Fritos have always been my favorite! I used to get them a lot in high school.” Her kids loved them too.

That Frito bag was gone! No Frito casserole that week. So the next time I get to the market, I buy another bag. One day that week I find my husband with the opened bag of Fritos, saying “these are like crack!” Okay, so I’ll buy another bag and try again the next week. “You may never get to make that Frito casserole you are planning . . . ” he says. So I am trying again. I bought two bags – they were 2 for 6 dollars. I hid one away.

Frito-essential Mexi-Chili Casserole is a typical 50s to 60s casserole. All it takes is a can of chili, a can of enchilada sauce, a can of tomato sauce, onion powder, sour cream, cheese and of course, Fritos. My recipe card is one that I typed before I left home to live on my own in the late 60s. I don’t make Mexi-Chili Casserole often. In fact, I can’t remember the last time I made it. I was always dieting.

In the fifties and sixties, home cooks found an abundance of canned and packaged products in grocery stores. A new, convenient, and quick way of cooking became the rage. Make a white sauce from scratch for a casserole? No, now the housewife could open a can of cream of mushroom soup instead. Take an hour to cook whole grain rice? No, now the housewife could use instant white rice. Cook vegetables? No, now there were canned varieties. Cook a fish? No, open a can of tuna and mix it with packaged pasta for a tuna casserole. (I discussed this before in my blog post on Eat, Drink and Be Healthy.)

Back to my Mexi-Chili casserole. The time finally arrived when I had a bag of Fritos and was in the mood to cook this casserole. It was so weird mixing together the canned ingredients. These days I usually make my own chile from scratch, add my own seasonings to a casserole, employ some vegetables other than “onion powder”, and don’t use a bag of chips as the starch. This should be fun.

Note: the bag of chips cost $3 and was 9 1/4 ounces. I know those 6-ounce bags of chips once cost 25¢.

Mexi-Chili Casserole

  • 1 x 6 ounce package Fritos (I used a scale to get the proper amount)
  • 2 cups grated Tilamook (cheddar) cheese
  • 1 x 15 ounce can of chili with beans
  • 1 x 15 ounce can enchilada sauce
  • 1 x 8 ounce can tomato sauce
  • 1 tablespoon dried onion
  • 1 cup sour cream

Reserve 1 cup Fritos and 1/2 cup cheese.

Combine remaining chips and cheese with the chili, sauces, and onion. Pour into an 11 x 7 x 2 casserole.

Bake uncovered at 350˚ for 20 minutes. Spread top with sour cream and cheese, and edge with the Fritos. Bake 5 minutes longer.


This casserole got me interested in “Fritos”. How long have they been around, and who invented them? Wikipedia to the rescue! Fritos have their own entry. They were created in 1932 by Charles Elmer Doolin. They are made from deep frying “extruded whole cornmeal”.

Frito Pie, similar to my Mexi-Chili Casserole, also has its own wikipedia entry. Basic Frito Pie is chili, cheese, and corn chips. The oldest known recipe using Fritos brand corn chips with chili was published in Texas in 1949, my year of birth! Frito Pie was sometimes served directly from a Frito bag, which was thicker than it is today.

Hamburger Enchilada Crepes

Another card I pulled out of my “antique” recipe box during these pandemic times is the recipe for Hamburger Enchilada Crepes. Gosh, I love these! I used to make them a lot, but somehow they have slipped my mind . . . for years!

I am a fan of crepes. This blog’s recipe index includes at least seven crepes recipes. I have my own way of making crepes: a spin in the blender for the batter, an hour rest and then another spin just before pouring a 1/3 cup portion into my old, cheapish crepe pan, and a flip to cook both sides of the crepe. Not traditional, perhaps, but it has worked for me for ages.

Back before I retired, I did a lot of my cooking for the upcoming work week on Sundays. This Hamburger Enchilada Crepes recipe lends itself well to that practice, as the crepes and filling can be made ahead of time and kept either in the refrigerator and probably (I think) in the freezer. The cheese sauce can be made while the stuffed crepes bake.

On a hunch, I checked my personal digital recipe document for Hamburger Enchilada Crepes. Aha! It’s there! I noted: “I just have to get this on disc before I lose the index card! I’ve been making these for years and would hate to lose the recipe.” So. My opinions of this great dish have not changed!

And now, I’ll share it with you. Happy pandemic cooking!

Hamburger Enchilada Crepes

Crepes

  • 1 1/2 cups milk
  • 2 eggs
  • 1 tablespoon oil
  • 1/4 teaspoon salt
  • 2/3 cup cornmeal
  • 1/2 cup flour

Put the milk, eggs, oil, and salt in a blender. Blend until smooth. Add the cornmeal and flour and blend 60 seconds.

When you are ready to make the crepes, heat a skillet or crepe pan on medium high. (My crepe pan is 8-inches in diameter.) Get the pan hot enough that when you hold your hand an inch above the surface, you can feel a lot of heat. Do not get the pan so hot that it smokes. Re-blend the crepe mixture just before you begin cooking the crepes. (In fact, you have to keep blending between making each crepe because the cornmeal settles.)

Spray some oil on the hot pan, and immediately pour in about 1/3 cup of the crepe mixture and tip the pan to cover the entire surface with batter. In about 20-30 seconds, it will be ready to flip. Cook the second side briefly, then remove the crepe from the pan and start another one cooking. This recipe makes about 6-8 crepes.

Filling

  • 1 pound hamburger
  • 1/2 cup chopped onion
  • 16 ounce can of refried beans
  • 1/2 cup taco sauce (or any type of salsa that you have on hand)

Cook the hamburger with the onion. Drain off any fat and add the refried beans and taco sauce. Stir to combine; remove from the stove.

I often use a can of plain pinto beans instead of refried beans. To the plain beans I add some cumin, chile powder, granulated garlic, cilantro, and salt to taste.

Sauce

  • 1 tablespoon margarine or butter
  • 3 tablespoons flour
  • 1 teaspoon chile powder
  • 1/4 teaspoon paprika
  • 1 1/2 cups milk
  • 1 cup grated cheddar cheese
  • 1/2 cup sliced olives

Melt the butter (or margarine) in a saucepan. Stir in the flour, chile powder, and paprika. Stir and cook this roux until the ingredients are well mixed. Gradually add the milk, stirring constantly. Cook until the sauce is smooth and thick and bubbly. Stir in the cheese and olives.

Assembly and Cooking

Lay a crepe on the breadboard, add some of the filling, and roll it up. Continue until all the crepes and filling are gone. Place the filled crepes in a shallow casserole or glass baking pan. Pour the sauce over the crepes (this can be done after the crepes have cooked awhile; see the *note below).

Bake at 375 degrees for 25 minutes.

*Note: I often make and fill the crepes and refrigerate or freeze them in the pan (without the sauce). Since the crepes may be partially frozen, or very cold, when I first put them in the oven, I bake them without sauce for awhile and add freshly made sauce sometime near the end of the cooking.

The original recipe says to serve with guacamole sauce topping, below. I rarely did, as these crepes are rich without it. You can see in my photo at the top of this post that I put the topping over some lettuce and served it with the crepes.

(Optional) Topping

  • 1 avocado
  • 1/4 cup sour cream
  • 2 tablespoons taco sauce


250 Cookbooks: Grilling and Barbecue, Cook’s Illustrated Guide

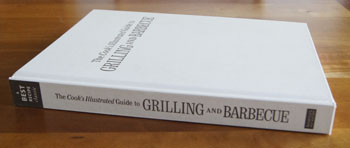
Cookbook #249: Grilling and Barbecue, Cook’s Illustrated Guide, a Best Recipe Classic, by the editors of Cook’s Illustrated, Brookline, MA, 2005.

The Cook's Illustrated Guide to Grilling and BarbecueMy second-to-last cookbook in this 250 Cookbooks blog! Hard to believe this 5-year project is coming to an end.

Cook’s Illustrated guide cookbooks are always among my favorites. Besides Grilling and Barbecue, I also have Cover and Bake and Best International Recipe. I’ve discussed the style of Cook’s Illustrated recipes in my previous posts on those two books. Briefly, you don’t just get a recipe, you get pages of discussion about how that recipe was developed – what they tried that did and did not work. Further information about ingredients and techniques is presented in boxes or side notes. I find that a Cook’s Illustrated recipe might take a bit more concentration to follow than common recipes, but the recipes always work for me. These guide books are all big, heavy, hardback, white-covered tomes.

I have eight “grilling” cookbooks, but this is one of my two “go-to” books for barbecue – the other is Weber’s Real Grilling. Weber’s Real Grilling is specific to gas grills, while Cook’s Illustrated Grilling and Barbecue gives for each recipe methods for both charcoal grilling and gas grilling. We have a gas grill, and I have no desire to cook with charcoal. The gas grill is just too easy! I’ll just say “I’m sorry” to those purists who think charcoal is the only way to grill!

Grilling and Barbecue begins with introductory sections on “Outdoor Cooking 101″ and Equipment and Tools for Outdoor Cooking”. They are quite useful and complete.

The first chapter is “Beef”. Strip and rib steaks, porterhouse and T-bone steaks, filets mignons, steak tips, flank steaks, London broil, hamburgers, prime rib, beef tenderloin, veal chops, beef ribs, and beef brisket are each discussed in detail, describing how to get the most out of each cut of beef. Specific recipes, sauces, salsas, marinades, and rubs are suggested, some of which appear in later chapters in the book.

The section on in the Beef chapter on “Does Branding Matter?” catches my eye. It begins: “To guarantee quality, more and more people are looking beyond the confines of their local supermarket butcher case and buying their steaks through mail order sources. These outlets promise all-star beef with a price tag to match”. I read on with interest, since I have tried mail order steaks in the past. The folks at Cook’s Illustrated did a thorough study of both local supermarket and mail order steaks. The steak that won first place in their taste tests is a mail order brand that cost $68/pound (Lobel’s Wagyu, or Kobe-style steak from Oakleigh Ranch in Australia). “We found that money can buy you happiness, if happiness for you is the best steak you ever ate”. But the “good news” is that you don’t have to spend a small fortune “or pay for shipping” to get a great steak. Coleman Natural steak, available at some supermarkets, is only $14 a pound and came in second in their taste tests. (Note the publication date of this book: 2005. We know prices have changed since then.)

Pork, lamb, chicken, turkey and other birds, fish, shellfish, vegetables, and pizza and bruschetta chapters follow in the same detail and style as the beef chapter. Sides and salads, rubs and sauces round out the book.

I think a study “kebabs” would be a good illustration of “Grilling and Barbecue, Cook’s Illustrated Guide“. Sure, I’ve made pork, beef, and chicken kebabs so often I rarely use a recipe, but the meat often comes out dry and chewy, or under-cooked, or unflavorful, and the onions and peppers and other vegetables burned or falling apart. I usually make kebabs the same way, no matter what type of meat I use. Just load up the skewers, brush with a sauce, and put them on the grill – that’s my method. But I decide to use this blog as an opportunity to study how to make really good kebabs. So I turn to the pages and lengthy kebab discussions in this tome – about 4 big pages on average for each type of kebab. Below is what I learn.

First, pork. The problem with pork kebabs is that the pork tastes bland and often dries out on the grill. Cook’s Illustrated tried different cuts of pork, and chose pork loin because it has a full flavor, is tender, and an “appealing resistance when you bite into it”. On their early tries, the pork loin dried out on the grill. To overcome this, they tried both brining and marinating, and chose the marinade method because it not only kept the meat “moist and juicy”, but it added “richness of flavor that was lacking in the lean pork loin”. Also, the oil in the marinade improved the pork’s texture and added other flavors to the meat. Not only that, but cutting the pork loin into 1 1/4 inch cubes and “butterflying” them improved the flavor of this rather neutral meat. To butterfly, each cube is cut almost through at the center before marinating, and then folded back together to skewer as a whole cube. On the gas grill, these cubes cooked best over a “more moderate level of heat” than beef, the grill is covered, and the kebabs are turned a quarter-turn every 2 1/2 minutes for about 9-10 minutes total. Cooking the pork to 145˚ was found to be ideal. A study of fruits and vegetables to accompany the pork on the skewers led them to recommend fresh pineapple in 1-inch chunks, bell peppers in 1-inch pieces, and red onion in 3/4-inch pieces.

Beef kebabs went through a similar study. Results: use top blade (flatiron) steaks or sirloin.  Butterfly 1 1/4-inch beef cubes and marinate in a non-acidic olive oil based herb mixture, use the same vegetable and fruits as in pork cubes, grill over direct high heat, cover down, turning one-quarter turn every 1 3/4 minutes, until meat is browned, about 7-8 minutes total.

Finally, chicken kebabs. Use chicken thighs cut into 1 1/2-inch chunks and marinate in a olive oil and salt, non-acidic marinade. Cook’s Illustrated found “early on” that it was clear that cooking chicken and vegetables together on kebabs “enhances the flavor of both”. After a lengthy study, they chose zucchini, eggplant, mushrooms, bell peppers, onions, bell peppers, small shallots, apples, peaches, pears, and fresh pineapple as appropriate for chicken kebabs. (Cook’s Illustrated doesn’t deem potatoes good for kebabs because they require pre-cooking.) They have a handy table that designates the size to cut each recommended fruit and vegetable and whether or not that fruit or vegetable should be marinated. For grilling, they recommend two skewers per kebab, to facilitate turning them without the chicken and vegetables spinning. Grilling should be done on medium high, uncovered, turning one-quarter turn every 2 minutes, until lightly browned, about 9 minutes total.

I am inspired! I’ll carefully follow their instructions and make all these different types of kebabs this summer. Then I can expand to their recipes for fish and shrimp kebabs.

Am I going to make kabobs for this blog? No! Instead, I want to cook a pork tenderloin for the two of us. This is a cut of pork that I use a lot – it’s tender, lean, often on sale, and a perfect portion for two people (with a little left over for the next day’s lunch). I usually simply sprinkle with salt and pepper and cook over direct medium high heat, turning about four times. Grilling and Barbecue says to brine the pork tenderloin, use a wet rub, and cook over high heat 3 minutes per side.

For copyright protection, I am not scanning in this recipe. Below is my adaptation of the original in Grilling and Barbecue, Cook’s Illustrated Guide.

Grilled Pork Tenderloin with Orange, Sage, and Garlic
serves 2

Pork tenderloin and brine

  • 1 pork tenderloin, about 1 pound
  • 1/3 cup sugar
  • 1 1/2 tablespoons salt
  • water

Wet spice rub

  • 2 cloves garlic, minced fine
  • 1 tablespoon grated orange zest
  • 1 tablespoon chopped fresh sage leaves
  • 1 tablespoon olive oil
  • fresh ground pepper to taste
  • salt to taste

Remove the “silver skin” from the pork tenderloin: simply slide a sharp knife under this thin piece of tendon on the outside of the tenderloin.

Dissolve the sugar and salt in several cups of water in a shallow bowl. Add the tenderloin and refrigerate about 1 hour. While the pork brines, prepare the wet spice rub – simply mix all the ingredients in a bowl.

Remove the tenderloin from the brining solution, rinse, and dry with paper towels. Rub the wet spice rub into the tenderloin.

Heat a gas grill by turning all the burners to high and with the grill covered. Then, open the gas grill and scrape the cooking grate clean with a grill brush. With the burners still on high, lay the wet-rub-coated pork tenderloin carefully on the grill. Close the cover. Turn about every three minutes so that all four “sides” of the tenderloin are browned. Using a quick-read thermometer, check that the meat is at 145˚. If not, cook until it is.

Serve!

Grilled Pork Tenderloin
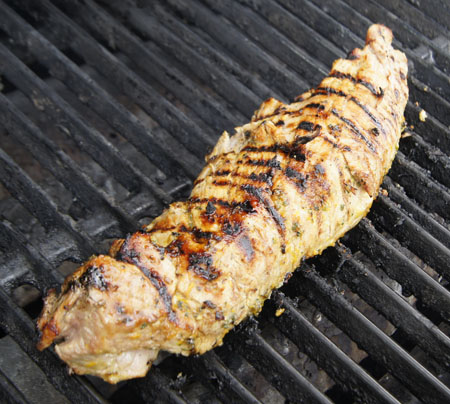
Yum! This was perfect! Moist and flavorful with great grill marks. I served it with a green salad and corn on the cob for a light, healthy, tasty meal.

Thank you, Cook’s Illustrated, for another great recipe.

250 Cookbooks: Curried Favors

Cookbook #247: Curried Favors, Family Recipes from South India, Maya Kaimal, Abbreville Press Publishers, NY, London, 1996. (Paperback edition.)

Curried Flavors cook book

Curried Favors is a beautiful cookbook. I picked it up at a Peppercorn display sometime in, well, probably the 2000s. It intrigued me, so I bought it. The 2000s was a period of time when I was learning about foreign cuisines from home-cook classes at the Escoffier School of Culinary Arts in Boulder. And I remember a visit to India’s Grocery in Boulder, where the owner told me how to make a curry: put a mixture of fresh spices and oil in a hot pan until they pop, then add vegetables and maybe meat, cook quickly, add a liquid, simmer a few minutes, and serve. That simple! I was entranced – at the time I had a totally different idea about Indian curries. (My old idea was any dish with store-bought ground curry powder.)

Today, I open Curried Favors and the first thing I note on the inside jacket is “Winner 1997 Julia Child First Book Award”. Julia again! The New York Times calls it “An artful and intimate cookbook.” It’s also an IACP cookbook awards winner. Well. I am happy to spend some more time with this book – it’s been a couple years since I adventured into its pages.

And it is an adventure. Maya Kaimal’s words and photos take the reader on a journey to southern India and the flavorful curries and other dishes found in this area.

The introduction to Curried Favors begins:

“If my South Indian father hadn’t found himself in a Kansas wheat field thirty years ago, this book would never have been written. Because he was doing atmospheric research on the American prairie, miles from any restaurants, he tried his hand at cooking. Being a scientist gave my father an advantage in cooking – he liked to experiment, and he wrote everything down so he could duplicate his results.”

In Maya Kaimal’s home, dinners alternated between her American mother’s “forays” into Julia Child and her father’s “latest experiments” with Indian cooking. At one point, her father was approached by “the owner of a cookware store in Boulder, Colorado, to see if he’d teach a course on Indian cooking”. (My guess is that that store was the Peppercorn.) He accepted, and taught the “popular class” for four years.

“Kerala [a state Southern India] is an interesting and unique culinary pocket, its cuisine shaped by climate, geography, and religion.” Coconuts, fish, shellfish, curry leaves, mustard seeds, and rice are abundant. Its location on the old trade routes brought new spices and foods to the ports and to the cuisine. Kerala is predominantly HIndu, but also has large Christian and Muslim populations. Christians eat all types of meat, some Hindus are vegetarian and some eat chicken, fish and lamb, but not beef; Muslims don’t eat pork. Each cultural group brings unique culinary contributions to the cuisine of this area.

My hubby hates curries. So when I cook from this book, I have to say “we are having a stir fry tonight”, and keep the “C” word out of it. He also cringes at anything colored turmeric or saffron yellow. He simply has an aversion to Indian foods. And yellow main dishes. But I consider the recipes I have tried from this book explosive in flavor, hot and spicy and bright.

Kaimal tells us that “curry powder” is not a simple spice, and “curry” does not define a particular dish. Instead, a curry is a dish of meat, fish, eggs, and/or vegetables cooked with a mixture of aromatic spices. Packaged “curry powder” is not called for in any of the recipes in this book.

As usual, I searched “Maya Kaimal” on the internet. She wrote one book after “Curried Flavors”. In 2003, she and her husband started a business, Maya Kaimal, selling Indian sauces, spices, and chips. Check out the website, because a lot of her recipes on posted on it.

The best way to show the gist, spiciness, and simplicity of the recipes in this book is to cook an example. I choose one that I have tried before, Chicken with Coconut Milk.

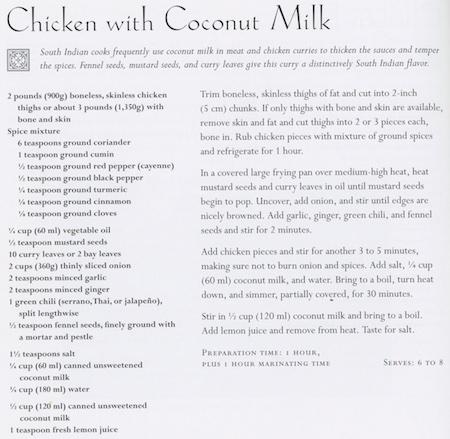
I plan to cut the recipe in half and leave out the turmeric, and use less cayenne. I have everything for this recipe in my pantry and or my freezer except the coconut milk and a fresh hot chili (a quick trip to a store solved those issues). I will use bay leaves instead of curry (or kari) leaves. (I know where to find curry leaves in downtown Boulder, but don’t have any in my pantry right now.} I also increased the amount of coconut milk. Below is my adaptation of the above recipe.

Chicken Coconut Curry
serves 2

Meat:

  • 12 ounces boneless skinless chicken thighs, cut in 1/2-inch chunks

Spice mixture (or rub):

  • 1 tablespoon ground coriander
  • 1/2 teaspoon ground cumin
  • 1/8 teaspoon cayenne
  • 1/2 teaspoon pepper
  • pinch cinnamon (1/16 teaspoon)
  • pinch cloves (1/16 teaspoon)

Combine the spices and rub into the chicken. Let stand 1 hour.

The rest of the curry:

  • 2 tablespoons vegetable oil
  • 1/4 teaspoon mustard seeds
  • 1 large bay leaf, broken in half
  • 1 cup onions, thinly sliced
  • 1 teaspoon minced garlic
  • 1 teaspoon minced fresh ginger
  • 1 small green chili, cut in half lengthwise, or use half of a serrano chili
  • 1/4 teaspoon fennel seeds, freshly ground
  • 3/4 teaspoon salt
  • 1/4 cup water
  • 1/2 cup coconut milk (unsweetened, but not “lite”)
  • 1/4 cup water
  • dash fresh lemon juice

Here are (most) of the ingredients I will use in the rub and spice mixture:

Chicken Coconut Curry ingredients
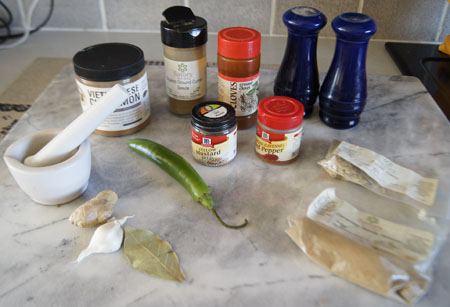
When the chicken has rested in its rub (refrigerated) for at least an hour, set a frying pan on medium high heat and add the oil, mustard seeds, and bay leaf. Cover. Heat until the mustard seeds pop. Uncover and add the onion and cook and stir until the onion is browning nicely. Add the garlic, ginger, green chili, and ground fennel seeds and cook and stir for 2 minutes.

Add the prepared chicken and cook and stir for about 5 minutes. Add the salt and half the coconut milk and the water. Bring to a boil, then turn down the heat and simmer, covered, for about 20-30 minutes. Add the rest of the coconut milk and the lemon juice and bring back to a boil, then serve. (I took the hot chili and the bay leaves out before serving.)

I served our curry over brown rice.

Chicken Coconut Curry
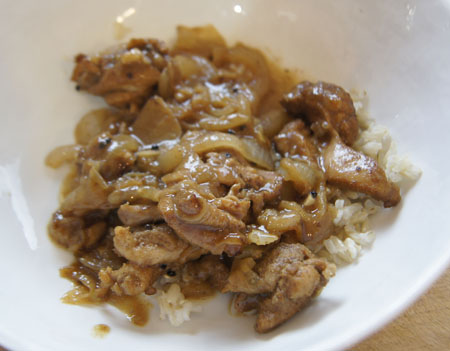
I love this curry. I like the whole cooking process, too. The aromas as it cooks! The flavors as I eat it! But hubby? Well, he ate it all. But when asked, he said something like “yeah, it was dinner”. Guess I didn’t slip this curry by him. Maybe it isn’t just the yellow color that he does not like about curries. His loss.

Chappathi
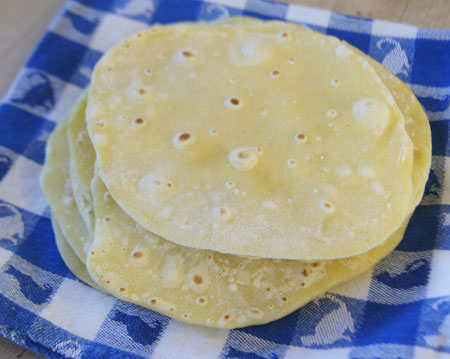
I also made chappathi from another recipe in this book. These are small flatbreads cooked on a stove-top, similar to tortillas, but made from durum wheat flour (“atta” flour) and water (and a little salt) – that’s all. I had some durum wheat flour in my pantry because of forays into pasta cooking. To make the chappathi, you mix and knead together flour and water, cut into equal-sized pieces, roll each to a circle, and cook briefly on a hot griddle. It’s kind of like making tortillas or crepes or pita breads. Mine came out pretty good. Here’s the rolled out dough:

Chappathi Dough

And the final chappathi:

Chappathi
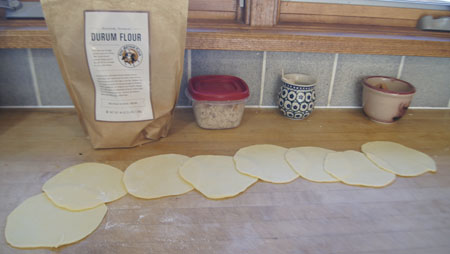
Taste? Not a lot, but I thought they were interesting. They sure are cute.

250 Cookbooks: Crock Pot Stoneware Slow Cooker

Cookbook #241: Crock-Pot® Stoneware Slow Cooker, Owner’s Guide, Rival, JCS/THG (The Holmes Group), 2006.

Crock-Pot Stoneware Slow Cooker cookbook
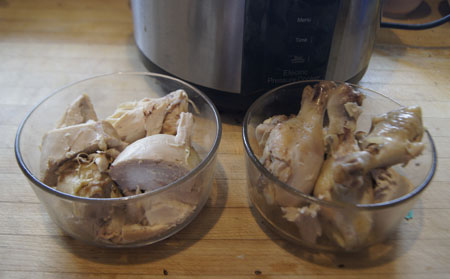
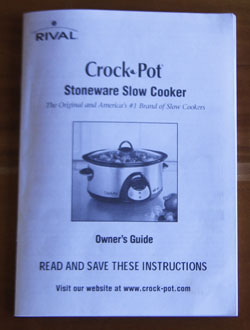
This is my current crock pot. It replaced a nearly-broken one in about 2006. This one has a removable stoneware crock that makes it easy to clean, a high-low setting, and a timer. This is my first crock pot with a timer, and I’d always get one like this from now on.

This is the last of my 11 crock pot cookbooks. Below is a list of those cookbooks and their publication dates, in the order that I covered them for this 250 Cookbooks blog. Crock pots are also called slow cookers, crockery cookers, or stoneware slow cookers. (I am reminded by Crock-Pot® Stoneware Slow Cooker that “Crock-Pot®” is a registered trademark.)

Crock-Pot® Stoneware Slow Cooker is a small booklet, 5×7-inches, 15 pages. Instructions and warranty take up 6 1/2 pages, and recipes 8 1/2 pages. I count 23 recipes. (Actually, there is another 15 pages, but those are upside down and in French.)

I am going to keep this cookbook, largely because it has “official” instructions and also warranty information. And also, the handful of recipes really look like they will “work”. If you read any of my other crock pot posts, you will know that I think crock pots turn good food into indiscernible mush with a bad recipe.

I find this in the question and answer section of the instructions:

QCan I cook a roast without adding water?
A Yes – if cooked on LOW. We recommend a small amount because the gravies are especially tasty. The more fat or “marbling” the meat has, the less liquid you need. The liquid is needed to properly soften and cook vegetables.

This hits home to me, because lately I have been slow-roasting beef roasts in the oven. I might try my crock pot next time.

The first recipe in Crock-Pot® Stoneware Slow Cooker is for Pot Roast of Beef. Someday I’d like to try this recipe and compare/contrast with the method I now use from Cook’s Illustrated (Cover and Bake).

The second recipe is for Beef Bourguignon, and that is what I’ll make for this blog. Another recipe I have my eye on is Chicken With 40 Cloves of Garlic, something I’ve always wanted to make. I might also consult the recipes for meat loaf, pork chops and roast, whole chicken, Swiss steak, French onion soup, jambalaya, and game hens (roasted with no added water).

Here is the recipe for Beef Bourguignon:

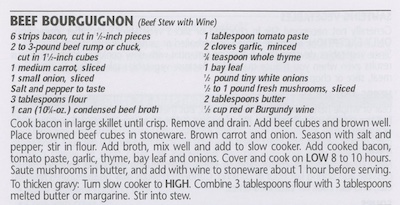
My version is below. I added more stock and more wine, and found that these changes gave just the right amount and thickness of gravy at the end. I used double the amount of tomato paste. I did not add the 3 tablespoons butter plus 3 tablespoons flour at the very end to thicken the broth, but I suggest you do that if you want a really thick gravy.

Beef Bourguignon
serves 6-8, and freezes well

  • 6 strips of bacon, cut in 1/2-inch pieces
  • beef rump, chuck, or cross-rib roast, around 3 pounds, trimmed of fat and cut into 1 1/2-inch chunks
  • 1 carrot, sliced
  • 1 onion, chopped
  • 3 tablespoons flour
  • 2 cups beef stock
  • 1 cup (about) red wine; divided
  • 2 tablespoons tomato paste
  • 2 cloves garlic, minced
  • 1 teaspoon dried thyme, or a few sprigs fresh thyme
  • 1 bay leaf (I used a big fat one recently purchased at Savory Spice Shop in Boulder)
  • 1/2 pound tiny white onions (you could leave these out, but I like them; the ones I used were frozen)
  • salt and pepper to taste
  • 1/2 pound fresh mushrooms, sliced
  • 2 tablespoons butter

Cook the bacon until crisp. Drain and set aside.

In a clean pan, use a little bit of the bacon grease to sauté the beef chunks. Do this in batches and at fairly high heat. (You can anso brown the beef in the pan used to cook the bacon.)

Place the browned beef chunks and the cooked bacon in the crock pot.

Add a bit of oil or bacon fat to the pan used to brown the beef, then add the carrot and onion and cook until brown. Add the 3 tablespoons flour and mix in as well as possible, then add the beef broth; mix well and add the vegetable-broth mixture to the crock pot.

Add about half the wine, the tomato paste, garlic, thyme, bay leaf, and tiny white onions to the crock pot. Add salt and pepper to taste. Stir to mix.

Cook on low for 8-10 hours (in my crock pot, the meat was tender at 8 hours). An hour before serving, sauté the mushrooms in the butter, and add them and some more red wine to the crock pot and continue slow-cooking. (Remove the bay leaf and any fresh thyme sprigs before serving.)

Serve!

Beef Bourguignon
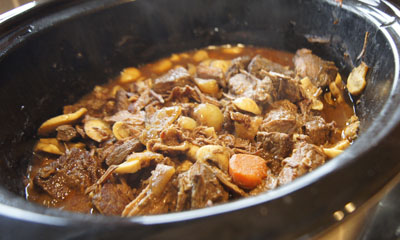
This was totally yummy. I loved the rich, dark broth-gravy. I am glad I didn’t add the flour/butter mixture at the end to thicken the gravy. It was rich and thick enough for me as it was – it was indeed “especially tasty”. I’m also glad I added more wine than called for in the recipe. I liked the sautéd mushrooms added for the last hour – their texture and flavor were not lost by 8 hours of cooking.

To serve, I cooked some potatoes, carrots, and peas and stirred them into our servings of bourguignon. I often like stew prepared with potatoes added later, because for the two of us, I usually cook a lot of stew-type meat at once and freeze some for another meal, and potatoes do not keep their texture after freezing. Also, this method opens up variations: you could serve the bourguignon over mashed potatoes, pasta, rice, gnocchi, polenta – you name it. Or keep it without added carbs for a nearly low-carb meal.

I get to enjoy this delicious bourguignon a few more times, and quickly, by thawing the portions I stowed away in my freezer. This recipe was a success!

250 Cookbooks: Sunset Cook Book for Entertaining

 Cookbook #234: Sunset Cook Book for Entertaining, the Editors fo Sunset Books and Sunset Magazine, Lane Books, Menlo Park, California, 1971.

Sunset Cook Book for Entertaining
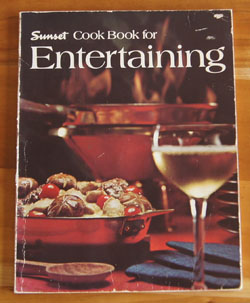
Entertaining, not my forté! I’m a bit too much of an introvert so I’ve never practiced it a lot. Sort of shy. And don’t get me wrong, I love cooking for people, but when it comes to presentation, I am lacking in ability and (desire). When company comes over (usually family), I want something delicious to serve and I don’t want diners getting full on appetizers. Save room for dessert!

I always thought that Sunset Cook Book for Entertaining was all about “appetizers” and I have only rarely looked through it. I am not sure even where this book came from, and it has no markings in it as clues. I pick it up and wonder how in the world I am going to be able to cook something from this cookbook, since we are on our January low-carb eating plan.

The first chapter is, indeed, appetizers. But hmmm, I see some good ideas, and only a few bad ideas. Like, no cream cheese-sour cream dips! (bad idea). The good ideas: Marinated Mushrooms, Ginger-Minted Carrots, wine-poached scallops (Coquilles St. Jacques), Quiche Lorraine Appetizers, and Hawaiian Beef Sticks. Sunset Cook Book for Entertaining also suggests having “sit-down” appetizers, where guests sit down to a first course of these goodies. I can see making that a meal, like tapas.

Maybe this is not a cookbook to be recycled.

Next is Soups and Salads – the traditional beginning of a meal. The soup and salad recipes are all easy with a few interesting flavor twists. I like the Greens with Dilled Shrimp, largely, probably, because of our low-carbed-ness moment.

dilled shrimp and greens recipeDistinctive Entrees begins: “The entree is the most important part of a meal, and the deciding factor in all the other things you serve before, with, or after.” Let’s see what they have. Most of the recipes sound good, like Beef Burgundy, Veal Veronique, and Giant Beef-Lobster Kebabs. But what I like about this chapter’s recipes is that almost each one requires very little last minute prep from the cook: “The foremost consideration in the selection of these entrees has been whether they are practical for entertaining. Nearly all of these dishes may be made partially or entirely ahead; many may be frozen.” A few of the recipes  look very involved but I might find them fun: Danish Chicken and Meatblls au Gratin, for instance, calls for veal meatballs, chicken breasts, and sweetbreads, all cooked and assembled in a rich sauce ahead of time and simply heated briefly just before serving. “Pheasant-in-a-Bag” is an example of one of the more unusual dishes in this chapter. I note a recipe for Turkey Tetrazzini, one I’ve come across several times in cookbooks of this era, and one that I have explored before (Encyclopedia of Cookery, Vol. 11, All-Time Favorite Recipes, and All-Time Favorite Casserole Recipes). An easy last-minute dish is “Steak, Mushrooms, and Asparagus”, a dish I plan to make for us soon.

I find throughout the chapters a series of “helpful hints”. For instance, soup garnish ideas, folded napkins, flavored butter seasonings, coffees from around the world, cooking with wine, the art of the small dinner party, and a guide to serving cheeses.

Accompaniments and Side Dishes has recipes for cooked vegetables (Green Beans, Mediterranean Style), potatoes (Skillet Potatoes Anna, Pecan-Topped Sweet Potatoes), rice (Risotto), bulgur (Wheat Pilaf with Peas and Lemon), pasta (Parsley Spaghetti), and breads (Buttery Pan Rolls, Pine Nut Sticks, Honey-Pecan Cornbread Sticks, Cheesy Spoonbread).

Distinguished Desserts is next. If you’ve been paying attention, you know that I find myself drooling over most of these recipes, but am holding back on cooking them because they are calorie-laden (and carb-laden!). These tempting recipes are for tortes and souffles, puddings and pies, sherberts and glacés (one with flaming strawberry sauce), and cakes and cookies. Most of the recipes in this chapter are a little different, a little fancier than my recipes for simple chocolate cakes and such. But none are for me today. I keep reading.

Hot and Cold Drinks recipes include hot drinks (Mexican chocolate, wassail bowl), cold drinks (citrus punch, yogurt coolers, fizzes) and alcoholic drinks (sangria, glögg, milk punch with brandy, Kahlua frost).

The final chapter is Special Meals for Special Occasions.This section combines new recipes and references to previous recipes for many dinner party menus. I’d say there are tons of ideas in this chapter for “hostesses” (including a good version of Beef Fondue). Different, unusual, and tasty ideas at that. I’d like to go to one of these dinner parties! But make them? Doubt I will.

I’ve scanned in several of the menus from this chapter. They show the breadth of menus and recipes included in this book.

page 66

page 71page 73page 76page 86

For this blog, I decide to make Steak, Mushrooms, and Asparagus from the Entrees chapter. This is a low-carb recipe, by the way! The suggested side dish carb, brown rice, is a good low-glycemic index grain choice, but I will use quinoa instead.

steak and asparagus
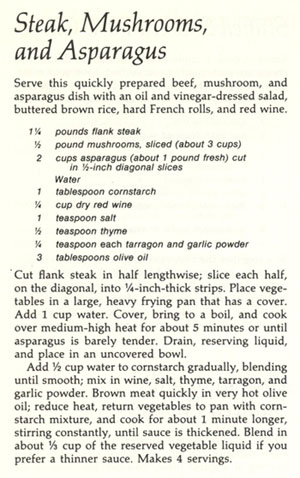
I’ve adjusted the herbs and thickening agent (cornstarch) up a bit to our own tastes, and made twice the amount of sauce.

Steak, Mushrooms, and Asparagus
serves 2

  • 12 ounces flank steak (cut one flank steak into two pieces lengthwise, use one and reserve the other for another meal)
  • 1/4 pound mushrooms, sliced (about 1 1/2 cups)
  • 1 cup asparagus (about 1/2 pound) cut on the diagonal into 1/2-inch pieces
  • 1 tablespoon cornstarch
  • 1/4 cup red wine
  • 1/2 teaspoon salt
  • 1/4 teaspoon tarragon
  • 1/4 teaspoon garlic powder
  • olive oil (about 2 tablespoons)

Cut the flank steak on the diagonal into 1/4-inch strips.

Place the mushrooms and asparagus in a frying pan. Add 3/4 cup water, bring to a boil, and cook over medium-high heat for about 5 minutes, until the asparagus is barely tender. Drain, reserving cooking liquid, and set aside.

Mix 1/2 cup water with the 1 tablespoon cornstarch, then add the wine, salt, thyme, tarragon, and garlic powder. Set aside.

Brown the meat quickly in very hot olive oil; reduce heat, return vegetables to pan, add the cornstarch mixture, and cook for about 1 minute longer, stirring constantly, until sauce is thickened. Blend in some of the reserved vegetable liquid if you prefer a thinner sauce.

Steak, Mushroooms, and Asparagus
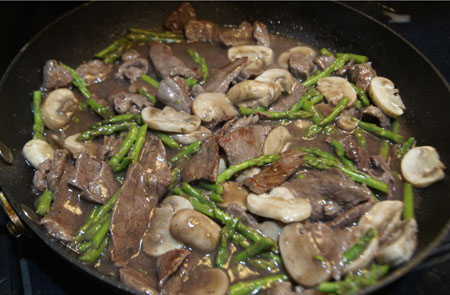
I liked this a lot, but all I got was a “pretty good” from my hubby. He is used to this type of meal with a lot of soy sauce; I, on the other hand, appreciated the subtle red wine sauce. I am not an asparagus fan, but the asparagus I found at the store was very small and young, and cut into the small pieces, I found it to be quite good.

I also made the Dilled Shrimp with greens another day last week. It was good, but the shrimp I bought were not good – they were tiny and tough. I’m sure it would be excellent with good shrimp.

Dilled Shrimp and Greens
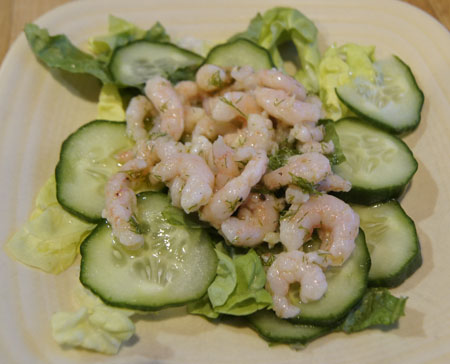
I have decided to keep this cookbook. Online, I find that it is still for sale (used) for several dollars a copy. And I found one favorable review – so I know I am not alone in appreciating this book. I have always liked the type of Southwestern cuisine that Sunset magazine promotes. Another “found” cookbook, right on my shelves!


250 Cookbooks: Pressure Cooker

Cookbook #230: Pressure Cooker, User’s Manual, Fagor America, Inc., Lyndhurst, NJ, 1999.

Pressure Cooker cookbookThis is the instruction manual that came with the pressure cooker I bought sometime in the early 2000s. I have already talked about that specific pressure cooker in my post Fagor Pressure Cookers, More than 50 Recipes.

The first few pages detail how to use a stove-top pressure cooker and how long to cook a variety of foods. I now use an electric pressure cooker, so only the cooking time lengths and pressure release times are useful to me. For instance, the length of time to cook chicken is discussed in this section:

page 11page 12

I’ve used this booklet – that note is in my handwriting. The cooking times for chicken correlate well with the times in my current electric cooker instruction booklet (Cuisinart Electric Pressure Cooker).

How about the recipes in this booklet? Good recipes might make me keep an instruction cookbook. But Pressure Cooker, User’s Manual, has only 8 pages of recipes, from soups to vegetables to rice and pastas to game and poultry to meat to fish to desserts. The recipes are basic preparations, none have a much flair. Instead, their purpose is to acquaint the new user with the range of foods that can be cooked in a pressure cooker. Here is a typical recipe:

Pot Roast Chicken recipe 
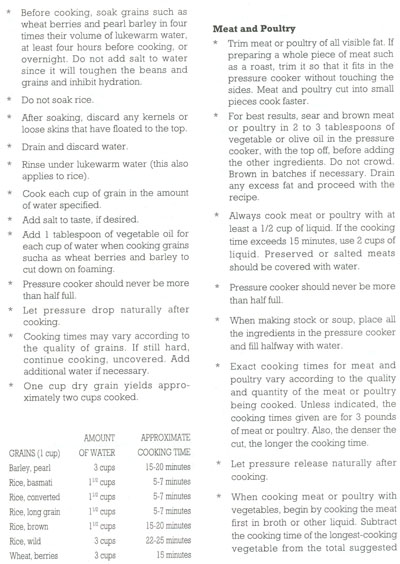
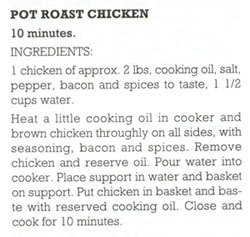
I don’t need this booklet anymore, since I no longer have a stove-top pressure cooker and since the recipes aren’t very exciting. I will recycle it.

For this blog I will cook chicken in my current electric pressure cooker. I go to Whole Foods to buy a whole chicken, but they are out! This is the day after Christmas and many shelves are bare. Not wanting to travel to another store, I buy bone-in chicken breasts and drumsticks, about 4 pounds worth. Do I need to cook chicken pieces for a shorter time than a whole chicken? According to to the section on Meats and Poultry in Pressure Cooker, User’s Manual (above), the answer is “yes” – 9-10 minutes for pieces, 12-15 for whole. (The chicken-piece cooking time length correlates well with my Savory Chicken recipe.) How much liquid should I add to the pot? Pressure Cooker, User’s Manual states “Always cook meat or poultry with at least a 1/2 cup of liquid. If the cooking time exceeds 15 minutes, use 2 cups of liquid.”

The pressure release method also affects how done the chicken will be in a certain amount of time. Are the pressure release method the same in both sets of instructions? No, they are not exactly alike, as I found when I compared the manual cooker instructions with those in my Cuisinart Electric Pressure Cooker book:

electric pressure cooker times

Comparison:

Manual cookbook instructions

  • slow release
  • 9-10 minutes for cut-up chicken
  • 12-15 for whole chicken (and I noted to cook whole chicken 15 minutes “especially if it’s slightly frozen)
  • 1 1/2 to 2 cups water in their recipe for cut-up chicken in Chicken Casserols

Electric pressure cooker instructions

  • quick release
  • 10 minutes for cut-up chicken
  • 24-28 minutes for whole chicken
  • 1 cup liquid in my recipe for cut-up chicken (Savory Chicken)

In summary, the manual cooker instructions state to cook a whole chicken a little bit longer than chicken pieces; the electric cooker instructions state to cook a whole chicken two and a half times as long. I can see that there are several other variables to control: cut of chicken, weight of chicken, amount of liquid, amount of liquid, length of cooking, and type of pressure release.

So how the heck shall I cook my odd mixture of thick chicken breasts and drumsticks? I decide to make an educated guess and do an experiment. I will cook my large-sized bone-in chicken breasts and 6 drumsticks in 1/2 cup water (and a little salt) for at least 10 minutes and use the quick release. But as an experiment, I decide to check the chicken after 8 minutes.

Results

At 8 minutes, the drumsticks were done, but the breasts were kind of “hard”. I took the drumsticks out of the cooker and cooked the chicken breasts 5 minutes longer. Here is my chicken at 13 minutes:

pressure cooked chicken

All the chicken pieces are done, but honestly, the breasts were kind of rubbery and dry. Hmmm. I poured the cooking liquid into a measuring cup – it totalled 1 cup. It seems a lot of the juices ran out of the chicken. In the future, I recommend trying more water in the pot at the start, up to 2 cups.

This chicken did make a great chicken salad. Cut up and dressed with mayonnaise, it was just fine, and didn’t taste rubbery. It was also good in chicken soup (made with that cup of chicken liquid). And I have enough chicken for yet another meal too.

This is an experiment in progress! For large chicken breasts, I suggest trying (first) 1-2 cups water, and 12-15 minutes (quick release) cooking time for a whole chicken. If I have a whole chicken, I’d try 16-20 minutes.

I had a fun time with this – I still like doing experiments.

250 Cookbooks: Five Hundred ways to prepare California Sea Foods

Cookbook #229: Five Hundred ways to prepare California Sea Foods, Compiled by State Fish Exchange, California State Printing Office, Harry Hammond, State Printer, Sacramento, CA, 1934.

California Sea Foods cookbook
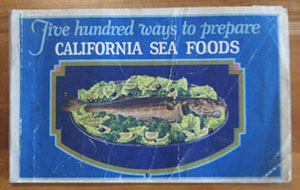
The sheer abundance of fish covered in this book is amazing – about 60 species! The table below shows the types, poundage, and total amount of fish produced in 1933 in California.

fishing production 1933

How does this compare with California’s fishery products today? On the California Department of Fish and Wildlife site, I found this document: California Department of Fish and Wildlife, Table 7 – Origin and Poundage of Commercia Fish Landings Into California During 2016. Here is a summary of a comparison of totals in 1933 and 2016:

  • 1933: 669,775,413 pounds of commercial fish and crustaceans/mollusks
  • 2016: 165,184,101 pounds of commercial fish and mollusks

Over 4 times as much was produced in 1933 than in 2016 – that is impressive. And below is my rough summary comparing the most fished types of fish 1933 and of the most fished types of fish in2016, in poundage per year (“m” is “million”):

  • 1933: sardines (510 m), mackerel (69 m), yellowfin tuna (51 m), , skipjack (16.5 m), sole (8 m), rockfish, salmon, anchovies, abalone, shrimp, crab (these last all 2-5 m)
  • 2016: squid (82 m), crab (dungess, 26.5 m), anchovies (18 m), sea urchin (6 m), mackerel (4 m), sole (4 m), shrimp, rockfish, hagfish, sablefish (these last all 2-3 m)

Fish tales abound in this data! Sardines were a huge industry in California until the 1940s. Sardine canneries abounded in the San Fransisco area – Cannery Row in Monterey was made famous by the book of the same name by John Steinbeck. Overfishing forced the canneries to close. Yellowfin tuna populations have dropped since the thirties – overfishing has declined the tuna population. Mackerel was heavily fished and canned in California, depleting the populations, but they came back by the 1970s. The higher proportion of dungess crabs today surprised me, until I learned that until 1938, it was illegal to can crabs. Why is squid such a huge proportion of the California fisheries in 2016? Because it is the popular “calamari”. But that’s not the whole story. According to a 2016 NPR aritcle, “More than 80 percent of U.S. squid landings are exported — most of it to China. The rare percentage of that catch that stays domestically goes to Asian fresh fish markets or is used as bait. Ironically, the lion’s share of the squid consumed in the United States is imported.”

California Sea Foods encourages Californians to eat more fish. “Make Tuesday Fish Day Too!” reads the front inside cover.

inner coverThis takes me back: when I was in elementary school, we always had fish on Friday – a tuna fish sandwich in my lunchbox. Fish on Friday was a Catholic practice, and although we were not Catholic, we nevertheless had those tuna sandwiches. Curious about this tradition, I found several interesting articles. In Lust, Lies And Empire: The Fishy Tale Behind Eating Fish On Friday, an npr.org article, I learn that this “no fish” policy was once thought to be because of a medieval pope who was trying to prop up the fishing industry. But instead, according to Christian teaching, abstinence was observed as a penance on Fridays is to commemorate the Friday death of Jesus, who redeemed a sinful world. “Abstinence” in this case refers to refraining from meat (Wikipedia). Why meat? Because it’s the flesh of warmblooded mammals, animals that have sacrificed their lives for us. Fish, the flesh of coldblooded animals, is “considered fair game”. (Many books have been written on this topic, including Fish on Friday by Leonard Feeney and Why Do Catholics Eat Fish On Friday by Michael Foley.)

Five Hundred ways to prepare California Sea Foods has a very useful table of contents/index, handily referring the reader to recipes for cooking and serving all of the fish in the above table. The fishes can be baked, boiled, cooked in a bouillabaise or cioppino, broiled, made into cakes or croquettes or fritada, fried, jellied (made into a mold), made in a pie, put in a salad or sandwich, put in a souffle or soup, or steamed (and I still haven’t listed all the methods!). After the fish recipes are lots of recipes for fish sauces.

As an example, I look up “sole”, a fish I cooked for a recent post:

sole
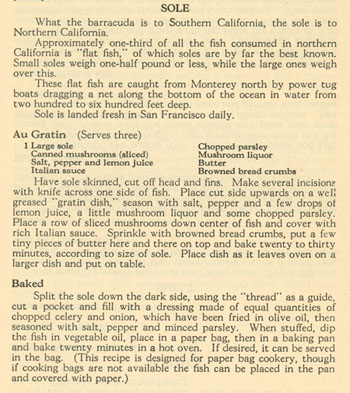
That’s not the only page of recipes for sole – they go on for four more pages!

Here’s another page from Five Hundred ways to prepare California Sea Foods:

tartar sauce
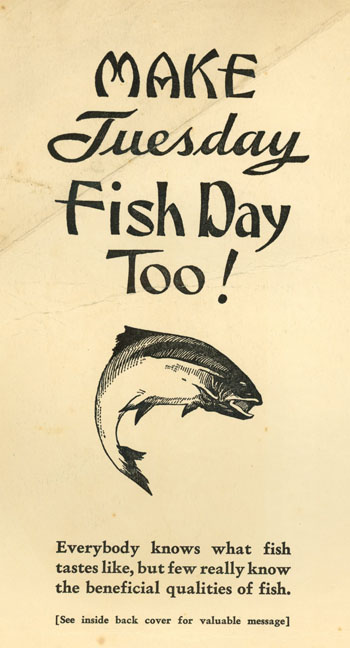
The book ends with “Reasons Why you should make Tuesday Fish Day too!” touts fish as “one of the most heathful and nourishing foods known to science”.

inner back cover

I will make Tartar Sauce for this blog. The original recipe is in one of the scans, above. My version is below. I didn’t have chervil

Tartar Sauce
enough for 2-3 people

  • one dill pickle, chopped (don’t use a huge pickle; you want about 1 tablespoon chopped)
  • 2 teaspoons capers
  • 1/2 teaspoon dried tarragon (or use fresh, or use chervil as given in the original recipe)
  • 1 tablespoon chopped fresh parsley
  • 1 green onion, chopped fine
  • 2 teaspoons Dijon mustard
  • 1/2 cup mayonnaise

Mix all of the above together and serve.

tartar sauce
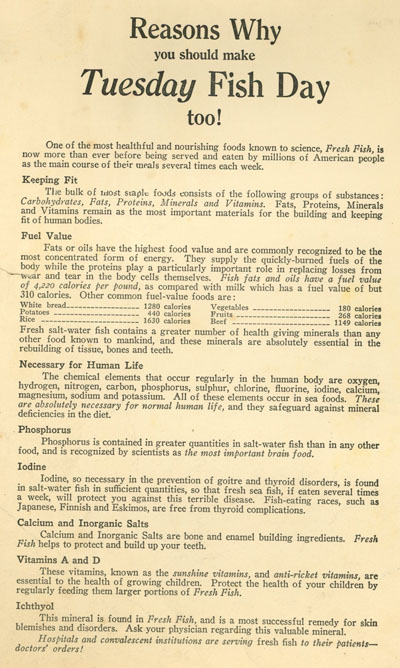
This tartar sauce was amazingly good. Fresh and zingy. I served it with salmon along with wedges of lemon. I usually make “tartar sauce” by mixing together mayo or yogurt with a little pickle relish and tarragon. But this one is a big step up in flavor, and still very easy to make. I am sure I’ll use it a lot in the future!

I’ll end with the photo on the back of the book. Peace.

back cover