250 Cookbooks: Two Hundred Toasts

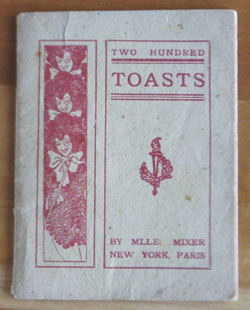
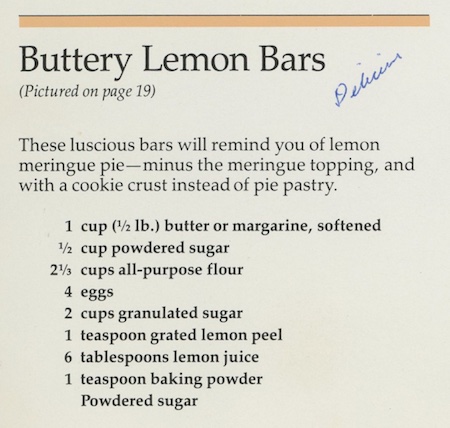
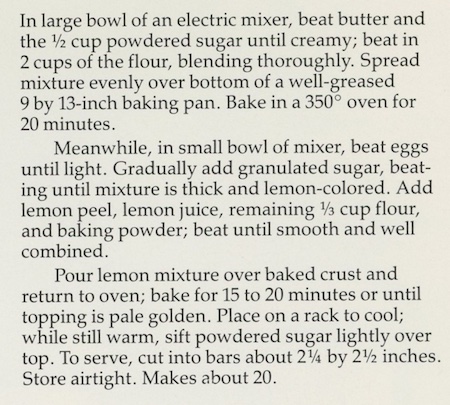
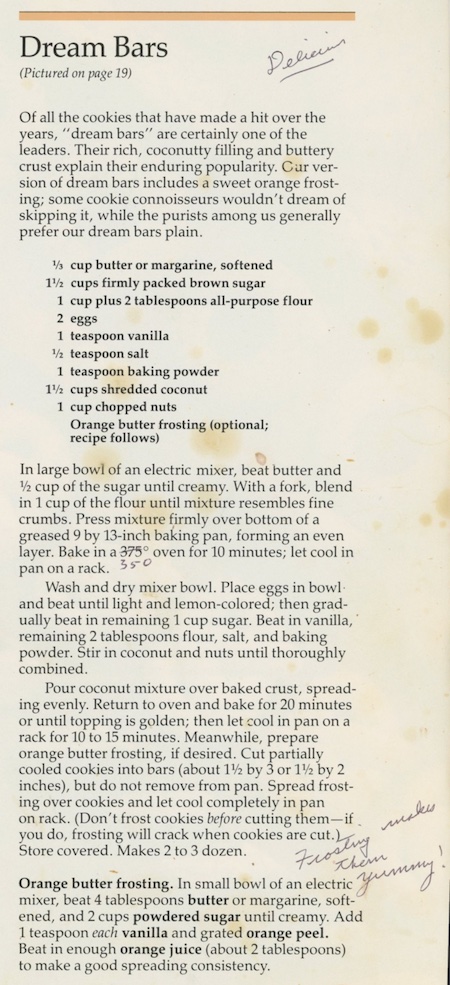
Cookbook #250: Two Hundred Toasts, Mlle. Mixer, New York City, Osborn Printing Co., Los Angeles, Ca, 1905.

Two Hundred Toasts cookbook

Let’s toast! To life, love, and the end of this “250 Cookbooks” blog! I began this section of my cooking blog back in October 2012 – here is my introduction. Now it’s June 2018. It’s been a long journey.

Two Hundred Toasts is the oldest of my “cookbooks”. It is actually a book of “toasts”, as in words said with the clinking of glasses. But I entered it in the database, and here we are.

1905. This book is 113 years old today. Is it worth a lot of money? A search revealed that I could purchase other publication years (1906 and 1917) for just $50. It is worth a lot more than that to me. It belonged to my grandmother – my mother’s mother – and I can remember many, many family dinners that began with a toast. And ended with one of Grandmother’s fantastic desserts. She always said “I only eat dinner to get dessert”, although she never gained weight, and she also enjoyed her cocktails. And her sherry, but that’s another story. My mother grew up on their large orange grove ranch in Southern California, where she ran free and loved her horse and went to school in Covina. Her older brother was friends with my father, they all went to school together, and that’s how my parents met and eventually fell in love and married and had the three of us.

I’m going to do something a little different with Two Hundred Toasts. There are no recipes in this book, so I have no recipe to cook. But the book is a delight, so I’ll scan in all the pages for us all to enjoy.

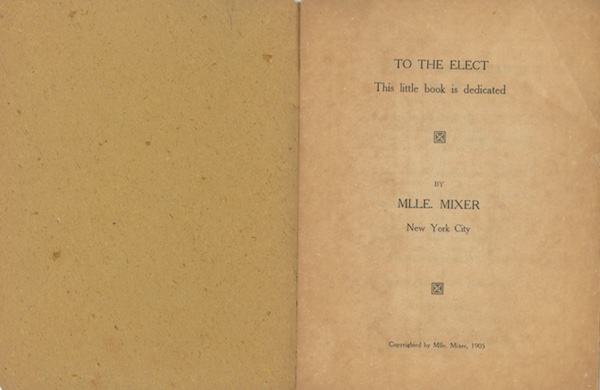
Here are the title and facing pages.

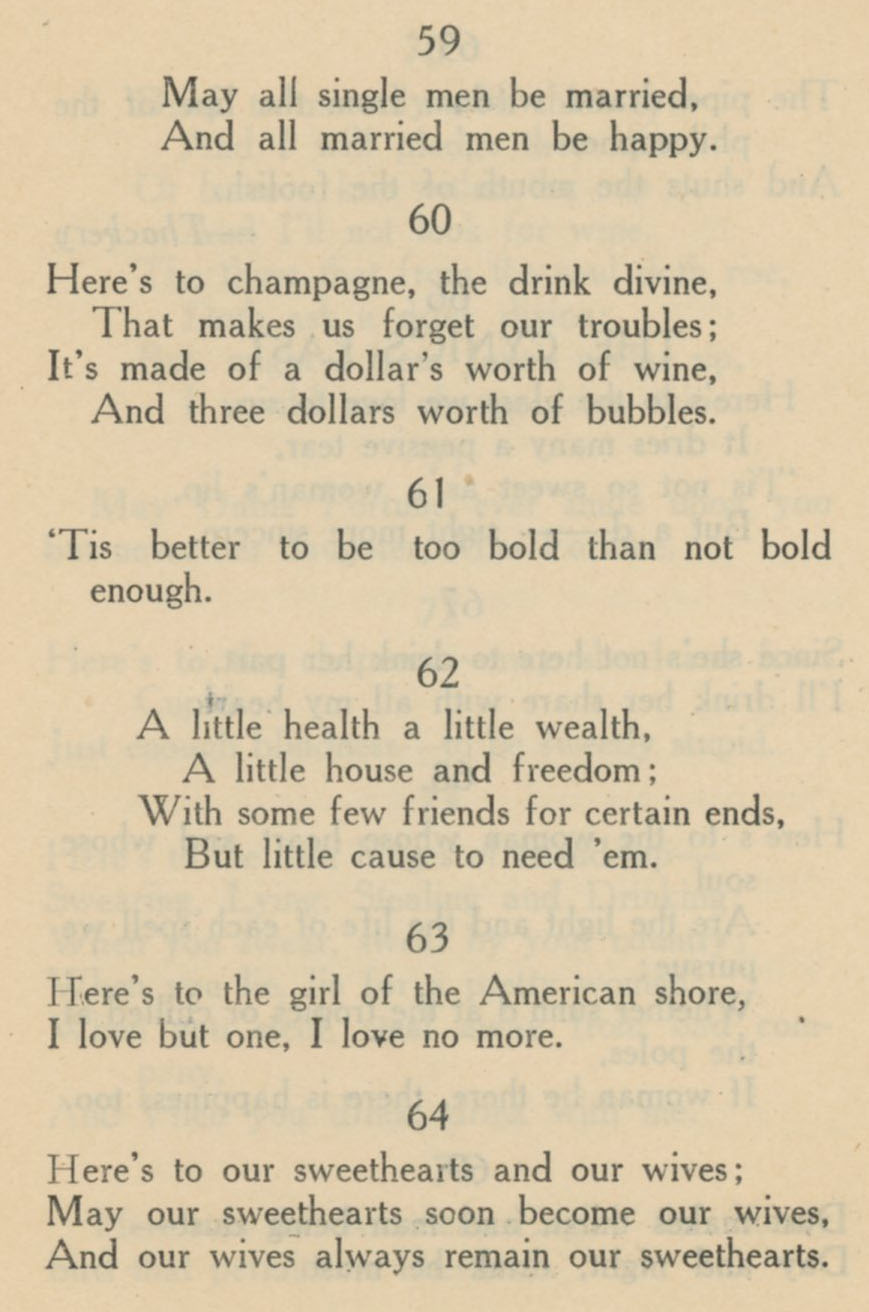
Next comes the first page of toasts, “Parisian Tosts”. Oops, a misspell. The first of many, I find. Mlle. Mixer is French (the front cover says “New York, Paris) so English must be her second language, or she was a bad typist. Google Books has digitized the 1906 version of this book. It’s different from my 1905 edition: all of the misspellings have been corrected. My edition is sort of endearing, typos and all. No spell checkers in 1905!

This size of scan makes it hard for us to read. I’ll leave the following one “as is” because I want to illustrate the facing page with the “Osborn Printing Co.” on it. But after these first two pages, I’ll scan them in as half-pages.

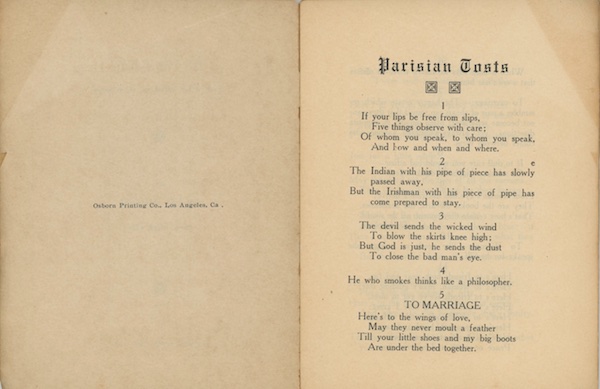
My favorite of the above toasts? The last, especially the line “Till your little shoes and my big boots are under the bed together”.

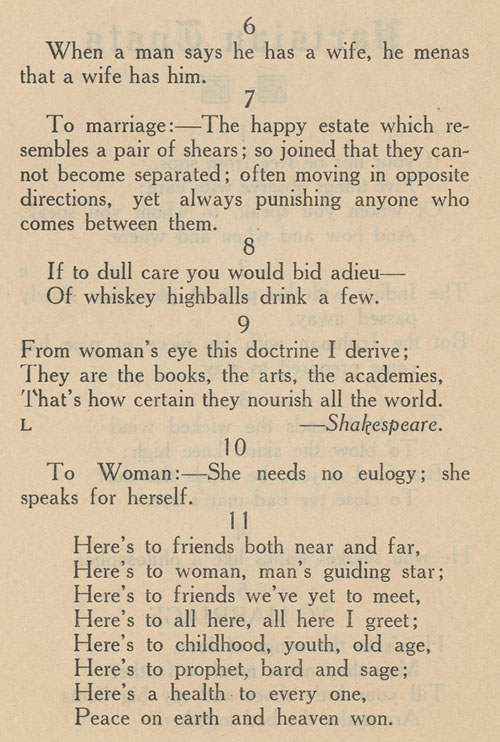
Here’s the next page. I like “When a man says he has a wife, he menas [sic] that a wife has him.”

“Since man is dust, it would appear, ‘Twere well to water him with beer.”

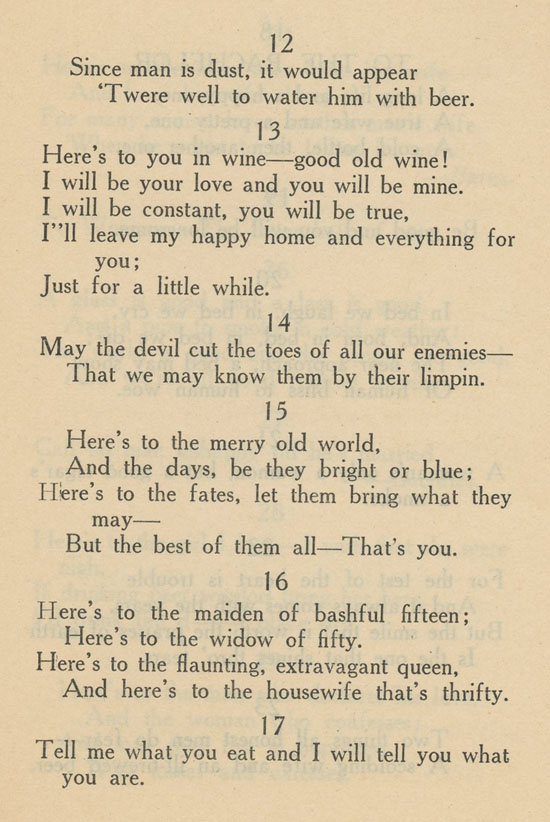
“Be good and you will be lonesome.”

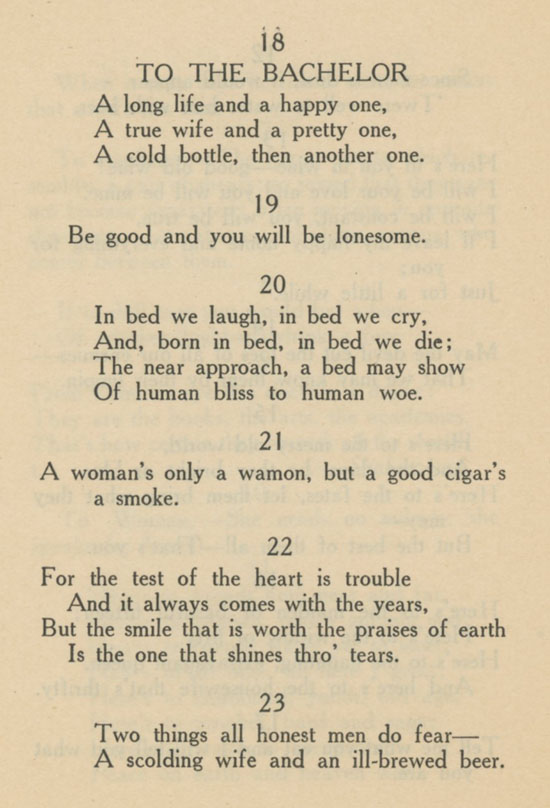
Oh my! Such an attitude: “To Woman: the bitter half of man” and “Call no man unhappy till he’s married.”

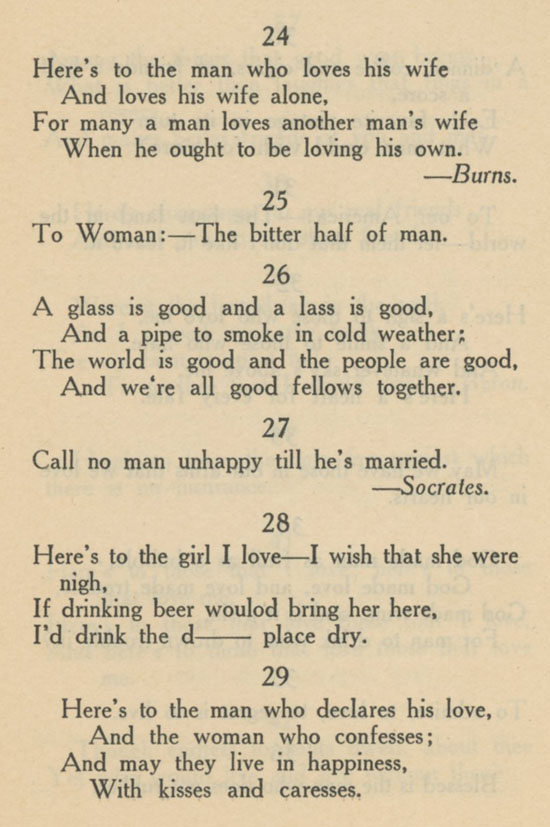
“To our America: The best land in the world – let them that don’t like it, leave it.”

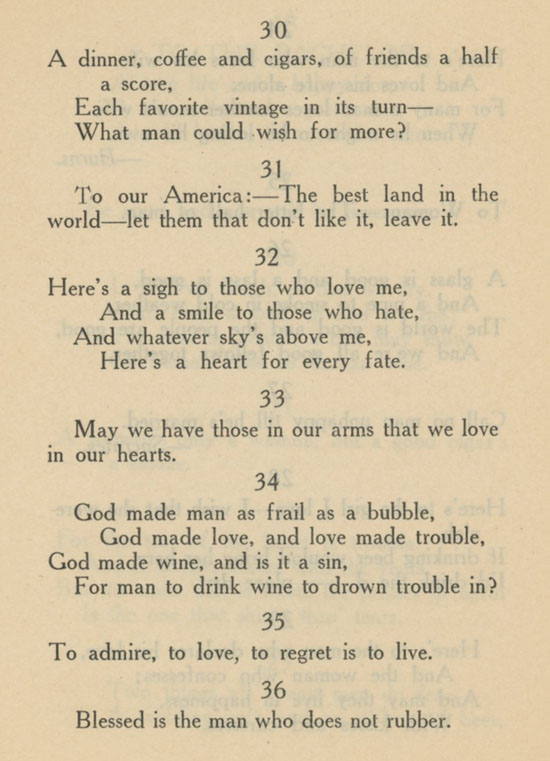
“Among the things that good wine brings, what is better than laughter that rings in a revery and makes better friends of you and me!” I like the one about champagne too.

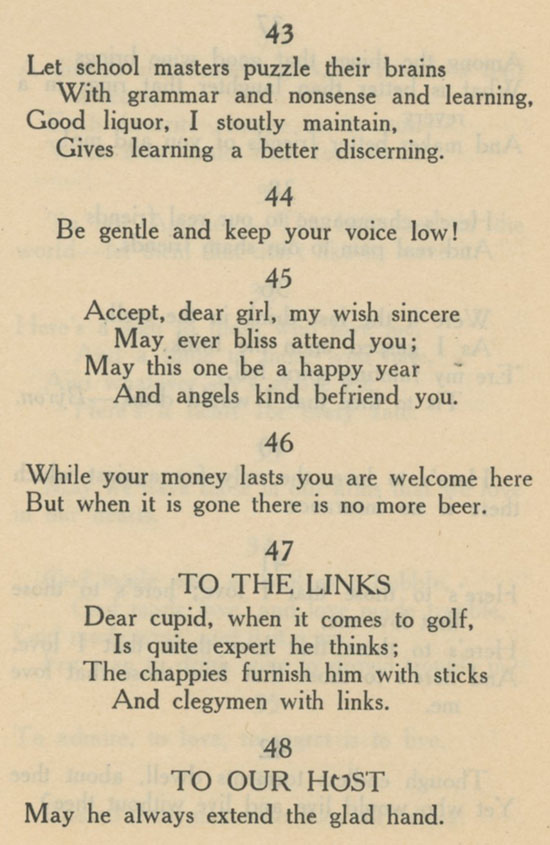
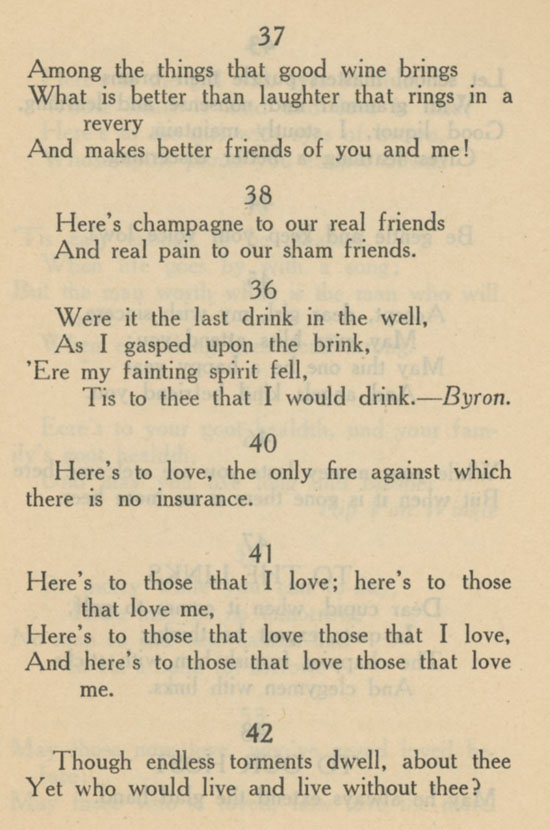
“Good liquor, I stoutly maintain, gives learning a better discerning!”

“Tis easy enough to be pleasant, when life goes by with a song; but the man worth while is the man who will smile when everything goes dead wrong.”

“Here’s health to the girl who will drink when she can, and health to the girl who can dance the can-can.”“Here’s to champagne, the drink divine, that makes us forget our troubles; it’s made of a dollar’s worth of wine, and three dollars worth of bubbles.”

“Since she’s not here to drink her part, I’ll drink her share with all my heart.”
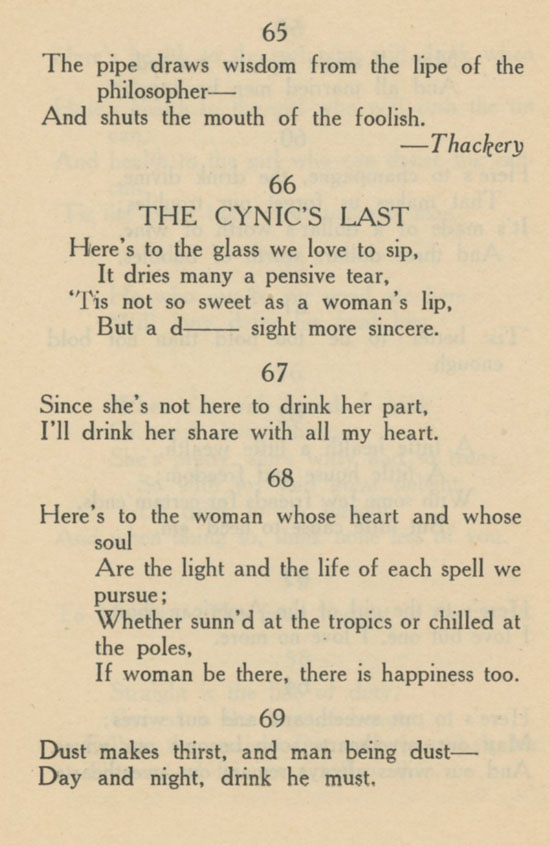
“May Dame Fortune ever smile upon you but never her daughter, Miss fortune.” And also: “Here’s to the chaperone – may she learn from Cupid. Just enough blindness – to be sweetly stupid.”

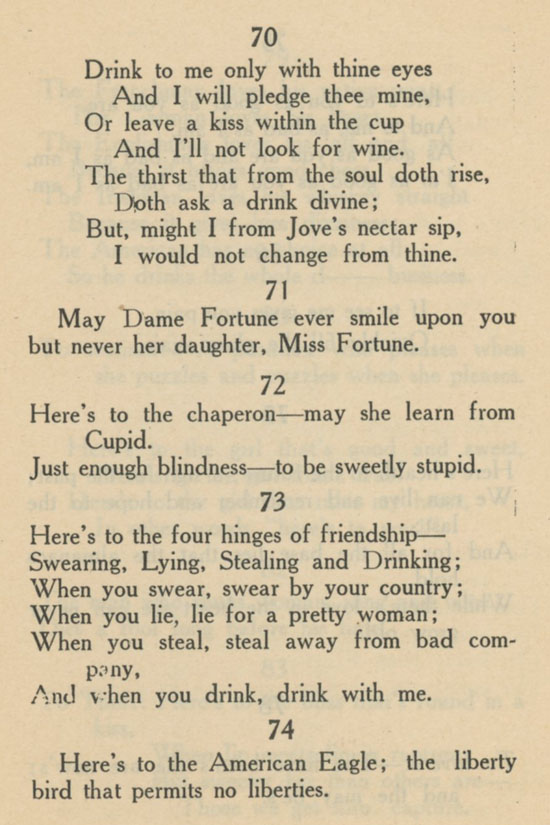
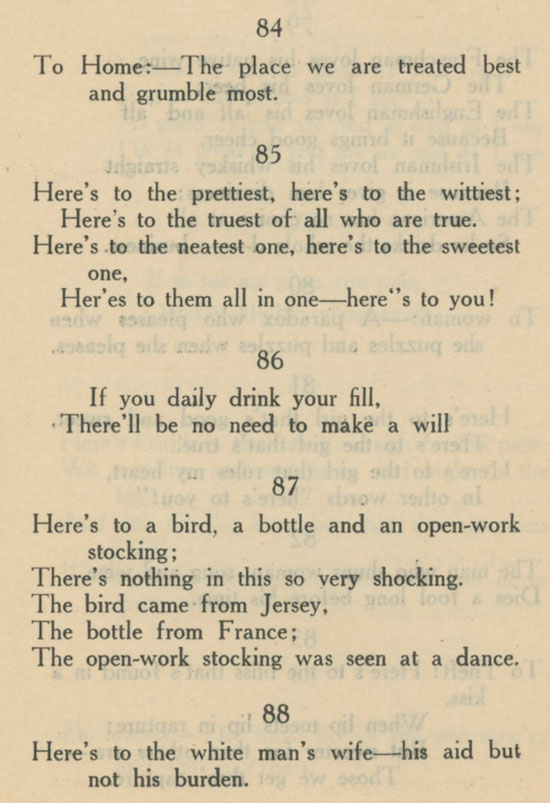
“To Home: – The place we are treated best and grumble most.”

Number 88 is a racial slur, but I guess it wasn’t in 1905. We might not have come a long way here in America, but at least we have come a little ways.

“Here’s to the light that lies in a woman’s eyes; And lies! And lies! And lies!”

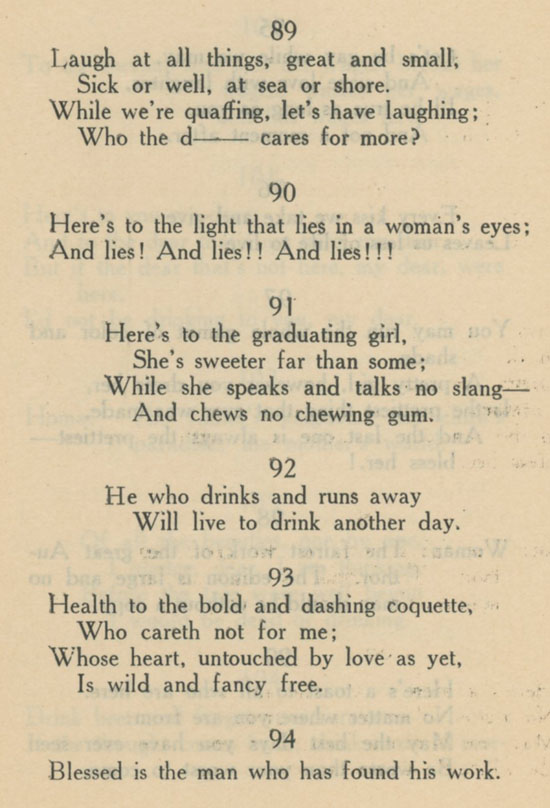
“Woman: The fairest work of the great Author. The edition is large and no man should be without a copy.” And “May the best days you have ever seen be worse than your worst to come.”
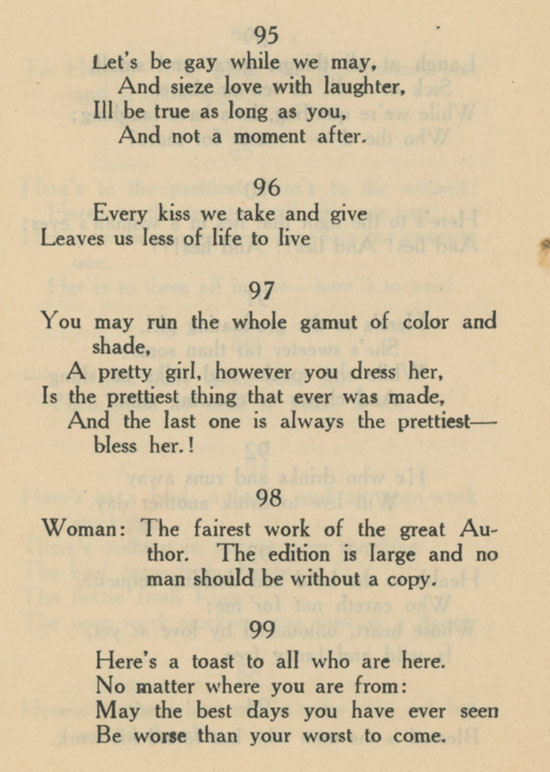
“Drink beer and forget your sorrow; if the thought comes back, drink more to morrow.” I also like number 100, about the servant and her wages.

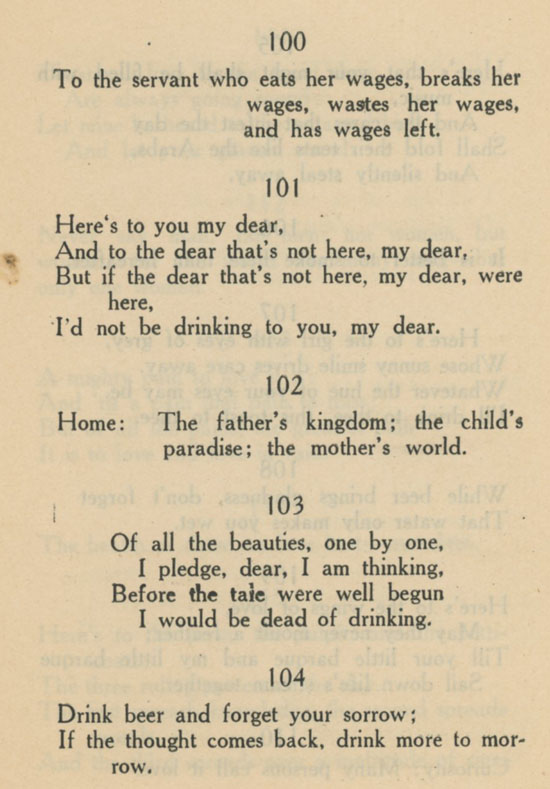
“While beer brings gladness, don’t forget that water only makes you wet.”

“The health of those we love best – ourselves.”

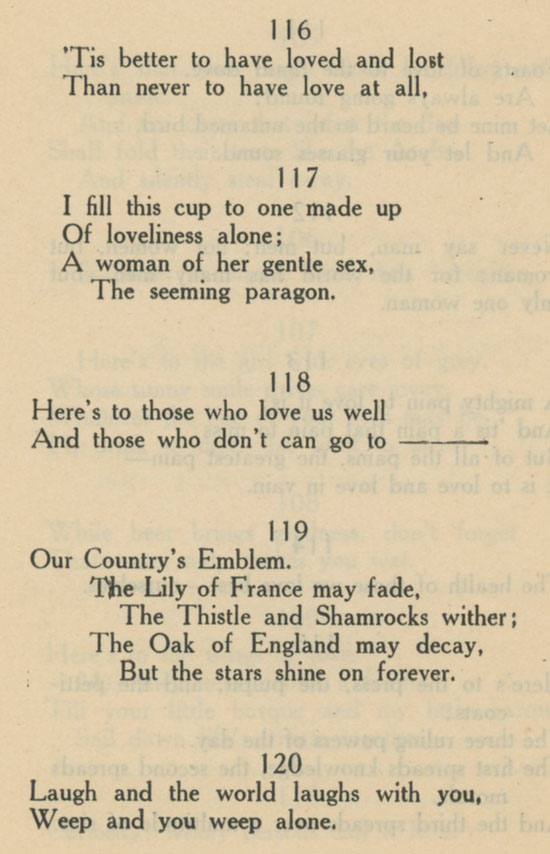
The classic: “Tis better to have loved and lost than never to have love at all.”

“Our absent friends, although out of sight, we recognize them with our glasses.”“Woman: Gentle, patient, self-denying. Without her man would be a savage and the earth a desert.”“Fill the bowl with flowing wine, and while your lips are wet, press their fragrance unto mine, and forget!!!!”
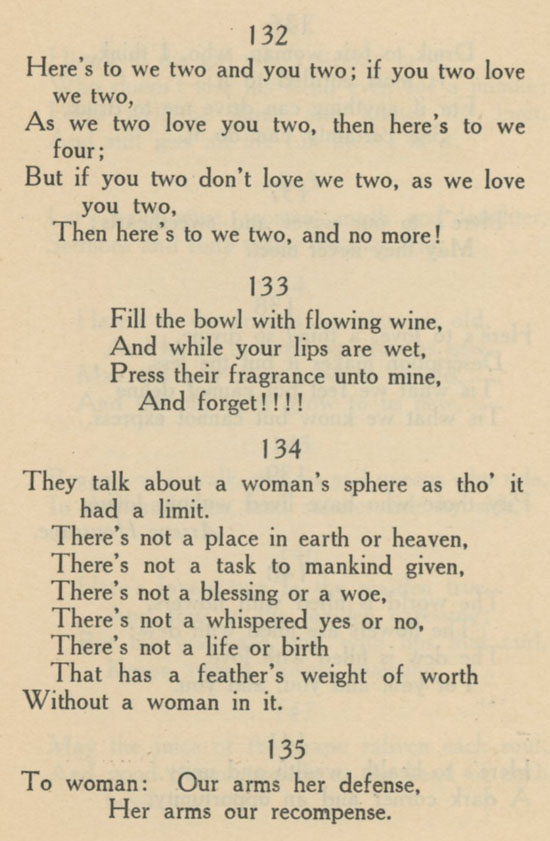
“Here’s to our wives and sweethearts; may they never meet.”

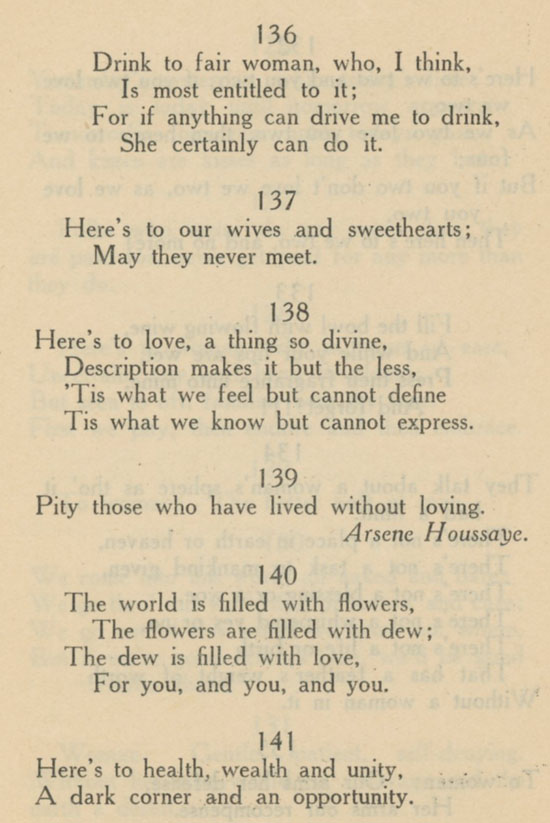
“Let’s have wine, women, mirth and laughter, sermons and soda water the day after.”

“It is not rank, nor birth, nor state, it’s git-up-and-git that makes men great.”

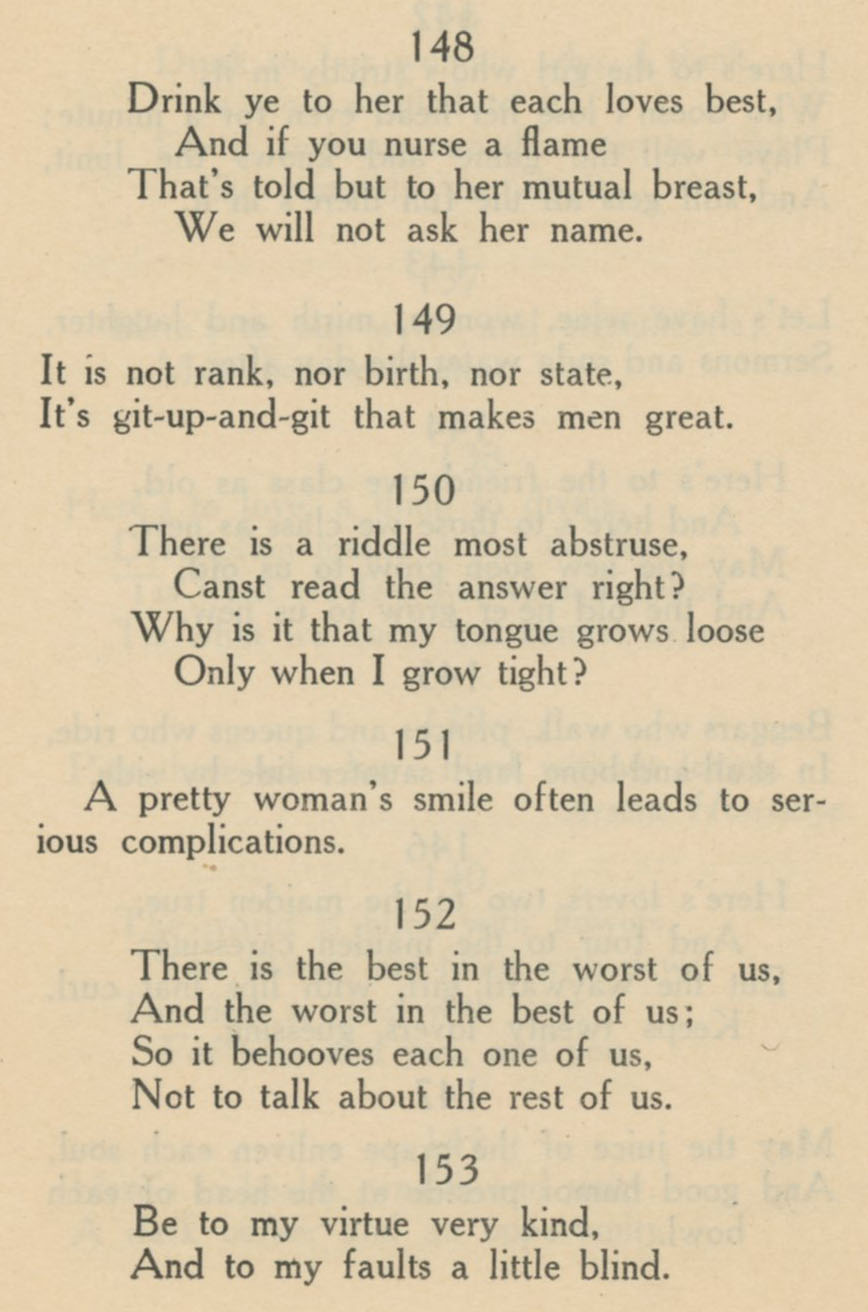
May we live as long as we want to, and want to as long as we live.”
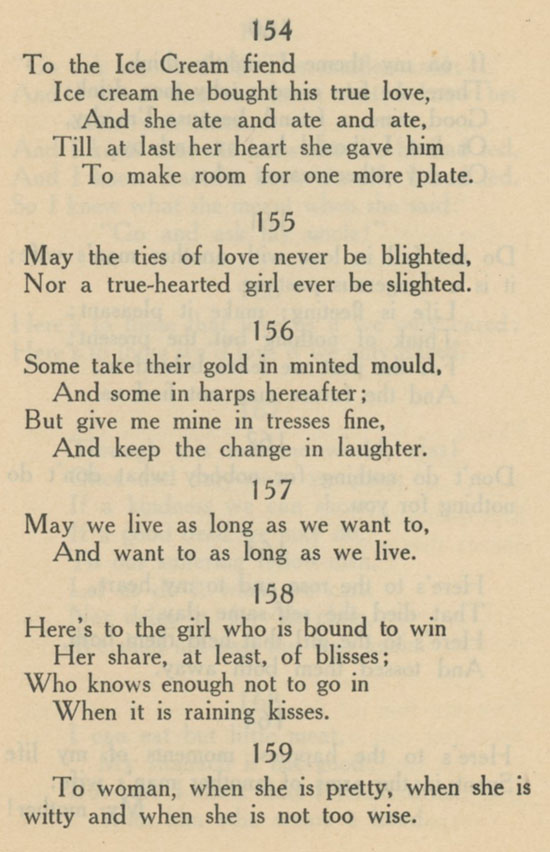
“Don’t do nothing for nobody what don’t do nothing for you.”
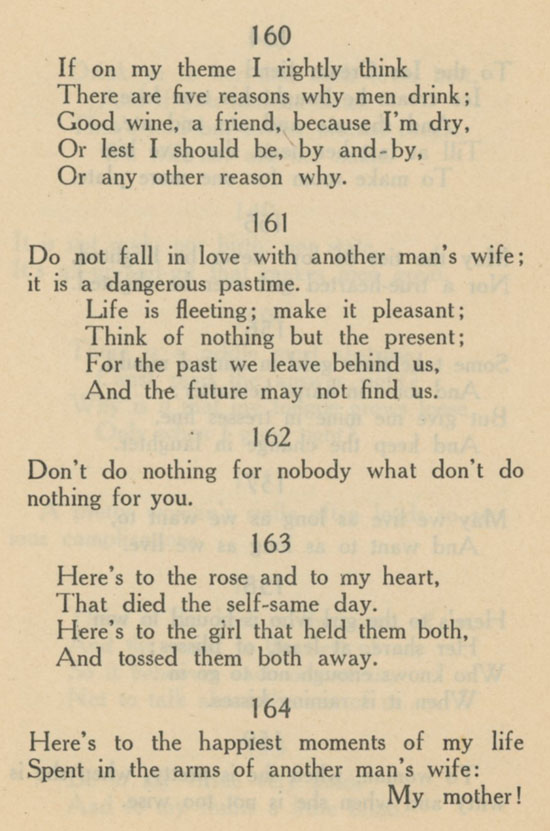
I like number 167, that ends: “We shall not pass this way again.”
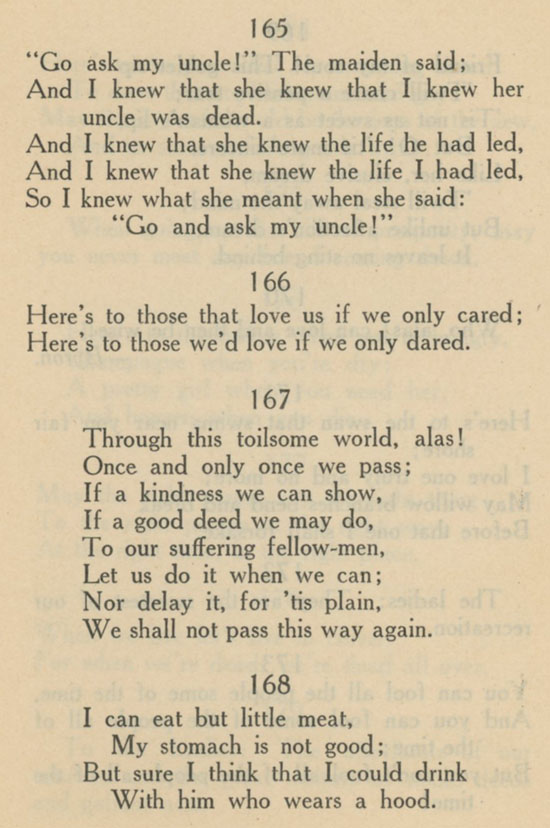
“You can fool all the people some of the time, and you can fool some of the people all of the time; but you can’t fool all of the people all of the time!”
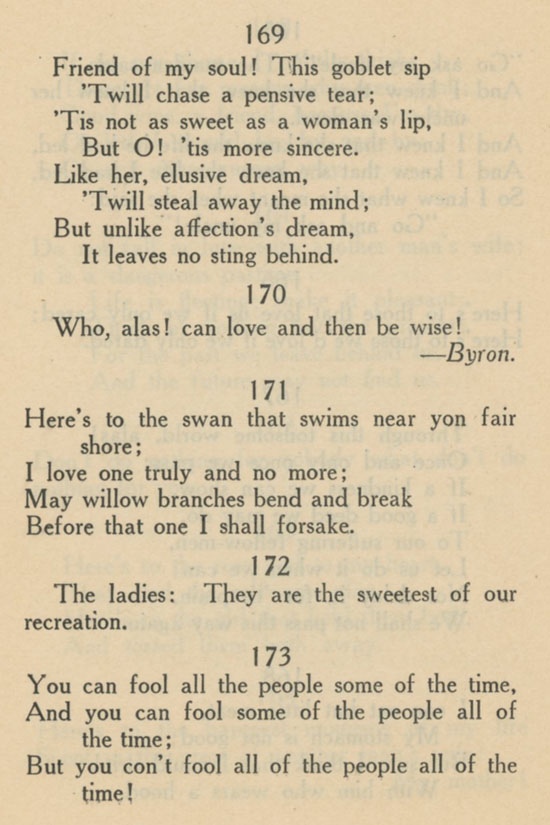
“When going up the hill of prosperity, may you never meet any friend coming down.”
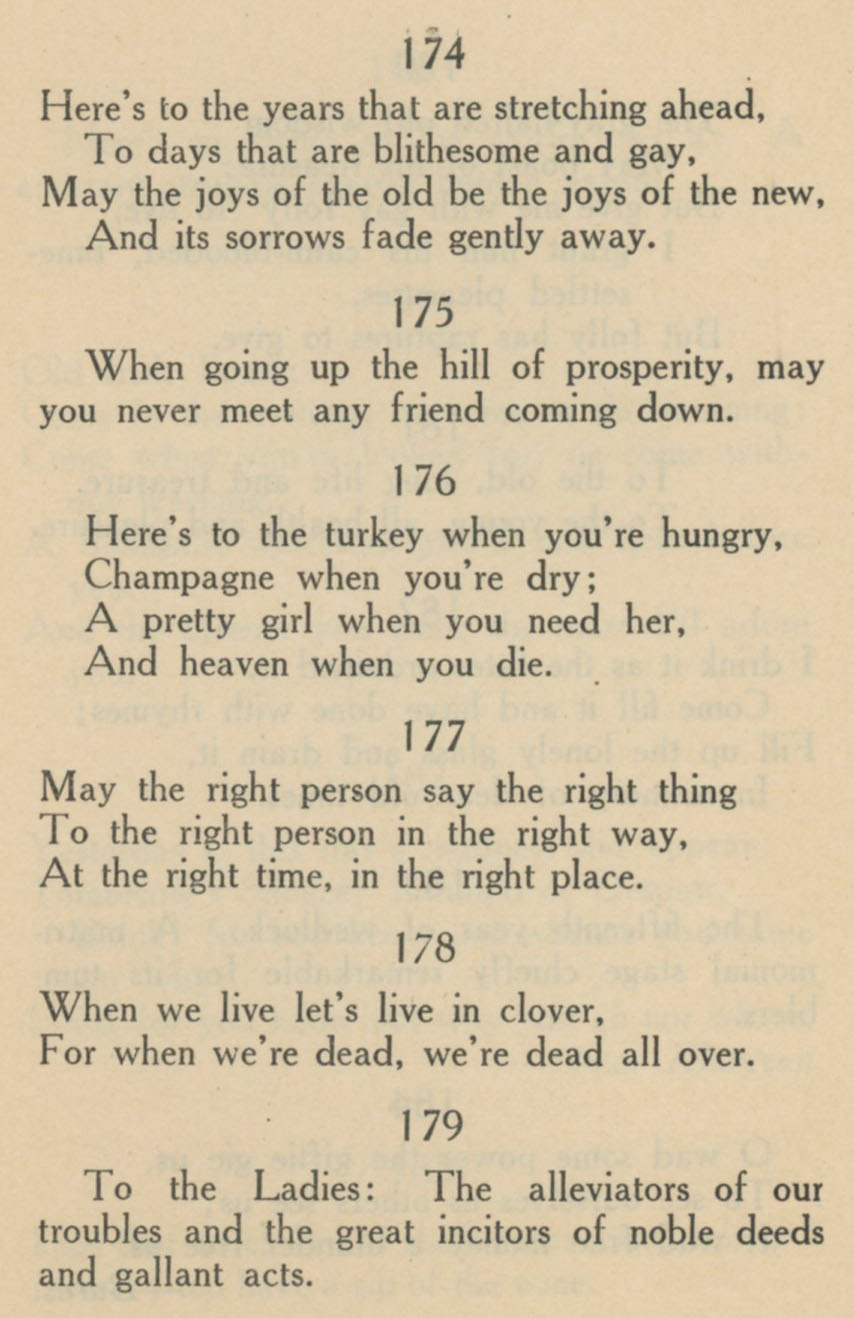
“To the old, long life and treasure. To the young, all health and pleasure.”“Here’s to virtue as the world sees it: A constant struggle against human nature.” And “Lips that touch liquor shall never touch mine, unless I too have a sip of the wine.”
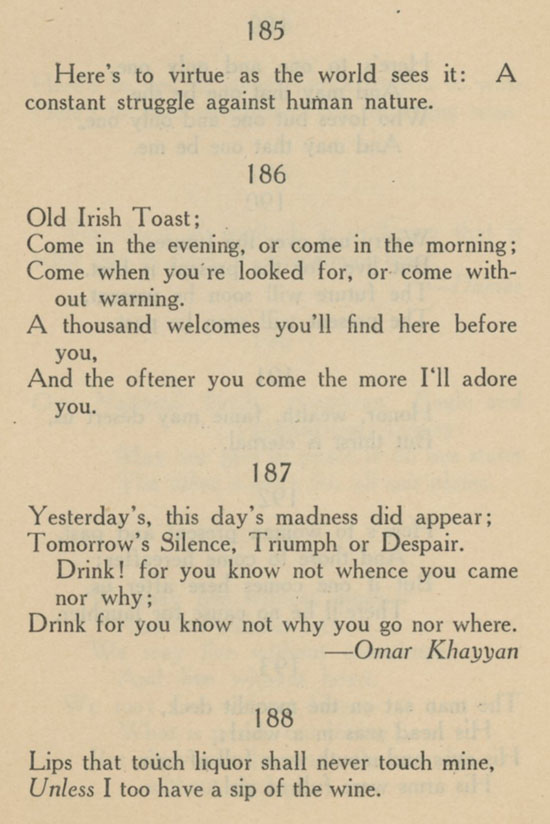
“Honor, wealth, fame may desert us, but thirst is eternal.”
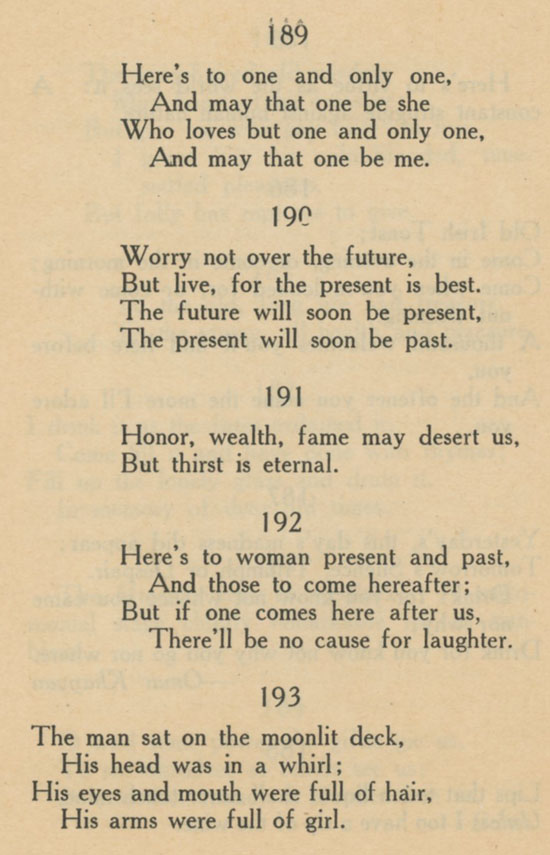
“Here’s to you in water, here’s to you in wine, here’s to your sweetheart, not forgetting mine.”
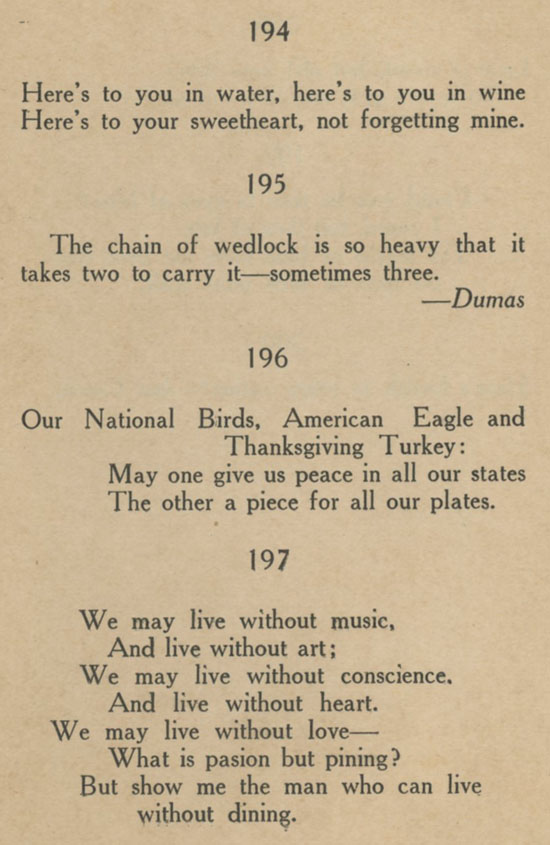
“Love is sweet, but oh! how bitter to love a girl, and then not git her.”
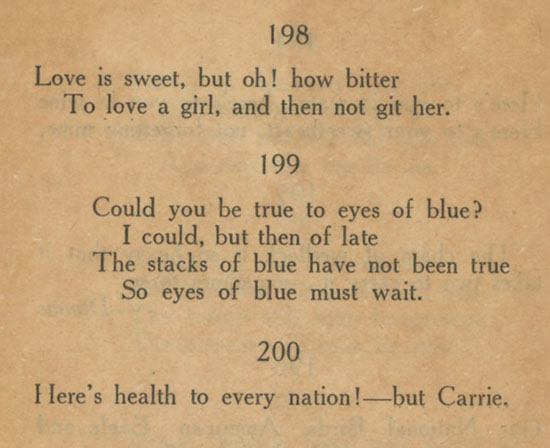
And so we come to the end of Two Hundred Toasts by Mlle. Mixer. I hope you found a few toasts that you liked.

250 Cookbooks: Grilling and Barbecue, Cook’s Illustrated Guide

Cookbook #249: Grilling and Barbecue, Cook’s Illustrated Guide, a Best Recipe Classic, by the editors of Cook’s Illustrated, Brookline, MA, 2005.

The Cook's Illustrated Guide to Grilling and Barbecue
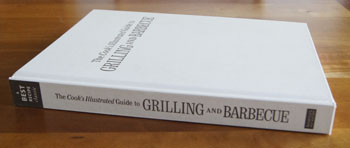
My second-to-last cookbook in this 250 Cookbooks blog! Hard to believe this 5-year project is coming to an end.

Cook’s Illustrated guide cookbooks are always among my favorites. Besides Grilling and Barbecue, I also have Cover and Bake and Best International Recipe. I’ve discussed the style of Cook’s Illustrated recipes in my previous posts on those two books. Briefly, you don’t just get a recipe, you get pages of discussion about how that recipe was developed – what they tried that did and did not work. Further information about ingredients and techniques is presented in boxes or side notes. I find that a Cook’s Illustrated recipe might take a bit more concentration to follow than common recipes, but the recipes always work for me. These guide books are all big, heavy, hardback, white-covered tomes.

I have eight “grilling” cookbooks, but this is one of my two “go-to” books for barbecue – the other is Weber’s Real Grilling. Weber’s Real Grilling is specific to gas grills, while Cook’s Illustrated Grilling and Barbecue gives for each recipe methods for both charcoal grilling and gas grilling. We have a gas grill, and I have no desire to cook with charcoal. The gas grill is just too easy! I’ll just say “I’m sorry” to those purists who think charcoal is the only way to grill!

Grilling and Barbecue begins with introductory sections on “Outdoor Cooking 101″ and Equipment and Tools for Outdoor Cooking”. They are quite useful and complete.

The first chapter is “Beef”. Strip and rib steaks, porterhouse and T-bone steaks, filets mignons, steak tips, flank steaks, London broil, hamburgers, prime rib, beef tenderloin, veal chops, beef ribs, and beef brisket are each discussed in detail, describing how to get the most out of each cut of beef. Specific recipes, sauces, salsas, marinades, and rubs are suggested, some of which appear in later chapters in the book.

The section on in the Beef chapter on “Does Branding Matter?” catches my eye. It begins: “To guarantee quality, more and more people are looking beyond the confines of their local supermarket butcher case and buying their steaks through mail order sources. These outlets promise all-star beef with a price tag to match”. I read on with interest, since I have tried mail order steaks in the past. The folks at Cook’s Illustrated did a thorough study of both local supermarket and mail order steaks. The steak that won first place in their taste tests is a mail order brand that cost $68/pound (Lobel’s Wagyu, or Kobe-style steak from Oakleigh Ranch in Australia). “We found that money can buy you happiness, if happiness for you is the best steak you ever ate”. But the “good news” is that you don’t have to spend a small fortune “or pay for shipping” to get a great steak. Coleman Natural steak, available at some supermarkets, is only $14 a pound and came in second in their taste tests. (Note the publication date of this book: 2005. We know prices have changed since then.)

Pork, lamb, chicken, turkey and other birds, fish, shellfish, vegetables, and pizza and bruschetta chapters follow in the same detail and style as the beef chapter. Sides and salads, rubs and sauces round out the book.

I think a study “kebabs” would be a good illustration of “Grilling and Barbecue, Cook’s Illustrated Guide“. Sure, I’ve made pork, beef, and chicken kebabs so often I rarely use a recipe, but the meat often comes out dry and chewy, or under-cooked, or unflavorful, and the onions and peppers and other vegetables burned or falling apart. I usually make kebabs the same way, no matter what type of meat I use. Just load up the skewers, brush with a sauce, and put them on the grill – that’s my method. But I decide to use this blog as an opportunity to study how to make really good kebabs. So I turn to the pages and lengthy kebab discussions in this tome – about 4 big pages on average for each type of kebab. Below is what I learn.

First, pork. The problem with pork kebabs is that the pork tastes bland and often dries out on the grill. Cook’s Illustrated tried different cuts of pork, and chose pork loin because it has a full flavor, is tender, and an “appealing resistance when you bite into it”. On their early tries, the pork loin dried out on the grill. To overcome this, they tried both brining and marinating, and chose the marinade method because it not only kept the meat “moist and juicy”, but it added “richness of flavor that was lacking in the lean pork loin”. Also, the oil in the marinade improved the pork’s texture and added other flavors to the meat. Not only that, but cutting the pork loin into 1 1/4 inch cubes and “butterflying” them improved the flavor of this rather neutral meat. To butterfly, each cube is cut almost through at the center before marinating, and then folded back together to skewer as a whole cube. On the gas grill, these cubes cooked best over a “more moderate level of heat” than beef, the grill is covered, and the kebabs are turned a quarter-turn every 2 1/2 minutes for about 9-10 minutes total. Cooking the pork to 145˚ was found to be ideal. A study of fruits and vegetables to accompany the pork on the skewers led them to recommend fresh pineapple in 1-inch chunks, bell peppers in 1-inch pieces, and red onion in 3/4-inch pieces.

Beef kebabs went through a similar study. Results: use top blade (flatiron) steaks or sirloin.  Butterfly 1 1/4-inch beef cubes and marinate in a non-acidic olive oil based herb mixture, use the same vegetable and fruits as in pork cubes, grill over direct high heat, cover down, turning one-quarter turn every 1 3/4 minutes, until meat is browned, about 7-8 minutes total.

Finally, chicken kebabs. Use chicken thighs cut into 1 1/2-inch chunks and marinate in a olive oil and salt, non-acidic marinade. Cook’s Illustrated found “early on” that it was clear that cooking chicken and vegetables together on kebabs “enhances the flavor of both”. After a lengthy study, they chose zucchini, eggplant, mushrooms, bell peppers, onions, bell peppers, small shallots, apples, peaches, pears, and fresh pineapple as appropriate for chicken kebabs. (Cook’s Illustrated doesn’t deem potatoes good for kebabs because they require pre-cooking.) They have a handy table that designates the size to cut each recommended fruit and vegetable and whether or not that fruit or vegetable should be marinated. For grilling, they recommend two skewers per kebab, to facilitate turning them without the chicken and vegetables spinning. Grilling should be done on medium high, uncovered, turning one-quarter turn every 2 minutes, until lightly browned, about 9 minutes total.

I am inspired! I’ll carefully follow their instructions and make all these different types of kebabs this summer. Then I can expand to their recipes for fish and shrimp kebabs.

Am I going to make kabobs for this blog? No! Instead, I want to cook a pork tenderloin for the two of us. This is a cut of pork that I use a lot – it’s tender, lean, often on sale, and a perfect portion for two people (with a little left over for the next day’s lunch). I usually simply sprinkle with salt and pepper and cook over direct medium high heat, turning about four times. Grilling and Barbecue says to brine the pork tenderloin, use a wet rub, and cook over high heat 3 minutes per side.

For copyright protection, I am not scanning in this recipe. Below is my adaptation of the original in Grilling and Barbecue, Cook’s Illustrated Guide.

Grilled Pork Tenderloin with Orange, Sage, and Garlic
serves 2

Pork tenderloin and brine

  • 1 pork tenderloin, about 1 pound
  • 1/3 cup sugar
  • 1 1/2 tablespoons salt
  • water

Wet spice rub

  • 2 cloves garlic, minced fine
  • 1 tablespoon grated orange zest
  • 1 tablespoon chopped fresh sage leaves
  • 1 tablespoon olive oil
  • fresh ground pepper to taste
  • salt to taste

Remove the “silver skin” from the pork tenderloin: simply slide a sharp knife under this thin piece of tendon on the outside of the tenderloin.

Dissolve the sugar and salt in several cups of water in a shallow bowl. Add the tenderloin and refrigerate about 1 hour. While the pork brines, prepare the wet spice rub – simply mix all the ingredients in a bowl.

Remove the tenderloin from the brining solution, rinse, and dry with paper towels. Rub the wet spice rub into the tenderloin.

Heat a gas grill by turning all the burners to high and with the grill covered. Then, open the gas grill and scrape the cooking grate clean with a grill brush. With the burners still on high, lay the wet-rub-coated pork tenderloin carefully on the grill. Close the cover. Turn about every three minutes so that all four “sides” of the tenderloin are browned. Using a quick-read thermometer, check that the meat is at 145˚. If not, cook until it is.

Serve!

Grilled Pork Tenderloin
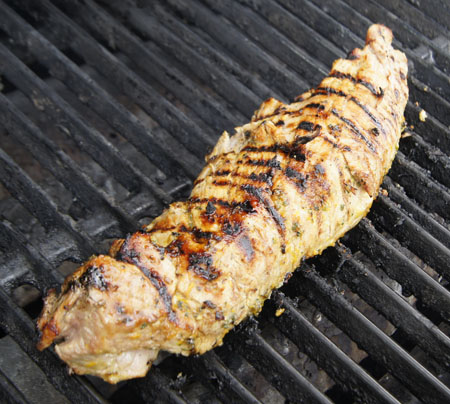
Yum! This was perfect! Moist and flavorful with great grill marks. I served it with a green salad and corn on the cob for a light, healthy, tasty meal.

Thank you, Cook’s Illustrated, for another great recipe.

250 Cookbooks: Pillsbury’s Bake Off Dessert Cook Book

Cookbook #248: Pillsbury’s Bake Off Dessert Cook Book, The Pillsbury Company, USA, 1968, 2nd printing, 1971.

Pillsbury Bake Off Dessert cook book
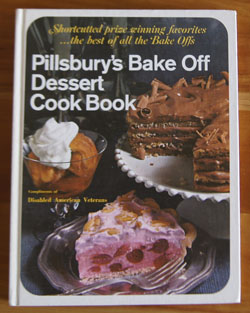
Pillsbury’s Bake Off Dessert Cook Book is the last and grandest of my Pillsbury Bake-Off cookbooks. All of the others are small booklets but this one is hard-cover bound and 144 pages long. It includes recipes from “Eighteen years of Pillsbury Bake Offs”, updated with “short-cuts and the use of convenience food ingredients where possible”. (I discuss Pillsbury Bake-off cookbooks/recipe magazines more thoroughly in my blog post covering the 1964 Bake-Off Cookbook.)

This is one of Mother’s cookbooks, but she has no written notes in it. Two places in the book are marked with small scraps of paper (pages 123 and 127). I’m kind of surprised at this, because she was such a Bake-off Cookbook fan. And I was hoping for a few more memorable notes from her, as I get to the last of her cookbooks in this 250 Cookbooks blog.

The first chapter is “Desserts Warm From The Oven”. Hmmm, sounds right up my alley. Peach Melba Special looks good: peaches and red raspberries with ginger topped with batter and baked. How about Applecots, apple halves stuffed with apricots and wrapped in dough and baked. Or Caramel Apple Pudding, a “pudding cake” with 1 1/2 cups fresh apples and 1/2 cup chopped almonds. What’s a pudding cake? It’s a cake made by placing a wet or dry batter in a pan, adding a boiling water sauce on top, and baking in the oven. Pudding cakes are one of my favorite desserts! Why? They are simple, often contain fruit, and are served hot with ice cream. Homey goodness.

I found two more recipes I like in the Desserts Warm From The Oven chapter. Apple Peanut Spoon Dessert calls for 4 cups of apples and has peanut butter in the topping. Baked Apple Cuplets are peeled whole apples topped with a cake-like batter and baked in custard cups.

The next chapter is “Family Dessert Favorites”. I like the Quick Banana Buns, an unusual banana dessert made from dough laced with mashed bananas cooked as buns, then filled with sliced bananas and whipped cream.

The final three chapters are “Pies, Pies, And More Pies”, “Make-Ahead Pies and Desserts”, and “Conversation Piece Pies And Desserts”. Hey – no chapters for pies and cookies! There are a few cake-type recipes in the other “Dessert” chapters, but that is all.

Mother was great at making pies, and I am surprised she marked none of the pie recipes. I think almost all of the pie recipes Pillsbury’s Bake Off Dessert Cook Book sound great. I just don’t make pies often because they are so full of calories. (And if I want to make a pie, I use one of my mother’s recipes.)

Many, but not all, of the recipes in Pillsbury’s Bake Off Dessert Cook Book call for “short-cut” ingredients, such as refrigerated rolls, canned pie filling, cake mixes, and canned fruits. For instance, one recipe calls for “peanut butter refrigerated quick caramel rolls with nuts”. I doubt these could be found in markets today – fifty years since the publication of this book. (Besides, I prefer to cook from scratch.)

It’s not until page 136 that I find the recipe I want to make for this blog: “Cherry Honeys”.

Why do I like this? Because it has fruit and honey in it, and I can cut calories by using Cool Whip® instead of whipping cream. Sour cream and coconut are folded into the whipped cream – an unusual and tasty-sounding twist. The serving sizes are small and designated so we can stay on our “diet” and still have these. Of course, I’ll make my own pie crust instead of purchasing pie crust mix. Plus, they should look really cute and pretty!

And I have to admit, I get to buy something new to make these: tart pans. I have quiche pans of many sizes, custard cups, many sizes of ramekins, small and large donut pans, bun pans, bundt pans, small and large spring form pans, cake pans, popover pans, lava cake pans, muffin pans – but NO mini tart pans!

Cherry Honeys
makes 6

  • crust for single-crust pie
  • 1 can (16 ounces) pitted dark sweet cherries
  • 1 1/2 tablespoons cornstarch
  • 1/4 cup honey
  • 1 tablespoon grated orange peel
  • 1 tablespoon lemon juice
  • 1/2 cup whipping cream (or use a light whipped cream alternative)
  • 1/2 cup flaked coconut
  • 1/3 cup sour cream
  • 2 tablespoons sugar

Divide the dough into 6 pieces. Roll each into a circle to fit 4-inch tart pans. Fit them into the pans, forming a standing rim, and flute the edges.

Bake at 450˚ for 8-10 minutes, or until golden brown. Cool.

Drain the cherries and save the juice. Add the cornstarch to the juice and mix well, then add the honey and orange peel. Cook over medium heat, stirring until the mixture is thick and clear. Remove from heat and add the cherries and lemon juice. Cool.

Beat the whipping cream until thick, then fold in the coconut, sour cream, and sugar.

Just before serving, spoon the cherry filling into the tart shells and garnish with the whipped cream mixture.

Cherry Honeys
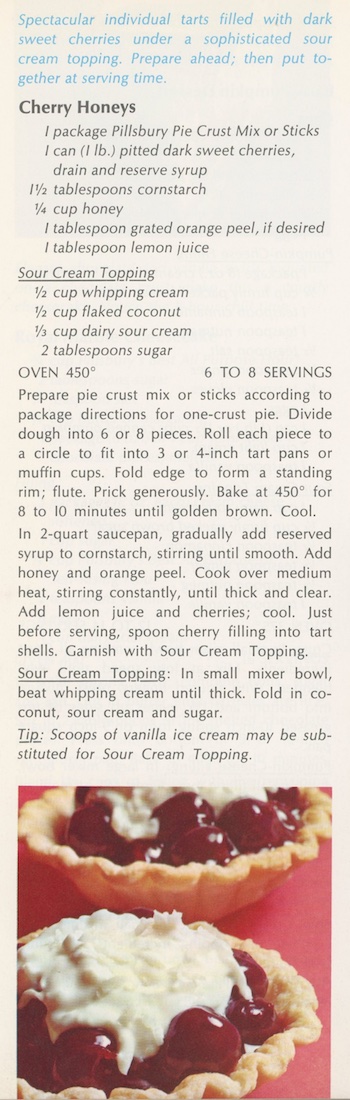
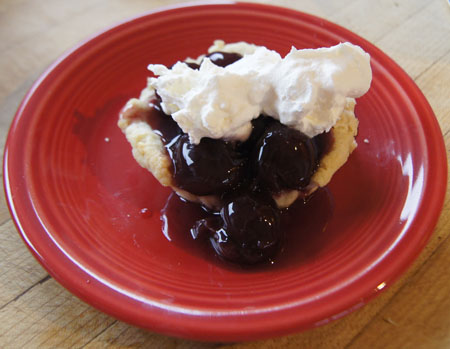
These were excellent. Except for the crust, they aren’t terribly rich. The next night, I made another batch of the cherry mixture and served them with ice cream. Yum!


250 Cookbooks: Curried Favors

Cookbook #247: Curried Favors, Family Recipes from South India, Maya Kaimal, Abbreville Press Publishers, NY, London, 1996. (Paperback edition.)

Curried Flavors cook book

Curried Favors is a beautiful cookbook. I picked it up at a Peppercorn display sometime in, well, probably the 2000s. It intrigued me, so I bought it. The 2000s was a period of time when I was learning about foreign cuisines from home-cook classes at the Escoffier School of Culinary Arts in Boulder. And I remember a visit to India’s Grocery in Boulder, where the owner told me how to make a curry: put a mixture of fresh spices and oil in a hot pan until they pop, then add vegetables and maybe meat, cook quickly, add a liquid, simmer a few minutes, and serve. That simple! I was entranced – at the time I had a totally different idea about Indian curries. (My old idea was any dish with store-bought ground curry powder.)

Today, I open Curried Favors and the first thing I note on the inside jacket is “Winner 1997 Julia Child First Book Award”. Julia again! The New York Times calls it “An artful and intimate cookbook.” It’s also an IACP cookbook awards winner. Well. I am happy to spend some more time with this book – it’s been a couple years since I adventured into its pages.

And it is an adventure. Maya Kaimal’s words and photos take the reader on a journey to southern India and the flavorful curries and other dishes found in this area.

The introduction to Curried Favors begins:

“If my South Indian father hadn’t found himself in a Kansas wheat field thirty years ago, this book would never have been written. Because he was doing atmospheric research on the American prairie, miles from any restaurants, he tried his hand at cooking. Being a scientist gave my father an advantage in cooking – he liked to experiment, and he wrote everything down so he could duplicate his results.”

In Maya Kaimal’s home, dinners alternated between her American mother’s “forays” into Julia Child and her father’s “latest experiments” with Indian cooking. At one point, her father was approached by “the owner of a cookware store in Boulder, Colorado, to see if he’d teach a course on Indian cooking”. (My guess is that that store was the Peppercorn.) He accepted, and taught the “popular class” for four years.

“Kerala [a state Southern India] is an interesting and unique culinary pocket, its cuisine shaped by climate, geography, and religion.” Coconuts, fish, shellfish, curry leaves, mustard seeds, and rice are abundant. Its location on the old trade routes brought new spices and foods to the ports and to the cuisine. Kerala is predominantly HIndu, but also has large Christian and Muslim populations. Christians eat all types of meat, some Hindus are vegetarian and some eat chicken, fish and lamb, but not beef; Muslims don’t eat pork. Each cultural group brings unique culinary contributions to the cuisine of this area.

My hubby hates curries. So when I cook from this book, I have to say “we are having a stir fry tonight”, and keep the “C” word out of it. He also cringes at anything colored turmeric or saffron yellow. He simply has an aversion to Indian foods. And yellow main dishes. But I consider the recipes I have tried from this book explosive in flavor, hot and spicy and bright.

Kaimal tells us that “curry powder” is not a simple spice, and “curry” does not define a particular dish. Instead, a curry is a dish of meat, fish, eggs, and/or vegetables cooked with a mixture of aromatic spices. Packaged “curry powder” is not called for in any of the recipes in this book.

As usual, I searched “Maya Kaimal” on the internet. She wrote one book after “Curried Flavors”. In 2003, she and her husband started a business, Maya Kaimal, selling Indian sauces, spices, and chips. Check out the website, because a lot of her recipes on posted on it.

The best way to show the gist, spiciness, and simplicity of the recipes in this book is to cook an example. I choose one that I have tried before, Chicken with Coconut Milk.

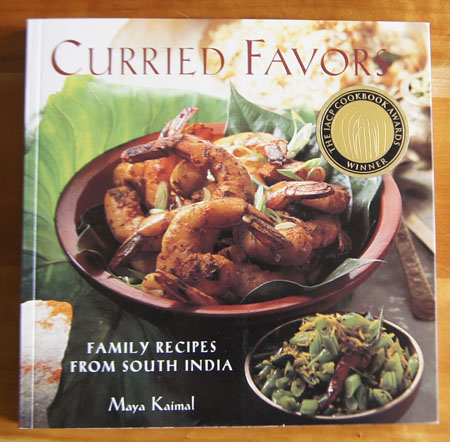
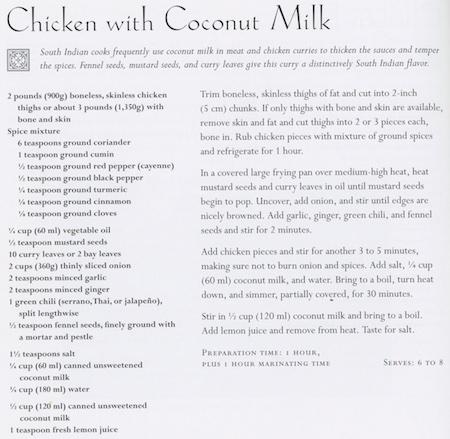
I plan to cut the recipe in half and leave out the turmeric, and use less cayenne. I have everything for this recipe in my pantry and or my freezer except the coconut milk and a fresh hot chili (a quick trip to a store solved those issues). I will use bay leaves instead of curry (or kari) leaves. (I know where to find curry leaves in downtown Boulder, but don’t have any in my pantry right now.} I also increased the amount of coconut milk. Below is my adaptation of the above recipe.

Chicken Coconut Curry
serves 2

Meat:

  • 12 ounces boneless skinless chicken thighs, cut in 1/2-inch chunks

Spice mixture (or rub):

  • 1 tablespoon ground coriander
  • 1/2 teaspoon ground cumin
  • 1/8 teaspoon cayenne
  • 1/2 teaspoon pepper
  • pinch cinnamon (1/16 teaspoon)
  • pinch cloves (1/16 teaspoon)

Combine the spices and rub into the chicken. Let stand 1 hour.

The rest of the curry:

  • 2 tablespoons vegetable oil
  • 1/4 teaspoon mustard seeds
  • 1 large bay leaf, broken in half
  • 1 cup onions, thinly sliced
  • 1 teaspoon minced garlic
  • 1 teaspoon minced fresh ginger
  • 1 small green chili, cut in half lengthwise, or use half of a serrano chili
  • 1/4 teaspoon fennel seeds, freshly ground
  • 3/4 teaspoon salt
  • 1/4 cup water
  • 1/2 cup coconut milk (unsweetened, but not “lite”)
  • 1/4 cup water
  • dash fresh lemon juice

Here are (most) of the ingredients I will use in the rub and spice mixture:

Chicken Coconut Curry ingredients
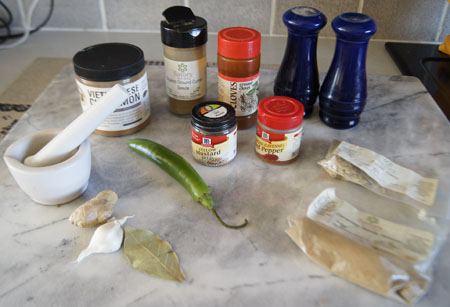
When the chicken has rested in its rub (refrigerated) for at least an hour, set a frying pan on medium high heat and add the oil, mustard seeds, and bay leaf. Cover. Heat until the mustard seeds pop. Uncover and add the onion and cook and stir until the onion is browning nicely. Add the garlic, ginger, green chili, and ground fennel seeds and cook and stir for 2 minutes.

Add the prepared chicken and cook and stir for about 5 minutes. Add the salt and half the coconut milk and the water. Bring to a boil, then turn down the heat and simmer, covered, for about 20-30 minutes. Add the rest of the coconut milk and the lemon juice and bring back to a boil, then serve. (I took the hot chili and the bay leaves out before serving.)

I served our curry over brown rice.

Chicken Coconut Curry
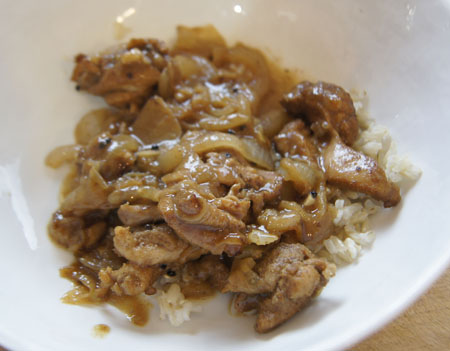
I love this curry. I like the whole cooking process, too. The aromas as it cooks! The flavors as I eat it! But hubby? Well, he ate it all. But when asked, he said something like “yeah, it was dinner”. Guess I didn’t slip this curry by him. Maybe it isn’t just the yellow color that he does not like about curries. His loss.

Chappathi
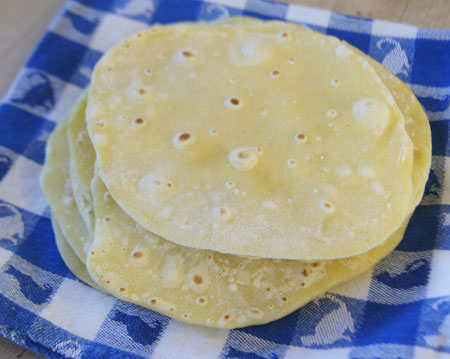
I also made chappathi from another recipe in this book. These are small flatbreads cooked on a stove-top, similar to tortillas, but made from durum wheat flour (“atta” flour) and water (and a little salt) – that’s all. I had some durum wheat flour in my pantry because of forays into pasta cooking. To make the chappathi, you mix and knead together flour and water, cut into equal-sized pieces, roll each to a circle, and cook briefly on a hot griddle. It’s kind of like making tortillas or crepes or pita breads. Mine came out pretty good. Here’s the rolled out dough:

Chappathi Dough

And the final chappathi:

Chappathi
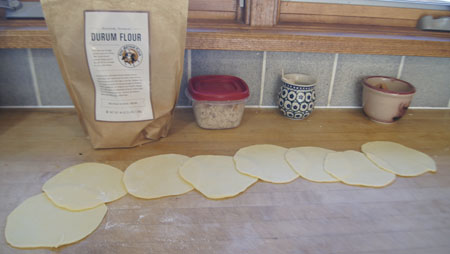
Taste? Not a lot, but I thought they were interesting. They sure are cute.

250 Cookbooks: Art of Cooking and Serving

Cookbook #246: The Art of Cooking and Serving with 549 Tested Crisco Recipes, Procter and Gamble Co., Cincinnati, Ohio, 1937.

The Art of Cooking and Serving coobook

This week is the first time I have read The Art of Cooking and Serving with 549 Tested Crisco Recipes. I know that once I opened it and entered the title and publication date in my database, noting that it “no writing in it; probably is Grandmother’s”, but I didn’t read it.

Today I sit down with The Art of Cooking and Serving, expecting it to be glowing with praise of Crisco, much like my 1942 booklet Good Cooking made Easy, Spry, the flavor saver, praised Spry. But no, The Art of Cooking and Serving is quite different, and I’ll get into that later in this post.

My copy of The Art of Cooking and Serving is in excellent condition. I check for copies online, and find a few, all under $15. This booklet is available in 1930 and 1931 editions as well as my 1937 edition. It is not available as full text on my go-to site, the Hathi Trust digital library.

I also learn that Crisco was introduced in 1911 by Procter and Gamble. The brand name is now owned by the J.M. Smucker Company.

Okay, let’s peruse this book. It’s 252 pages long, paperback bound, and 5×7-inches in size. There are some color photos, and a lot of black and white photos.

The short forward does laud the benefits of Crisco brand shortening, but after that, not much is said about it. In fact, many recipes do not include Crisco at all in the ingredients. Here are the first two paragraphs of the foreword:

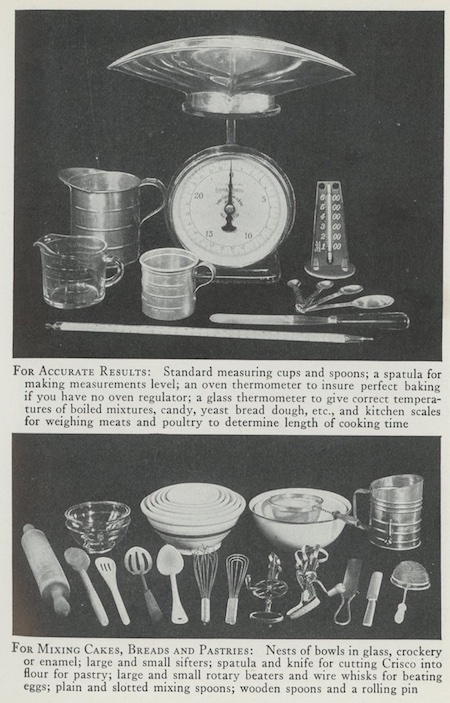
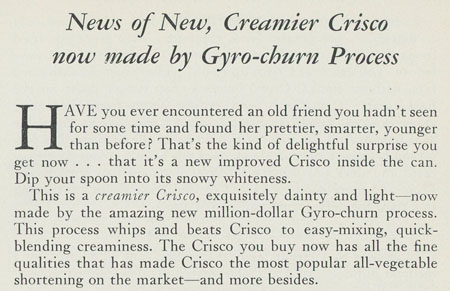
Next come four chapters that discuss the proper way to manage a kitchen and serve food. Transport yourself back 81 years, to the kitchen of my grandmother, to the culture of America in the 1930s. Here is the beginning of the first chapter:

Here is the breakfast table in a house without a maid:

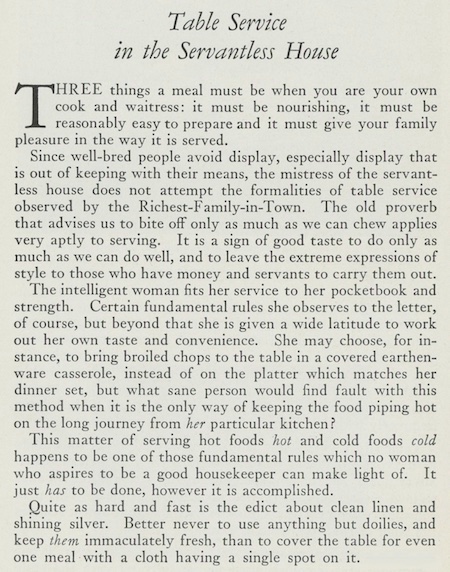
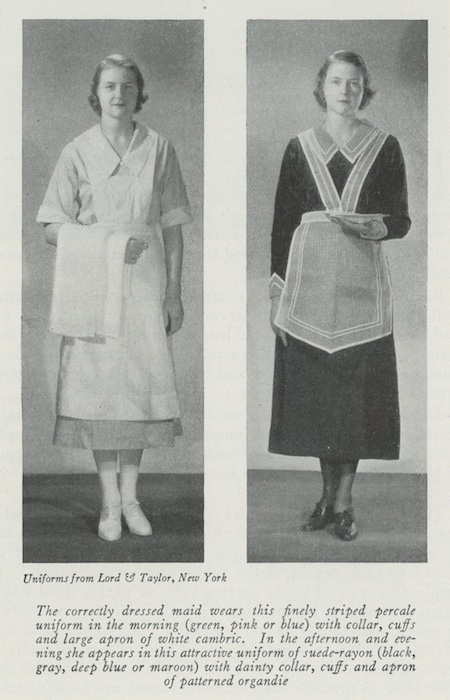
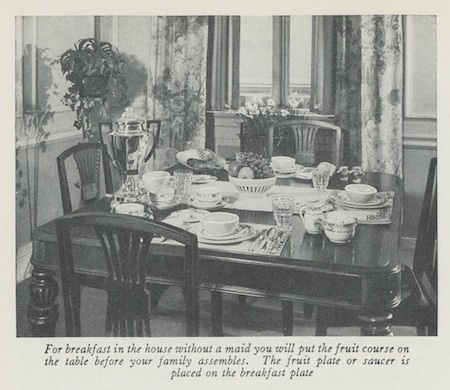
This chapter goes on for 24 pages describing the proper way to serve food in the servantless home. And if you have a maid? That chapter has 9 pages, beginning with these paragraphs:

And the uniforms should look like this:

The chapter on “Helpful Cooking Equipment” has several vintage photos. I am kind of surprised that the mixing equipment does not show an electric mixer, since I found that these were introduced to American cooks by the 1930s.

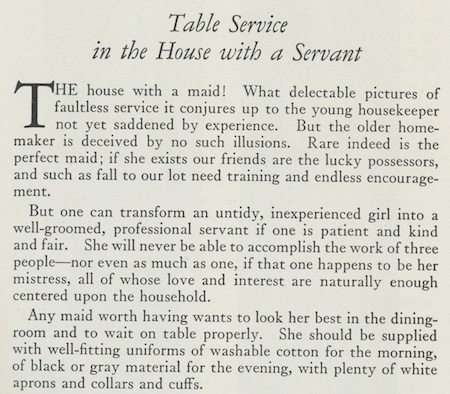
“How to Plan Your Meals” is a short chapter on what foods to include in your diet for sufficient protein, energy (fats, starches, sugars), body regulation (roughage and minerals), vitamins, and water.

Next, sixteen recipe chapters cover deep-fat frying, soups, cereals, cheese, fish, meat, poultry, salads, cakes, cookies, pastry, candy, desserts, and sauces. Below are a few examples from this bounty of recipes.

This excerpt includes a Spanish Omelet, a recipe I almost made for this blog.

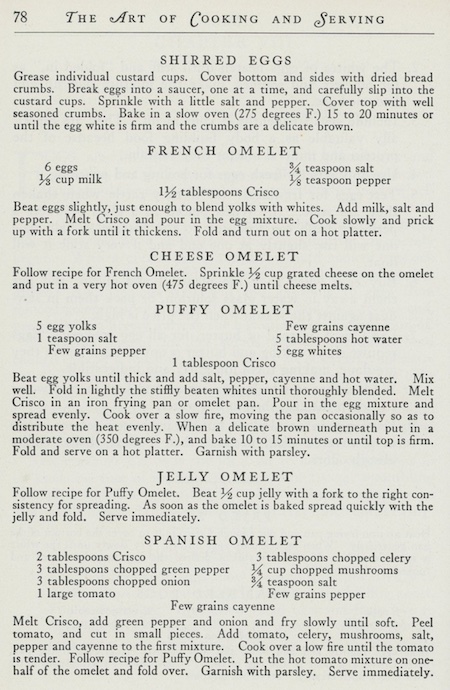
Here is a photo of the omelet:

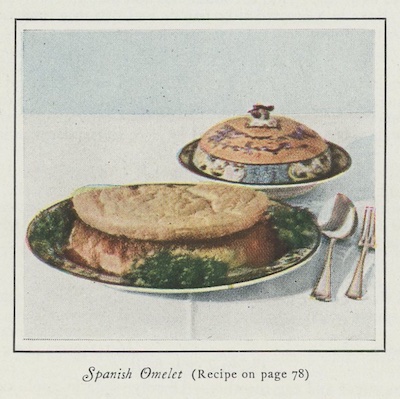
These recipes are for main dishes.

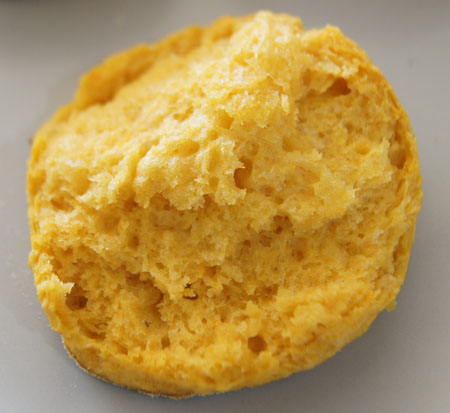
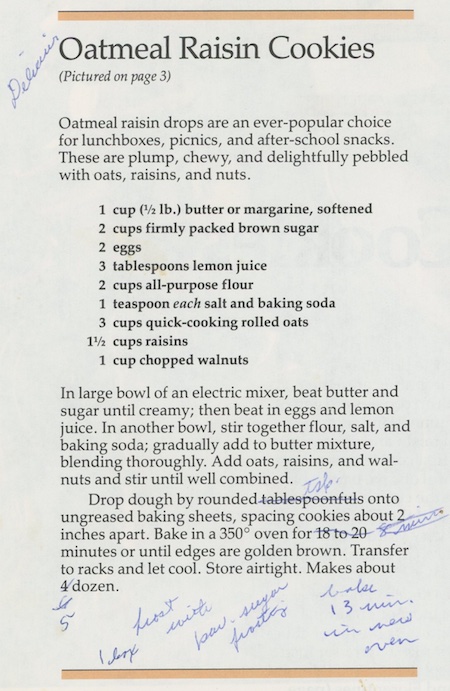
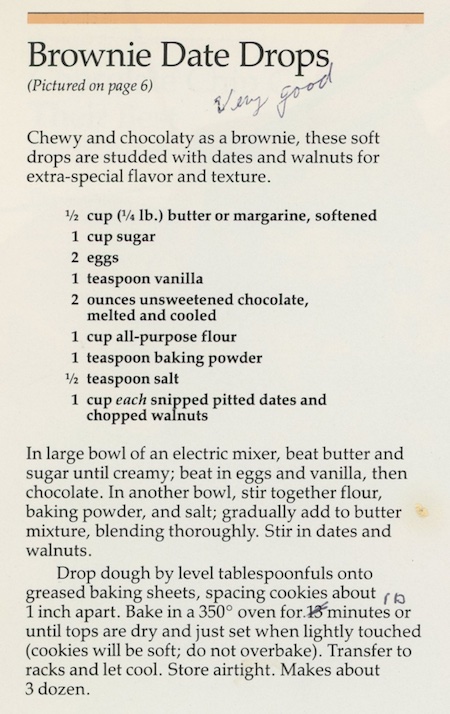
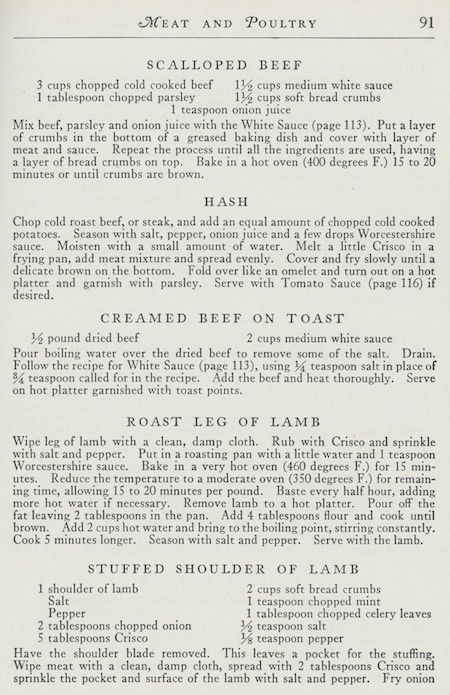
These are classic cookie recipes, especially the Hermits (a dark spice cookie filled with fruits and nuts) and the Oatmeal Cookies.

Here is one of the color photos: Thanksgiving Desserts.

My mother’s pie crust recipe is almost just like this one below – except her recipe specifies the amount of cold water. She specified Crisco brand shortening in the recipe I got from her.

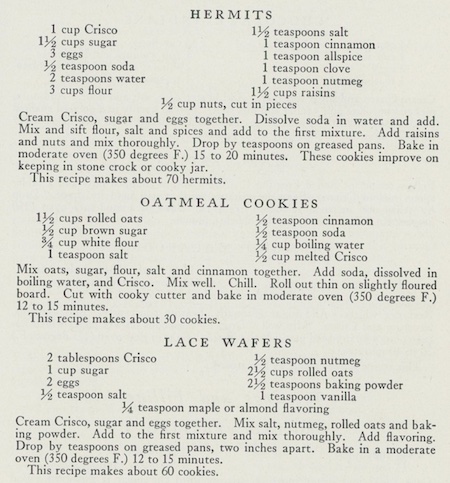
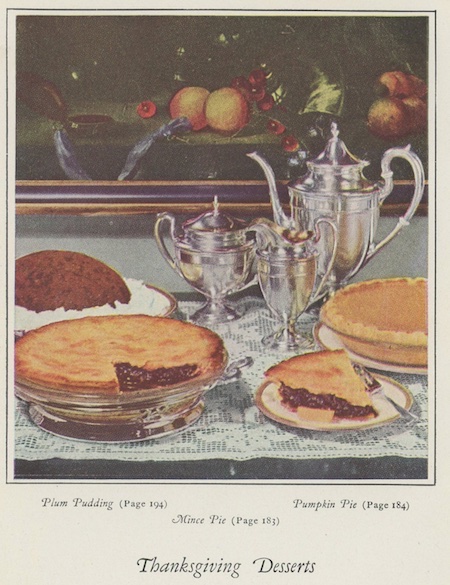
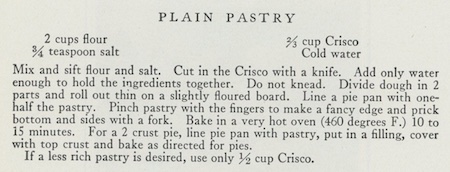
And what type of pie to make with the plain pastry crust? Why not old-fashioned Mincemeat Pie, or Mock Cherry Pie:

After the recipes, the last few chapters cover large quantity cooking and menus for all occasions and reference tables and charts. And The Art of Cooking and Serving ends with a very helpful index.

There really are a lot of recipes I could choose to try for this blog. So many in this book are good, homey, from-scratch recipes! I decide to make Sweet Potato Biscuits.

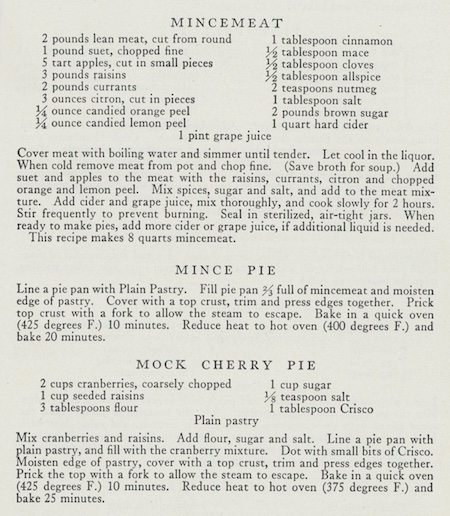
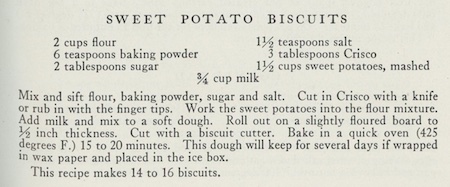
I think this is an amazing recipe. For one, it calls for 1 1/2 cups of sweet potatoes – and that’s a lot! And it calls for only 2 tablespoons of sugar and 3 of shortening. I think the 2 tablespoons baking powder might be a bit much, but I stayed with that original amount. I am going to use my immersion blender to mash the sweet potatoes with the milk, and my food processor for the flour and shortening. Otherwise, I am staying with the original recipe.

Sweet Potato Biscuits
makes about 16

  • 2 cups flour
  • 2 tablespoons baking powder
  • 2 tablespoons sugar
  • 1 1/2 teaspoons salt
  • 3 tablespoons vegetable shortening (I use Crisco!)
  • 1 1/2 cups cooked sweet potatoes (I used one huge sweet potato and it was barely enough)
  • 3/4 cup milk

Put the flour, baking powder, sugar, and salt in a food processor. Pulse for about 2 short pulses. Add the vegetable shortening and pulse for 4-6 short pulses. Pour the mixture into a bowl.

Mash the cooked sweet potatoes with a fork enough to measure 1 1/2 cups. Add the 3/4 cup milk. Mix well: I used my immersion blender, but an electric mixer or food processor would also do the trick.

Add the sweet potato mixture to the flour-shortening mixture and stir with a big spoon. This is a soft, wet dough. The next step is to roll the dough out on a floured bread board. I got my hands into the dough mass to make this transfer, adding a bit more flour so it would not stick to my hands. It was a bit messy.

Press the dough out until it is about 1/2-inch thick. I found that I did not even have to use my rolling pin to get it to this thickness.

Use a biscuit cutter to cut out the biscuits. I actually had exactly 16 biscuits! Bake at 425˚ for 15-17 minutes, until lightly browned.

Here are my biscuits ready to bake. I just got new half-sheet pans and my first Silpat® so I am showing them off:

sweet potato biscuits
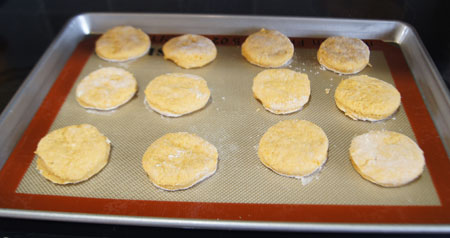
Here they are, baked:

Sweet Potato Biscuits

And here is the lovely color of the inside of a biscuit:

cut biscuit
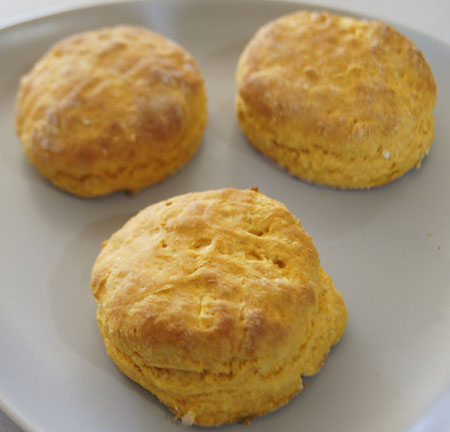
My daughter and I really loved these. Hubby avoided them – he isn’t a sweet potato fan. His loss. And more for us! This was definitely a successful recipe.

Sometimes it’s a good idea not to throw out those old cookbooks! I had fun exploring The Art of Cooking and Serving.

250 Cookbooks: Cookies, Step-by-Step Techniques

Cookbook #245: Cookies, Step-by-Step Techniques, the editors of Sunset Books and Sunset Magazine, Lane Publishing Co., Menlo Park, California, 1985.

Cookies cook bookI’ve saved this book for one of my last entries for this 250 Cookbooks blog because it is special to me. It was my mother’s, given to her by my brother and sister in 1986. Her notes are in it, some pages are stained with food, and many pages are falling out of the binding. I just love it!

note on title page

I like cookies, any time of the year. But especially at Christmas: I used to make tons to give away. Of my 250 cookbooks, 8 are specifically “cookies”. And if you look at my recipe index, you will see how many favorite cookies I have. Although I only rarely make cookies these days, it doesn’t mean I don’t like them!

Sunset put together a good collection of cookie recipes in Cookies, Step-by-Step Techniques. I page through carefully, admiring the photographs and looking for the recipes that Mother marked, and looking for ones I’d like to try. Actually, almost all of the recipes sound very good.

The first recipe she marked is “Oatmeal Raisin Cookies” (she marked them “Delicious”). I make a similar oatmeal cookie with chocolate chips instead of raisins, and a combination of brown and white sugar. This recipe has all brown sugar and I’m sure they would be delicious. Note that Mother didn’t stop with them “as is”, but frosted them with butter-powdered sugar frosting! (And she kept her slim figure somehow!)

Oatmeal Raisin Cookies

“Brownie Date Drops” are marked “very good”.

Brownie Date Drops

She marked “Coconut Macaroons” as “not special”, and “Buttery Lemon Bars” as “Delicious”.

Buttery Lemon BarsButtery Lemon Bars

“Dream Bars” were “Delicious“. That underline means extra delicious! I smile at all of the food stains on the recipe (below).

Dream Bars

“Peanut Blossom Cookies” are marked “Delicious”. It differs from the recipe I already posted for Peanut Blossoms by having a little more peanut butter (1/2 cup) and a little less flour (1 1/3 cups). Peanut Blossoms are also in my Hershey’s Chocolate Cookbook, published in 1982, and in A Treasury of Bake Off Favorites, published in 1969.

I note the “Chinese Almond Cookies” to try, as well as “Old-fashioned Molasses Chews”. “Date-Oatmeal Cookies” are marked “not great”. I’d like to try the recipe for “Fruit Bars”, because they look like fig newtons.

The chapter I focus on for a recipe for this blog is “Wholesome Cookies”. We try to avoid cookies these days (calories), so if I do make them, I try to use a recipe that contains a lot of nutritious ingredients. I like the “Half-cup Cookies” – they call for 9 ingredients in the half-cup quantity: butter, peanut butter, brown sugar, honey, chocolate chips, nuts, coconut, raisins, and granola. The flour in Half-cup Cookies is whole wheat. Other cookies in this wholesome chapter include many of the half-cup ingredients, plus fructose (sweeter than sucrose, table sugar), bran, carob chips, wheat germ, and tahini.

I am tempted to make Half-cup Cookies right away, but instead I choose the recipe for Graham Crackers. Why? Grandson visiting. He loves to roll out dough, and we all want him to eat foods that are sort of healthy. These graham crackers are made with whole wheat flour and wheat germ and honey, and contain less sugar than most cookies. Plus, I can mix them up the day before, making less work for what will surely be a busy day.

Graham Crackers

The only change I made to this recipe is how we rolled them out. I like to use half-sheet pans lined with pre-cut parchment paper for baking cookies. So we rolled out the dough directly on to a piece of parchment and then carefully transferred the paper and dough to a half-sheet pan.

Graham Crackers
makes two half-sheet pans, about 40 crackers

  • 3/4 cup butter
  • 1/4 cup honey (85 grams)
  • 1/2 cup brown sugar
  • 1 teaspoon vanilla
  • 3 cups whole wheat flour (I used whole wheat, not white whole wheat)
  • 1/2 cup toasted unsweetened wheat germ
  • 1 teaspoon salt
  • 1 teaspoon cinnamon
  • 1/2 teaspoon baking powder
  • 3/4 cup water

In a mixer, beat together the butter, honey, brown sugar, and vanilla until creamy. Stir together the flour, wheat germ, salt, cinnamon, and baking powder. At low mixer speed, add the flour mixture to the creamed mixture alternately with the water.

Wrap the dough in plastic or put in a sealed storage container and refrigerate at least 1 hour or up to 3 days.

Divide the dough into 2 equal portions. Place one portion of dough on a lightly floured board and press it out as much as you can with your hands. Transfer the dough to a piece of parchment, pre-cut to fit a half-sheet pan (a half-sheet pan is the same size as a cookie sheet). Roll the dough until it goes just past the parchment. (This is tough work! My dough was very stiff. But between the two of us, we got the dough all rolled out.) Trim the dough to match the parchment. It will be about 1/8-inch thick.

Transfer the rolled and trimmed dough and the parchment to a half-sheet pan or to a cookie pan. Cut the dough into 3-inch squares. We used a pizza cutter (a pastry wheel) and my quilter’s long straight edge tool. Then, poke each “cracker” 3 times with a fork.

(Note: we cut the dough before transferring to the pan and it was kind of tricky because the individual crackers moved around.)

Note: Easier way to roll out dough! I baked the second half of the dough a week after the first batch. The dough was very, very stiff, so I heated it in the microwave. It rolled a lot easier! I don’t think the “refrigerate at least 1 hour” step is necessary. Another trick is using a silicone half-sheet liner (I just bought my first Silpat®). The Silpat® was stiff enough to allow me to transfer the cut crackers easily to the half-sheet pan.

Bake at 325˚ for 20-30 minutes. The cookies are done when lightly browned. You might find the crackers at the edges of the pan getting too brown (mine did), so remove edge crackers when necessary. Start checking and removing browned crackers at 20 minutes.

Here are the crackers, ready to be baked:

graham crackers in pan
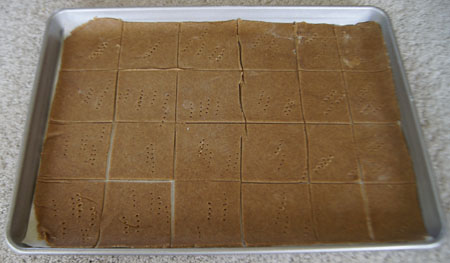
And here is a cooked one on a plate:

graham cracker
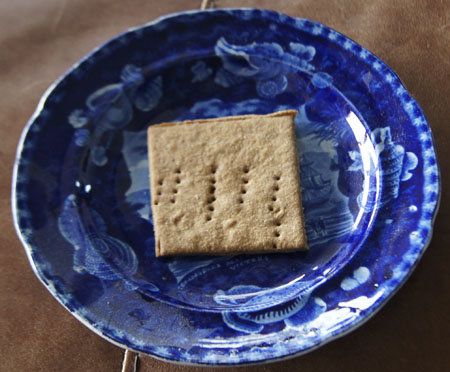
Oh yes, there are not just 3 fork pricks in this cracker! Practicing “one-two-three” with a 4 year old sometimes doesn’t work. But who cares? These were actually delicious, although not all the adults liked them. I thought they were even better the next day, but I doubt the rest of the batch lasted that long – my grandson made sure that he put all his crackers in a bag to take home. I saved this one cracker in the photo above to be sure I had one to take of picture of the next day. Then I ate it!

Successful healthy graham crackers! And a lot of fun. I gave Dzo a tiny child’s camera (that really works!) and he took a photo of the pan of cookies too.

Dzo taking photo of cookies

250 Cookbooks: From Julia Child’s Kitchen

Cookbook #244: From Julia Child’s Kitchen, Julia Child, Alfred A. Knopf, NY, 1975. Second printing, 1982. Hardcover edition.

From Julia Child's Kitchen cookbook
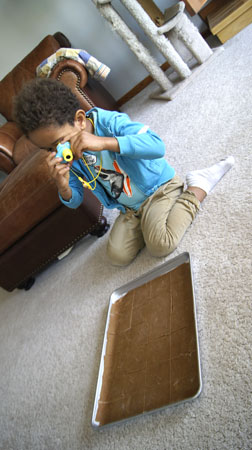
“I smile warmly at Julia Child’s complete love of cooking”. These words were mine when I explored Mastering the Art of French Cooking. And I again smile as I open From Julia Child’s Kitchen.

Fourteen years passed between the (initial) publication of these two books. In 1975, Julia Child has a successful television series and is world renown. And she hasn’t lost her love of cooking. That love bursts from the pages of From Julia Child’s Kitchen. And the photographs! Her husband’s stunning photographs and drawings grace the book.

Let me share the first paragraph from the introduction. It’s a perfect illustration of what the book is about and Julia’s style of writing.

FromJCKitchenIntro
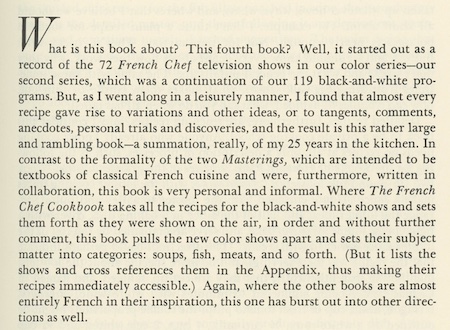
From the above excerpt, we learn that Mastering the Art of French Cooking was written as a textbook, a complete guide, and was written as a collaboration. I used to be a bit intimidated by that first tome. (Now I totally enjoy it!) From Julia Child’s Kitchen is less serious and more fun. Sure, it includes all the important methods of preparing soups, poultry, meats, egg dishes, quiches, homemade sausages, fresh vegetables, French breads, pastries and desserts. But it focuses on the American home cook, with recipes that can be made in a reasonable amount of time and with any level of cooking skill. From Julia Child’s Kitchen also has a chapter on “earthy alternatives”, such as lentils, beans and rice. I find most of the recipes a bit less calorie-laden than in her previous book. And, there are cartoons throughout.

Every chapter and many recipes begin with memoirs of her experiences and travels. Also intertwined are references to her television shows in the 1970s and 1980s. Often a recipe expands on a recipe from a half-hour show that didn’t have time to give all the alternatives.

“Salads, aspics, and summer fare” begins with “Musings upon Caesar and his salad”:

“One of my early remembrances of restaurant life was going to Tijuana in 1925 or 1926 with my parents, who were wildly excited that they should finally lunch at Caesar’s restaurant. Tijuana, just south of the Mexican border from San Diego, was flourishing then, in the prohibition era. People came down from the Los Angeles area in droves to eat in the restaurants; they drank forbidden beer and cocktails as they toured the bars of the town; they strolled in the flowered patio of Agua Caliente listening to the marimba band, they gambled wickedly at the casino. Word spread about Tijuana and the good life, and about Caesar Cardini’s restaurant, and about Caesar’s salad.”

Caesar’s salad! I used to think it originated in Italy. In fact, one of my cookbooks, International Recipes, classified Caesar’s salad as Italian. I have noted recipes for Caesar’s salad in at least four of my cookbooks, and made it for this blog using the recipe in Joy of Cooking. I called that version “a classic Caesar’s, no mushrooms or other vegetables, with the perfect dressing, made on the salad rather than in a bottle.” The Joy of Cooking calls it a famous recipe from California. But no, it is actually from Mexico. At the restaurant with her parents in the 1920s, Caesar himself made the salad for them. She remembers “the only thing I see again clearly is the eggs. I can see him break 2 (coddled) eggs over that romaine and roll them in, the greens going all creamy as the eggs flowed over them.” The salad was a sensation partly because “it was only in the early twenties that refrigerated transcontinental transportation came into being. Before then, when produce was out of season in the rest of the country, there was no greenery to be had. Before then, too, salads were considered rather exotic, definitely foreign, probably Bolshevist, and, anyway, good only for sissies.”

See how I get caught up in this book? Julia goes on to write that she contacted the daughter of Caesar Cardini to get the original recipe for the TV show and for From Julia Child’s Kitchen. Accordingly to Julia, anchovies were not in the original recipe; instead, Worcestershire sauce was used (Worcestershire has a “speck” of anchovy in it). The Joy of Cooking recipe only differs from the recipe in From Julia Child’s Kitchen in the anchovies and the inclusion of a little wine vinegar along with the lemon juice.

Garlicky Sautéed Potatoes is a good example of presentation style of recipes in From Julia Child’s Kitchen. Actually, the full title is “Garlicky sautéed potatoes and a pressure-cooked quickie”. “Pressure-cooked quickie?” Intrigued, I read on. I find the title covers three ways to prepare garlicky potatoes, and the third is the pressure-cooked version:

  • Pommes de terre sautées à la catalane, or Potatoes sautéed with onions, peppers, and herbs
  • Pommes de terre sautées à l’ail, or Potatoes sautéed with garlic and herbs
  • Pommes de terre sautées à la minute, or Fast potatoes with onions and herbs, pressure-cooked

Potatoes sautéed in a stove top pan is a staple at dinners at our house. I never use a recipe, just throw them together. It might be good for me to take some time studying Julia Child’s methods, because sometimes mine turn out good, and sometimes disappointing. And I can compare her recipe for the pressure-cooked version with one I tried previously for this blog entry: Country Style Potatoes.

“Egg Dishes” catches my eye. Remember when I discussed how to boil an egg in Kitchen Science? Well, Julia Child uses the same method. Her discussion of hard boiled – or HB – eggs covers 8 pages! I use a push-pin to poke a whole in the egg, but she actually had an egg-pricker. (They even sell complicated egg prickers online these days.) Continuing with eggs, we come to poached eggs. I use silicone cups to hold eggs to “poach” them in boiling water, but true poached eggs are made by sliding a cracked egg directly into boiling water. She calls poached eggs the “purest and loveliest of ways to cook eggs. I have tried the method of poaching eggs directly in boiling water, but was never successful. But this morning, I carefully studied Julia Child’s method and on my first try, successfully made 4 poached eggs! They were almost perfect! And definitely yummier than the silicone cup method.

At first, I kind of want to make Julia’s Garlicky Sautéed Potatoes for this blog. But then I came across her recipe for Rye Bread. I have a lot of rye flour in my pantry that I should use up, and rye flour is a whole grain flour and thus “good for us”. So I decide to try the rye bread first, and then the potatoes some other time. Below are the first two pages of Julia Child’s recipe for rye bread. The entire recipe goes on for another five pages!

FromJCKitchenRye1FromJCKitchenRye2
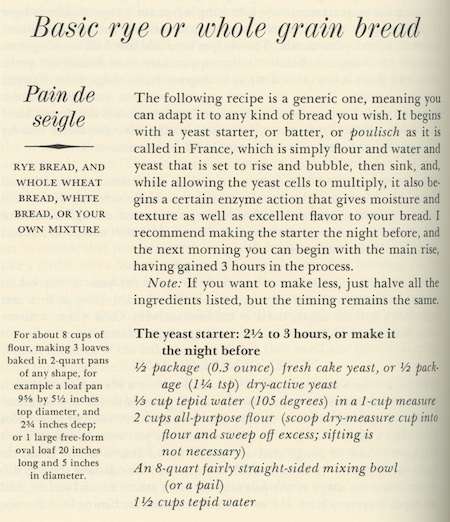
And in the very back of From Julia Child’s Kitchen I find this – what I call very funny – passage in one of the appendices:

FromJCKitchenRye3What tickles me about this? The “or your own holy mixture” clause. Ahem, that’s me! I am always substituting flours like gluten or bread flour or high fiber flour in recipes. And note I have already made three types of rye bread for this blog:

I’ll call my version of Julia Child’s Basic Rye Bread “My Own Holy Mixture Rye Bread”. I will halve the recipe, use my tried-and-true dry active yeast, and a mixture of rye, unbleached white, and gluten flours (see my entry on flours and yeast). I like to add diastatic malt powder (to improve the rise) and caramel color. Finally, I added caraway seeds, because I like them in rye bread. Here is a photo of my malt and caramel:

malt and caramel

My Own Holy Mixture Rye Bread
makes one large 9×5-inch loaf

Yeast starter:

  • 5/8 teaspoon active dry yeast
  • 2 1/2 tablespoons water
  • 1 cup unbleached all purpose flour
  • 3/4 cup water

Stir the yeast into the 2 1/2 tablespoons water until it is dissolved, then stir in the flour and the 3/4 cup flour. Cover the mixture and let it stand at room temperature for at least 2 1/2 hours and up to overnight. Here is how my yeast starter looks the next day:

yeast mixture
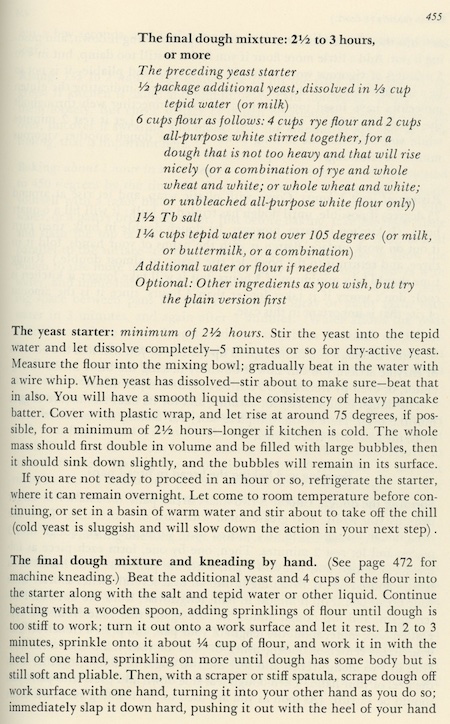
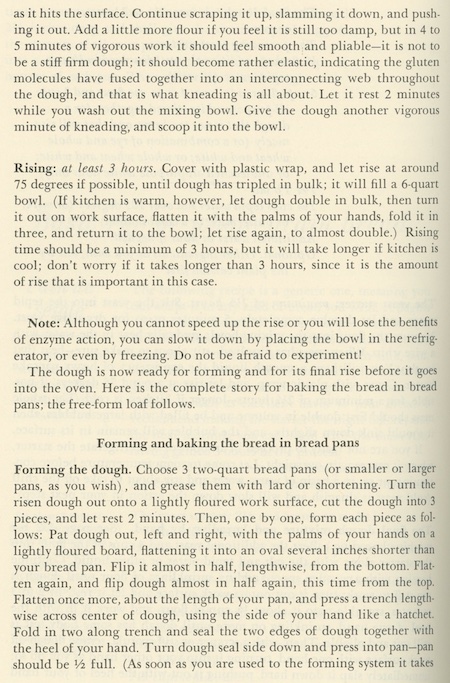
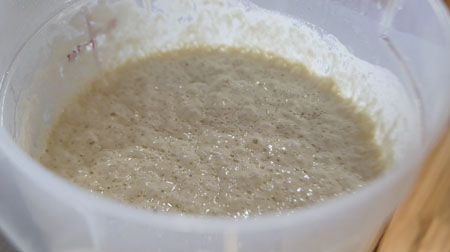
It is just lovely and bubbly and has a wonderful yeasty sour smell.

Final rye dough mixture:

  • the yeast starter mixture, all of it (above)
  • 3/4 cup buttermilk
  • 5/8 teaspoon active dry yeast
  • 2 cups rye flour, or 8 1/2 ounces (I used dark rye flour)
  • 1 cup of a mixture of unbleached AP flour (75%) and gluten flour (25%), or 5 ounces total
  • 1 teaspoon diastatic malt powder
  • 1/2 teaspoon caramel color
  • 1 1/2 teaspoons salt
  • 1 tablespoon caraway seeds (add at the “beep” of the bread machine)

Put all of the ingredients except the caraway seeds into the bowl of a bread machine. Set to a dough cycle that includes a rising step. Start the machine, and monitor the dough a bit to make sure it is forming a big ball of dough. My dough was pretty sticky, but I didn’t add any more flour. From experience with my bread machine and my yeast, I know that a heavy dough like this will give a better rise and texture if left sort of sticky to the touch.

Add the caraway seeds when the machine beeps that it is time for such ingredients, or fold it into the dough when it is finished kneading and rising.

When the dough cycle is complete, remove the dough to a lightly floured board. Fold and press the dough for a minute or so, then form it into a loaf and place it in a lightly greased 9/5-inch loaf pan.

Bake at 375˚ for 25 minutes, then turn the oven to 350˚ and bake another 7-10 minutes, until the top is nicely browned. When done, it should sound hollow when tapped.

Here is my loaf. In my opinion, the amount of dough was a bit too much for the pan, but I would not change this in the future. If you like, experiment with free form loaves as in Julia Child’s original recipe.

rye bread loaf

The texture was a tiny bit moister than my usual whole wheat bread. But, it was entirely delicious! It stayed together as a slice, but was soft and yummy tasting, especially with corned beef or pastrami on it.

rye bread loaf cut

Success!

250 Cookbooks: The Vegetarian Cookbook

Cookbook #243: The Vegetarian Cookbook, Nicola Graimes, Hermes House, Anness Publishing Ltd, London, 2003.

The Vegetarian Cookbook
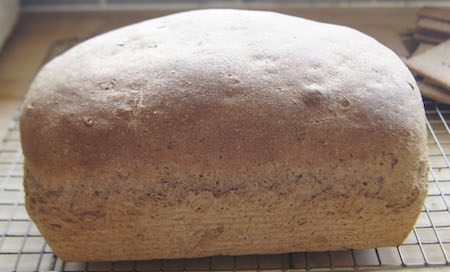
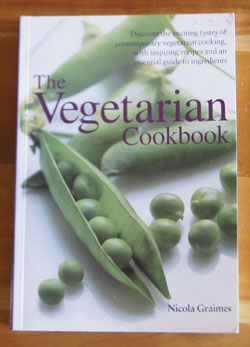
The Vegetarian Cookbook is pleasantly laid out and illustrated, and Nicola Graimes is a personable author. I probably bought this book at a time when my daughter was vegetarian. I don’t think I’ve cooked many – if any – of the recipes in it! Why not? I really can’t tell you.

Nicola Graimes writes in the introduction:

“Vegetarianism is not purely about achieving and maintaining good health. A meat-free diet is enjoyable, delicious and varied. The choice of fresh vegetables, fruit, herbs, noodles, pasta, grains and cheeses is now more extensive than ever before, enabling cooks to experiment with different flavours, textures and colours, and vegetarian food has become a popular cuisine in its own right.”

And, dear spell checker, “flavours” and “colours” is correct in this Britain-published cookbook!

More from Graimes:

“Today, much of our food is processed and bears little resemblance to the original ingredients, so the recipes in this book specify fresh, unrefined foods whenever possible.”

If you have read any of this blog of mine, you will know that I am entirely in agreement with the above statement. So why haven’t I used this cookbook? Time to settle in and give The Vegetarian Cookbook a good reading. The first fifth of The Vegetarian Cookbook is an extensive guide to ingredients, from vegetables to spices and oils and pastas. Useful, but these days I usually rely on the internet instead.

The rest of the book is recipes, most with an international flair. “Soups” is the first recipe chapter, beginning with chilled soups. (I am not a fan of chilled soups.) I do like several of Graimes’ recipes for hot soups. I’d like to try North African Spiced Soup (potatoes, celery, tomatoes, chickpeas, and lots of spices) and Spiced Lentil Soup. Cream of Courgette Soup? A courgette is a zucchini, so it’s cream of zucchini soup. Garlic and Coriander Soup is an interesting concoction of cilantro (coriander), garlic, vegetable stock, bread, and poached eggs. Roasted Vegetable Soup sounds good too. First you roast butternut squash, carrots, parsnip, rutabaga, and leeks, then combine them with vegetable stock, cook, puree, and serve.

So. There are some interesting recipes in this book. Perhaps in 2003 I wasn’t quite as adventurous in my cooking? Not sure. I turn to the appetizers chapter. I like Asparagus in Egg and Lemon Sauce because the sauce would be lighter than traditional hollandaise sauce. To make Twice Baked Gruyere and Potato Souffles you smash cooked potatoes with egg yolks and gruyere cheese, fold in beaten egg whites mixed with gruyere cheese, and bake in ramekins. Corgette Fritters with Chili Jam are fried in a small amount of oil, and the chili jam is home made.

The Vegetarian Cookbook continues with chapters entitled Lunches and Suppers, Fresh and Healthy Dishes, Entertaining in Style, Side Dishes, Salads, and Breads and Savoury Bakes. I noted several recipes I’d like to try: Jamaican Black Bean Pot, Penne Rigate with Mixed Vegetable Sauce, Baked Cheese Polenta with Tomato Sauce (this recipe calls for the polenta “logs” sold in local stores), Pumpkin Gnocchi, Summer Herb Ricotta Flan (crust-less, high protein, low fat), Polenta Crepes, Avocado, Red Onion and Spinach Salad with Polenta Croutons, and Cheese and Courgette Cluster Bread. Champagne Risotto calls for over a cup of champagne! Graimes writes: “This may sound rather extravagant, but makes a beautifully flavoured risotto, perfect for that special celebratory dinner.”

I had fun looking up ingredients I didn’t know. “Puy” lentils are small green lentils with blue marbling. “Borlotti” beans” are oval with red streaks and can be substituted with red kidney beans. “Quorn” is a British meat substitute. “Con chiglie” is a type of pasta, sort of like small shell pasta. “Gem” squash looks like a plump zucchini. “Garganelli” is a penne-shaped pasta. “Kohlrabi” is a vegetable related to cabbage and I’m not sure I’ve seen it in local stores. “Rocket” salad is arugula salad. Some ingredients might be hard for me to find. For instance, one recipe calls for a mixture of both fresh and mature Pecorino cheese – only a store with an extensive cheese collection is likely to carry both. Pickled walnuts? I’ve never noticed these in any local stores. I don’t have a good source of wild or field mushrooms called for in a lot of recipes.

It’s largely Nicola Graimes‘ excitement about her recipes that makes the book enjoyable. A former editor of Vegetarian Living magazine, she has over 20 books to her credit, and is still writing. I might buy her book Superfood Energy Balls & Bites, since I often eat little bites of protein bars throughout a day of work-outs and other activities.

For this blog, I decide to make Walnut Bread, a whole wheat bread with lots of walnuts.

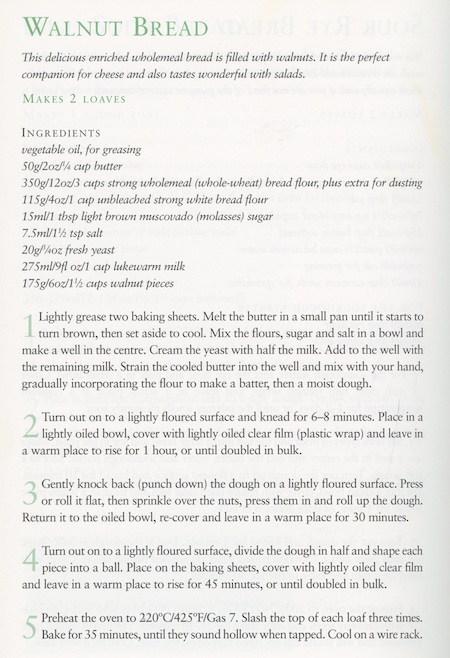
(This book is hard to open out flat enough to follow a recipe while cooking!)

I will make this bread in my breadmaker. For the “strong wholemeal (whole-wheat) bread flour”, I decide to use half whole wheat and half white whole wheat flours, both from King Arthur Flour. For the “unbleached strong white bread flour”, I will use King Arthur unbleached white bread flour, with a touch of vital wheat gluten too. I used turbinado sugar for the “light brown (molasses) sugar”. I made the dough in a single loaf pan rather than two small round loaves. My version of Graimes’ recipe is below.

Whole Wheat Bread with Walnuts
makes one 9×5-inch loaf

  • 1 cup milk (may need a little more, see below)
  • 1/4 cup butter, cut into small pieces
  • 12 ounces whole wheat flour (I used a mixture of whole wheat and white whole wheat)
  • 4 ounces white bread flour (I put a couple tablespoons vital wheat gluten and then added white bread flour to 4 ounces total)
  • 1 tablespoon brown sugar or turbinado sugar
  • 1 1/2 teaspoons salt
  • 2 1/4 teaspoons yeast (1/4 ounce)
  • 1 1/2 cups chopped walnuts

Put all the ingredients except the walnuts in a breadmaker. Set to a dough cycle with a rising step. Watch as the kneading begins – my dough wasn’t forming a firm ball so I added a bit more milk.

When the breadmaker signals that it is done, take the dough out and roll it out. Sprinkle with the walnuts and press them firmly into the dough. Knead the dough several times to distribute walnuts. Then, form into a loaf and place in a 9×5-inch loaf pan.

Let rise until the bread tops the sides of the loaf pan. Bake at 425˚ for 35 minutes.

Walnut Bread Loaf
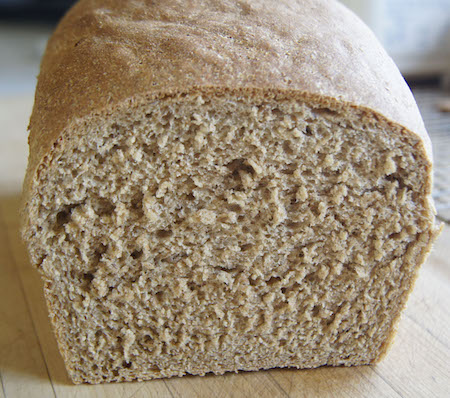
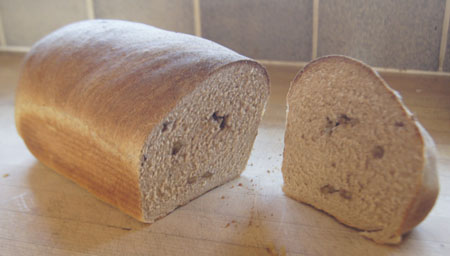
This bread is excellent! I think I found the perfect combination of whole wheat flours to give it excellent flavor and still have good texture – sometimes whole wheat loaves turn out sort of like heavy rocks. The walnuts made me keep wanting to have another bite! Note that this is a good bread for people on a low-carb diet, because it is whole-grain and also has nuts.

I will definitely keep The Vegetarian Cookbook!

250 Cookbooks: My Party Book of Tested Chocolate Recipes

Cookbook #242: My Party Book of Tested Chocolate Recipes, General Foods Corp. – 4012, USA, 2nd Ptg., 1938.

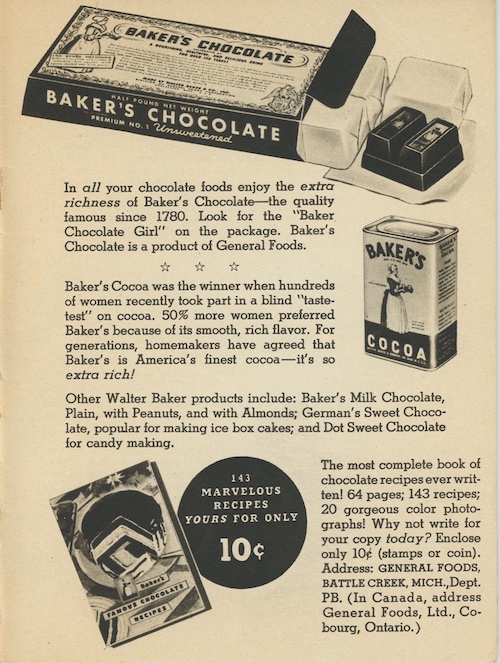
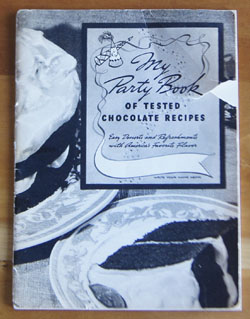
1938. It’s amazing this vintage cookbook has lasted this long! One tear in the front cover is the only flaw. I open to the first page:

“Now what can I serve that everyone likes?” you ask yourself when you plan party refreshments. And if you decide on “something chocolate” you’re sure to be right. For Chocolate is America’s favorite flavor.

As a true American, I do love chocolate, and would love to try every recipe in this cookbook!

Here’s the rest of the first page:

inside cover
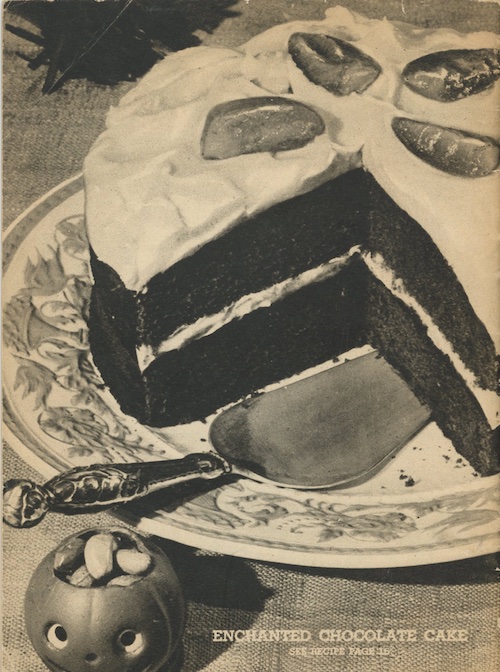
“How to have success with chocolate” is the second page:

success with chocolate
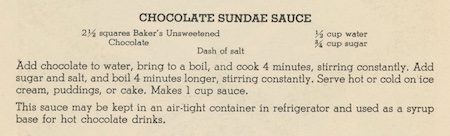
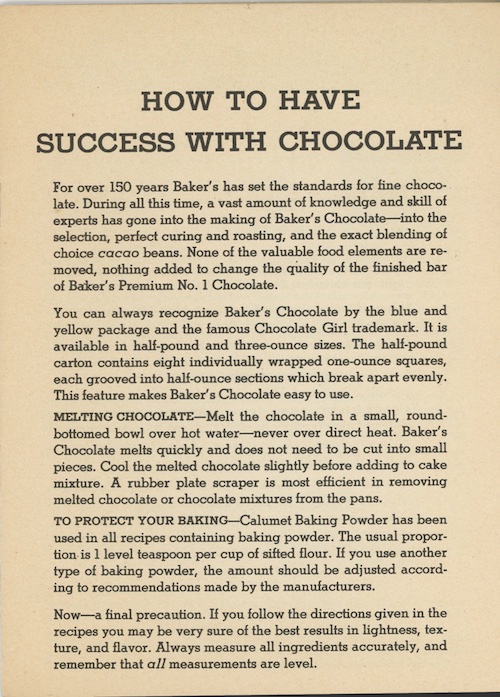
“For over150 years Baker’s has set the standards for fine chocolate”. Since this book was published in 1938, that  means Baker’s Chocolate was formed in 1788 or earlier. Let’s check. I pull up Wikipedia’s entry for Baker’s Chocolate. In 1764, John Hannon and Dr. James Baker of Massachusetts began a business importing cocoa beans from the West Indies. Dr. Baker took over the company in 1780, when Hannon did not return from a sailing trip. Baker renamed the company “Baker’s Chocolate”. So, the claim is correct. Chocolate itself was discovered in meso-America (Wikipedia’s History of Chocolate). The Americas had chocolate before Europe – sometimes I forget that!

The “How to have success with chocolate” page in My Party Book of Tested Chocolate Recipes also asserts “None of the valuable food elements are removed, nothing added.”. My current package of Baker’s baking chocolate lists “chocolate” as the sole ingredient. And today’s package has a nutrition label, so I can check the 1938 claim that it has valuable food elements:

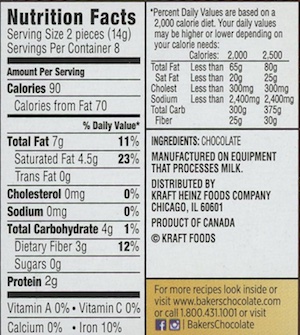
From the above label, we can see that one-half an ounce  of baking chocolate has 90 calories, 78% from from fat, with a small amount of dietary fiber and 2 grams of protein. No vitamin A or C, no calcium, but some iron. Valuable food elements, yes, I guess. But nowadays – unlike 1938 – chocolate, especially dark chocolate, has been found to be chock-full of trace nutrients and antioxidants and more, as in this article on HealthLine.

I learn from a web search that baking chocolate (unsweetened chocolate or bitter chocolate) is cooled, hardened chocolate liquor, which is melted ground cocoa, and it contains between 50 and 58 percent cocoa butter. On the other hand, unsweetened cocoa powder has 46 grams of fat in one-half ounce, 50% from fat. It is made from roasted cocoa beans that are ground into a fine powder.

Baker’s unsweetened chocolate is no longer sold in a “blue and yellow package” but the “famous Chocolate Girl trademark” is still on it. Today the package is yellow, orange, and brown. I included this package in the photo I took of the recipe ingredients, below on this page.

Ironically, my package also indicates that Baker’s chocolate is now manufactured in Canada.

Just one more comment on the “How to have success with chocolate” page. Baking chocolate used to be sold in eight ounce packages, specifically, each package contained 8 individually wrapped squares of 1-ounce each. This is an important fact, since older recipes call for “1 square of baking chocolate”. Current packages are not individually wrapped, but I will remember that “1 square of baking chocolate” means “1 ounce”. (This fact is also on the currently-sold packages of Baker’s baking chocolate.)

Where did I get this cookbook? I think I got this from my mother’s collection, or perhaps it was my grandmothers. No recipes are marked. Today I find it available on several online used-book stores for about 3 dollars. And, full text is available on the Hathitrust website.

Here are some examples of recipes.

I decide to Chocolate Sundae Sauce for this blog.

This ought to be a good project for my 4 year old grandson to help me with. He loves mixing things! Plus it will be special to have homemade sundae sauce over ice cream for a simple dessert for all of us.

Chocolate Sundae Sauce
1 cup sauce

  • 2 1/2 ounces unsweetened baking chocolate
  • 3/4 cup water
  • 1/2 cup sugar
  • dash of salt

Put the chocolate and the water in a sauce pan. Bring to a boil and cook 4 minutes, stirring constantly. Add the sugar and salt and boil 4 minutes longer, stirring constantly. Serve hot or cold over ice cream.

We get all the ingredients together:

ingredients for chocolate sauce
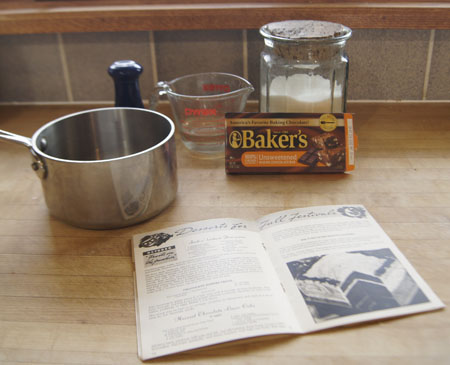
Here’s my helper, doing the stirring chores!

Dzo stirring the chocolate sauce
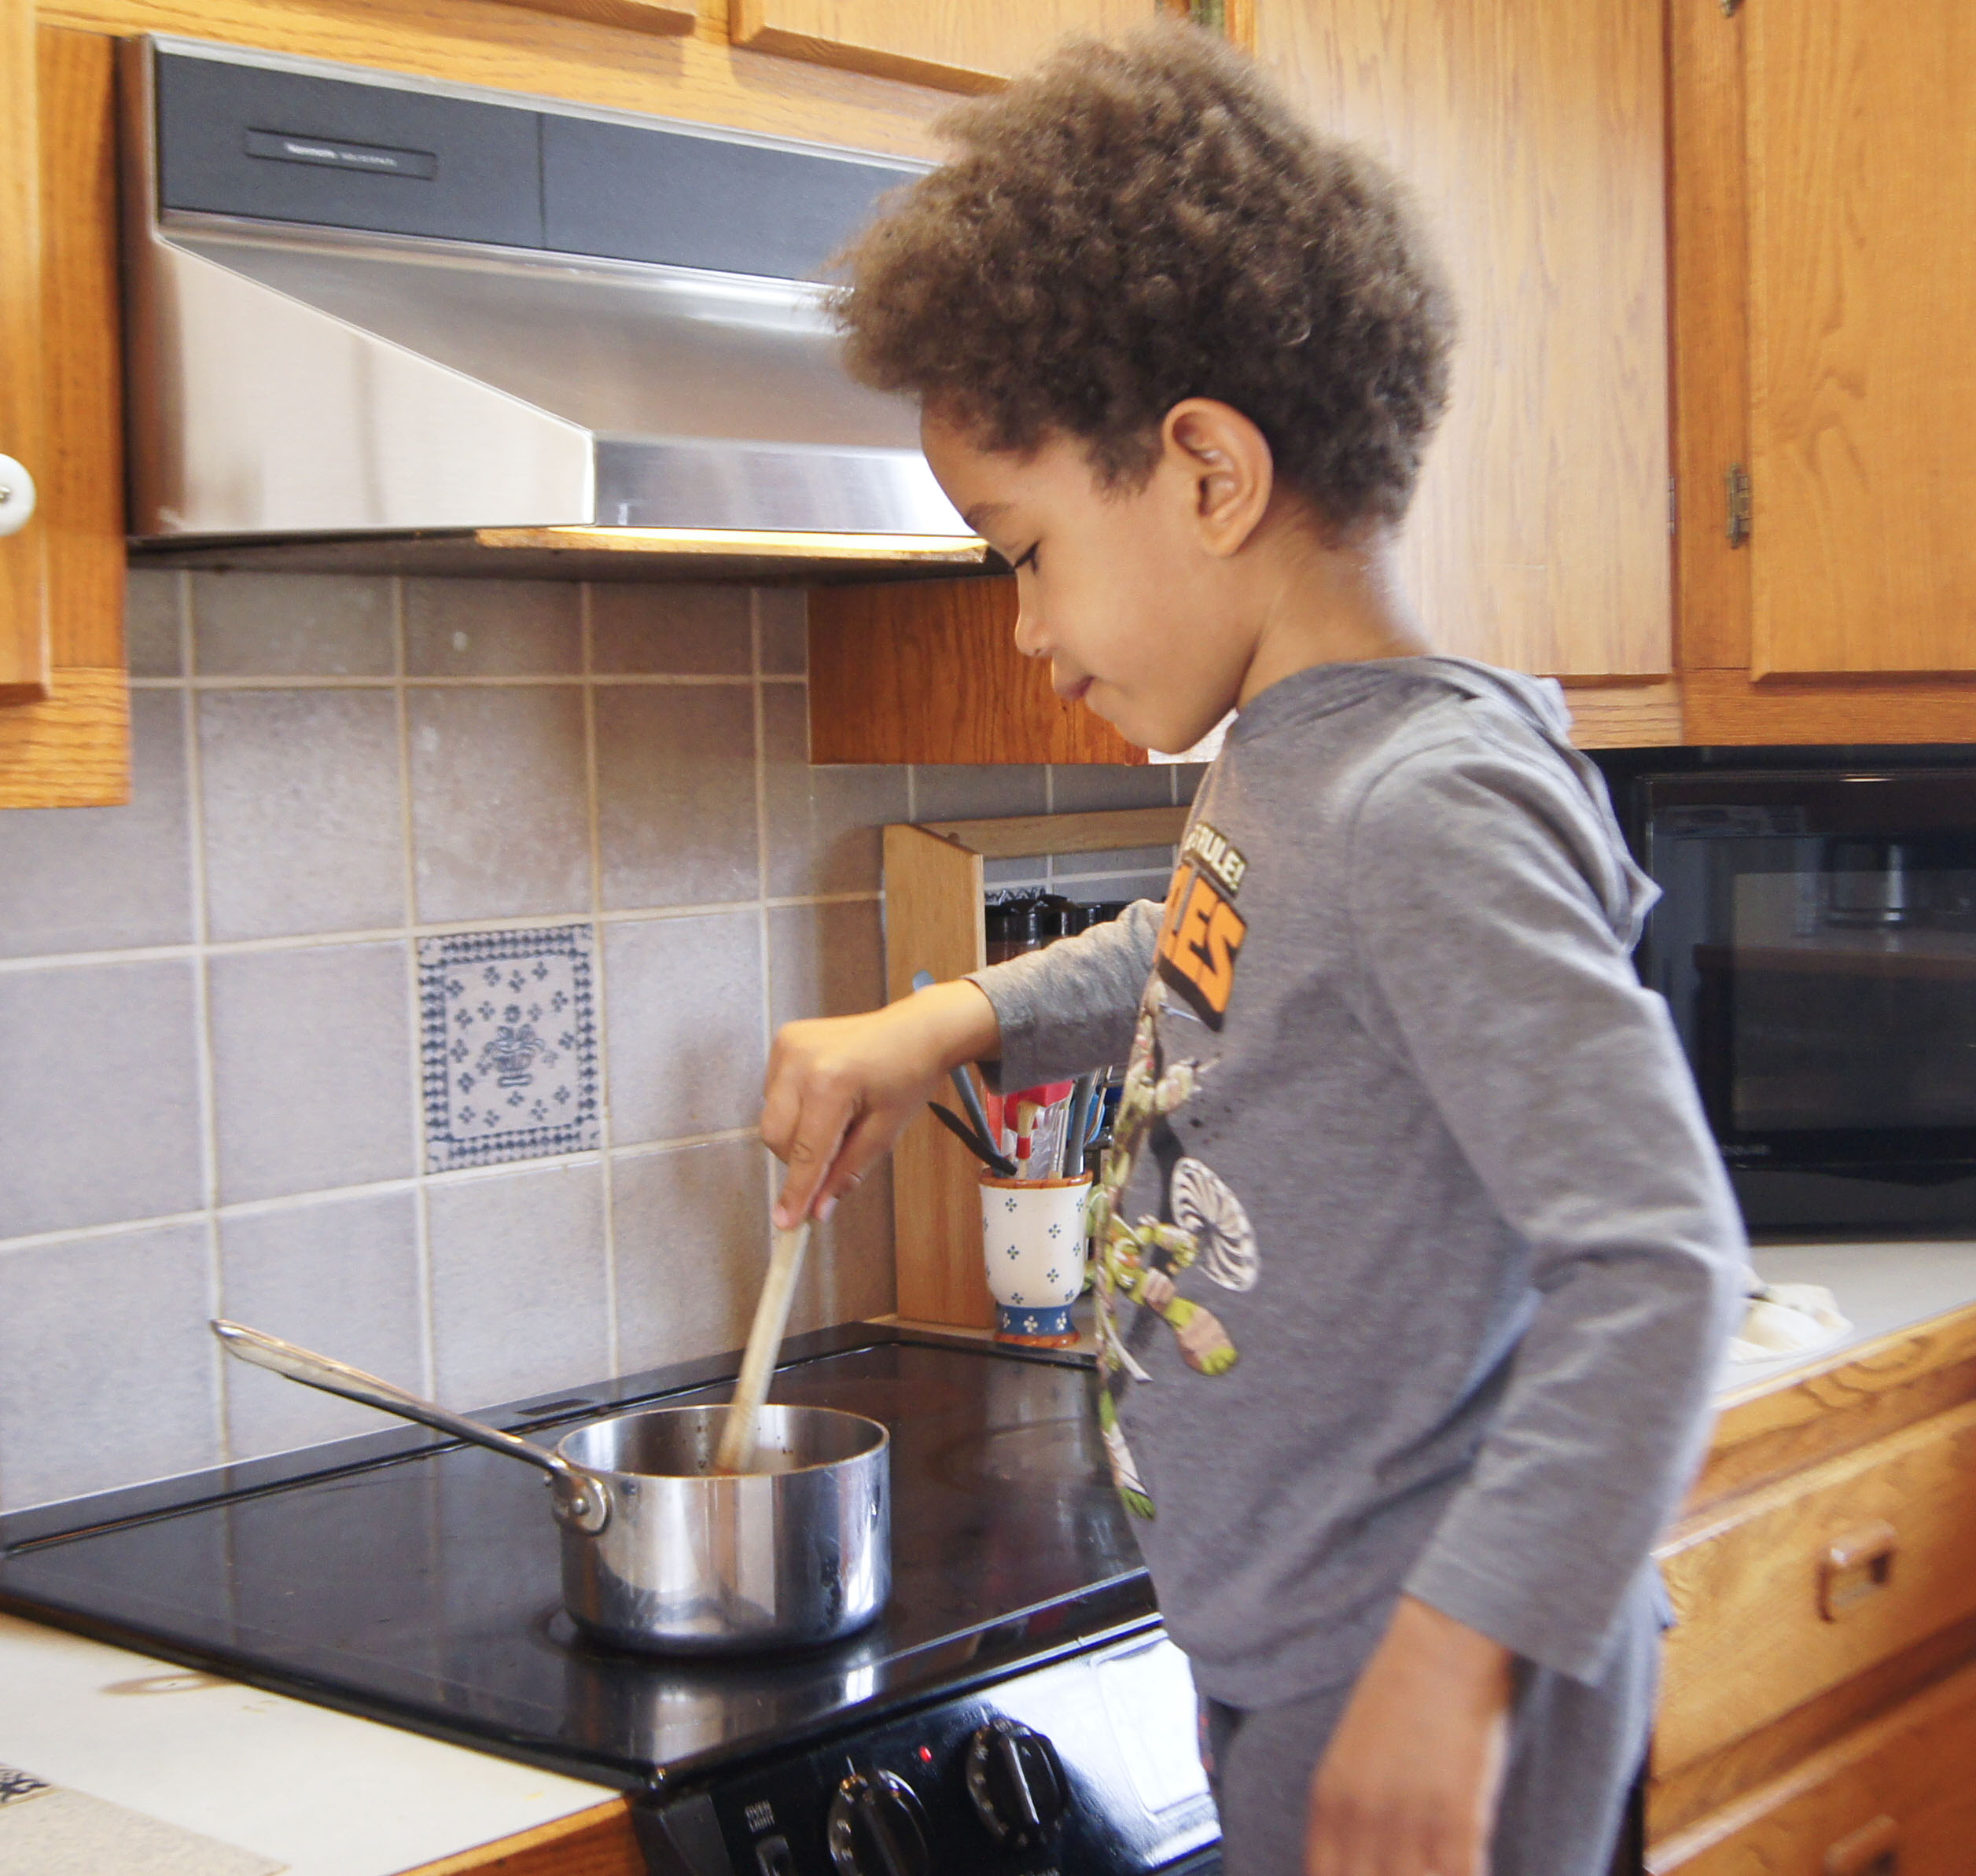
Later, after dinner, we enjoyed the sauce over vanilla ice cream and berries.

Chocolate Sauce over ice cream
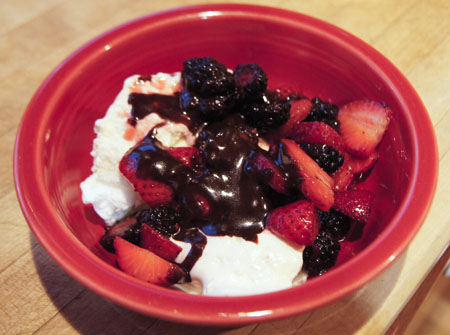
Yum yum yum! It was pretty special to have our own homemade sauce.

This sauce will store – we had a little left over. The next day it was stirrable at room temperature, but pretty thick, and would not pour unless heated. Not a real problem, just heat in a microwave oven – a convenience that was not available in 1938.

Below are scans of the front cover, back cover, and the inside-back cover.

250 Cookbooks: Crock Pot Stoneware Slow Cooker

Cookbook #241: Crock-Pot® Stoneware Slow Cooker, Owner’s Guide, Rival, JCS/THG (The Holmes Group), 2006.

Crock-Pot Stoneware Slow Cooker cookbook
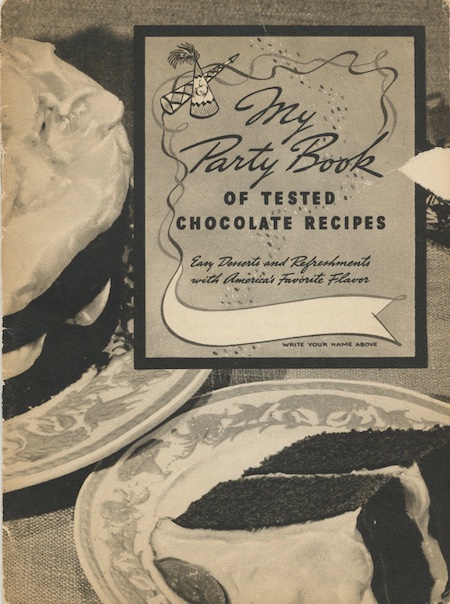
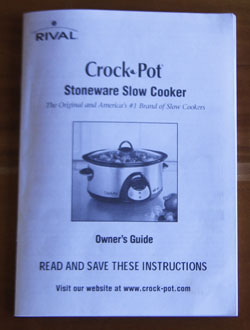
This is my current crock pot. It replaced a nearly-broken one in about 2006. This one has a removable stoneware crock that makes it easy to clean, a high-low setting, and a timer. This is my first crock pot with a timer, and I’d always get one like this from now on.

This is the last of my 11 crock pot cookbooks. Below is a list of those cookbooks and their publication dates, in the order that I covered them for this 250 Cookbooks blog. Crock pots are also called slow cookers, crockery cookers, or stoneware slow cookers. (I am reminded by Crock-Pot® Stoneware Slow Cooker that “Crock-Pot®” is a registered trademark.)

Crock-Pot® Stoneware Slow Cooker is a small booklet, 5×7-inches, 15 pages. Instructions and warranty take up 6 1/2 pages, and recipes 8 1/2 pages. I count 23 recipes. (Actually, there is another 15 pages, but those are upside down and in French.)

I am going to keep this cookbook, largely because it has “official” instructions and also warranty information. And also, the handful of recipes really look like they will “work”. If you read any of my other crock pot posts, you will know that I think crock pots turn good food into indiscernible mush with a bad recipe.

I find this in the question and answer section of the instructions:

QCan I cook a roast without adding water?
A Yes – if cooked on LOW. We recommend a small amount because the gravies are especially tasty. The more fat or “marbling” the meat has, the less liquid you need. The liquid is needed to properly soften and cook vegetables.

This hits home to me, because lately I have been slow-roasting beef roasts in the oven. I might try my crock pot next time.

The first recipe in Crock-Pot® Stoneware Slow Cooker is for Pot Roast of Beef. Someday I’d like to try this recipe and compare/contrast with the method I now use from Cook’s Illustrated (Cover and Bake).

The second recipe is for Beef Bourguignon, and that is what I’ll make for this blog. Another recipe I have my eye on is Chicken With 40 Cloves of Garlic, something I’ve always wanted to make. I might also consult the recipes for meat loaf, pork chops and roast, whole chicken, Swiss steak, French onion soup, jambalaya, and game hens (roasted with no added water).

Here is the recipe for Beef Bourguignon:

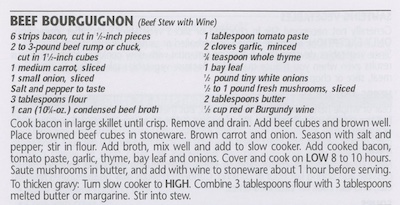
My version is below. I added more stock and more wine, and found that these changes gave just the right amount and thickness of gravy at the end. I used double the amount of tomato paste. I did not add the 3 tablespoons butter plus 3 tablespoons flour at the very end to thicken the broth, but I suggest you do that if you want a really thick gravy.

Beef Bourguignon
serves 6-8, and freezes well

  • 6 strips of bacon, cut in 1/2-inch pieces
  • beef rump, chuck, or cross-rib roast, around 3 pounds, trimmed of fat and cut into 1 1/2-inch chunks
  • 1 carrot, sliced
  • 1 onion, chopped
  • 3 tablespoons flour
  • 2 cups beef stock
  • 1 cup (about) red wine; divided
  • 2 tablespoons tomato paste
  • 2 cloves garlic, minced
  • 1 teaspoon dried thyme, or a few sprigs fresh thyme
  • 1 bay leaf (I used a big fat one recently purchased at Savory Spice Shop in Boulder)
  • 1/2 pound tiny white onions (you could leave these out, but I like them; the ones I used were frozen)
  • salt and pepper to taste
  • 1/2 pound fresh mushrooms, sliced
  • 2 tablespoons butter

Cook the bacon until crisp. Drain and set aside.

In a clean pan, use a little bit of the bacon grease to sauté the beef chunks. Do this in batches and at fairly high heat. (You can anso brown the beef in the pan used to cook the bacon.)

Place the browned beef chunks and the cooked bacon in the crock pot.

Add a bit of oil or bacon fat to the pan used to brown the beef, then add the carrot and onion and cook until brown. Add the 3 tablespoons flour and mix in as well as possible, then add the beef broth; mix well and add the vegetable-broth mixture to the crock pot.

Add about half the wine, the tomato paste, garlic, thyme, bay leaf, and tiny white onions to the crock pot. Add salt and pepper to taste. Stir to mix.

Cook on low for 8-10 hours (in my crock pot, the meat was tender at 8 hours). An hour before serving, sauté the mushrooms in the butter, and add them and some more red wine to the crock pot and continue slow-cooking. (Remove the bay leaf and any fresh thyme sprigs before serving.)

Serve!

Beef Bourguignon
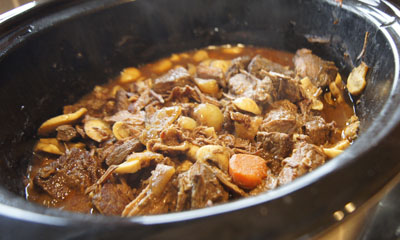
This was totally yummy. I loved the rich, dark broth-gravy. I am glad I didn’t add the flour/butter mixture at the end to thicken the gravy. It was rich and thick enough for me as it was – it was indeed “especially tasty”. I’m also glad I added more wine than called for in the recipe. I liked the sautéd mushrooms added for the last hour – their texture and flavor were not lost by 8 hours of cooking.

To serve, I cooked some potatoes, carrots, and peas and stirred them into our servings of bourguignon. I often like stew prepared with potatoes added later, because for the two of us, I usually cook a lot of stew-type meat at once and freeze some for another meal, and potatoes do not keep their texture after freezing. Also, this method opens up variations: you could serve the bourguignon over mashed potatoes, pasta, rice, gnocchi, polenta – you name it. Or keep it without added carbs for a nearly low-carb meal.

I get to enjoy this delicious bourguignon a few more times, and quickly, by thawing the portions I stowed away in my freezer. This recipe was a success!