1990s blog: Chocolate Peanut Butter Cup Cookies

1990s note: These are absolutely deadly. Make them for someone who loves Reese’s Peanut Butter Cups!

Chocolate Peanut-Butter-Cup Cookies

  • 1 cup margarine
  • 3/4 cup smooth peanut butter
  • 3/4 cup brown sugar
  • 3/4 cup white sugar
  • 2 eggs
  • 1 teaspoon vanilla
  • 2 1/4 cups flour
  • 1 teaspoon baking soda
  • 1/2 teaspoon salt
  • 1/3 cup unsweetened cocoa powder
  • 5 2-oz. pkgs peanut butter cups, each cup cut into 8 pieces*
  • 6 oz. chocolate chips (1 cup)

Beat margarine, peanut butter, sugars, and vanilla until light and fluffy. Add eggs, one at a time. Reduce speed to low and add mixed dry ingredients. Stir in peanut-butter-cup pieces and chocolate chips. Bake at 350° for 8 minutes until dry and slightly firm to touch.

Makes about 4 dozen.

*You can miniature peanut butter cups. I used these once, and unwrapped them, and weighed out 10 oz. Then, I cut each one in half.

cookies graphic

Please refer to my Cookie Recipe Basics to make sure your cookies turn out!
Read the introduction to my 1990s cooking blog for background information.

1990s blog: Drop Cookies

1990s note: This recipe came from my college roommate way back when. It is one of the few cookies that I like that do not contain chocolate!

2012: I haven’t made these for awhile, but if I was to make a non-chocolate cookie, this or a ginger cookie would be my choice. Ooh, that’s what makes these so good, all brown sugar! And nuts, raisins, and spices.

And the simple recipe title, “Drop Cookies”, makes me smile. I ranted a bit about long recipe titles in my discussion of The New Pasta Cookbook. If I were pretentious, I would re-name these cookies “Brown Sugar and Spice Cookies with Nuts and Raisins”.

Drop Cookies

  • 1 cup Crisco
  • 2 cups brown sugar
  • 3 eggs
  • 1 teaspoon vanilla
  • 3 cups flour
  • 1 teaspoon baking soda
  • 1/2 teaspoon salt
  • 1/4 teaspoon cloves
  • 1/4 teaspoon nutmeg
  • 2 teaspoons cinnamon
  • 1 cup nuts
  • 1 cup raisins

Cream Crisco, add brown sugar and then eggs and vanilla. Combine dry ingredients and slowly add to creamed mixture. Stir in nuts and raisins.

Bake at 350° for 10 minutes.

cookies graphic

Please refer to my Cookie Recipe Basics to make sure your cookies turn out!
Read the introduction to my 1990s cooking blog for background information.

1990s blog: World’s Best Peanut Butter Cookies

The title says it all. A good basic peanut butter cookie with chocolate chips and peanuts. Wish I could eat them all day! When making these to give away, I would probably buy creamy peanut butter, but for home use, I always just use chunky peanut butter. And Skippy or a similar brand, not a “health food store” or fresh ground peanut butter.

World’s Best Peanut Butter Cookies

  • 1 cup margarine
  • 1 cup peanut butter
  • 1 cup sugar
  • 1 cup brown sugar
  • 2 eggs
  • 2 cups flour
  • 1 teaspoon baking soda
  • 1 cup chocolate chips
  • 1/2 cup chopped, roasted peanuts

Cream margarine and peanut butter, the add the sugars. Add eggs, one at a time, and beat until creamy. Add the baking soda to the flour and stir to mix, then add this dry mixture to the creamed mixture. Stir in chocolate chips and peanuts.

Drop by teaspoonfuls onto greased baking sheets and flatten slightly with the back of a fork (this both flattens and decorates the cookies).

Bake at 350° for 15-20 minutes. Makes 6-7 dozen.
cookies graphic

Please refer to my Cookie Recipe Basics to make sure your cookies turn out!
Read the introduction to my 1990s cooking blog for background information.

1990s blog: Oatmeal Chip Cookies

1990s note: I’ve made these about a zillion times. The original recipe is from my Mother. Try using 2 cups of M&M’s, too!

2012 note: These are the cookies I have made more than any of my other recipes. I must have made them in college, since one of my college roommates mentioned on Facebook that she calls them “Patty’s Cookies”! I have slightly nudged the original recipe, using a couple tablespoons more flour and more chocolate chips than is written on the recipe card that reflects my mother’s original recipe.

Oatmeal Chip Cookies

  • 1 cup margarine
  • 1 cup white sugar
  • 1 cup brown sugar
  • 2 eggs
  • 2 cups plus 2 tablespoons flour
  • 1 teaspoon baking soda
  • 1 teaspoon salt
  • 2 cups oats (quick)
  • 1 cup chopped nuts
  • 1 12-oz. package chocolate chips (about 2 cups)

Cream margarine, gradually add white and brown sugars, creaming well. Blend in eggs, then add dry ingredients and mix thoroughly. Stir in oats, nuts, and chocolate chips.

Bake on ungreased sheets (or use parchment-lined baking sheets) at 375° for 9-12 minutes.
cookies graphic

Please refer to my Cookie Recipe Basics to make sure your cookies turn out!
Read the introduction to my 1990s cooking blog for background information.

1990s blog: Chocolate Chews

This is a recipe that my mother made for us when we were kids and then I made for my own kids. They are chocolate-nut cookies, rolled in powdered sugar before baking to make them pretty. A good old standby.

Chocolate Chews

  • 1/2 cup solid vegetable shortening (Crisco)
  • 1 2/3 cup sugar
  • 2 teaspoons vanilla
  • 2 eggs
  • 2 1-oz. squares unsweetened baking chocolate
  • 2 cups flour
  • 2 teaspoons baking powder
  • 1/2 teaspoon salt
  • 1/3 cup milk
  • 1/2 cup nuts
  • powdered sugar (to roll the cookies in)

Cream Crisco, sugar, and vanilla. Add eggs and chocolate. Combine dry ingredients, then add to creamed mixture alternately with milk. Stir in nuts. Chill dough 2 hours.

Form in balls about 3/4-inch in diameter and roll in powdered sugar.

Bake at 350° about 10 minutes.
cookies graphic

Please refer to my Cookie Recipe Basics to make sure your cookies turn out!
Read the introduction to my 1990s cooking blog for background information.

Cookie Recipe Basics

Aside

Cookie Recipe Basics

Shortenings

In all of my cookie recipes, do not substitute one type of shortening for another. If it says “margarine”, do not use butter. If it says “vegetable shortening”, do not use margarine. I can’t guarantee a recipe will work if shortening substitutions are made. In general, I am not a fan of margarine, but if you are going to make cookies, you want them to turn out as good cookies.

Mixing batter

Most drop cookie batters begin with mixing the shortening and sugar, and then adding eggs. I always use a stand mixer and beat the shortening and sugar on high until fluffy,  lower the speed to crack in the eggs, and beat again blend on high until fluffy. Then, add the combined dry ingredients and mix only until they are all mixed in.

Flour

Unless otherwise stated, I use unbleached all-purpose flour for cookies. I always measure flour for cookies by dipping a measuring cup into a large canister of flour and shaking it level. This isn’t the most scientific or re-producible method, but that’s what I do. Occasionally I’ll add a little more flour to a batter if the first pan of cookies flattens out too much.

Mixing dry ingredients

I don’t sift. I do mix with a spoon the flour and other dry ingredients (baking powder, baking soda, salt, spices) in a bowl. I use all purpose flour.

Melting chocolate

I often use the microwave. I use the high setting and check and stir every half a minute. If melting chocolate with butter or margarine, it’s often more convenient to use a pan on the stove top.

Miscellaneous ingredients

Use real chocolate chips and real vanilla.

Baking

Many of my older recipes state to bake either on greased or ungreased baking sheets. Today (2012), I bake all cookies on parchment lined half sheet pans. I haven’t re-made some of the older recipes, so some of the greased/ungreased nomenclature may be included in the recipes. It actually can make a difference in how the cookies “bake up”, meaning, how much they spread out as they bake.

And always preheat your oven before putting in the cookies.

1990s blog: Irresistible Low-Fat Chocolate Brownies

1990s note: This recipe was on a can of sweetened condensed milk, ages ago. These are great! No one will know that they are low-fat.

Today: This is (still) my “go-to” recipe when I want something very chocolatey but also calorie controlled. For instance, on a Valentine’s Day, I baked these in small heart-shaped pans (lined with parchment). To serve, I drizzled each plate with chocolate syrup, added the heart-shaped brownie, dusted with powdered sugar, spooned on a little low-fat topping, and garnished with fresh sliced strawberries and mint leaves. Elegant, chocolatey, and not too many calories.

Irresistible Low-Fat Chocolate Brownies

  • 1 14 oz. can low-fat sweetened condensed milk
  • 1/3 cup unsweetened cocoa
  • 4 egg whites
  • 1/4 cup flour
  • 1 teaspoon baking powder
  • 3/4 cup chocolate chips (can use bittersweet for extra chocolate punch)
  • 1 teaspoon vanilla

Combine the low-fat sweetened condensed milk, cocoa, and chips and microwave until the chips melt. Stir in remaining ingredients.

Bake in 13×9″ pan, which has been sprayed with non-stick spray, for 20 minutes at 375˚ or until center is set.

Makes 18, 120 calories and 3 g fat each.Low-fat Brownies

Please refer to my Cookie Recipe Basics to make sure your cookies turn out!
Read the introduction to my 1990s cooking blog for background information.

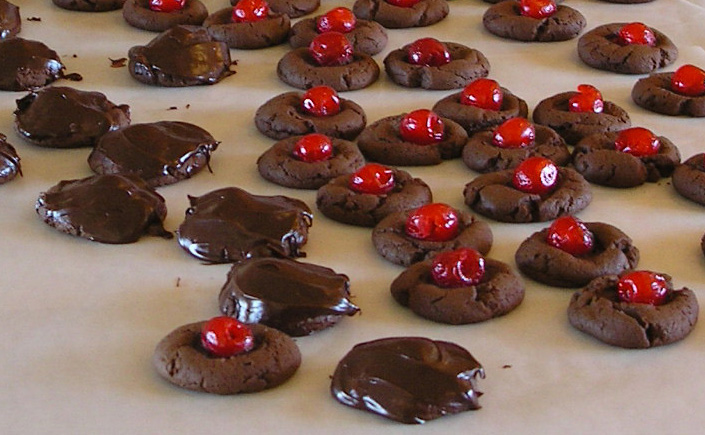
1990s blog: Chocolate Covered Cherry Cookies

Hoo-boy, these are the ultimate cookies. My signature cookies, I would say. I always made these for Christmas. I even wrote about them in my “other” blog, the one I began in 2005, and where I still discuss other-than-food matters (unless a food matter just can’t be resisted). If you go to that old entry, be sure to click on the photo to enlarge it.

1990s note:
I clipped this recipe from a magazine years ago. Since then, they have become my “trademark” cookie. I have never seen this recipe anywhere else — and it is excellent! Lotsa chocolate and cherries — they even freeze well and are even good and soft eaten frozen. The version below reflects years of tweaking from the original magazine recipe.

2015 note:
I found the original of this recipe in the “Best You Can Bake” Chocolate Desserts cookbook.

Batter:

  • 1 1/2 cup margarine
  • 3 C sugar
  • 3 eggs
  • 1 1/2 tablespoons vanilla
  • scant 4 cups flour (about a tablespoon less than 4 full cups)
  • 1 1/2 cup unsweetened cocoa powder
  • 3/4 teaspoon salt
  • 3/4 teaspoon baking powder
  • 3/4 teaspoon baking soda

Goodies:

  • 28 ounce jar maraschino cherries. This will probably be more cherries than you need. And just get the non-health-food-store type of maraschino cherries. Eating these once in a while isn’t a death sentence. You need some of the cherry juice for the frosting.

Frosting:

  • 36 ounces chocolate chips
  • 3 cups sweetened condensed milk. One 14-ounce can has 20 tablespoons; you need about 2 1/2 cans.
  • 1/2 cup plus 1 tablespoon cherry juice (from the drained maraschino cherries)

Begin by draining the maraschino cherries through a colander, reserving the juice. After you drain them, place them on a double layer of paper towels and roll them around until most of the juice is gone. This is a really important step. Let them continue drying as you prepare the batter.

Cream the margarine and sugar, the add the eggs and vanilla. In a separate bowl, mix the dry ingredients and stir to combine. With the mixer on a low speed, add the dry ingredient mixture to the creamed mixture in portions (so as not to make a big mess). Mix just until all of the dry ingredients are incorporated.

Place a piece of parchment on a cookie sheet or half-sheet pan. Heat the oven to 350˚.

Shape the dough into 1″ balls and place on the prepared cookie sheet. Push down the center of each ball with your thumb, then place 1 cherry in the indentation.

Bake 10 minutes at 350°. Do not overcook!

To make the frosting, put the chocolate chips and sweetened condensed milk and cook on high in the microwave until chocolate melts.This takes several minutes; check the melting process by stirring. When all of the chocolate is melted, stir in the cherry juice. Add a little more cherry juice if the frosting is too thick.

When the cookies are cool, you can start frosting them. I always lay them out on the counter on sheets of wax paper. Then, I pick up a cookie, hold it over the bowl of frosting, and completely cover the cookie with frosting, and place it back on the wax paper to cool.

Chocolate Covered Cherry CookiesLet the cookies stand in a single layer over night to let the frosting set completely before you pack them into containers. This recipe makes about 6 dozen cookies. They are great fresh, and they also freeze well. You can eat them frozen!

Please refer to my Cookie Recipe Basics to make sure your cookies turn out!
Read the introduction to my 1990s cooking blog for background information.

1990s blog: Marbled Chocolate and Cream Cheese Brownies

cookies graphic2012 note: Above is the graphic I used for cookie recipes in my original 1990s blog recipe. I had purchased a package of gif images to illustrate my old site. I’m not an artist! And I didn’t have a DSLR camera to play with then. I also had a rather bright green background color to each page. (It glares at me now.)

These are great brownies. For years, they were a favorite choice to take to TA meetings at the end of each semester. They are moist and chocolatey. I usually double the recipe and bake in a 10×15″ pan.

Marbled Chocolate and Cream Cheese Brownies

Chocolate Batter:

  • 1/2 cup margarine
  • 1 cup sugar
  • 2 eggs, lightly beaten
  • 3 1-ounce squares unsweetened chocolate
  • 1 teaspoon vanilla
  • 1/2 cup flour
  • 1/4 teaspoon baking powder
  • 1/4 teaspoon salt

Cream Cheese Batter:

  • 3 ounces cream cheese, softened
  • 2 tablespoons sugar
  • 1/2 teaspoon vanilla
  • 2 tablespoons margarine, softened
  • 1 egg
  • 2 tablespoons flour

Heat oven to 350°. Grease and flour a 9″ square baking pan (glass is preferred).

Prepare chocolate batter: Melt butter and chocolate, stir in sugar and vanilla. Add eggs; stir until well blended. In small bowl combine 1/2 cup flour, baking powder, and salt; stir into chocolate mixture until smooth. Set aside.

Prepare cream cheese batter: In small bowl, beat cream cheese, butter, sugar, egg, and vanilla until smooth. Blend in flour.

Alternately add spoonfuls of chocolate and cream cheese batter to prepared pan. Using a thin metal spatula, gently twist through batter to create marbled effect. Bake 25-30 minutes until wooden pick inserted in center comes out clean. Cool in pan on wire rack.

If you double this recipe, use a 10×15″ glass pan, and bake 30-35 min.

Please refer to my Cookie Recipe Basics to make sure your cookies turn out!
Read the introduction to my 1990s cooking blog for background information.

1990s blog: Introduction

I first put some recipes on the web in about 1997. In that year, I created and maintained a website (and server) for students of organic chemistry teaching labs. I tucked a personal website on the same server, and then uploaded my favorite recipes. It wasn’t a true blog – but that’s only because the word blog was not coined until 1999.

I still like the content of my first website, so I am going to pull it into this current WordPress blog. Below is my old site introduction. Hey, I haven’t changed much!

Date written: circa 1997
I have been collecting and cataloguing recipes for many, many years. The Net allows me to share them with all you Web Crawlers looking for something new to cook!

[I then listed my recipe categories in this order: cookies, desserts, yeast breads, muffins, quick breads, main dishes]

Think the order’s backwards? I don’t. That’s part of my philosophy of cooking: always think of dessert first. You just eat the rest so you can eat dessert, anyway. Which brings us to …

My Philosophy of Cooking

Each person develops their own cooking “style”. Many factors determine how you cook: what you like, what your spouse likes, what your kids like, how weight-conscious you are, what part of the world you are from, how your family cooked while you were young, how much a part of your life food is, how much you like to cook, whether or not you like to follow recipes to a “t”, how much you like to experiment . . . on and on. Each cook has a unique cooking personality. It follows that each person’s recipe collection reflects their cooking personality.

My cooking personality? I began cooking only desiring to bake cookies, cakes, and pies. But, the old family metabolism kicked in, and I had to watch those calories. So, I began baking breads. Since I liked to cook but couldn’t survive on dessert and bread alone, I looked to main dishes. I enjoy spending time in the kitchen, pots a-bubbling and bread a-baking, so some of my recipes take a lot of time. But, some don’t, since I work full time, and refuse to eat food from a fast food restaurant or a package. You won’t find any vegetable or salad recipes in my collections, because we like our vegetables as close to raw as possible, untainted by cooking or heavy dressings. We eat a salad each night with dinner, consisting of a variety of lettuces and raw vegetables. Cooked vegetables? Steamed lightly, only, with a sprinkling of almonds or lemon, perhaps. Soups? I just throw anything I feel like into the pot, rarely following a recipe. Traveling through the late sixties and the seventies, I picked up many ideas from natural, “health food” cooking. These ideas tamed down a bit with the years, trading health food ideas for what my family would actually eat, and then expanding to include the low-fat nutrition ideas which are currently so popular.

My collection includes only recipes that I really like and that I make frequently. I didn’t just gather the recipes from cookbooks and throw them into a database: it’s a very personal collection. Each recipe is prepared several times and modified if necessary before I deem it good enough to be made a permanent part of my collection.

I hope that a few of my recipes will overlap with your own cooking personality and that you will enjoy them as much as I do!

…Never Trust a Skinny Cook….