250 Cookbooks: Quick and Easy Recipes

Cookbook #34: Quick and Easy Recipes. California Home Economics Teachers, California Cookbook Company, Orange, California, 1986.

Quick and Easy Recipes
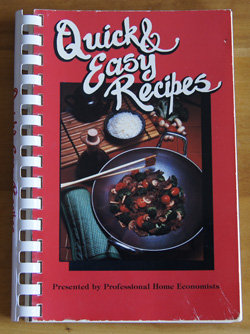
This spiral-bound book is a collection of recipes contributed by home economic teachers in California in the 1980s. It’s a notched-up version of a “community” cookbook, as it is professionally published (it has an ISBN) and has good color photos contributed by several food companies.

My sister sent me this cookbook for Christmas in 1986. She was a teacher in the California school system and that’s probably how she came across this book. She notes three recipes – layered spinach salad, orange bread, and spinach dip – as being really good. Layered spinach salad was a classic back then, a great dish for bringing to a party. You make it the day before so the flavors can meld. This version has spinach, bacon, frozen peas, Romano cheese, fresh mushrooms, red onions, mayonnaise and sour cream. I have made and liked the orange bread (you blend a whole orange!) and the spinach dip, served with fresh vegetables, could be made low-cal by using Greek yogurt.

Like the spinach salad, the recipes in this book are a very good reflection of American family cooking in the 1980s. Classic recipes include artichoke dip, clam dip, cheese rolls, molded salads, tuna casseroles, hamburger stroganoff, and chicken rice casserole. The recipes are not always from scratch, but they are still home-cooked. Examples of typical 80s ingredients are Bisquick, frozen dinner rolls, crescent rolls, packaged pudding, canned soups, cake mixes, dried onion soup mix, tater tots, canned tuna, canned clams, and canned French fried onions. These ingredients may not be the best for us, but they aren’t terrible and they bring both ease of cooking and (to me) a sense of comfort food. And on the healthier side, many of this book’s recipes do include only non-packaged and fresh ingredients, and several recipes are labeled “low-fat”.

I will go back to this cookbook for some of the classics I remember from that time. If I ever want to make artichoke dip or layered salad, now I know where to find a recipe without going online. Plus the cookbook has a note from my sister, so I definitely will keep it!

But what to cook for this blog? As usual, I’m looking for something low-fat that uses ingredients I have on hand, and that will add to my cooking repertoire. This cookbook has a chapter titled “Stir Fry Cookery”; sounds right up my alley. I chose to try the “Shredded Beef with Green Peppers” because (1) I have a flank steak in the freezer and (2) flank steaks are a lean meat and (3) I like the tablespoon of fresh ginger it includes and (4) it calls for very thin slicing and then marinating of the flank steak before cooking. I’m usually pretty impatient when preparing meat for stir fries, tending to cut it into large slices. That works for chicken or pork tenderloin, but not for beef (too tough). I think the very thin slicing – shredding – will get me out of my usual rut.

I plan to modify the recipe (surprise!). My dining partner doesn’t like green peppers, so I’ll tone them down and add some other vegetables that I have on hand.

Shredded Beef with Green Peppers
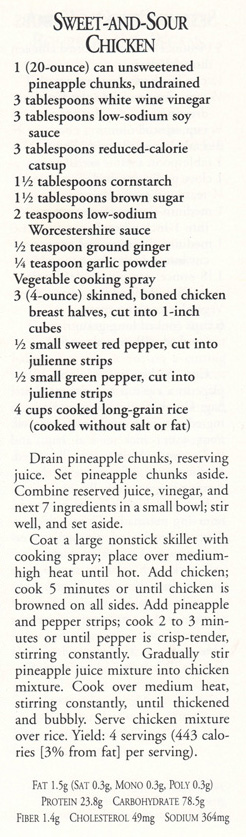
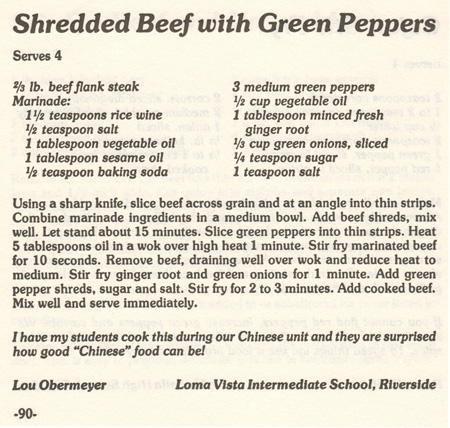
Looking carefully at the above recipe, I see a mistake: It calls for 1 tablespoon of vegetable oil in the marinade and 1/2 cup for cooking. But in the directions, it says to put 5 tablespoons of oil in the wok, and never says what to do with the other 3 tablespoons. And half a cup of oil is way too much oil anyway – that’s almost 1000 calories!

Another issue: it has way too little meat, at least for our tastes. Two-thirds of a pound of meat is about 10 ounces; I use about 9 ounces for 2 people, and this recipe claims to feed 4.

I don’t like sesame oil very much, and I think it needs soy sauce, so in my version I will put 1 tablespoon soy sauce in the marinade and then taste to decide if it needs more after it cooks. I’ll also up the vinegar (and use rice wine vinegar, not “rice wine”). Why baking soda? That’s a strange ingredient for a stir fry; I’ll leave it out. I also think it needs thickening, so I’ll add a touch of cornstarch.

Guess I pretty much mangled the original recipe, even before I started! And then I began cooking … oooh, more changes are needed. I got the wok nice and hot with a little oil in it, then added the finely shredded beef. No way was it done cooking in 10 seconds. After about 30 seconds there were still a lot of raw pieces of meat, but then the meat released a bunch of juice into the pan. I probably cooked the meat 5 minutes before it was all cooked, and then I had quite a bit of juices in the pan. The juices are sure to add to the flavor – I decided to take it off the heat and keep the juices. (Maybe it would have been done in 10 seconds if I had used 5 tablespoons of oil, but heck, it would have splattered all over the place.)

Whew, lots of changes. The recipe below is how I actually cooked this dish.

Shredded Beef with Vegetables
serves about 2 people

I served this over rice.

Steak and marinade:

  •  9 ounces flank steak, sliced across the grain, at an angle, as thinly as you can – you want it “shredded”
  • 1 tablespoon rice wine vinegar
  • 1 tablespoon soy sauce
  • 1 tablespoon vegetable oil
  • sesame seed oil to taste (I used a few drops)

Vegetables:

  • 1 tablespoon freshly grated ginger root
  • a mixture of thinly sliced vegetables, such as green peppers, green onions, carrots, baby bok choy, cabbage, mushrooms, and/or celery
  • 1/4 teaspoon sugar
  • soy sauce to taste: I used about 2 tablespoons reduced-sodium soy sauce

Combine the sliced beef with the marinade ingredients and let stand about 15 minutes. While it marinades, prepare your vegetables. I used shitake mushrooms, baby bok choy, carrots, green peppers, and green onions. Aim for about the same amount of total sliced vegetables as you have sliced beef.

Heat a tablespoon or two of vegetable oil in a wok (or any fry pan) over high heat for 1 minute. Add the beef and stir fry until all the meat looks cooked but not so long that the juices that come out of the meat evaporate away. Remove the cooked beef (and its juices) from the wok and put in a bowl.

Return the wok to medium high heat. You can add a few drops of oil, if you wish. Add the vegetables (don’t forget the ginger) and stir fry for 2-3 minutes. Add the cooked beef and its juices back to the pan. Add:

  • 1 teaspoon cornstarch dissolved in a couple tablespoons water
  • soy sauce to taste (1-2 tablespoons)

Heat through and serve over rice.

shredded beef
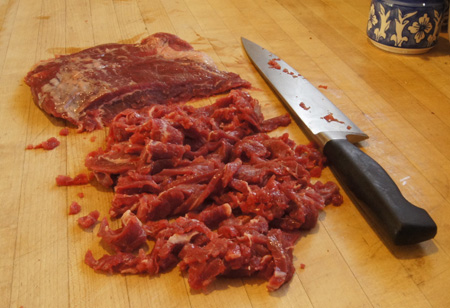
I sharpened my knife and took some time to “shred” the beef. The pile of sliced beef is about 9 ounces; the rest went back into the freezer for another meal.

vegetables for shredded beef dish
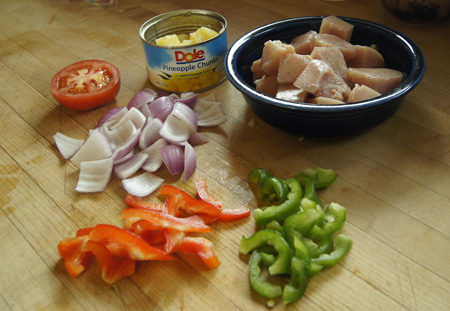
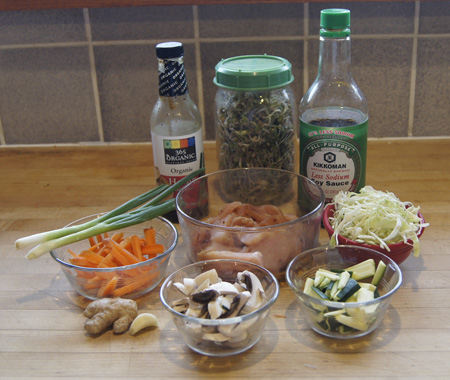
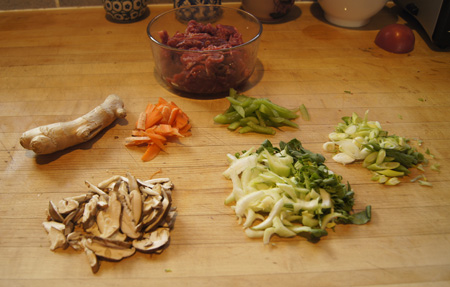
Above are the sliced vegetables (and a hunk of ginger root) that I used in the dish.

Shredded Beef with Vegetables
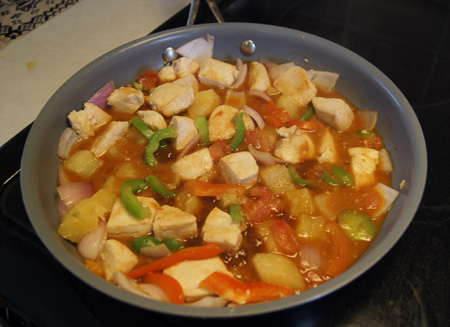
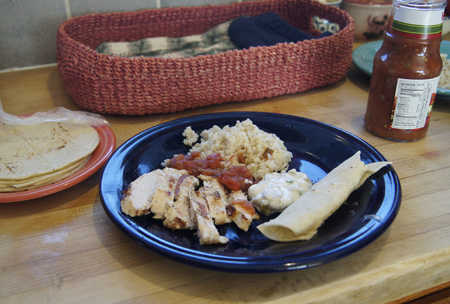
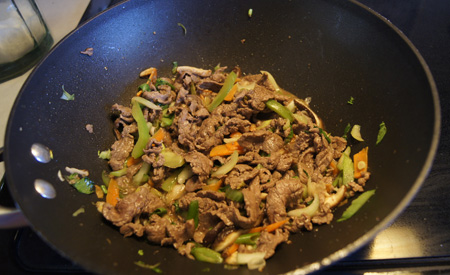
And above is the cooked dish. We liked it a lot! Some red peppers might have been nice for color. It had just enough sauce to serve over rice. Taking the time to carefully shred the flank steak before cooking is really worth the while.

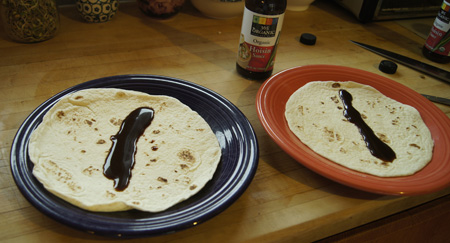
I now have a new stir fry recipe in my repertoire! Hmm, this would be good with hoisin sauce in a flour tortilla. Moo shoo beef. Stay creative!

250 Cookbooks: Simply from Scratch Recipes

Cookbook #33: Simply from Scratch Recipes. Pillsbury Kitchens, The Pillsbury Company, USA, 1977.

Simply From Scratch RecipesThis cookbook is from Pillsbury, the same company that produced the Bake-Off cookbooks/booklets (my entry for cookbook #4 discusses the bake-off concept). My mother was fond of these booklets. I actually have two copies of this small one: my own, and my mother’s. It’s entered twice in my database of 250 cookbooks, so I will cover it twice in this blog. I’ll start with hers.

My mother’s copy is about as beat up as my own – it’s been used a lot! This booklet does have great recipes. As I page through her copy, I note both my sister’s and my mother’s writing on many of the recipes.

Simply From Scratch has recipes for yeast and quick breads, pies and cakes, and cookies. My mother marked mostly cookie recipes: Candy Bar Squares, Touch-of-Lemon Sugar Cookies, Peanut Streusel Banana Bars, Salted Peanut Cookies, Crackly Topped Ginger Cookies, and Lemon-Go-Lightly Cookies. On “Blueberry Muffins”, she wrote “Delicious” and “Patty” in parentheses. That’s because I’m sure I told her to try this recipe, it’s one of my favorites. She tried and liked two of my other favorites: Cinnamon-Raisin English Muffins and Potato-Chive Rolls. My sister liked the Applescotch Crisp.

Both my sister and my mother liked “Rocky Road Fudge Bars”. My sister wrote “Excellent” and my mother wrote “delicious – very rich”. Rocky Road Fudge Bars, why is that so familiar? I didn’t mark this recipe in my copy of the cookbook. So, I checked my “cookie” document, and found the recipe there with this note to myself: “I don’t think I’ve made these, but the recipe was carried through several versions of my recipe collection, so I added them to this document.” Probably I got the recipe from my mother, not realizing it was in Simply From Scratch.

I’m going to try these cookies! We are having company to help us eat a rich dessert. I’m sure they will be excellent made exactly as written.
Rocky Road Fudge BarsRocky Road Fudge Bars

Bar:

  • 1/2 cup butter or margarine (I used butter)
  • 1 oz. unsweetened chocolate
  • 1 cup sugar
  • 1 cup flour
  • 1/2 to 1 cup chopped nuts
  • 1 teaspoon baking powder
  • 1 teaspoon vanilla
  • 2 eggs

Filling:

  • 8-oz. cream cheese, softened (reserve 2 oz. of this for the frosting, below)
  • 1/2 cup sugar
  • 2 tablespoons flour
  • 1/4 cup butter or margarine
  • 1 egg
  • 1/2 teaspoon vanilla
  • 1/4 cup chopped nuts
  • 1 cup semisweet chocolate pieces

Frosting:

  • 2 cups miniature marshmallows
  • 1/4 cup butter or margarine
  • 1 oz. unsweetened chocolate
  • remaining 2 oz. cream cheese
  • 1/4 cup milk
  • 1 lb. powdered sugar (3 cups)
  • 1 teaspoon vanilla

Prepare bars: Combine butter and chocolate in saucepan over low heat until melted. Add remaining bar ingredients; mix well. Spread in a greased and floured 13×9-inch pan.

Prepare filling: In a small bowl, combine 6 ounces cream cheese with the next 5 filling ingredients (sugar through vanilla). Beat 1 minute at medium speed until smooth and fluffy; stir in nuts. Spread over chocolate mixture. Sprinkle with the chocolate chips.

Bake at 350˚ 25-35 minutes, until toothpick comes out clean. Remove from oven; sprinkle with marshmallows. Bake 2 minutes longer.

While the bars are in the oven, prepare the frosting. In a saucepan over low heat, stir together the 1/4 cup butter, 1 ounce chocolate, remaining 2 ounces cream cheese and milk until the chocolate melts. Stir in the powdered sugar and vanilla until smooth.

As soon as you take the bars with the melted miniature marshmallows out of the oven, pour the frosting on top and swirl together.

Cool before cutting into bars. Store in refrigerator.Rocky Road Fudge BarsYes, these are very, very good. Rich. If you have more than you can eat, put them in the freezer. As my mother notes, these freeze well and are good frozen.

I want to share another page from this book, a page with lots of food stains and notes from my mother. (This is purely sentimental!)

page 82


250 Cookbooks: Crepes Cook Book

Cookbook #32: Crepes Cook Book. Better Homes and Gardens, Meredith Corporation, 1976.

Crepes Cook BookI bought this cookbook used for $3. It’s the only cookbook I have that is devoted specifically to crepes, and I love crepes! (See my Beef Jardiniere Crepes post for more crepe-praise.)

There is only one recipe in this book that I have used a lot: Shrimp Chow Mein Dinner. But looking over the recipes now, I find it easy to find one to try for this blog, and I marked several more to try later.

The first pages of the book present crepe cooking instructions. (I only disagree with it on one crepe-making issue: when making the crepe itself, I always cook both sides.) Then it gives a variety of recipes for crepes: main dish, calorie counter’s, buttermilk, cornmeal, Parmesan, whole wheat, sour cream, dessert, chocolate dessert, lemon dessert, and coffee dessert crepes. Basic sauces and fillings come next. I sort of like this, because it encourages you to be creative. However, I wish they would have at least cross-referenced each crepe recipe with the entree/dessert recipes that they are used for in this cookbook. For instance, if I want to find a recipe using “Cornmeal Crepes”, I have to scan each recipe in the book – it has a crummy index that is no help in my search.

Recipes that I have marked to try include: Szekeley-Filled Crepes (potato crepes filled with pork), Home-Style Pork Pie Crepes (ground pork in buttermilk crepes), Crepe-Style Manicotti, Beef Enchilada Crepes, and Low-Calorie Cherry Crepes (a dessert crepe). Chinese Mu-hsu-jou Crepes remind me of my Moo Shoo Turkey. The Mu-hsu-jou crepe batter substitutes water for milk. I should try this recipe sometime, since crepes might be better than flour tortillas for moo shoo wraps. A google search reveals that Mu-hsu-jou recipes employ “Mandarin Pancakes” and one recipe I found online for these pancakes is identical to the recipe in my Crepes Cook Book.

Intrigued by the use of crepes in Chinese food, I decided to try “Chinese-Style Dinner”. This recipe is an egg roll in a crepe. Egg rolls are usually deep fried, so this seems like a good way to bring a low-fat version of this treat into my repertoire.

One more discussion before I get to the Chinese-style dinner. This cook book is pretty good about using fresh ingredients, except for canned shrimp, and frozen asparagus and fish. Whole grains and fresh vegetables are often used. So except for a few fat-laden sauces, the recipes fit into my healthy eating plan. This is funny though: in the Greek-style Crepe Casserole, they suggest that you can substitute American cheese for feta cheese. That’s just silly!

Back to the Chinese-Style Dinner. Even though these are not deep-fried like egg rolls, this is not a quick recipe. The ingredient list is long, and you have to chop up seven vegetables and two meats, make crepes, and make one or two sauces. Let’s see if it’s worth the trouble!

Chinese-Style DinnerMy version of the recipe (below) is half of the one given in the book. I made the full amount of crepes, though, and used them for breakfast the next couple days. It made seven filled crepes for our meal; we ate all but one. I used some pre-cooked shrimps that I had on hand in the freezer, but I think you could use raw shrimp. I weighed the pork and the shrimp amounts. I was out of fresh mushrooms so I used canned. I like water chestnuts, but this recipe only uses 1/4 cup, which means you will have some leftover – leave them out if this is an issue. The point is, you can be pretty free and creative with what you include in this recipe.

I made only the Sweet and Sour Sauce for these crepes; I suggest you also try the Horseradish-Mustard Sauce as in the scanned-in recipe. Feel free to use a purchased, bottled sweet and sour sauce if you want to save time.

Chinese-Style Dinner, or, “Egg Roll Crepes”
serves 2-3

Crepes:

  • 1 1/2 cups milk
  • 1 cup flour
  • 2 eggs
  • 1 tablespoon vegetable oil (you can leave this out to save calories)
  • 1/4 teaspoon salt

Filling:

  • 1/4 pound ground pork
  • 1/4 pound cooked (or raw) shrimp
  • 1 clove garlic, minced
  • 1 cup finely shredded bok choy, baby bok choy, or cabbage
  • 1/2 cup mushrooms, preferably fresh, shitake would work great
  • 1/4 cup finely chopped onion
  • 1/4 cup finely chopped celery
  • 1/4 cup finely chopped water chestnuts
  • 1/4 cup grated carrot
  • 1/2 of a beaten egg (yes, I beat one egg, then divided it between this recipe and my accompanying Chinese fried rice)
  • 1 tablespoon soy sauce
  • 1-2 teaspoons dry sherry (you could leave this out if you don’t have any on hand)
  • 1/4 teaspoon sugar (double this if you are leaving the sherry out)

Sweet and Sour Sauce:

  • 1/4 cup brown sugar
  • 1/2 tablespoon cornstarch
  • 1/4 cup red wine vinegar
  • 1/4 cup chicken broth or water
  • 2 tablespoons finely chopped green bell pepper
  • 1-2 tablespoons finely chopped red pepper, or used canned red peppers or pimentos
  • 1/2 tablespoon soy sauce
  • a few dashes of garlic powder
  • a few dashes of ground ginger (or a little grated fresh ginger)

For the crepes, put all of the crepe ingredients in a blender and blend on high until well mixed. Scrape down the sides, then let rest an hour or so. Blend again. Heat a pan, coat it with non-stick spray, then pour about 1/3 cup of the batter into the hot pan and tilt the pan so the batter spreads to the edges of the pan. Cook until brown, then flip and briefly cook the other side. I made about 12 crepes from this recipe of batter.

For the filling, heat a non-stick pan, then cook the pork until it is browned. Stir in the garlic and cook a minute or so. If necessary, drain off any fat. Add the vegetables and the shrimp and cook and stir 2-3 minutes more. Remove from heat, put in a bowl, allow to cool, then add the egg, soy sauce, sherry, and sugar.

For the sauce, combine the brown sugar and cornstarch in a small pan. Stir in the remaining ingredients and cook and stir till bubbly.

To assemble, place a crepe on your work surface. Fold the edge nearest the filling up and over filling just till mixture is covered, fold in the two sides, then roll up tightly as for a jelly roll. This is how much filling I used per crepe:

crepes assemblyPlace the filled crepes seam side down in a non-stick-sprayed baking pan. The recipe says it makes 32 crepes, but I only made 7 with a half-recipe. Guess I stuffed them fuller than they intended.

egg roll crepes in panBake, uncovered, at 375˚ for about 20 minutes. Serve with the Sweet and Sour Sauce. I added my Chinese-style rice and steamed broccoli.

Egg Roll Crepes These were a big hit! We both really, really liked them and I will make them again. We didn’t try to pick them up, we just poured the sauce over and used a fork. They have more filling than a typical egg roll, and the crepe wrap brings great flavor to the dish. The eggs in the crepe batter bring new meaning to “egg rolls”. Once again, I am glad that I am doing this 250 Cookbooks blog. Another great recipe: Found!

Favorites: Applesauce-Carrot Muffins

Applesauce Carrot MuffinsThis recipe was in my short-list of muffins in my 1990s blog, as were my Lemon Poppy Seed Muffins. I made them last week and I still really like them. Not only do they taste good, but they have carrots, apples, and whole wheat flour to boost the nutrition, and are low-ish in fat.

Applesauce-Carrot Muffins

  • 1 cup flour
  • 3/4 cup whole wheat flour
  • 1 teaspoon baking soda
  • 1/2 teaspoon salt
  • 1 teaspoon cinnamon
  • 1/2 teaspoon nutmeg
  • 1 egg
  • 1/2 cup sugar
  • 1/4 cup oil
  • 1/4 teaspoon vanilla
  • 1/2 cup milk
  • 1 cup applesauce
  • 3/4 cup grated carrots

Beat egg and sugar until fluffy, then beat in oil, milk, and vanilla. Stir in applesauce. Combine flours, baking soda, salt and spices in large bowl. Stir applesauce mixture into flour mixture only until just blended. Quickly fold in carrots.

Put into 12 muffin-pan cups. Bake at 400˚ for 15 to 18 minutes until lightly browned.

Less-calorie alternative:

As written, these have about 150 calories each. You can shave the calories and still have a pretty good muffin by using 5/8 cup skim milk and only 2 tablespoons oil and using either 2 egg whites or egg substitute for the egg and using a scant 1/2 cup sugar.

250 Cookbooks: The Low-Fat Way to Cook

Cookbook #31: The Low-Fat Way to Cook. Oxmoor House, 1993.

The Low-Fat Way to CookI have used this book a lot, both as a reference on low-fat cooking and for recipe ideas. I’ve made the Dijon pork chops and sweet and sour chicken many times, although I’d forgotten about them until I pulled this book from the shelf. This book is an old friend.

This is a large hardcover book with good color photos. The recipes are easy to follow and pleasantly laid out. It’s not very personal; this book has editors rather than an author. Nutrition information is  given for each recipe. Most main dishes are 250-400 calories per serving.

I pretty much cook the way this book outlines. Since it’s a 1993 book, I was already cooking like this when I purchased the book, so I guess I wanted reinforcement and recipe ideas.

So what are low-fat guidelines? Choose lean cuts of meat, poultry without the skin, and fish. Bake or broil instead of frying. Use vegetable cooking spray or when absolutely necessary, reduced calorie margarine. Braise tough cuts of meat (long, slow cooking). En papillote cooking is great – this is cooking in paper packets. Top pot pies are topped with phyllo sheets rather than fat-filled crusts. Choose low-fat dairy products and use egg substitute or egg whites. For baking, use very little oil and incorporate vegetables, fruits and whole grains.

Beyond the above suggestions, this cook book encourages the reader to watch serving size and read labels. Page 17 has a great chart of “serving sizes”.

I like this cookbook a lot better than the Cooking Light Cookbook 1992, which was the first of my 250 Cookbooks posts, and also an Oxmoor book. The recipes in this cookbook don’t call for all sorts of weird ingredients – they call for items I already have in my pantry/refrigerator. Sensible.

So what recipe to try? I am going to “try” Sweet-and-Sour Chicken. Now, I have made this before; I have a post-it next to the recipe stating that it is “pretty, spicy and thick sauce, good with pork too”. But I had forgotten this recipe, and it’s time to try it again.

Sweet-and-sour dishes need to have just the right combination of vinegar and sugar. This is one time when I actually carefully measure the vinegar and the sugar. Other than that, this is a really simple dish. Just stir fry the vegetables and the chicken, then add the sauce and heat. Takes about 10 minutes to cook.

Sweet-and-Sour ChickenThe only thing I disagree with in this recipe is that it calls for reduced-calorie catsup – just ridiculous when you are only using a couple tablespoons in a dish. One tablespoon of regular catsup only has 20 calories! So I used regular catsup. (I always use low-sodium soy sauce so no problem there.)

I have another sweet-sour recipe in my repertoire and I am incorporating an idea from it: onions. I like onions in my sweet-sour dishes, so I include them in my written recipe below. I also like a touch of tomato. And, you can add carrots and use fresh ginger instead of powdered ginger. Hey, recipes are guidelines, not written in stone!

Sweet-and-Sour Chicken
serves 2 people

  • 9-12 ounces of skinned, boneless chicken breasts, cut into 1-inch cubes
  • 1 8-ounce can pineapple chunks (or a 10-ounce can if you can find one)
  • 2 tablespoons vinegar (white, white wine, or red wine)
  • 2 tablespoons soy sauce
  • 2 tablespoons catsup
  • 1/2 tablespoon Worcestershire sauce
  • 1 1/2 tablespoon brown sugar
  • 1 tablespoon cornstarch
  • 1/3 teaspoon ground ginger, or about a teaspoon grated fresh ginger
  • 1/4 teaspoon garlic powder, or one minced clove
  • 1/4 of a small red pepper, cut into julienne strips
  • 1/4 of a small green pepper, cut into julienne strips
  • 1/4 of an onion, cut into 1/2-inch squares
  • optional: diagonally sliced carrots
  • optional: half a tomato, peeled and cored and chopped
  • cooked rice

Drain the pineapple chunks, reserving juice and setting the chunks aside. Combine the juice with the vinegar, and the next 7 ingredients (soy sauce through garlic powder) in a small bowl or measuring cup; stir well and set aside.

Heat a nonstick pan over medium-high heat until it feels hot when you hold your hand an inch above it. Then, coat it with cooking spray and add the chicken and cook 5 minutes or until chicken is browned on all sides. Add the peppers and onion (and carrots or any other veggies you are using) and cook 2-3 minutes, until the veggies are crisp-tender.

Add the pineapple chunks (and the optional tomato) and stir a minute to heat through. Give the pineapple juice mixture a good stirring to distribute the cornstarch, then slowly add it too. Cook over medium heat, stirring constantly, until thickened and bubbly. It only takes a couple minutes.

It’s ready to serve, over your favorite type of cooked rice!

Here are the gathered ingredients:

Sweet-and-Sour Chicken ingredientsAt the preparation point when I took the above photo, I hadn’t decided to add the tomato or not, so it’s sitting there uncored and unpeeled. Below is the cooked dish.

Sweet-and-Sour ChickenYum!

Favorites: Moo Shoo Turkey

If my eyes fall upon the bottle of hoisin sauce in my refrigerator, I think of Moo Shoo Turkey and get a hankering to make this for dinner. Moo Shoo Turkey is really just a stir fry in a flour tortilla, why do I like it so much? Dunno. I included it on the short list of main dishes in my 1990s blog, and I still make it today, in 2013. I am not sure where I got the original recipe, must have been from a magazine or newspaper. It is low-fat, and tasty. It takes a little while to pull together the ingredients, so I won’t say it’s really “simple”. But it’s worth it.

Hoisin sauce is a “sweet and garlicky bean sauce” (Cook’s Thesaurus). I find that different brands taste quite different. I have found it at the Asian Seafood Market, Safeway, and Whole Foods (my current brand). It’s essential for this dish.

I sprouted mung beans to make the bean sprouts for this dish. Why? Because I could. Also, I often find that supermarket bean sprouts (1) come only in a large package and (2) are often slimy by the time I go to use them. If you are in Boulder, though, you can drop by the Asian Seafood Market and buy just the right amount of very fresh bean sprouts, as she sells them in bulk.

Photography: I’m finding that cooked entrees often take terrible pictures. So I’m trying something new, a photo of the ingredients for this dish. They take a pretty picture:

ingredients for Moo Shoo TurkeyMoo Shoo Turkey
serves 2 (depending on appetites)

Combine and marinate at least 30 minutes (can marinate all day):

  • 3 tablespoons soy sauce
  • 1 tablespoon lime juice
  • dried hot peppers (a few shakes)
  • 12 ounces raw turkey breast, thinly sliced

Prepare/gather:

  • 1 clove garlic, minced
  • 1 teaspoon grated or minced fresh ginger
  • 1 carrot, julienned
  • 1 cup shredded cabbage
  • 1/2 zucchini, julienned
  • several mushrooms or shitake, sliced
  • 1 tablespoon soy sauce
  • 1 cup bean sprouts
  • chopped green onions for garnish
  • hoisin sauce
  • 3 flour tortillas

Stir fry the garlic, ginger, and carrot for a couple minutes on medium-high heat (use as little oil as possible). Then add 2 tablespoons of water to the pan, cover, and cook for 1 minute.

Uncover the pan and add the cabbage, zucchini, mushrooms, and the 1 tablespoon soy sauce. Cook a few minutes, until the vegetables soften. Then remove the vegetable mixture from the pan and set it aside in a bowl.

Add the turkey with its marinade and cook until the turkey turns white and liquid is slightly reduced. This will take 5-10 minutes.

Add the vegetable mixture back to the turkey mixture in the pan and add the bean sprouts too. Heat through – just a couple minutes. Sometimes I thicken this mixture with 1-2 tablespoons cornstarch mixed with 1/4 cup water.

Spread flour tortillas with 1-2 tablespoons hoisin sauce each. Microwave them a few seconds to heat and soften, then add the turkey-vegetable mixture and some chopped green onions. Serve immediately.

I’m kind of generous with the hoisin sauce:

Moo Shoo Turkey This looks kind of lonely on the plate. I often serve it with Chinese-style stir fried rice.Moo Shoo TurkeyLonely or not, Moo Shoo Turkey was great once again!

graphic

250 Cookbooks: The Bread Machine Cookbook II

Cookbook #30: The Bread Machine Cookbook II. Donna Rathmell German. Bristol Publishing Enterprises, San Leandro, CA, 1991. (Nitty Gritty Cookbooks)

Bread Machine Cookbook IIThis is a great little cookbook for anyone who has a bread machine. When I first started using a bread machine, I learned as much from this book as I did from the instruction manuals that came with the machines. The first chapters have straightforward instructions and questions and answers about what to watch out for when using a bread machine to make yeast breads; the rest of the pages are recipes for over 100 different breads. This cookbook is especially helpful for making bread from many different types of flours and grains. I am glad that I re-discovered this book for my 250 Cookbooks project!

I cover bread machine basics in my recipe for “My Daily Bread“. Just so you know: I use the machine to knead and rise my yeast breads, and then bake them in a conventional oven.

I decided to try “Rye Beer Bread”. This particular recipe is half rye flour; my old favorite recipe is only one-third rye flour. That fact and the addition of beer should give this bread a nice flavor and hearty texture. I’m adding caraway seeds too – what’s a rye bread without caraway seeds?!

Rye Beer Bread recipeNote how the above recipe simply gives the amounts for different sizes of loaves; I usually begin with about 1 cup of liquid so I chose the middle size. Instructions for using the machine are given in the introductory pages of The Bread Machine Cookbook II and are not repeated in each recipe. The version below indicates how I adapted the recipe for the way I always make bread.

Caraweed SeedsRye FlourRye Beer Bread
makes one 8½ x 4½-inch loaf

  • 1 1/8 cups beer (I used a good local microbrewery pale ale)
  • 2 tablespoons vegetable oil
  • 1/2 teaspoon sugar
  • 1/2 teaspoon salt
  • 1 1/2 teaspoons caraway seeds
  • 1 1/2 cups bread flour (8 ounces; I included a little gluten flour)
  • 1 1/2 cups rye flour (6 1/2 ounces)
  • 2 1/2 t yeast

Put all of the ingredients in a bread maker and set to the dough cycle. (Choose a cycle that both kneads and rises the bread.) Watch the dough as it kneads and add a bit more flour or a little water if necessary to have a smooth, non-sticky ball of dough.

When the dough/rising cycle is done, take the bread out of the bread maker and form into a loaf. Place in a small loaf pan (8½ x 4½-inch). Bake at 385˚ for 25 minutes.

My dough was a little sticky, and I should have added a little more flour. This is reflected in the photo of the baked loaf; it fell just a little as it baked, you can see some deep dimples on the top. It was still excellent.

Rye Beer Bread loafSliced, the bread looks great. I used it to make corned beef sandwiches for lunches several days in a row.

Rye Beer Bread slicedAnd yes, I am going to keep this cookbook!

Favorites: Southwestern Grilled Chicken

I clipped this recipe back in the 80s from the Colorado Daily, the campus newspaper of the University of Colorado, Boulder. Me, a seasoned cook, using a recipe from a campus newspaper, a resource that targets the 18-24 year old crowd! But this is a great dish for families too. I included it on the short list of main dishes in my 1990s blog, and I still make it today, in 2013. It is simple, low-fat, and tasty.

The original recipe suggested serving with grilled or broiled green, red, and yellow bell peppers. Instead, I always serve it with a good, chunky salsa, rice, and warmed corn tortillas.

Southwestern Grilled Chicken
serves 3-4, depending on appetites

  • 8 oz. plain yogurt (Greek yogurt works great)
  • 1/4 cup chopped green onions
  • 8 oz. chopped green chiles (canned work fine)
  • 1 teaspoon cumin
  • 1/2 teaspoon salt
  • 1 tablespoon mayonnaise
  • 1 pound boneless chicken breasts (or chicken tenders)
  • hot salsa (your choice)
  • cilantro (optional)
  • cooked rice

I generally start this in the morning and let the chicken marinade all day, but a couple hours is sufficient.

Combine the yogurt, onions, chilies, cumin, and salt. Remove about 2/3 cup of this mixture, mix it with the tablespoon of mayonnaise, and set it in the refrigerator for later use (it’s a sauce for the cooked chicken).

Put the rest of the yogurt mixture in a bowl and add the chicken pieces. You can make the chicken extra tender by piercing it a lot with a sharp fork. Cover the bowl and set the chicken-marinade mixture in the refrigerator.

About a half hour before dinner time, remove the chicken from the yogurt marinade. Cook the chicken either in a broiler or on the grill:

  • broil about 5 minutes per side 4-5″ from an oven broiler set on high OR
  • grill over medium high direct heat, about 5 minutes per side

The chicken is done when an instant-read thermometer reads about 165˚. If you don’t have a thermometer, check for doneness by cutting into one of the pieces with a knife (it should no longer be pink inside).

Slice the chicken into 1/2″ thick pieces and plate it with the cooked rice. Sprinkle with chopped cilantro if you wish. Serve it with the reserved yogurt mixture and hot salsa. Warmed corn tortillas make a great addition!

Southwestern Grilled Chicken