Cookbook #157: El Molino Best Recipes, El Molino Mills, Alhambra, CA, 1953.
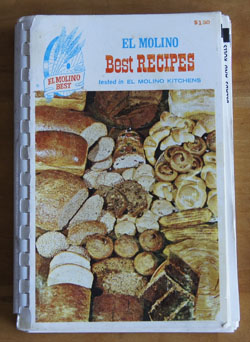
El Molino Mills was a “specialty miller of whole grain flours and cereals”. Established in 1926 in California, it was owned by the Vandercook family. The company no longer exists, as far as I can tell. The trademark was last owned by Archol Pure Products Corporation.
I probably bought my copy of El Molino Best Recipes while we were still in California, in the early 1970s. An online search revealed several different editions and book cover images for the same title. Mine was probably one of the later printings.
I haven’t looked at this cookbook in decades! The first recipe is “Whole Wheat Bread”, and it looks like I used this recipe because the page is a little food stained. I probably studied this recipe and the next several pages on breadmaking way back when we were first living together in an old house in Huntington Beach. I was determined to make my own whole wheat yeast bread, even then. The hippie movement was heavily into “back to the earth” cooking, and El Molino Best Recipes abounds with ingredients such as whole grains and soy beans and carob and sprouts.
This cookbook might be where I learned about the importance of gluten in yeast breads. Most of its bread recipes include a bit of gluten flour. But I don’t remember “wet gluten base”. You mix water and flour to make a ball of dough, then put it in a bowl of water and let stand a couple hours. Next you wash out the starch by kneading under water, continually pouring off the starchy water and kneading the dough. In the end, you have a lump of raw gluten, high in protein. What do you do with it? You cook it and make meat-free burgers and the like. Sounds pretty yucky to me.
I’m not inclined to keep this cookbook, but I might, just for the memories. Children in the 1950s (like me) were brought up on soft, white store bread – breads and cereals made from chewy grains were a whole new discovery.
I decide to make “Soy Chili Con Carne” for this blog. I’ve been meaning to make soy bean chili ever since I bought soy beans when I covered The Soybean Cookbook. Soy bean chili is about the only way I liked cooked soy beans. But I haven’t made it in years!

I have an electric pressure cooker, so I’ll use it to cook the soy beans. I found some salt pork from Whole Foods in my freezer, but it could be left out.
- 1 cup uncooked soybeans
- 1 cup tomato sauce
- 1 tablespoon chili powder
- 1 teaspoon salt
- 2 tablespoons diced salt pork (optional)
- 1/2 onion, chopped
- 1/4 pound ground meat
- 1 tomato, chopped
- additional chili powder (optional)
- cayenne powder to taste
Combine the soybeans, tomato sauce, 1 tablespoon chili powder, salt, and enough water to cover the beans in an electric pressure cooker. Cook on high for 15 minutes; quick release the pressure. Alternatively, cook on the stove top several hours, until the soybeans are soft.
Fry the salt pork until crisp (if you are using it). Add the onions and cook them until soft, then add the ground meat and cook until it is brown. Add the cooked soybeans*, tomatoes, and more chile powder (optional). Simmer on the stove top about an hour to mingle the flavors. Add more chili powder, cayenne powder, and salt to taste.
*I cooked the soybeans in too much liquid, so I drained the cooked beans and saved the cooking liquid, and only added back a portion of the cooking liquid so the chili would not be too soupy.
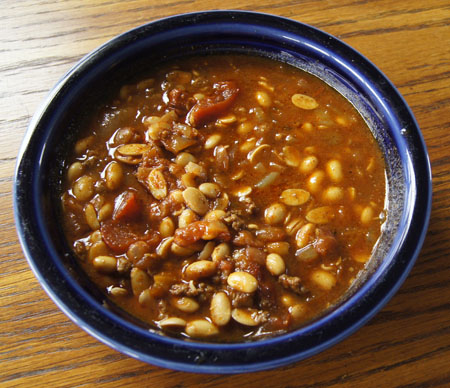
I made this soybean chili on a snowy April morning. I didn’t think it would be very good, I was kind of making it just as an “experiment”, but both of us tasted it and loved it and we scarfed up the entire batch for lunch! Cheese on it is very good, and onions too. The soybeans are a bit crunchier than pintos or kidney beans, and all in all, it was simply excellent.
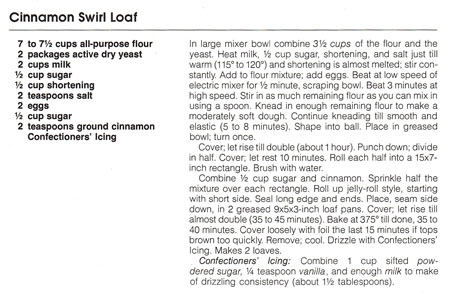 In this recipe, a sweet and rich yeast bread dough is rolled around cinnamon and sugar before baking. I’ve tried swirled breads before, but after baking they always had big gaps in the swirls. Why? Because I always brushed butter onto the dough before the cinnamon and sugar. The butter sent the layers flying apart when the loaf was cooked. This recipe uses water (duh! says this chemist) to keep the dough layers together. I want to see if it works.
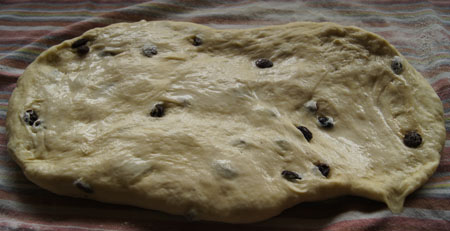 The cinnamon-sugar sprinkled on top:
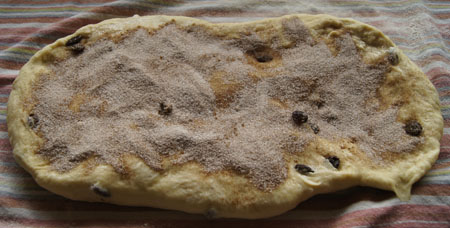 Now the next photo isn’t terribly pretty. This bread about overflowed the pan on baking and leaned to one side. But it tasted great! Next time I make it, I will probably start with less milk and less flour or maybe less yeast (this is not written into the above recipe). I baked it at 375˚, and the crust was browner than I like; next time, I will bake it at 350˚. Otherwise, I will definitely make this again! The swirled layers stayed together, just like I wanted.
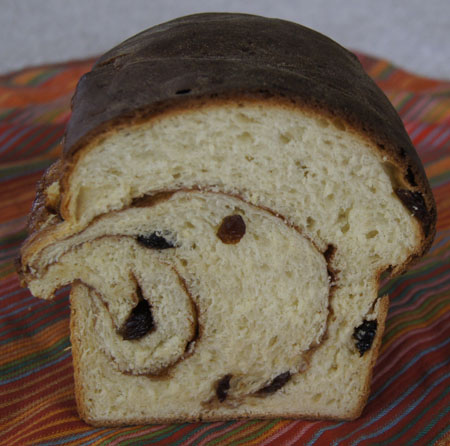
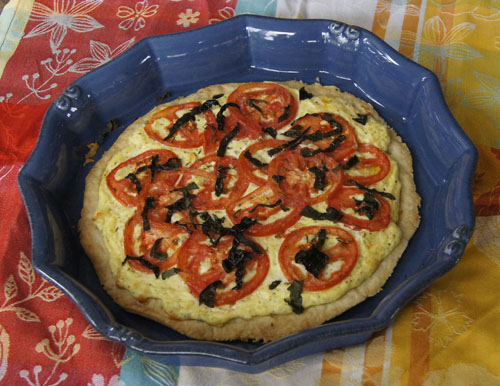
 Fresh Tomato Cheese Tart