250 Cookbooks: Extra-Special Crockery Pot Recipes

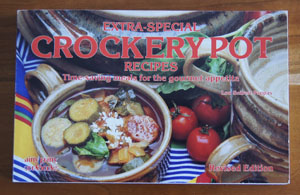
Cookbook #183: Extra-Special Crockery Pot Recipes, Lou Seibert Pappas, Bristol Publishing Enterprises, San Leandro, CA, 1975. A Nitty Gritty Cookbook.

Extra Special Crockery Pot Recipes cookbookI have 10 crock pot/slow cooker cookbooks! Crazy. I discussed the history of crock pots in a previous post: The Electric Slow Cooker Cookbook.

Extra-Special Crockery Pot Recipes is similar in design and layout to The Bread Machine Cookbook II, another “Nitty Gritty Cookbook”. These books are all about recipes – cleanly laid out and easy to follow.

I find lots of different ideas to try in Extra-Special Crockery Pot Recipes. The soups chapter includes the basics (French onion soup) and the slightly exotic (Caldo Xochitl). Next is salads. Salads in a slow cooker? At first I thought: cooked salads? But no, the recipes are for regular lettuce-type salads including leftover slow-cooked chicken or beef. I am often looking for “main dish salad” recipes in the hot summertime.

I’m not tempted by any of the recipes in the fish chapter – fish generally needs only a brief cooking. The poultry chapter includes the basics (poached chicken) and the unusual (Chicken and Cherries Jubilee). “Meats and Casseroles” has lots of ideas. It’s the longest chapter in the book, and I like a lot of the recipes: a wide range from the basic (Meat Balls Stroganoff) to the unusual (Choucroute Garni).

“Breads and Cakes”? Why bake bread in a slow cooker? “There are sometimes occasions when you may prefer not to heat the oven or perhaps you are at a location without an oven, when having a crockery pot makes baking possible.” I remember our relatively recent family reunion in California where the oven in the rental did not work, so we cooked a cake in the barbecue. But hey – we could have looked for a crock pot instead!
The fruits chapter gives recipes for cooked fresh fruit to be used in desserts or for breakfast. “Preserves” has a recipe for apple butter (already made it!) as well as orange marmalade and apricot pineapple jam and a couple chutneys. Beverages? Hot Spiced Cider, Swedish Glugg, and Hot Mulled Wine.

I decide to make Savory Swiss Steak for this blog. Wikipedia says “Swiss steak is meat, usually beef, prepared by means of rolling or pounding, and then braising in a cooking pot of stewed tomatoes, mushroom sauce, or some other sauce, either on a stove or in an oven.” That’s a pretty broad definition – and the recipe in Extra-Special Crockery Pot Recipes definitely falls within it. (I have made Swiss Steak for this blog before, but it was not a slow-cooked version.)

Savory Swiss Steak recipe

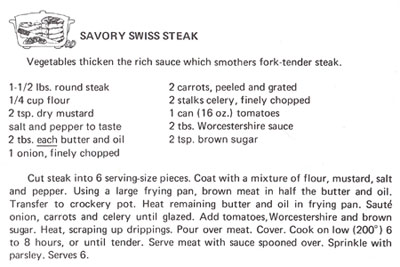
Round steak is a very lean meat (nice when you don’t want a fatty gravy) but it can be flavorless or tough. Hopefully this recipe makes it tender and tasty! I think I’ve tried this recipe before, since this page was marked when I pulled the book off the shelf.

Slow Cooker Swiss Steak
serves about 4

  • 1 1/2 pounds round steak
  • 1/4 cup flour
  • 2 teaspoons dry mustard
  • salt and pepper to taste
  • 2 tablespoons butter (or less)
  • 2 tablespoons oil (or less)
  • 1 onion, chopped
  • 2 carrots, chopped
  • 2 stalks celery, chopped
  • 1 16-ounce can diced tomatoes
  • 2 tablespoons Worchestershire sauce
  • 2 teaspoons brown sugar
  • fresh parsley (optional)

Cut the round steak into about 6 pieces. Mix the flour, dry mustard, and salt and pepper. Heat a frying pan and add half of the butter and oil. Dredge the steak in the flour mixture, then fry in the hot butter/oil until browned. (You might need to do this in a couple batches, it depends on the size of your frying pan.)

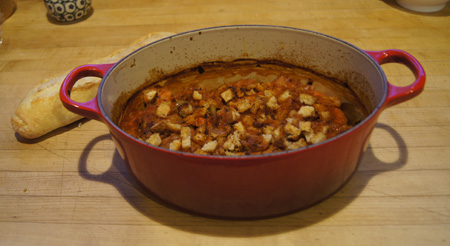
Remove the meat from the fying pan and put it in the crock pot. Put the rest of the butter and oil in the hot (now empty) frying pan, then add the onion, carrots, and celery. Cook until the vegetables are “glazed” or softened. Add the tomatoes, Worchestershire, and brown sugar; heat, scrapping up the fond. Transfer the entire mixture to the crock pot.

Cover and cook on low about 6 hours, or until the beef is tender. Serve over noodles, mashed potatoes, or rice, with some fresh parsley sprinkled on top (if you have it).

Swiss Steak
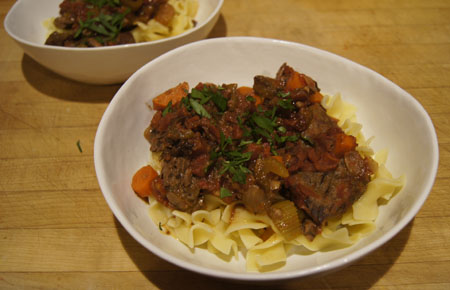
This was excellent! I will make it again. Very tasty and the meat was very tender. There was enough for two meals for the two of us (I froze half for later use).

1990s blog: Basic New York Water Bagels

I totally enjoy my own homemade bagels. I wrote this note in the 1990s and it is still true today:

I make these a lot! I like them for sandwiches. I think, but I’m not sure, that using malt syrup makes them better; you can find it in a beer brewing supply store. If you can’t find it, don’t worry about it!

These days (2016) I use malt powder that I purchase online from King Arthur Flour. It is more subtle than the malt syrup that I used to use, and not as sweet (so I add a little sugar). But no worries, if you want to try these but have no malt, just use sugar instead.

I like these bagels so much that I wrote about these in my other blog. Geeky food-obsessed me.

The following recipe is pretty much as I wrote it for my 1990s food blog. The recipe is adapted from The Best Bagels are Made at Home by Dona Z. Meliach. Please refer to my recipe for “Oat Bagels with Pumpkin Seeds” for photos of how to form bagels and a photo of the package of malt powder that I use.

Basic New York Water Bagels
makes 8-10 bagels

  • 1 1/8 cup water
  • 1 tablespoon oil
  • 2 tablespoons diastolic malt powder AND 1 tablespoon sugar OR 2 tablespoons malt syrup OR 2 tablespoons sugar
  • 3/4 teaspoon salt
  • 2 teaspoons yeast
  • 16 ounces bread flour (3 1/3 cups)*

*I highly recommend using bread flour rather than all purpose flour for all yeast breads. Please see my reference page on yeast and flours.

Mix in breadmaker on a dough cycle with a rising step. Or, by hand until you have a stiff dough, then let rise until double and punch down.

Divide into 8-10 equal pieces. (I like bigger bagels so I usually make 8.) I like to use a kitchen scale: The total weight of the dough is usually about 800 grams, so it’s 100 grams per bagel.

Form into bagels: press each piece into a flat round, poke a hole in the center, then enlarge the hole by placing one hand on the inside and one on the outside and rolling the dough between your hands until you have a big, smooth ring. (If you don’t get the inside hole quite big, when the dough rises and cooks, you won’t have a hole in your bagel. That’s why I say to put your hand inside the bagel; the hole needs to be that big.) Photos here.

Let the formed bagels rise 20 minutes. Bring some water to a boil in a saucepan and add malt syrup (2 tablespoons) or powder (1 tablespoon) or sugar (1 tablespoon) in it. Preheat the oven to 400 degrees.

When the water is boiling briskly, place the risen bagels in it a couple at a time and boil 30 seconds on each side.

(After rising, the top of the bagel is smoother than the bottom. So that the baked bagel has a smooth top, I always flip the bagel as I put it in the water. In other words, I pick up a risen bagel, turn it over and place it in boiling water. After 30 seconds, I turn it. After another 30 seconds, I take it out of the boiling water.)

Remove the boiled bagel to a rack to drain. Continue until all the bagels are boiled. Brush the bagels with egg wash (1 egg beaten with 1 T water) and sprinkle with poppy or sesame seeds. Bake 18-22 minutes at 400 degrees.

NY bagels

Read the introduction to my 1990s cooking blog for the history of this category of my blog.

breads

250 Cookbooks: Appetizers, Hors d’Oeuvres to Light Meals

Cookbook #142: Appetizers, Hors d’Oeuvres to Light Meals, Sunset Books, Lane Publishing Co., Menlo Park, California, 1984.

Appetizers Sunset cookbook

My recipe repertoire is wanting in the appetizer category. Usually I focus on a full meal, and don’t want people filling up on snacks and killing their appetites. But some appetizers are dang tasty! How can I fit these into a balanced eating plan?

How about a whole meal of different small plates or appetizers? Some protein, some vegetables, some richness. I’ve done this a time or two and it is fun. This holiday season, in the limbo area between Christmas and New Years, I decided to entertain with just such a meal.

I pulled Appetizers, Hors d’Oeuvres to Light Meals from the shelf for ideas. A bit hesitant at first with a 30 year old appetizer book in hand, to my surprise I actually like the recipes in this cookbook! I don’t think I have ever looked at this book before (it came from my mother’s collection). The photographs in this Sunset book are great, too.

The chapters are:

“Light Bites” (Simple crisp nibbles, marinated vetetables, bite-size vegetable and fruit combinations)
“Dips, Spreads and Pates” (Hot and cold dips, meat, seafood and cheese spreads, meat and vegetable pates and terrines)”Appetizers from the Oven” (Breads and pastries, tarts, turnovers and quiches, baked vegetable appetizers)
“Substantial Snacks” (Meats, poultry, fish and shellfish)
“Salad, Soup and Pasta” (Composed and mixed green salads, hot and cold soups, fresh, light pasta combinations)

I marked many recipes to try: mini bagels, cheese twists, cheese herb pretzels (all these are from-scratch doughs), spinach dip, sugar snaps, chili peanuts (from raw Spanish peanuts), shitake spinach soup, carrot soup, potato pancakes with apples and goat cheese, dried tomatoes (how to make your own dried tomatoes), shrimp avocado salad, crab puffs, baked shrimp, and falafel meatballs and mushrooms.

Mother only marked one recipe: “Shrimp Dip”, made from cream cheese, sour cream, greeen onions, and cooked shrimp (she used canned shrimps). She called it “Delicious”. My parents often got together with their friends for cocktail parties, and these sour cream-cream cheese based dips were popular in that era. My favorite was a clam dip.

One more plus for this cookbook. A lot of the recipes can be made ahead or at least a lot of the prep work can be done the day before. I find this book friendly and helpful!

I decide to make Appetizer Mini-Quiches for this blog.

Mini Quiches recipe

These should smell wonderful coming out of the oven, bacon and cheese in a home-made pastry. Yes they will take a little fuss, but I’ll use the help of my “girls” (daughter and daughter-in-law) and it will be fun. I made the filling the day before, and cut the recipe in half. Below is my version.

Mini-Quiches
makes about 30

Filling:

  • 3 strips bacon
  • 2 ounces mushrooms, chopped
  • 2 tablespoons green onions, chopped
  • 3 ounces grated Swiss cheese
  • 1 egg
  • 3/8 cup sour cream

Pastry:

  • 1 cup flour
  • 1/4 teaspoon salt
  • 1 1/3 ounces butter, chilled and cut in chunks
  • 1 1/8 ounces solid vegetable shortening, chilled and cut in chunks
  • 1/4 teaspoon caraway seeds
  • 1 egg, beaten and mixed with a tablespoon water

Cook the bacon; remove from pan and crumble. Leave a little of the bacon fat in the pan, then cook the mushrooms in it. Combine the bacon, mushrooms, green onions, and Swiss cheese.

Beat the egg and add the sour cream. Set the bacon mixture and the egg mixture aside while you prepare the pastry.

Put the flour and salt in a food processor and pulse a couple times to mix. Add the butter and shortening and pulse 6-10 times, until the mixture resembles fine crumbs. Pour into a bowl, then add the egg-water mixture a little at a time, mixing into the dough with a fork or your hands until the dough clings together. (You probably won’t need all of the egg-water mixture.)

Have ready a muffin pan – or “pans” if you have more than one. The bottom of each of my muffin tins measures about 1 3/4-inches. I did not grease the pan.

Roll the dough about 1/8 to 1/16-inch thick. Use a 2-inch biscuit cutter to cut circles of dough, and put the circles in the muffin pan cups. Continue re-rolling scraps of dough until the pastry is used up.

I had help rolling these out! We made about 28 cut-outs.

Divide the bacon mixture on top of the pastry in the pans. Then, spoon about 1 teaspoon of the egg-sour cream mixture on top of the bacon mixture. Here they are ready to bake.

Mini Quiches

Bake at 375˚ for 20-25 minutes, until the filling puffs and the tops are lightly browned.

Mini Quiches

These were so good it was hard to get them onto a serving plate before they were all eaten! A winning recipe.

Note that these can be varied easily, for instance, the original recipe has a variation of ham, green chiles, green onions, and jack cheese. You can make these ahead of time and reheat in a 350º oven for 10 minutes.

Favorites: Applesauce-Carrot Muffins

Applesauce Carrot MuffinsThis recipe was in my short-list of muffins in my 1990s blog, as were my Lemon Poppy Seed Muffins. I made them last week and I still really like them. Not only do they taste good, but they have carrots, apples, and whole wheat flour to boost the nutrition, and are low-ish in fat.

Applesauce-Carrot Muffins

  • 1 cup flour
  • 3/4 cup whole wheat flour
  • 1 teaspoon baking soda
  • 1/2 teaspoon salt
  • 1 teaspoon cinnamon
  • 1/2 teaspoon nutmeg
  • 1 egg
  • 1/2 cup sugar
  • 1/4 cup oil
  • 1/4 teaspoon vanilla
  • 1/2 cup milk
  • 1 cup applesauce
  • 3/4 cup grated carrots

Beat egg and sugar until fluffy, then beat in oil, milk, and vanilla. Stir in applesauce. Combine flours, baking soda, salt and spices in large bowl. Stir applesauce mixture into flour mixture only until just blended. Quickly fold in carrots.

Put into 12 muffin-pan cups. Bake at 400˚ for 15 to 18 minutes until lightly browned.

Less-calorie alternative:

As written, these have about 150 calories each. You can shave the calories and still have a pretty good muffin by using 5/8 cup skim milk and only 2 tablespoons oil and using either 2 egg whites or egg substitute for the egg and using a scant 1/2 cup sugar.

Favorites: Moo Shoo Turkey

If my eyes fall upon the bottle of hoisin sauce in my refrigerator, I think of Moo Shoo Turkey and get a hankering to make this for dinner. Moo Shoo Turkey is really just a stir fry in a flour tortilla, why do I like it so much? Dunno. I included it on the short list of main dishes in my 1990s blog, and I still make it today, in 2013. I am not sure where I got the original recipe, must have been from a magazine or newspaper. It is low-fat, and tasty. It takes a little while to pull together the ingredients, so I won’t say it’s really “simple”. But it’s worth it.

Hoisin sauce is a “sweet and garlicky bean sauce” (Cook’s Thesaurus). I find that different brands taste quite different. I have found it at the Asian Seafood Market, Safeway, and Whole Foods (my current brand). It’s essential for this dish.

I sprouted mung beans to make the bean sprouts for this dish. Why? Because I could. Also, I often find that supermarket bean sprouts (1) come only in a large package and (2) are often slimy by the time I go to use them. If you are in Boulder, though, you can drop by the Asian Seafood Market and buy just the right amount of very fresh bean sprouts, as she sells them in bulk.

Photography: I’m finding that cooked entrees often take terrible pictures. So I’m trying something new, a photo of the ingredients for this dish. They take a pretty picture:

ingredients for Moo Shoo TurkeyMoo Shoo Turkey
serves 2 (depending on appetites)

Combine and marinate at least 30 minutes (can marinate all day):

  • 3 tablespoons soy sauce
  • 1 tablespoon lime juice
  • dried hot peppers (a few shakes)
  • 12 ounces raw turkey breast, thinly sliced

Prepare/gather:

  • 1 clove garlic, minced
  • 1 teaspoon grated or minced fresh ginger
  • 1 carrot, julienned
  • 1 cup shredded cabbage
  • 1/2 zucchini, julienned
  • several mushrooms or shitake, sliced
  • 1 tablespoon soy sauce
  • 1 cup bean sprouts
  • chopped green onions for garnish
  • hoisin sauce
  • 3 flour tortillas

Stir fry the garlic, ginger, and carrot for a couple minutes on medium-high heat (use as little oil as possible). Then add 2 tablespoons of water to the pan, cover, and cook for 1 minute.

Uncover the pan and add the cabbage, zucchini, mushrooms, and the 1 tablespoon soy sauce. Cook a few minutes, until the vegetables soften. Then remove the vegetable mixture from the pan and set it aside in a bowl.

Add the turkey with its marinade and cook until the turkey turns white and liquid is slightly reduced. This will take 5-10 minutes.

Add the vegetable mixture back to the turkey mixture in the pan and add the bean sprouts too. Heat through – just a couple minutes. Sometimes I thicken this mixture with 1-2 tablespoons cornstarch mixed with 1/4 cup water.

Spread flour tortillas with 1-2 tablespoons hoisin sauce each. Microwave them a few seconds to heat and soften, then add the turkey-vegetable mixture and some chopped green onions. Serve immediately.

I’m kind of generous with the hoisin sauce:

Moo Shoo Turkey This looks kind of lonely on the plate. I often serve it with Chinese-style stir fried rice.Moo Shoo TurkeyLonely or not, Moo Shoo Turkey was great once again!

graphic

Favorites: Southwestern Grilled Chicken

I clipped this recipe back in the 80s from the Colorado Daily, the campus newspaper of the University of Colorado, Boulder. Me, a seasoned cook, using a recipe from a campus newspaper, a resource that targets the 18-24 year old crowd! But this is a great dish for families too. I included it on the short list of main dishes in my 1990s blog, and I still make it today, in 2013. It is simple, low-fat, and tasty.

The original recipe suggested serving with grilled or broiled green, red, and yellow bell peppers. Instead, I always serve it with a good, chunky salsa, rice, and warmed corn tortillas.

Southwestern Grilled Chicken
serves 3-4, depending on appetites

  • 8 oz. plain yogurt (Greek yogurt works great)
  • 1/4 cup chopped green onions
  • 8 oz. chopped green chiles (canned work fine)
  • 1 teaspoon cumin
  • 1/2 teaspoon salt
  • 1 tablespoon mayonnaise
  • 1 pound boneless chicken breasts (or chicken tenders)
  • hot salsa (your choice)
  • cilantro (optional)
  • cooked rice

I generally start this in the morning and let the chicken marinade all day, but a couple hours is sufficient.

Combine the yogurt, onions, chilies, cumin, and salt. Remove about 2/3 cup of this mixture, mix it with the tablespoon of mayonnaise, and set it in the refrigerator for later use (it’s a sauce for the cooked chicken).

Put the rest of the yogurt mixture in a bowl and add the chicken pieces. You can make the chicken extra tender by piercing it a lot with a sharp fork. Cover the bowl and set the chicken-marinade mixture in the refrigerator.

About a half hour before dinner time, remove the chicken from the yogurt marinade. Cook the chicken either in a broiler or on the grill:

  • broil about 5 minutes per side 4-5″ from an oven broiler set on high OR
  • grill over medium high direct heat, about 5 minutes per side

The chicken is done when an instant-read thermometer reads about 165˚. If you don’t have a thermometer, check for doneness by cutting into one of the pieces with a knife (it should no longer be pink inside).

Slice the chicken into 1/2″ thick pieces and plate it with the cooked rice. Sprinkle with chopped cilantro if you wish. Serve it with the reserved yogurt mixture and hot salsa. Warmed corn tortillas make a great addition!

Southwestern Grilled Chicken

Favorites: Lemon Poppy Seed Muffins

“Muffins are one of my favorite breakfast foods. You can bake up a batch on the weekend, freeze them, and microwave one for breakfast direct from the freezer.”

The above was written by me for my 1990s blog, and it’s still true! I have over 40 muffin recipes in my personal “Muffins” document!

I published this recipe for Lemon Poppy Seed Muffins in my old 1990s blog. I call this recipe “my own”, since I pooled several recipes and tweaked the ingredients until we all thought them perfect.

I don’t make these muffins a lot any more. They come with a pretty high calorie and fat content (about 225 calories/muffin), and it’s hard to eat just one of these. And today I choose butter over margarine, and usually try to use a vegetable oil instead of butter. Saturated fats and all that. Finally, I like my breads to pack more of a fiber and nutrient wallop, and these muffins offer little of either.

I save these muffins for special occasions, when we have company or when I’m in the mood to through caution to the wind. Or when I commit to extra 10 minutes on the stair climber.

I guarantee, these are great muffins.

Lemon Poppy Seed Muffins

  • 2 cups flour
  • 1 teaspoon baking soda
  • 1 teaspoon baking powder
  • 1/4 teaspoon salt
  • 1/2 cup margarine
  • 3/4 cup sugar
  • 2 eggs
  • 2/3 cup sour cream
  • 1/4 cup lemon juice (preferably fresh)
  • 1 teaspoon vanilla
  • 3 tablespoons poppy seeds
  • 1 teaspoon grated lemon peel

Stir together flour, baking powder, baking soda, and salt. Cream margarine and sugar until fluffy, then add eggs one at a time. Add flour mixture alternately with sour cream, lemon juice, and vanilla; beat until blended. Fold in poppy seeds and lemon peel.

Put into 12 muffin cups and sprinkle tops with sugar if desired. Bake at 375˚ for 18-20 minutes.

muffins

1990s blog and favorites: Botched-Up Cassoulet

CassouletI call this “Botched-up Cassoulet” because I do know that a cassoulet is a famous French entree that if prepared according to tradition, is complicated and takes days to prepare. I have an e-mail from a “fellow food fiend” who describes making this dish:

I have been cooking for three days. First I made a complicated true French cassoulet including sausage, lamb and duck. I even bought these wonderful white beans that I can only get in the Bay Area. When we were there over the weekend I stocked up. I wish you could see these beans, they are so beautiful I can barely stand to cook them. They look nothing like beans in a bag.

I looked up “cassoulet” in my authoritative cookbook, The Best International Recipe (from Cook’s Illustrated, Christopher Kimball). Sure enough, a cassoulet recipe is offered: flageolet beans, boneless pork shoulder, garlic pork sausages, and confit duck legs. The duck confit alone takes over a day to make. And the authors admit that even this is a toned down version, appropriate for a home cook. (But we all know, hint hint, that a true cassoulet can only be made by a properly trained chef.)

I offer instead a tasty version that is very good and can be relatively low in fat. While being high in fiber and nutrition. And being very easy to make. The original recipe is from one of my slow cooker cookbooks. I’ve made this tons of times and included it on the short list of recipes in my 1990s blog. It’s yummy, even to my non-bean-loving dining partner.

Botched-Up Cassoulet (crock pot method)


1990s note by me: A true European “cassoulet” is, I believed, baked in a special ceramic casserole under special conditions. I remember reading about it once. It is one of those esoteric topics that true chefs like to go on at length about. Here is my version. Do not be afraid to substitute anything, just keep the total liquid to the amounts specified.

Serves 2-3 people.

  • 15 oz. can navy beans*
  • 8 oz. can tomato sauce
  • 2 carrots cut into 1/2 inch pieces
  • 1 stalk celery, cut into 1/2 inch pieces
  • 1/2 cup chopped onion
  • 1 clove garlic, minced
  • 1 bay leaf
  • 1/2 teaspoon basil (use a tablespoon of fresh basil if you have it)
  • 1/2 teaspoon oregano
  • 1 cup water plus 1 teaspoon chicken bouillon (or use chicken stock)
  • about 1 cup chicken, cooked or not
  • about 3/4 cup ham or sausage

Put it all in the crock pot and cook on low 10-12 hours.

*Navy beans are those small white beans, often sold as Great Northern beans. Instead of using canned, you can buy them dry, soak overnight, and boil, with salt to taste, until done.

Non-crock pot method

You might note that the photo at the top of this page reveals that I cooked the cassoulet in a Le Creuset rather than a slow cooker. Sometimes I prefer to cook it this way. Part of the problem is that my current slow cooker is pretty big and a meal for two people gets lost in it. So, the following is my method for baking the cassoulet in a covered casserole. I like to cook the onions first, and the Le Creuset allows me to do that on the stove top and then add the rest of the ingredients for the baking step.

Directions: Use the same ingredients as listed in the slow cooker method, above. Begin by cooking the onions until they are soft, then add the garlic and cook 30 seconds. (If your casserole cannot be used on the stove top, you can skip this pre-cook step.) Combine all of the ingredients in the casserole and cover it. (My choice for chicken is bone-in, skinned thighs. I used three of these chicken thighs along with a half-cup of ham for the two of us when cooking the cassoulet in the photo.)

Bake at 325˚ for two hours. Then, uncover, turn the oven up to 400˚, and cook for about another 20 minutes. Check a couple times during this uncovered baking period; it’s time to take it out of the oven when most – but not all – of the liquid has evaporated.

This is extra good with some bread crumbs on top. So if you want to, roughly shred  enough sourdough bread to make about 3/4 cup crumbs. Saute these large crumbs in a small amount of butter. Put on the uncovered casserole in the last 15 minutes of the baking time.

Read the introduction to my 1990s cooking blog for background information.


Favorites and 1990s Blog: Beef Jardiniere Crepes

This favorite recipe for leftover beef in crepes was in my 1990s blog. I’m listing it in both categories because unlike the cookie recipes, which I can  make only rarely, I make this recipe a lot.

I love to make crepes. They are so pretty and yummy. They do take a chunk of time, though, since I always mix them and then let the batter sit for at least an hour before cooking. And pan-cooking the crepes is time-intensive, at least for about 10-15 minutes. This all means that (for me) the time chosen to make crepes is traditionally a slow, leisurely pocket of time, a Sunday afternoon, a time with nothing pressing.

Crepes can be made ahead of time and stored in the refrigerator for several days. For Beef Jardiniere Crepes, I used to make the crepes, filling, and sauce on Sunday, and then on a weekday quickly put them all together and bake. Then it was a 30-minute weekday meal, and delicious and low calorie.

I have watched Alton Brown make crepes on TV, and read about them elsewhere. I make them a little different. I cook both sides, and rarely are my crepes “lacy”. If crepes are lacy, all the good moist filling leaks out. And I really don’t understand why one would only cook one side. Maybe mine are thicker. Maybe mine are better.

I do use a pan sold specifically for crepes. I bought it years ago and it looks like it. It is a cheap, light, non-stick pan with shallow sides. Any 8-10″ non-stick pan will do. To save calories, I lightly coat the pan with non-stick spray (instead of butter) before cooking each crepe. Details on my method are in the text and photos below.

Beef Jardiniere Crepes


I make these a lot. They are yummy, on the low-calorie side, have lots of veggies, and use up leftover roast beef. Plus I just like crepes. [Note to myself in my personal recipe file.]

This recipe serves about 4.

Crepes:

  • 2 eggs
  • 1 cup milk
  • 3/4 cup flour
  • 1/2 teaspoon baking powder
  • 1/4 teaspoon salt

Filling:

  • 1 pound leftover cooked beef, chopped into 1/4-1/2″ dice
  • 1 1/2-2 cups beef broth
  • 1/2 cup chopped onion
  • 1/2 cup chopped celery
  • 3/4 cup chopped carrots
  • 1/2 teaspoon dried basil or fresh basil to taste
  • 1/2 teaspoon dried sage or fresh sage to taste
  • salt and pepper to taste
  • 1 tablespoon cornstarch mixed with 1/4 cup water

Sauce:

  • 1 1/4 cup reserved cooking liquid
  • 1 tablespoon catsup
  • 1 tablespoon red wine (optional, but good)
  • 1/8 teaspoon garlic powder
  • salt and pepper to taste
  • parsley, fresh or dried, to taste
  • 1 tablespoon cornstarch

Place all crepe ingredients in a blender and blend until smooth, stopping and scraping down a couple times, about 1-2 minutes. Let stand at least one half hour before making the crepes, then blend briefly again.

(At this point, you can jump down to making the filling while the crepes rest.)

Heat a non-stick skillet on medium high until a drop of water sizzles when put in the pan. Or, hold your hand an inch above the pan and see if noticeable heat is coming off it. I keep my pan on a setting between 8 and 9 (with 10 being the highest setting). Give the pan a quick spray with something like Pam (do this before cooking each crepe). Measure out about 1/3 cup crepe batter. Hold the pan in one hand and quickly pour the batter into the pan and rotate the pan so that the batter covers the pan. Cook only 10-20 seconds, until golden brown on the bottom. Then, flip and cook the other side. Continue until all crepes are cooked. (Makes 8-10 crepes.)

Cook the onion, carrots, and celery in a small amount of butter or olive oil until the onion wilts, then add the chopped roast beef and the broth and cover and cook 15 minutes.

Pour off 1 1/4 cup of the vegetable-beef cooking liquid and reserve for the sauce. If too much of the liquid has cooked away, make up to this volume with more beef broth. You want to leave a little liquid behind in the vegetable-beef mixture too, so that it is saucy.

Add the 1 tablespoon cornstarch mixed with 1/4 cup water to the vegetable-beef mixture and cook over medium high heat until the mixture thickens. Remove from heat and set aside.

Combine all the sauce ingredients except the cornstarch. If the mixture is cool, you can add the cornstarch directly to it; otherwise, stir the cornstarch into a little water first and then slowly stir it into the sauce. Cook the sauce until thick – this takes just a few minutes.

Note: We like our sauces fairly thick. If I see that the sauce is not thickening as much as I like, I’ll add more cornstarch. This is an individual preference so feel free to make changes.

Fill crepes with vegetable-beef mixture, cover with foil, and bake at 375° for 15-20 minutes. Serve with the heated sauce.

Below is a photo of a crepe just about ready to be turned. See the how the edges are golden brown. And I wasn’t kidding when I said my crepe pan was old and worn – but it works great. crepes
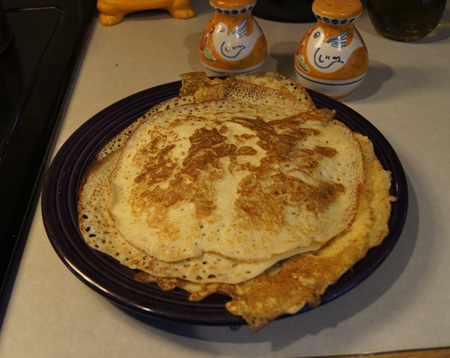
Now the second side cooks:

crepes

 A pile of crepes:crepesThe beef and vegetables cooking:

beef and vegetable filling
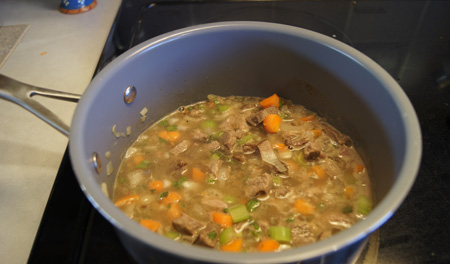
The filled crepes waiting to be covered and baked. I usually have a little extra filling that I put over the top of the filled crepes, it makes them look prettier.

filled crepes
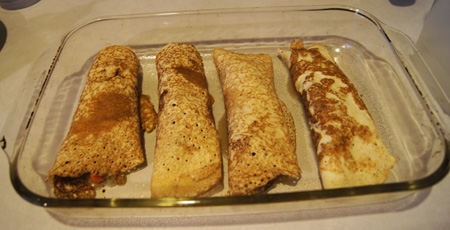
I wasn’t going to take another photo of the prepared crepes or I wouldn’t have chosen the yellow plate. But plated, they looked so pretty (we both commented on them) that I just couldn’t resist. Below is my one-and-a-half crepe serving, my calorie-allotted amount. It was very good.

plated crepes
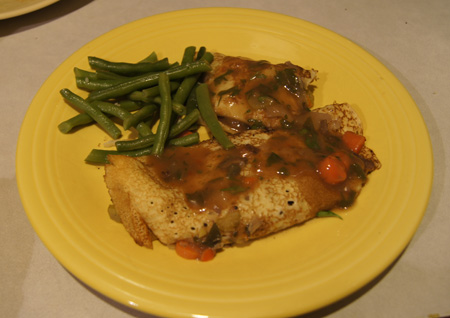
I usually have some leftover crepes. I don’t mind, I like them for breakfast. Sometimes I fill them with cottage cheese, sprinkle with a little cinnamon, roll up and cook in a non-stick pan for a few minutes. Kind of like healthy crepes suzette. Or I just heat them up and drizzle with syrup. Or we have them for dessert, filled with blueberries. Can’t go wrong having too many crepes about.

1990s blog: Main Dishes

I rushed through my 1990s blog cookie recipes at the end of 2012. I wanted to but did not make a single batch of them – that’s why I had almost no photos. Whew, cookie season is over, and I made it through with only virtual cookies!

But even without cookies, I did pack on a few holiday pounds. It’s January and time to eat scantily for a couple months. This is not the time to even think of cookies. The next section of my 1990s blog that I’ll cover is “Main Dishes” and most of them are relatively low-calorie and packed with protein and nutrients. I’ll take us through these recipes slowly, cooking and photographing most of the recipes as I go. I now realize that I already blogged one of these recipes, Chicken Casserole, as a “Favorite”.

The main dishes content in the 1990s blog was short, partly because most of the things I used to cook routinely were done sans recipe. Also, I had just started on that blog/website when, well, I was distracted and my time was spent on a website on an entirely different subject. Life’s like that.

I wrote this for my 1990s blog:

 My collection of main dish recipes is a motley one. Most “main dishes” I cook do not require a recipe, as in cooking a steak and baked potato, hamburgers, fish, etc. Spaghetti is a stand by, as is stir fry, but these don’t require a recipe. Therefore, the recipes that have made their way into this collection are only those that are a bit tough to memorize, those that are a bit more difficult to put together.

“I Was a Weekend Cook”

Yup, that was me. For over thirty years. Sunday would find me making pasta sauce, stroganoffs, stews, chiles, and soups, not to mention yeast and quick breads. I’d cook crepes and rice and pasta and store them in the refrigerator. Many casseroles could be made up to a certain point and then frozen. I’d coat chicken pieces and freeze the whole pan of uncooked chicken in the freezer. These took up a lot of freezer space, so we got a large storage freezer. I used the “timed bake” function of my oven quite often, so that I could come home to the aroma of food cooking and know that dinner would be ready soon, with just a few minutes of last-minute prep. At the time, I thought that many of my methods for the use of freezer and timed bake were unique; I’ll eventually get to these methods and recipes in this blog. I had a few crock pot recipes in my 1990s blog too.

Today my personal recipe documents number in the hundreds of pages. And I get to leisurely cook on weekdays. I’ve come a long ways, baby!