Happy Saint Patrick’s Day! That was the inspiration for these tortillas. Well, that and Sam Sifton’s recipe for Irish Tacos (New York Times Cooking website).
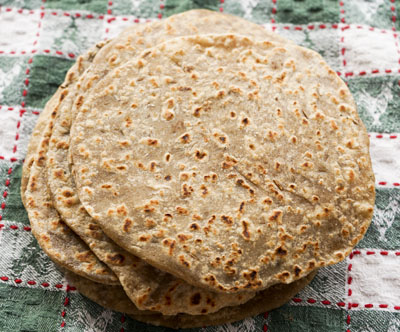
I have been making flour tortillas for awhile and have developed a recipe that I like (flour tortillas). Why not a rye bread tortilla? Should be yummy good stuffed with home-cooked corned beef and Swiss cheese and pickles and a tasty cabbage slaw. And it was! Below is how I made these delicious “tortillas”.
Rye Caraway Tortillas
cup rye flour
1 1/4 cup bread flour
1/4 cup gluten flour (or bread flour)
1 teaspoon salt
1 tablespoon caraway seed (or less – it’s up to you)
1/4 cup olive oil
1 cup water, microwaved one minute
Put the flours, salt, and caraway seed in a bowl and mix well. Add the olive oil and about half the water. Mix the dough, and continue adding only enough of the remaining water so that you have a dough that holds together and is smooth and not sticky. Continue kneading a few times, then divide into 8 portions and roll each portion into a ball.
Let the dough rest, covered, for 2-3 hours at room temperature.
Heat a heavy flat pan on a stove top burner set on medium. The pan is ready when you feel good heat when your hand is about 3/4 inch above the pan. You do not want it smoking hot. I use a remote temperature sensor and try to get (and keep) the pan at about 400˚.
Roll the balls of dough into 8-inch circles. Put a tortilla on the pan and let it cook for about 20-30 seconds on the first side. It is ready to flip when light brown spots appear on the underside (peek!). Flip, and cook the other side of the tortilla the same way.
It’s January, the time for New Year’s resolution-inspired diets. And poor me, the grain-loving cook, who has a husband that believes in the effectiveness of low-carb diets. What’s a spaghetti without pasta? A stir-fry without rice? A burrito without a tortilla?
I came up with some good low-carb-substitutes for pasta and rice this year, substitutes that both of us like. For noodles, I take a medium zucchini, cut it in half lengthwise and then again so it’s in quarters, then run it lengthwise through my mandoline. Voila! Zucchini noodles. For rice, I process cauliflower in the food processor until it looks like rice, then lightly steam the the particles.
And a tortilla for a low-carb diet? That presented a problem. So I got to work researching online low-carb diet web sites and then went to my kitchen to modify my usual recipe for flour tortillas into a low-carb version. Happily, this post is the success of this endeavor! Below is my new recipe, and below that, a discussion of how I came up with the recipe and notes about the ingredients.
Low Carb Tortillas (my own recipe)
1 cup almond flour
1 cup coconut flour
1/2 cup vital wheat gluten
1 teaspoon salt
1 tablespoon xantham gum
1/4 cup olive oil
7/8 to 1 cup water, heated for 1 minute on high in the microwave
In a bowl, mix the flour with the salt. Add about a half-cup of the warmed water and all of the olive oil. Mix together with a spoon. Add more water only as necessary for the dough to hold together.
Turn the dough onto a breadboard and knead a few times, until the dough forms a ball. Divide the dough into 7 equal sized pieces. Work each piece of dough until it is a smooth and pliable ball. Let the dough stand, covered with a damp towel, for at least 15 minutes and up to several hours.
Cut two parchment paper pieces, about 10-inch squares. Take one of the 7 balls of dough and flatten it with your hands, then place it between the two parchment pieces. Use a rolling pin to roll each dough ball into a thin sheet, about 7-8 inches in diameter. After rolling, my tortillas had some ragged edges, so I trimmed them a bit to neaten them. (You can use a bowl to invert on the rolled dough to make perfect edges. If you have a lot of trimmed edges, you can combine them and make an eighth tortilla.)
Place a heavy, flat pan or skillet on the stove top. If possible, use a cast iron griddle. Use a paper towel to wipe a bit of oil on the pan. Turn the heat to about medium and let it slowly heat for several minutes. The pan is ready when you feel good heat when your hand is about 3/4 inch above the pan. You do not want it smoking hot. I use a remote temperature sensor and try to get (and keep) the pan at about 400˚.
Put a tortilla on the pan and let it sit for about 20-30 seconds on the first side. It is ready to flip when light brown spots appear on the underside (peek!). Flip, and cook the other side of the tortilla the same way.
Enjoy!
Recipe Development and Ingredients
My regular (non-low-carb) flour tortilla recipe has 2 1/2 cups all-purpose flour, olive oil, water and salt. For low carb-diets, almond flour and coconut flour are often used as all-purpose flour substitutes. Since almond and coconut flours have no gluten, they need something sticky to make them pliable. A popular ingredient for adding this pliability is xanthan gum. One low-carb site suggested (but did not try) vital wheat gluten, too, as this flour adds pliability and is relatively low in carbohydrates.
Xanthan gum is newly-discovered ingredient for me. I first tried xanthan gum a few weeks ago, using online recipes for both low-carb “corn” tortillas (made entirely from almond flour) and low-carb flour tortillas (made entirely from coconut flour). The xanthan gum was a success, the tortillas were not. It was amazing! I had this funky “corn” almond flour tortilla that folded easily, but tasted like . . . well, like dirt. When I tried solely coconut flour as the flour in tortillas, they they were again pliable, but they tasted sweet and like coconut.
What is xanthan gum? It’s a bacterial product made by fermenting sugar with Xanthomonas campestris. It is sold as a dry powder and it is fun to put in water because it immediately forms a gel! Is xanthan gum a healthy ingredient? According to WebMd, it is considered “likely safe” when used as directed. It’s main concern is that it is a laxative – a fact I found out the hard way when I tried using double the amount called for in an early trial. Don’t do that! That swelling in water to make a fun gel does the same “fun” swelling in your intestines.
I find xanthan gum readily available, on shelves in the supermarkets or online.
What is gluten flour? Called either “gluten flour” or “vital wheat gluten”, it is the glue that holds wheat bread together, that adds elasticity to doughs. I’m a fan of gluten flour, have been for years. (See Flours and yeast and My Daily Bread.) When added in small amounts to whole wheat flour, it helps the heavy flours rise up to fluffy loaves. Carbs in this flour? One tablespoon of gluten flour has 35 calories and 1 gram carbohydrate. My tortilla recipe calls for 1/2 cup or 8 tablespoons gluten flour, so that is 8 grams of carbohydrate per tortilla if you make 8 tortillas.
Vital wheat gluten can be hard to find these days. And to think, I used to purchase in from the bulk bins in either Whole Foods or Safeway! Nowadays I order it from King Arthur Flour. Bob’s Red Mill sells it too.
The combination of almond, coconut, and vital wheat gluten flours gives the tortillas a good taste, and the proper amount of xanthan gum lends them perfect pliability. I also like the olive oil in the tortillas – if you are going fat-free, you could leave it out.
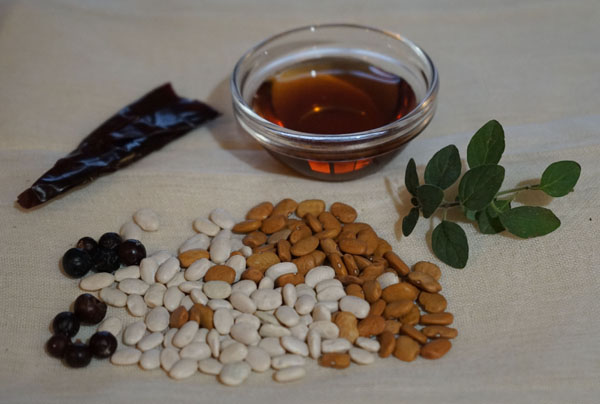
Clockwise: agave nectar, oregano leaves, brown tepary beans, white tepary beans, juniper berries, and dried New Mexico chile.
The Sioux Chef’s Indigenous Kitchen by Sean Sherman with Beth Dooly, University of Minnesota Press, Minneapolis, London, 2017. This book Tcame to me as a gift from my daughter. For a year it’s lain on the table by my reading chair, and I’ve spent hours flipping through its pages, admiring the photos, learning about the relationship of the land and indigenous peoples, and enjoying the stories of living with the bounty of our beautiful surroundings. But cook from the recipes? Well, I did make something with dandelion greens, but that is as far as I got. It’s not easy finding all the ingredients to make the recipes, and I gave up.
That changed when I came upon an article in a November issue of the New York Times: Sean Sherman’s 10 Essential Native American Recipes. Now I’m off and running to make “Tepary Beans with Chile-Agave Glaze”. I am re-inspired!
My first step is to gather my ingredients. Kind of like, turning on the oven. A start. It would be great if I could find the ingredients on our three acres of Colorado land, but the grasses and dandelions are brown with winter, we have no cedar branches, no wild grains, no fish, and I am not about to kill one of our bunny rabbits.
So I take my search instead to local and online stores. For Tepary Beans with Chile-Agave Glaze, I am searching for brown tepary beans, white tepary beans, agave nectar, and juniper berries. I also need chestnuts for a stuffing recipe, so I add these to my search list, as they are another of the foods discussed in the Sioux Chef.
Tepary Beans
First, the beans. The Sioux Chef tells me that beans are the “backbone of Native cuisine . . . add body to soups, stews, and salads . . . pureed, they become a dough for fritters, burgers, and croquettes”. And so many native beans they have! On pages 40-41, Sherman lists 22 kinds. A few I recognize: anazazi, black turtle (black beans), great northern, lima, navy, pinto, rice (wild rice), and southern peas (black-eyed peas). I learn that tepary beans are native to the Sonoran Desert of Arizona and Mexico. Their flavor is “earthy and pronounced”.
I turn to the internet for a source of tepary beans. Helpfully, the article in the NY Times gives me a link to Ramona Farms. On that site, I learn that tepary beans, or bafv, are among the world’s most drought-resistant edible beans. Ramona Farms is on the Gila River Indian Reservation in Arizona. Its proprietors are Ramona Button and her husband Terry. They work to preserve indigenousspecies of plants, including teparies, which had become almost extinct by the late 1970s. Luckily, the couple discovered that Ramona’s father had left “a few seeds of the white and brown tepary beans in glass jars in a trunk in the old adobe house that [Ramona] grew up in”. From this source, they are now able to offer them for sale to the local population and luckily, to interested foodies like me.
I add both brown and white tepary beans to my online cart at Ramona Farms. Then I add some “parched pima cornmeal”, just to try it. It is touted as “Hand harvested, hand parched, hand processed and packed to order! Great in cornbread. You will be surprised at the flavor the roasting adds to your cornbread. Get creative and make your own masa!” This parched cornmeal sounds interesting – I look forward to using it in cornbread. (P.S. A few days after I checked-out my Ramona Farms online cart, I get a personally written shipment confirmation. Nice touch.)
Agave
Agave nectar is the next ingredient on my search list. I learn from the Sioux Chef that indigenous peoples employed tree sap, honey, agave, and fruit as sweeteners. “Our ancestors relied on sweet foods for energy; they played an important role in a healthy diet and were not considered indulgences.” Generally, sweets were eaten throughout the day, for energy, as opposed to the European convention of having sweets after a big meal.
Agave “nectar” is more accurately called a “syrup”, as it is cooked down from the core of agave plants. Agave are big leafy plants of the species agave americana or agave tequilana (blue agave); they are also known as the century plant or American aloe. And yes, agave juice is fermented and distilled to make mescal. Tequila!
I kind of figure I can find agave nectar at Whole Foods, and I am correct. I have the choice of different brands and different types: light agave, blue agave, raw agave, or amber nectar. I decided to choose an agave nectar as close as possible to what the indigenous populations might have used, so I put a bottle of the dark, unfiltered agave nectar in my basket. Later, I find online that unfiltered agave nectar has more minerals than the other types. I also learn that light agave nectar has a mild flavor, amber nectar bit more caramel-like flavor, and dark or raw agave strong caramel notes and a distinctive flavor. If it is labeled “blue agave”, it is specifically made from that species of agave. The main sugar in agave nectars is fructose. Fructose is about one and a half times sweeter than sucrose, the main sugar in cane sugar (suggesting you would need less of it to sweeten a dish) and agave nectar has a relatively low glycemic index. This article on Healthline.com explains current nutritional thoughts on agave (2019).
Just what does agave taste like? I open my bottle of raw agave nectar and gently put a clean fingertip in . . . taste it . . . YUM! It’s less viscous than honey, and is very sweet with a pleasant flavor all its own. Not honey, not maple syrup, not brown sugary, just gently agave.
Juniper berries
Juniper berries are next. Decades ago, we actually had juniper plants in our planters, but (understandably) I did not save any seeds. Probably I will have to go to the Savory Spice Shop in Boulder for these, but I decide anyway to check while at Whole Foods. Voila! I find them in the spice section, near the bulk foods. A spice jar of dried juniper berries for less than 5 dollars.
According to the Sioux Chef on juniper: “We rely on the peppery astringent notes of juniper to do the work of pepper in our food . . . Fresh or dried, it’s best crushed before adding; note the the flavor is quite strong. Substitute with pepper.” This description in the first pages of the book illustrates how helpful the author is in helping his readers know how to use unusual ingredients, and how to substitute if necessary. On page 181, he states of the juniper: its “dusty blue berries are peppery and give foods a ginny edge”. The book includes includes photos and descriptions of juniper and also bergamot, sage, cedar, mint, staghorn sumac, mustard, and rose hips.
Chestnuts
Chestnuts are the final search item on my list. I check the index and flip to page 141 of the Sioux Chef. “Until the early 1900s, American chestnut trees filled our forests from Georgia to Canada, stretching west through Ohio to southern Wisconsin, Minnesota, and Iowa.” Around the turn of the twentieth century, “plant hobbyists introduced Asian chestnut trees and inadvertently imported a fungus”. Turns out, this fungus invaded American chestnut trees and decimated the population. Today’s American chestnuts are a hybrid variety.
I am a girl of the western US, California and Colorado, and have never seen chestnuts on a tree nor had them as a tradition in family meals. Never had “chestnuts roasting on an open fire”. Have no idea what they taste like. When I run across a Thanksgiving stuffing casserole recipe with chestnuts, I decide to make it. I find chestnuts at Whole Foods, a large jar of them, peeled and in some sort of liquid. Fifteen dollars! I get them anyway.
On to cooking!
As I finish writing the above sections, I get a notice from the post office that the tepary beans from Ramona Farms are at the post office. I will pick them up today, and I am pretty excited, just to think, they are heritage beans, grown by indigenous food devotees in Arizona. I am able to help support them as well as taste a bit of what the folks who used to live on our continent ate before us Europeans came and built supermarkets. So, to the post office I go! Then, home to cook.
I studied Sherman’s recipe in the NY Times, then just plunged in. I did not measure exact ingredients, I treated it as a no-recipe recipe (ala Sam Sifton, NY Times). I used the vegetable oil I had around (the recipe suggests sunflower oil), and I used generic salt (the recipe calls for sea salt, which I learn from the Sioux Chef was a traded commodity, used often as currency). For the chili powder, I used pulverized dried New Mexico chilis. These were quite hot, so you may have to adjust the chile powder you use or the amount (I used about half a tablespoon). The juniper berries are my own addition to the recipe, and totally optional.
ingredients
tepary beans
agave nectar, preferrably unfiltered
salt (sea salt if you have it)
chile powder (use dried, pulverized New Mexico chiles or use jarred commercial chile powder)
onions
vegetable oil (calls for sunflower oil; I used a blend of canola and other oils)
oregano (dried, fresh, Mexican or European)
optional: a couple juniper berries, crushed
instructions
Begin the night before by soaking the tepary beans. I used 1/2 cup white and 1/2 cup brown tepary beans. First, pick over the beans, then put them in water to cover by a couple inches. (I actually soaked them two nights, the second night in the refrigerator.) After the soak, drain them and pick over again.
Put the tepary beans in a pot and cover with several inches of water. Add a teaspoon or so of salt. Bring to a boil and then simmer for about two hours, checking a few times for done-ness.
As an alternative cooking method in the future, I might try:
a slow cooker: First on high for an hour, then on low for 6-8 hours.
a pressure cooker: Soak a cup of tepary beans overnight, drain, then place in a pressure cooker with 2 cups water and some salt. Set the cooker to high pressure, 35 minutes, then allow the pressure to release naturally for 5 minutes before a quick pressure release. (Verified 2022. 35 minutes on high gets them almost soft, and the water above the cooked beans is sufficient. I removed a bit of that water and cooked the beans without pressure until the mixture was as I liked it and the beans done. I came up with this method using my studies of my electric pressure cooker in 2020.)
When the beans are tender, drain them. I ended up with 3-4 cups. Try to remember to save 1/2 cup of the cooking liquid (you sort of need it later).
Measure out as many tepary beans as you like for the meal at hand. I used one cup cooked beans and saved the rest for a chili or the like.
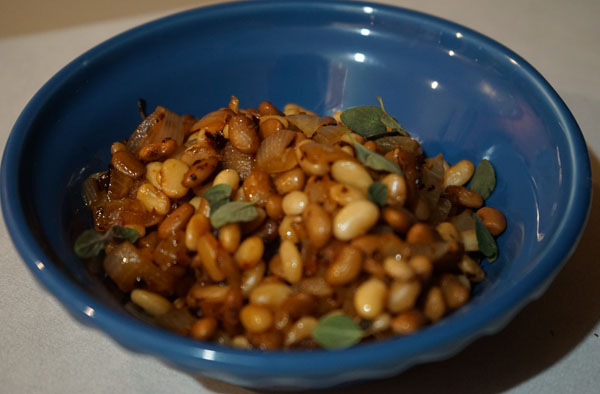
Saute about 1/4 cup onion in a tablespoon or so of vegetable oil until the onion is soft. Add the cooked, drained tepary beans and stir a few minutes. Taste for salt and adjust as to your liking. Add a tablespoon of agave nectar, half a tablespoon of chile powder, and about a half cup of the reserved bean-cooking liquid (or plain water, if you forgot); cook down until the water has evaporated and the beans are nicely glazed. Add a crushed juniper berry (if you have it, otherwise use some black pepper) and a scant teaspoon of dried oregano (Mexican oregano if you have it). Taste, and adjust seasonings. I ended up adding more agave nectar – my chiles were quite hot so I added no more of those. I served with a few fresh oregano leaves.
I liked these a lot. The tepary beans are earthy, and small and firm. The agave glaze makes them just wonderful.
Tamales are great, but kind of a pain to make. At least, that’s my usual feeling about them. Since I’ve entered my retirement phase of life, though, I have more time to cook, so I’ve been exploring different types of potentially lengthy recipes. Tamales are my current project.
A couple years ago I entered a tamale recipe in my “Main Dishes” document. Not sure I’ve explained my “recipe documents” before. Perhaps I should take a second to describe these? It’s like this. Back in the 1990s I began entering my recipes in a word-processor document using, of course, Macs. It began as one document in Word. Then I split into categories and put them in Framemaker. After Adobe stopped making an Apple version of Frame, I moved them all to Apple’s Pages. I sometimes treat my recipe documents like a diary – I talk to myself in them. My tamales entry is a great example of this trend of mine, and it’s also the recipe that is the focus of this blog entry.
So here we go, my tamale recipe in my Main Dishes document:
“Can’t believe I’ve never written down a recipe for tamales! Guess I always use the recipe on the back of the masa harina or the tamale kits I used to buy (Melinda’s?).”
[Actually, it was Melissa’s. On their site: “Melissa’s Tamale Kits take all the pain out of preparing a delicious, impressive meal”. The kit includes clean corn husks, masa, and a recipe. I used to find these kits at Safeway.]
“Anyway. I bought some masa marina from Bob’s Mills. No recipe on the package. I could find nothing in my notes, so I checked Cooks Illustrated. They included fresh corn! (and baking powder). I compared with a recipe in the Mexican cookbook that I got from Mother. I drew up a recipe mid-way between the two on amount of lard, and yes, I used lard. I steamed them in my stove top bamboo steamer. These were great.”
“The filling can be anything almost. I used some (wet) pork green chile and a few sliced whole olives and a little cheese mixed in. I would have liked queso fresco. John likes a sauce on top, but not a fresh salsa. Try some enchilada sauce on his. I am happy with no or very little sauce, but even my preference can be swayed by how wet the filling is. The cooked masa stands out better if the filling isn’t too wet.”
Below is the recipe I wrote down then (a couple years ago) and it is the recipe I used exactly last week. I know when a recipe is perfect in my recipe documents by the fact that when I make it, I make no new changes. That is this one!
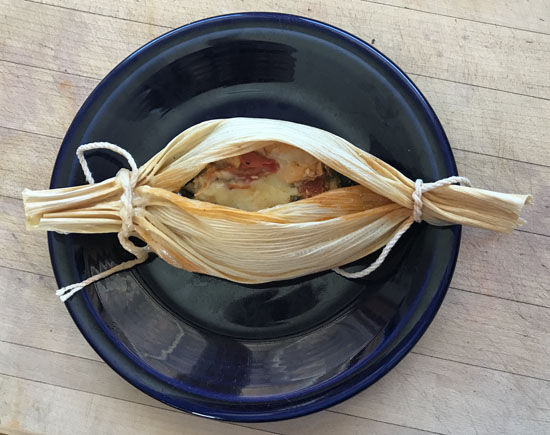
Note: This recipe is supposed to make 10 tamales, the folded style. I only make 6 because this is the way I like them! The top is open or only lightly covered by the husks. This is how they made them at the Zolo Grill in Boulder, back a few years. It allows the tamales to be fluffy and full of filling, rather than a smashed paste of filling between thick layers of masa.
Tamales, my style makes 6 large, serves maybe 3
1 cup masa
1/2 cup fresh or frozen corn
1/4 teaspoon salt
3/4 teaspoon baking powder
40 grams lard (about 3 tablespoons; you could substitute vegetable shortening)
water
filling of your choice (suggestions below)
Soak 6 corn husks in boiling water (clean them if necessary). They take about an hour to become nice and pliable.
Cook the corn for a few minutes in boiling water (on the stove top or in the microwave). Drain it. Process the corn in a small or large food processor or just chop it fine. Put this corn in a measuring cup and make the volume to 1/2 cup with water.
Put the masa, salt, and baking powder in a food processor and pulse a couple times. Add the lard in chunks and process briefly until the lard is in less than pea-sized lumps. Dump into a bowl. Add the corn/water mixture and mix the dough until it is wet. Add more water in small amounts, mixing after each addition, about a couple tablespoons total. You want the dough to hold together but do not work it too much.
Lay out 6 corn husks and divide the dough among them. Spread the dough to within an inch or so of the corn husk edges. Add filling on top. Tie the ends with string, like in my photo at the top of this page.
Steam about 30 minutes. I use a stove top bamboo steamer set inside a wok.
If you like, serve with a sauce like enchilada sauce.
Fillings
These are just suggestions! I do like cheese in chunks in my open tamales, as they melt into a nice gooey mess.
Chicken: Cook a boneless chicken breast in boiling water until done. Chop into pieces, or shred with a fork. Saute in a pan with onions and garlic, then add chiles and tomatoes (salsa, fresh, hot tomato sauce, or some other sort of mixture). I like sliced olives too. Add cumin and chili powder and cilantro and other seasonings as desired. Cook until flavors combine, then cool. Fold in chunks of jack cheese before laying the filling atop the tamale dough.
Pork or beef: Use you favorite homemade pork or green chili. Aim for up to a half-cup of filling per tamale.
Beyond that, use your imagination. Zolo’s makes wild mushroom tamales. I’ve seen sweet potato ones too. Or turkey, fish, duck with mole sauce, pumpkin . . . just use your imagination.
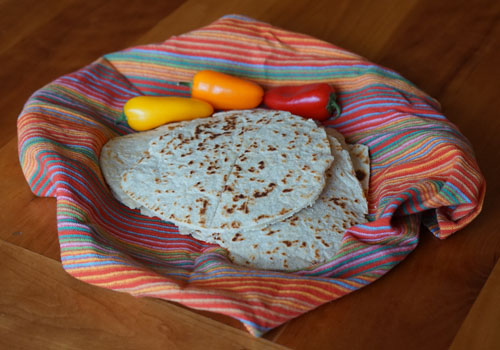
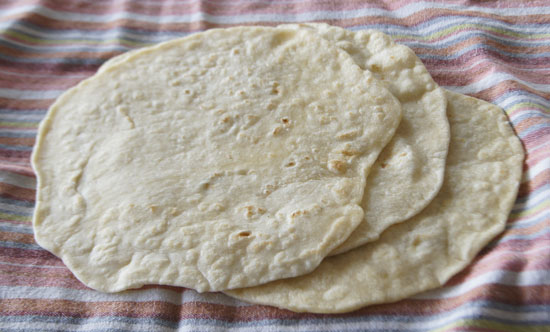
Homemade flour tortillas! Don’t they look delightful? And the tortillas in the above are my first try. My first try! I came across several recipes on the web and decided on a King Arthur Flour recipe. I’ve been using King Arthur flour and their web site for years. Turns out I was correct in choosing a recipe from this dependable site, as you can see from my photo!
The above tortillas are made with all-purpose flour and lard. After several trials with different fats and flours, I decide the recipe just below is my favorite go-to method. Below that, I go into the trials I did with different ingredients.
Flour tortillas – my “go-to” recipe
2 1/2 cups all-purpose flour
1 teaspoon salt
1/4 cup olive oil
7/8 to 1 cup water, heated for 1 minute on high in the microwave
In a bowl, mix the flour with the salt. Add about a half-cup of the warmed water and all of the olive oil. Mix together with a spoon. Add more water only as necessary for the dough to hold together. I usually end up mixing the dough with my hands. You want the dough to be smooth and not-sticky.
Turn the dough onto a lightly floured breadboard and knead a few times, until the dough forms a ball. Divide the dough into 8 equal sized pieces (by weight, if possible), form each portion into a ball, and let sit, covered with a cloth or bowl, for 2-3 hours at room temperature.
Place a heavy, flat pan or skillet on the stove top. If possible, use a cast iron griddle. Use a paper towel to wipe a bit of oil on the pan. Turn the heat to about medium and let it slowly heat for several minutes. The pan is ready when you feel good heat when your hand is about 3/4 inch above the pan. You do not want it smoking hot. I use a remote temperature sensor and try to get (and keep) the pan at about 400˚.
While you are waiting for the pan to heat, start rolling the balls of dough into 8-inch circles on a lightly floured board. I say “lightly floured” because if you use too much flour, the flour will stick to the tortillas through the cooking process. Start cooking (next paragraph) as soon as the pan is ready; I usually roll and cook a single tortilla, rolling the next one as the previous one cooks.
Put a tortilla on the pan and let it sit for about 20-30 seconds on the first side. It is ready to flip when light brown spots appear on the underside (peek!). Flip, and cook the other side of the tortilla the same way.
Trials
For the ingredients, you can choose from several fats: lard (traditional), butter, shortening, or vegetable oil. I chose lard for my first try. It came from lard in a jar that I bought at Whole Foods over a year ago. The original recipe calls for 1 teaspoons baking powder, but I left it out for Try 1.
Try 1: Simple Tortillas (with lard and all-purpose flour) Begin these tortillas several hours before you plan to cook them.
2 1/2 cups all purpose flour
1/2 teaspoon salt
1/4 cup lard
3/4-1 cup water
Mix the flour with the salt in a bowl. Divide the lard into chunks, then add it to the flour-salt mixture. With your fingers, carefully work the lard into the dough, until the lard is in small bits, each coated with flour. You could use a pastry blender or a food processor to do this, but I liked doing it “by hand”. From King Arthur flour: “Coating most of the flour with fat inhibits gluten formation, making the tortillas easier to roll out.”
Microwave 1 cup of water for one minute. Pour about 3/4 of it into the dough and immediately mix it in with a spoon or fork. Add more water only as necessary for the dough to hold together. Put the dough on a breadboard and knead a few times, until the dough forms a ball.
Divide the dough into 8 equal-sized pieces: I used a scale. Set them out at room temperature, well-covered, for about 2 hours.
Cook the tortillas about 30 seconds per side.
Results for Try 1: The tortillas looked great, but either they didn’t have enough salt or the lard was too strong a taste. Although, in burritos, the taste was hardly noticeable.
Notes: I think the “trick” in this recipe is having the dough rest for a couple hours before rolling. While browsing the web, I found other flour tortilla recipes that called for a rest before rolling, from 15 minutes to 2 hours. I chose the 2 hours, as per my own experiences with breadmaking, especially no-knead doughs. Flour does something magical when mixed with water and allowed to sit.
Another trick is rubbing the flour with a solid fat before adding the water. This makes the gluten in the flour separated by bits of fat, and it rolls out easier. How will oil work? That will come in another try.
I left the baking powder in the KA Flour recipe out. Why? The first time I simply forgot it. Later, I read this on the Mexican Please website: “And regarding the baking powder … sometimes I use it and sometimes I don’t. It will make them a little bit thicker and fluffier. That works great if you want the tortillas to double as flatbread or pita. If you want a thinner, traditional tortilla then you can omit the baking powder.” I do like my tortillas “traditional”, but I will try baking powder in one of my sets of trials.
Tries 2 and 3: Simple Tortillas (with solid vegetable shortening, all-purpose or white whole wheat flour, increased salt)
1 1/4 cup all-purpose OR white whole wheat flour
1/2 teaspoon salt
2 tablespoons solid vegetable shortening (Crisco)
3/8 to 1/2 cup water
Combine ingredients, form into balls, let rest, and cook as in Try 1.
Results: Both the all-purpose and the white whole wheat flour doughs were easier to roll into 8-inch circles than in Try 1, which was made with lard. The flavor was great in each. The whole wheat flour ones took a bit less water when mixing. They definitely have a whole wheat flavor and seem a bit heavy. I liked them better, hubby preferred the all-purpose flour ones
Notes: The pan heat: 400˚ is the target according to KA. I got the pan to 400˚ by heating on medium high for several minutes. I used the remote temperature thermometer that we use for pizzas. I found that the pan kept heating up at medium high. By the time I was on the 7th tortilla, I had the pan all the way down to 3. It was great to cook them at this temperature – no burning at all on the batch.
Tries 4 and 5: Simple Tortillas (all purpose flour with olive oil, increased salt – as in tries 2 and 3 – with and without baking powder and with salt)
1 1/4 cup all-purpose flour
1/2 teaspoon salt
1/2 teaspoon baking powder OR without
2 tablespoons olive oil
3/8 to 1/2 cup water
Mix the flour with the salt. Add baking powder to one try and leave it out of the other try. Add about half of the hot water to each try and then all of the olive oil and mix it all together. Add more water to each “trial”, but only as necessary for the dough to hold together. Put the dough on a breadboard and knead a few times, until the dough forms a ball. Divide each dough into 4 equal sized pieces, roll each into a ball, and let sit 2-3 hours at room temperature.
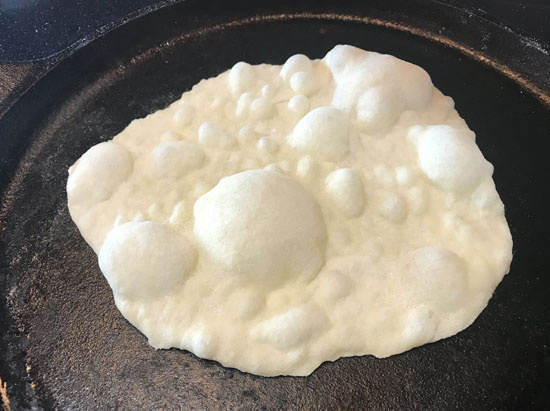
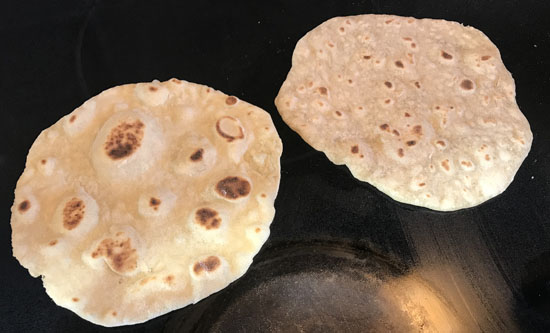
Results: In general, the olive oil trials needed less water. In fact, the tortillas were a bit smaller, and you might want to roll out only 3 from a small batch (1 1/4 cup flour size). Both the olive oil trials yielded tortillas that were more pliable than the lard or shortening trials. The tortillas made with baking powder really puffed up on cooking! After cooking, both types – with and without baking powder – were almost interchangeable.
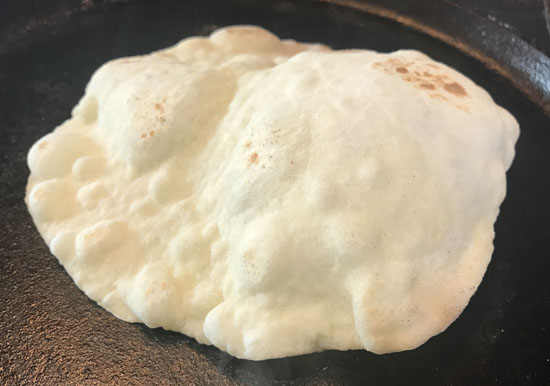
Here is one of the baking powder tortillas after a few seconds of cooking:
The same one after a few more seconds. Note how high it has puffed!
Here is a comparison of a baking powder tortilla (left) verses one without baking powder (right). The sides we are seeing are the second sides cooked. Note that the non-baking powder tortilla has smaller brown spots.
Notes: The cast iron pan kept heating up as I cooked the 8 tortillas. I started with the burner at setting 6-7 to preheat to 400˚ on my remote temperature sensor. When I added the first tortilla, I turned the burner down to 6. As I continued the cooking additional tortillas, the temperature creeped up, and I turned it the burner down to 4 or 5. The pan temperature still creeped up, and was 570˚ after I cooked my last tortilla. They were not burning at 570˚, but do keep aware of temperature changes of the cast iron pan. Cooking 8 tortillas only took about 8 minutes.
Conclusions
From my tests and tastings, I like best the tortilla method that calls for olive oil, all-purpose flour, and no baking powder. This will be my go-to recipe. I’ll probably try different types of flour – cassava, barley flour, whole wheat pastry flour, perhaps others – and different mixtures of flours, like half all-purpose and half a different flour. I use more salt than in the original recipe.
The whole wheat versions are healthier, and quite acceptable, but the others are softer and my husband likes them better, so white flour tortillas are my go-to at the moment.
My modified recipe for flour tortillas
2 1/2 cup all-purpose flour
1 teaspoon salt
1/4 cup olive oil
7/8 to 1 cup water
Mix the flour with the salt. Add about three-quarters of the hot water, all of the olive oil, and mix it all together with a spoon. Add more water only as necessary for the dough to hold together.
Put the dough on a breadboard and knead a few times, until the dough forms a ball. Divide each dough into 8 equal sized pieces (by weight, if possible), form each portion into a ball, and let sit 2-3 hours at room temperature.
Cook each side of the tortillas on a pre-heated flat pan pan. If possible, use a cast iron griddle. You do not need to oil the pan for these tortillas. If possible, monitor the temperature of the griddle with a remote sensor.
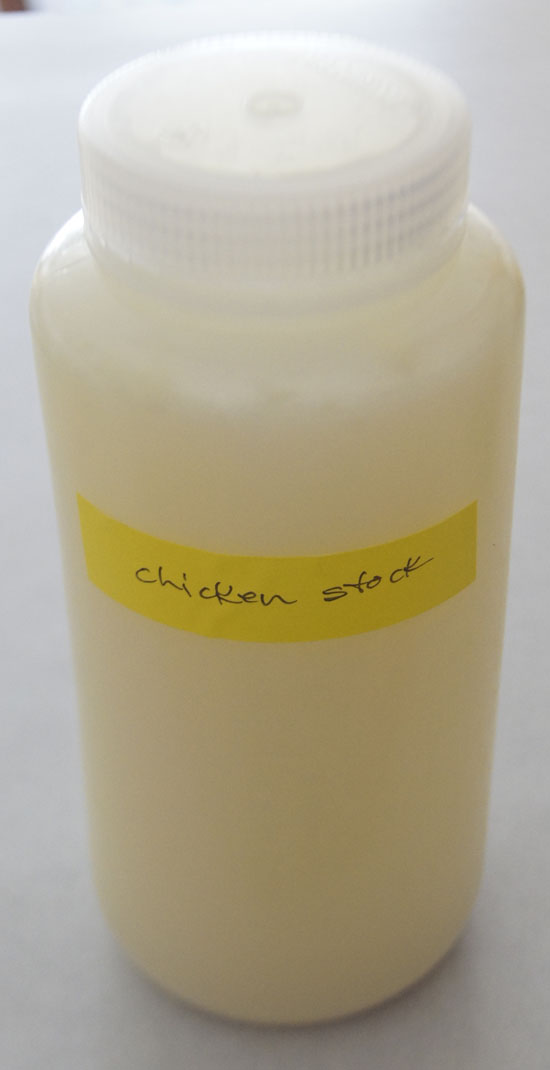
The trick to my chicken and beef stocks is not how they are made, but how they are stored. I put the stocks in wide mouth in Nalgene® high-density polyethylene bottles and store them in the freezer. (Also at Cole palmer.)
Advantage? You can pull a bottle of stock out of the freezer, microwave on high for several minutes, and pour your homemade stock into a dish you are making within a few minutes. If you don’t use the whole bottle, put it back in the freezer for next time. That way, you know your stock. Much more than you know the stock out of a box from the market. You can make it preservative free, organic, salt-free, or seasoned as you like.
And it is less expensive. I made 8 liters chicken stock (8.5 quarts, 136 ounces), an amount equal to 4 1/4 boxes of purchased stock (packaged in 32 ounce packages), for $8.50 (an organic chicken). If you purchase quality, organic stock, that is about $15.
Another advantage is that you are storing the stock in a freezable container. Thus, you simply put it back in the freezer. When I use purchased stock from a box, I often store it in the refrigerator, thinking I will use the rest soon. But often I do not, and have to throw it out in a few days or weeks.
Plus it is a stock, not a broth. Stocks are made using the bones.
My stock is much more concentrated than the water-y stock I find in the store-bought boxes.
I took a large, whole organic chicken and put it in my big 12 quart pot. I added water to cover (and more, nearly to the top of the pot), some celery and carrots (not even necessarily chopped), some salt and maybe some oregano, and simmered several hours. I stop the simmering about the time the chicken is falling off the bone.
Then I strain it through a wire strainer. It might take several batches to strain all of the stock. When the entire pot has been put through the strainer, I “rinse” the bones, meat and skin with some water.
Next, I portion the stock into large, covered containers, like big rubbermaid containers with a good lid. I refrigerate it overnight. The next day, I take it out of the refrigerator and skim off the hardened fat.
The remaining stock is a bit viscous, so I let it warm up for an hour or two. Then, I funnel it into the Nalgene bottles.
I also make my own beef stock and store it in my Nalgene bottles. It is more expensive to make, and I typically use a pressure cooker and the following recipe:
Ingredients: 3 pounds beef shanks and oxtails, a mixture Toss them in oil and then brown them in the pressure cooker (large one) on both sides. Add several carrots (not peeled) and a bunch of celery, peppercorns and 1/4 t salt. Fill pressure cooker to 2/3 volume with water, and pressure cook 50 minutes (start timing when the first hiss becomes apparent). Let cool before opening. Strain through a colander, then line a colander with cheesecloth and strain again.
This makes less stock than the chicken stock recipe, since my electric pressure cooker only holds 6 quarts. I treat my beef stock like liquid gold – it is dark brown and wonderful. So, so much better than common beef broth from the stores. Sometimes, if I have leftover beef bones from a rib roast or the like, I make my beef stock in a matter more like my chicken stock. But the small batch pressure cooker beef stock is the best.
Once I made fish stock. I got some fish bones from Whole Foods and followed a recipe from somewhere on the web. But it was stinky, and I don’t use it often, so I never made it again. I’ve made vegetable stock, I think, but I don’t use it very often and would have to find a recipe.
I do not keep any type of bouillon cubes or granules in my pantry any more. I spoil myself with my own chicken and beef stocks! The trick is storing them in microwave-able bottles in the freezer.
Cookbook #114: Vive La Machine, Moulinex Products, Inc., editor Sue Spitler, published by Marketing Communications International, USA, 1977.
“A superb collection of international recipes and menu suggestions prepared especially for the new breed of electric kitchen appliances.”
And what is the “new breed” of kitchen appliances? Food processors: counter-top machines that shred, slice, chop, and puree foods. They became available for home cooks in the US sometime in the 1970s. I got my first one in the 80s. It was a “La Machine”. Hence I own this cookbook!
But alas, that old La Machine bit the dust. It did a pretty good job of shredding: I used it a lot to grate cheese, zucchini and carrots. The slicer worked okay but it was often easier to slice small amounts of vegetables with just a knife. You had to hold a bowl under the spitter-shute because the shredded/sliced foods came flying out. I liked the nice small bowl with a spinning blade for dicing vegetables and grinding meats. A drawback of the La Machine was that it was hard to clean, since the dirty parts were not immersible.
But the big issue with my La Machine was the funky connection of the top to the bottom. I had to buy new parts at least once. I eventually replaced it with a Cuisinart brand food processor.
I kind of like this Vive La Machine cookbook. The recipes rely on freshly grated and chopped foods, thus recipes are from-scratch and up my alley.
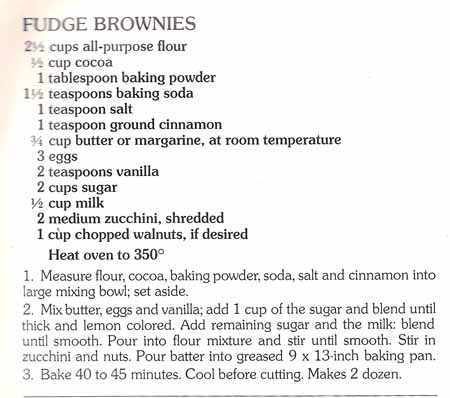
For this blog, I choose to make “Fudge Brownies”.
I am going to re-name these “Chocolate Zucchini Brownies”. They are chocolaty, but not really fudgy.
My version is below: I halved the recipe and made a couple small changes.
Chocolate Zucchini Brownies makes an 8×8-inch pan of brownies
1 1/4 cups flour
1/3 cup cocoa
1 1/2 teaspoons baking powder
3/4 teaspoon baking soda
1/2 teaspoon salt
3/4 teaspoon cinnamon
6 tablespoons butter (3/8 cup)
2 eggs
1 teaspoon vanilla
1 cup sugar
3 tablespoons milk
1 cup shredded zucchini, lightly packed (about 1 medium zucchini, whatever that is)
1/2 cup chopped walnuts
In a bowl, stir together the flour, cocoa, baking powder, baking soda, salt, and cinnamon. Set aside.
In a mixer, blend well the butter, eggs, vanilla, and sugar. Add the milk and mix in. Add the flour mixture and mix on low speed until smooth. Add the zucchini and nuts.
Pour into a greased (I used non-stick spray) 8-inch square baking pan. Bake at 350˚ for 35-45 minutes, or until it tests done with a toothpick.
This recipe is a keeper! Yes I already have about a dozen great brownie recipes, but this one needs to be put in my repertoire. These are kind of light and fluffy and are especially moist. If no one told you zucchini was in them, I doubt you would guess. And the cinnamon – the cinnamon! It adds a . . . je ne sais quoi touch . . . never leave out the cinnamon.
These brownies fell just a little bit in the center of the pan. Since we live at 5400 feet, next time I will apply my high-altitude baking suggestions to see if they help. Doesn’t matter a lot, these taste yummy!

 The trick to my chicken and beef stocks is not how they are made, but how they are stored. I put the stocks in wide mouth in