250 Cookbooks: Eat, Drink and Be Healthy

Cookbook #91: Eat, Drink and Be Healthy, Agnes Toms, Pyramid Publications, NY, NY, 1971.

Eat, Drink and Be Healthy cookbook
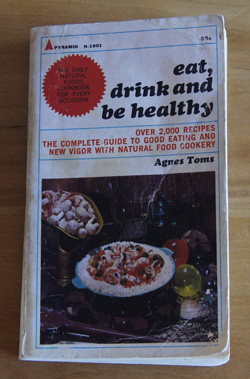
Eat, Drink and Be Healthy is one of the early “health food” cookbooks that fueled my generation of hippies. I probably bought it in a used book store when I was a poor graduate student – my guess is that the word “drink” in the title caught my eye as much as the promise of being healthy. I never used this book a lot and there are few food stains and no handwriting or paper notes in it. I should just toss it now. But . . . a closer look at the publication details reveals that the first printing of this book was in 1963, not 1971. I used to think that my generation invented the “health food” craze, but no, eating natural foods had its seeds in American culture “before the first young man grew his hair long, before the first young woman burned her bra”, as I wrote in my blog entry on The Soybean Cookbook. Maybe I should explore this book a bit more before tossing it in the recycling pile.

Searches reveal that the author, Agnes Toms, wrote several other books, including Delicious and Nutritious Cooking: A Book for Students and Others (1956), The Joy of Eating Natural Foods: The Complete Organic Cookbook (1962), and Natural Foods: Meals & Menus for All Seasons (1973).

“The Complete Organic Cookbook”! Toms published a book on organic cooking in 1962! I don’t remember hearing much about “organic foods” until maybe the early seventies. Whole grains and nuts and seeds and the like, but not organic.

In her forward to Eat, Drink and be Healthy, W. Coda Martin, M.D., writes “this is not just another cookbook. It is one that fulfills a specific need for all – a way to better health through good nutrition” and encourages “food unspoiled by sprays, additives, artificial coloring or flavoring”.

These are not new concepts to today’s food culture, but in the fifties and sixties, when home cooks were using a plethora of newly available canned and packaged products, convenience took precedence. Be in the kitchen for the hour it takes to cook brown rice? No, cooks were encouraged to use instant white rice. And so on.

Agnes Toms had a Masters in Home Economics and taught nutrition and prepared menus for a junior high. Her book outlines a nutrition plan that is still sound today. The recipes include ingredients like carob, unbleached white flour, whole wheat flour, a variety of whole grains, brewers yeast, honey, meat and game (even organ meats), sunflower seeds, sesame seeds, home-baked breads, garden fresh vegetables, fruits, sprouts, unsaturated oils, tahini, nuts, and food unspoiled by sprays, additives, artificial coloring or flavoring.

Today we have no problem finding these food items in our huge “health food” stores. But in 1963? No, they were hard to find. I remember those days. Toms addresses this issue in her introductory pages:

“I know it is a real problem for many people to find the food products mentioned in this book. To them, may I suggest some ways to deal with this problem:

  1. Look in the Classified pages of your telephone book for health food stores in your area; or consult the advertisements in health magazines.
  2. Search the shelves of your local market for unsulphured molasses, spray-dried milk, unflavored gelatin, honey, herbs, spices, nuts, vegetable oils.
  3. Look for milling companies in your area and ask them about wheat germ, whole-grain flour, buckwheat, peanut, rice, and other flours. See if they have brown rice and whole soybeans.
  4. Look for a hatchery near you for fertile eggs, or scour the neighborhood for some one who has a flock of chickens on the ground, with a rooster.
  5. Get the health-minded women in your neighborhood together and demand that the local dairy produce raw certified milk; and be sure to ask your dairy where you can procure natural cheeses.”

We are fortunate to have such variety in our markets today!

For this blog, I decide to make “Chow Mein”.

Chow Mein recipeI bought noodles labeled “chow mein”  for this recipe. That’s the dry, crunchy noodles sold ready to eat in a plastic bag or in a can. I plan to serve the dish directly over these noodles.
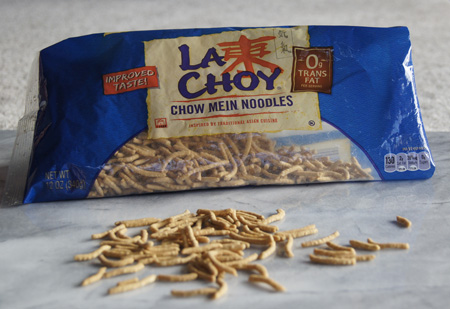
chow mein noodlesI have always served whet I call “chow mein” directly over these noodles. But when I look up chow mein recipes today, they use fresh egg-wheat noodles, not the packaged crunchy ones. Wikipedia’s entry on chow mein states that for crispy chow mein, fresh noodles are stir fried for the dish. AboutFood.com explains the difference between chow mein and lo mein; they too state that chow mein is made from fresh noodles. Even the La Choy website – La Choy is the brand name of the chow mein noodles that I bought – doesn’t have a recipe for a chow mein served directly over the crunchy, packaged noodles. They do have the recipe for Haystacks, that classic recipe for cookies made from the crisp noodles.

Consensus? In today’s American cooking culture, crunchy packaged chow mein noodles are added to salads, vegetables, stir-fries, and even desserts to give a boost of crunch, but not as the sole noodle ingredient in a dish.

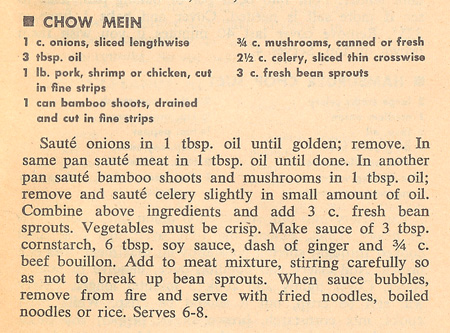
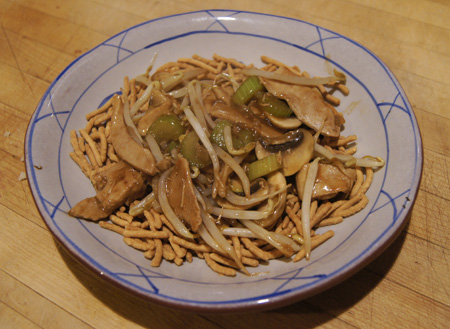
Toms’ recipe including the basic ingredients of onions, thinly sliced meat, and bean sprouts in a brown sauce are consistent with traditional chow meins (according to Wikipedia). Here is the version of chow mein that I made.

Pork Chow Mein
serves 2-3 people

  • 1/2 cup sliced onions
  • 8-10 ounces pork, sliced thinly (shrimp or chicken could be substituted)
  • about 1/2 teaspoon freshly grated ginger
  • 1 cup celery, sliced
  • 5-6 mushrooms, sliced
  • 2 tablespoons corn starch
  • 4 tablespoons soy sauce
  • 1/2 cup water or broth (more if necessary)
  • 1-2 cups fresh mung bean sprouts
  • chow mein noodles

Cook the onions in hot oil until soft; remove from pan. In the same pan, stir-fry the pork until it loses its pink color; add the ginger to the pork while it cooks. Remove the pork from the pan, then stir fry the celery and mushrooms just until the celery is a little softened. Add back the onions and meat and stir to combine.

Stir together the corn starch and soy sauce and water and add to the pork-vegetable mixture. Heat and stir until it thickens; if it gets too thick, add some water or broth. Add the bean sprouts just a few minutes before you serve the dish.

Serve directly over packaged crunchy chow mein noodles, or over cooked egg-wheat noodles or rice. Your choice.

pork chow meinComments

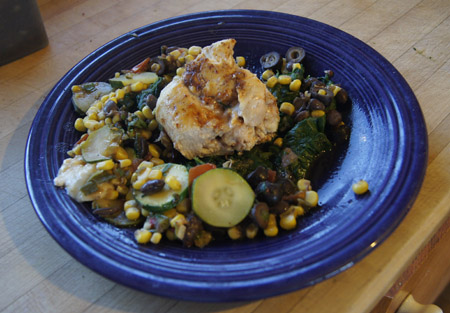
This was good. I would make it again. But next time I’ll serve it over noodles or rice and just sprinkle with the crunchy noodles.

If you read the original recipe, you will note that I changed the instructions a bit. Her version says to use two pans, an unnecessary step, IMHO. The sauce ingredients were not listed with the other ingredients; I put them in the list with the others.

If you make this, feel free to add any vegetables you like. I think some carrots and red bell peppers would make it prettier. As Agnes Toms states in the directions: “Vegetables must be crisp”, so don’t overcook them. This chow mein goes together fast, yielding a tasty nutritious meal in minutes.

250 Cookbooks: The Pizza Book

Cookbook #90: The Pizza Book, Evelyne Slomon, Times Books, NY, 1984.

The Pizza BookI didn’t keep the book jacket, but here is what it looked like:

The Pizza Book jacket coverPicture this: Boulder, Colorado, sometime in the seventies. We are enjoying a pizza at Old Chicago Pizza, downtown. Wow, they used fresh mushrooms on this pizza! It was heavenly. I fell in love with pizzas at that point. But not the cheesy-greasy fast food pizzas, the good ones. I started making my own, and bought The Pizza Book in the eighties.

Since we live too far from a town for pizza deliveries, and since I am a cook, it’s not a stretch that I began making my own pizzas. I make one about every other week. My favorite crusts have morphed over the years, from a thick whole wheat crust to a thinner beer-based crust to a non-kneaded thin crust. I have tried many toppings, but usually come back to a tomato and cheese based pizza with sausage or pepperoni, mushrooms (fresh!), onions, and black olives. (My Mexican pizza is one of my saved variations.) I have tried several baking methods: cookie sheet, perforated round pan, baking stone, and gas grill.

And you know what? All of the crust and ingredient and baking methods work. Each type of pizza has its place in a sensible pizza-eating plan!

Evelyn Slomon tells us that pizza came to America with Italian immigrants in the late nineteenth century. Too poor to buy bread, the women would pay to bake their own dough in an oven at a bakery. They would often take a portion of the dough and flavor it with tomato sauce and bake it alongside their loaves. “In the old country it was called pizza” according to Slomon. This pizza was done before the loaves and it “appeased the appetites of hungry children.”

Slomon continues with the history of pizza in America, then presents a comprehensive guide on how to make pizza. It’s a great reference on different types of pizza doughs and the basic skills needed to prepare pizzas. And then there are about 200 recipes to choose from – enough ideas to keep any pizza cook happy. And of course, you are encouraged to come up with your own ideas. Most of Slomon’s recipes give a choice of different doughs and toppings and even baking methods.

Even though this book was published thirty years ago, it is still available either new or used. It has stood the test of time – this book is still all you need to make great pizza. I highly recommend The Pizza Book.

I decide to make “Chèvre Pizza”. I have the choice of 7 different crusts and 5 different toppings. I decide to use Sicilian-style dough (has a lot of olive oil) and Chèvre Pizza #2: “Herbed Goat Cheese and Fresh Tomatoes”. I am going to vary this further by adding prosciutto (from variation #3) and a few fresh basil leaves (from my garden). I’ll assemble it on a pizza peel and then bake it in a hot oven on a preheated baking stone.

The Pizza Book recipeMy version is below.

Herbed Goat Cheese, Fresh Tomato, and Prosciutto Pizza
makes two 12-inch pizzas (approximately)

Besides the ingredients below, you will need semolina flour. For equipment, you need a pizza peel and a large baking stone.

Sicilian Style Pizza Dough

  • 3/4 cup water
  • 1 package (scant tablespoon) yeast
  • 3 cups flour (I used bread flour)
  • 1/4 cup olive oil
  • 1/2 teaspoon salt

Put the dough ingredients in a breadmaker and set to the “dough” cycle (including a rising step). Or, mix and knead by hand or in a food processor, then let rise until double in bulk. During the mixing and kneading steps, you may need to add a little more flour to get a soft, smooth ball of dough. Prepare the pizza toppings while you wait for the dough to rise.

Oven

Place a baking stone in your oven 30 minutes before you want to start baking the pizzas. Turn it to 500˚, or as close to that as your oven will go.

Herbed Goat Cheese (etc.) topping

  • 11 – 12 ounces plain goat cheese
  • 2 minced garlic cloves
  • 1 teaspoon dried or 1 tablespoon chopped fresh mixed herbs – I used fresh thyme and fresh oregano
  • 8 ounces grated mozzarella cheese
  • fresh tomatoes, about 1 1/2 pounds
  • several thin slices of prosciutto, about 2-3 ounces
  • several fresh basil leaves, thinly sliced
  • 2 tablespoons olive oil (approximate)

Mix the garlic and herbs with the goat cheese, using a fork to mash them together. My goat cheese mixture was pretty crumbly. Cut the prosciutto into strips.

Peel and core the tomatoes, then chop them into rough dice. Put them in a strainer and let them drain while you roll out the pizza dough.

Assemble and bake the pizza

Note: There are many ways to roll or stretch out a pizza dough. I usually use a rolling pin. But after re-reading Slomon’s pizza book, I decided to try chilling the dough briefly before stretching it out. So below is the method I used, but feel free to use another method.

After the dough has risen, divide it into two portions. Flatten each into a disc and cover with plastic. I placed them in the refrigerator for 15 minutes or so. (This should make the dough easier to handle. It is an optional step that I might eliminate next time; see my comments below.) Next, remove from the fridge and work each disk on a breadboard, pushing and stretching into a circle. You can pick up the dough and play with letting it hang down over your knuckles to stretch it out, and even hold it by the edges and let gravity pull it down. The olive oil in this dough makes it easy to work with! I was able to get each portion stretched into a 12-inch circle.

(Is your oven hot? You need it hot before you assemble the pizza, or the dough might get soaked while you wait for the oven to heat.)

Put one of the discs onto a pizza peel that has semolina dough sprinkled on it. Sprinkle the herbed goat and mozzarella cheeses on first, then add the prosciutto and the basil leaves. Put on the tomatoes, then drop some olive oil on top of the tomatoes and on the rim of the dough.

Carefully slide the topped pizza onto the hot pizza stone, close the oven door, and bake for 15 minutes. Get the second half of the pizza dough topped while you wait for the oven, then bake it in the same manner.

I actually made one goat cheese pizza and one with prosciutto, black olive, onion, bell pepper, mozzarella, Parmesan, and fresh tomatoes. I had a feeling the goat cheese one would be “too much” for him, and I was right. I liked both toppings!

Comments

While my dough was rising, I gathered my ingredients. First, the goat cheese and herbs with the peeled tomatoes and prosciutto.

pizza ingredientsI was glad that I thought to drain the chopped tomatoes. I had some great roasted garlic from a stand in Lyons, so I used some of it on the pizza.

pizza ingredientsBelow is half the dough on a pizza peel.

pizza dough on pizza peelHere is the first pizza, ready for the oven.

pizza before cookingBaked!

goat cheese pizzaThese pizzas were baked to perfection. I really, really like the simple “sauce” of just fresh, non-precooked tomatoes. It’s easy and fresh-tasting. Putting the cheese on first keeps the crust from sogging. The prosciutto tucked under the tomatoes keeps it from burning in the very hot oven. The very hot oven makes the crust crisp.

Both of us thought the crust tasted a bit like a big “cracker”. This is good or not, it depends on your preference. I will probably use less olive oil in the dough next time and eliminate the chilling step. I think the yeast in the dough didn’t have time to warm up and work its magic in rising the baking dough, or perhaps the olive oil inhibited the rising. The recipe is good as written, but . . . tweaking is part of the experiment, and that’s what cooking is about!

250 Cookbooks: Zestful Recipes for Every Meal

Cookbook #89: Zestful Recipes for Every Meal, Mutual Orange Distributors, Bruce McDaniel, Gen. Mgr., Redlands, CA, 19?? (see below).

A colorful booklet catches my eye. Bright oranges, lemons and grapefruits adorn the cover.

Because California Citrus Fruits are so luscious, so healthful, and so adaptable to all branches of cookery, it is with utmost confidence that we present this little booklet.

Zestful RecipesMy mind drifts back to the 1950s. A little blond girl runs out to the trees in her backyard and picks a few lemons. Into the kitchen to hand-squeeze them and add sugar and water and ice for the best lemonade ever. Yup, that was me! Both my parents were born in citrus-kissed Southern California, and I was too. My mother grew up on a ranch where my grandfather grew oranges.

You can be refreshed on the hottest summer day with a good, tart, icy drink, and for this purpose California citrus fruits are necessary additions to the larder. With plenty of oranges, lemons and grapefruit on hand, a jar of sugar syrup waiting the the refrigerator, and perhaps half a dozen bottles of carbonated water and ginger ale, stored in a cold place, you’re all ready for the mid-afternoon “lift” that comes with a glass of iced citrus beverage. And for those suppers-out-of-doors which every family enjoys, these delicious drinks are important.

I find no handwritten notes in Zestful Recipes, and just a few stains. I noted in my database that it came from my Mother. It’s just 3.5×6-inches, and quite obviously it was an advertising-recipe booklet. Shall I just toss it? Explore some more?

I can’t find a publication date in Zestful Recipes. I google Amazon and find an entry’s photo that looks just like my booklet. It costs $10 and was published in 1940, according to the website (accessed November 2014). Hmmm.

A little more searching. Wow, this is cool. I find the entire Zestful Recipes booklet, scanned to a digital image and available to the public! Check this out on the Hathi Trust website: catalog.hathitrust.org/Record/005601173. Go down to “viewability” and click on “full view”. That’s exactly the same booklet! Cute, its owner had written a recipe for meat loaf on the first page. My Zestful copy is a lot cleaner.

The Hathi Trust site gives the publication date of Zestful Recipes as probably 1931. That means: This book is a Treasure! It is quite likely that my grandfather’s oranges were distributed by “Mutual Orange Distributors” (publishers of Zestful Recipes), way back in the first half of the twentieth century. His ranch was in the vicinity of Covina, near the cities of Glendora, San Dimas, Pomona, Claremont, and not too far from Redlands. That whole area was covered with orange groves when I was a child, and Orange County still had tons of groves when I was in college. I go back now and it’s mostly freeways and houses and strip malls.

If you are interested, here are a couple links to more information on Mutual Orange Distributors and the history of the citrus business in Southern California.

So it looks like my copy of Zestful Recipes could once have belonged to my grandparents, acquired somehow through their orange-growing business. My mother kept hold of it for decades, and now it is in my hands. I will keep it.

I decide to make “Citrus Fruit Syrup” on page 3 of Zestful Recipes.

Citrus Fruit Syrup recipeThis is just a basic simple syrup, often used in beverages, both alcoholic and non-alcoholic. Like flavored oils and vinegars (see my entry for Michael Chiarello’s book), simple syrups are “pantry basics” that you can make for yourself. And if you are an ex-chemist (me!), you just might want to do so!

Lemon Simple Syrup

  • 1 cup sugar
  • 1 cup freshly squeezed lemon juice

Combine the sugar and the juice in a pan on the stove. Bring to a boil and boil for 5 minutes. Watch carefully! Mine foamed up and boiled over when my back was turned. But it still turned out beautifully.

Lemon Sugar SyrupWhat to do with this syrup? We made some delicious Lemon and Vodka Martinis, recipe courtesy of Giada De Laurentiis. (Oh my, those were too good, made with my lemon sugar syrup and Greygoose.)

Here are some photos taken at Grandpa and Grandma Burch’s ranch, from 1947-1950.

ranch

My sister at the ranch. That’s an orange in her hand!

ranch

My brother “helping out” at the ranch.

ranch

Mother and I at the ranch. I’m sure she made our dresses.

250 Cookbooks: Bread Machine Recipes

Cookbook #88: Bread Machine Recipes, Favorite Brand-Name Recipes, Vol. 6, March 23, 1999, No. 31, © Publications International, Ltd., 1999. Bread Machine Recipes CBI like this little recipe magazine cookbook! I bought it for myself back in 1999, and I know I have tried at least one recipe from it. Lots of fun ideas. Now that I am retired, I have more time to play with different recipes. In case you are new to my blog, I’ll tell you: I love to bake bread! This post explains my history with yeast bread.

There are so many recipes I want to try in this cookbook that I will just keep it next to my bread machine for awhile. All the recipes are from scratch, and very few “brand names” are even mentioned. Rye breads, corn breads, breads with fruits and carrots, breads cooked in muffin pans, cinnamon rolls, chocolate rolls, and pizzas galore. I like the recipe for “Savory Pull-Apart Loaves”. You make the dough, then divide it into 16 pieces, flatten them and coat with olive oil and herbs, then layer it all back together into a 9×5-inch loaf pan. Be great with a good soup or stew.

I choose to make “Jamaican Cherry Bread” for this blog. It has fresh limes and fresh ginger and tart cherries (a super food!) and coconut (I love coconut!). I like fruited yeast breads toasted for breakfast or used in peanut butter sandwiches. Here is their recipe:

Jamaican Cherry BreadThe Cherry Marketing Institute, the brand name noted at the bottom of the above recipe, has more tart cherry recipes on its website.

My version of this recipe is below. I used all-purpose flour and gluten flour instead of bread flour, I used fresh ginger, and I used purchased toasted coconut chips. I baked it in the oven in a loaf pan instead of in the breadmaker.

Ginger-Cherry-Coconut Bread

  • 3 1/4 cups flour (17 ounces): I used 1 1/4 ounce gluten flour and added all-purpose flour to 17 ounces; 17 ounces of bread flour would work well too
  • 2 1/2 teaspoons yeast
  • 1 cup milk
  • 3/4 teaspoon salt
  • 1/4 cup brown sugar
  • 3 tablespoons butter, cut into chunks (substitute vegetable oil if you prefer)
  • 2 teaspoons freshly grated ginger root
  • grated peel of one lime
  • juice of one lime
  • 1/2 cup dried tart cherries
  • 2/3 cup coconut (use toasted shredded coconut or coconut chips)

Place all ingredients EXCEPT the cherries and coconut in your breadmaker. Set to a dough cycle, preferably one with a rise cycle. If your breadmaker has an option (a beep or an automatic feeder) to add the cherries and coconut near the end of the kneading cycle, use it. If not, you can add these ingredients at the time you form it into a loaf. Briefly, if you add the cherries and coconut too soon, the breadmaker will grind them up into tiny pieces.

When the dough/rising cycle is complete, remove the dough from the breadmaker. Add the cherries and coconut if you have not already done so. Fold over a few times and form into a loaf then place in a 9×5-inch loaf pan. Bake for 30 minutes at 385˚.

Comments

Great bread!

Below is the bread dough about 10 minutes into the kneading cycle. To me, it looked like it needed a bit more flour, but I let it go and after another 10 minutes the dough was smooth and perfect.

cherry yeast doughMy breadmaker goes “beep” when it’s time to add raisins, nuts, cherries, etc. You can see it doesn’t do a great job of incorporating all of the cherries. Those ones that are poking out will just burn in the oven. I tried to get them all poked back in but it was impossible.

cherry bread doughThe photo below illustrates when it is time to put the risen loaf into the oven.

cherry yeast bread doughHere is the baked ginger-cherry-coconut bread:baked cherry breadIt tastes great. I like it with cream cheese and I like it with peanut butter – as toast and in a sandwich. Butter and jam would be great too. Why just eat boring store-bought toast in the morning, when you can have something really different?!

I’m kind of iffy on the use of coconut chips (big and made for granola or snacking), rather than flakes (the kind sold for baking). The chips gave a subtle crunch to the bread, but their coconut flavor was kind of washed out by the time the bread was baked. Next time I think I’ll use coconut flakes. The coconut-toasting step suggested in the original recipe might help bring out their color and flavor.

I plan to make this bread again!

250 Cookbooks: Pillsbury’s 36th Bake-Off Cookbook

Cookbook #87: Pillsbury’s 36th Bake-Off, The Pillsbury Company, Minneapolis, MN, 1994.

Bake-Off Cookbook 36thThe earliest Bake-Off cookbook I covered in this blog was published in 1959; I discuss these cookbooks/recipe magazines more thoroughly in my blog post covering the 1964 Bake-Off Cookbook.

I recorded in my database that this cookbook was my mother’s. She did not mark any of the recipes, but I find some main dishes that sound interesting: Garden Vegetable Feta Pizza, Spicy Broccoli Aioli Pizza, Tuscan Spinach Torta, Confetti Corn and Bulgur Salad, West African Chicken and Groundnut Stew, and Chicken Vegetable Stir-Fry Salad. I am sort of surprised to find this trendy recipes in this old cooking magazine. I didn’t discover feta cheese until the late 90s. I learned about aioli in a cooking class sometime in the 2000s. Bulgur? Late 90s too. We had “groundnuts” in Ghana on our first trip to West Africa in 2011. In the US,  groundnuts are called “peanut butter”.

The cookbook also has recipes for salads and soups and sandwiches, and of course, cookies and cakes and pies. Only about a quarter of the recipes are for sweets – an unusual stat for Bake-Off Cookbooks – and yes, I would love to make any of them, but I will restrain myself! It’s nice that most of the main dishes in this bake-off cookbook dial in at a little under 500 calories.

My only complaint is a general one: many recipes include pre-made doughs, such as pie crusts, refrigerated biscuits or crescent rolls, or mixes, such as corn muffin or yellow cake mix. Pillsbury brand name canned vegetables are always specified but hey, it’s their cookbook.

The cover recipe, “Pepper Jack Chicken with Calico Corn Saute”, sounds excellent! That’s what I will make for this blog. I decide to hang onto this cookbook for awhile and try several of the recipes.

Pepper Jack Chicken RecipeThis recipe calls “3 whole chicken breasts” and infers that the cook will bone them. A whole chicken breast is the two halves together. Today boneless chicken breasts are usually sold as half-pieces. And they are fairly cheap, so you don’t save a lot by boning them yourself. Since chicken breasts range in size from small to large, I find it best to weigh out 9-10 ounces for a meal for the two of us.

I plan to make this Pepper Jack chicken pretty much as written. I happen to have my own black beans, so I will use them instead of the canned ones. I don’t have fresh jalapenos, but I have some great dried ones. I wonder if I will get away with the spinach, plated under the “calico corn saute”. My dining partner does not like cooked spinach . . .

Pepper Jack Chicken with Corn Saute
serves about 2, depending on appetites

Feel free to change up the vegetables in this recipe. Or if you like following a recipe, do so. Whatever!

  • 2 boneless chicken breast halves; about 9-10 ounces
  • 1/2 teaspoon cumin
  • 1/2 teaspoon chile powder
  • salt and pepper
  • 2-3 ounces Jack cheese with jalapenos (“Pepper Jack”), grated
  • flour (to coat the chicken)
  • zucchini, about a third of a medium one, sliced or diced
  • 1 garlic clove, minced
  • jalapeno pepper, about 1 teaspoon fresh or dried
  • 1/2 teaspoon cumin
  • salt and pepper
  • 1/2 of an 11-ounce can of canned corn, or use fresh or frozen corn, about 1/2 – 1 cup
  • 1/2 of a can of plain or seasoned black beans; about 1/2 – 1 cup
  • 1 medium tomato, chopped
  • 1/2 of a small can of black olives, sliced
  • 1 green onion, chopped
  • chopped fresh cilantro to taste
  • 5 ounces of fresh spinach (optional)

Pound the chicken until it’s thin. I like to put it on a ziplock bag and pound with the flat side of a mallet. Others advise to work from the center and gently press it thin. I like to pound. And it worked.

(One of my chicken breasts was huge, so I cut it in half. I proceeded with three rectangles of flattened chicken breasts.)

pounding a chicken breastSprinkle both sides of the chicken breasts with the cumin, chile powder, and salt and pepper. Lay them out on your work surface and top with the grated cheese.

chicken breasts with cheeseRoll up as tightly as you can and use a couple toothpicks to secure the rolls. Sprinkle with flour on all sides.

stuffed chicken rollsHeat a skillet using medium heat, then add a little oil (and a little butter if you want). Add the chicken rolls and cook until browned on all sides. Continue cooking until they are done. It’s hard to tell when these are “no longer pink”, but 15-20 minutes is probably how long they will take. You can check the temperature with a thermometer; you can cover them if you think they need more cooking. When cooked, remove the toothpicks.

Meanwhile, make the “corn saute” in another pot or skillet. First, cook the zucchini, garlic, jalapeno pepper, cumin, and salt and pepper in a small amount of olive oil a couple minutes until everything softens. Add the corn, black beans, tomato, olives, green onions, and cilantro and cook a couple minutes until everything is hot. Taste and adjust seasonings if necessary.

If you are using spinach, get it ready too. I usually put the fresh spinach in a big pot, add about a tablespoon of water, cover the pot, and turn to high until it boils. Then I remove it from the heat, allow to cool, and drain. Feel free to cook it using your own favorite method.

Plate the spinach topped with the corn saute, then put the chicken breasts on top.

Pepper Jack Chicken RollsThis was soooo good! I love meals with lots of vegetables. It was good and spicy and the cheese melted into the chicken, keeping it moist and giving it a lot of flavor. I think this might become one of our favorites.

And the spinach? Didn’t get away with it. It was left behind on my husband’s plate. But he liked the rest of it!