250 Cookbooks: New Slow Cooker Meals

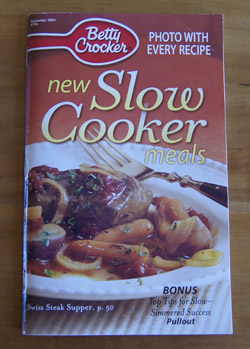
Cookbook #86: New Slow Cooker Meals, Betty Crocker, General Mills, Inc., Minneapolis, MN, 2001.

New Slow Cooker CookbookI remember there was a time that I searched my house but couldn’t find any of my slow cooker cookbooks. That’s probably when I picked up this small cookbook at a supermarket. Today, I don’t find any of the recipes in New Slow Cooker Meals inspiring. In my opinion, most of the recipes would be better cooked in a pot on the stove for an hour than dragging out a big crockpot and having it cook all day. But then again, I am retired. (See my first crock pot entry for my opinions on crock pot cooking in general.)

Betty Crocker’s New Slow Cooker Meals is 5×8-inches and 96 pages. You could subscribe to Betty Crocker cookbooks, and this cookbook has a url printed in it: www.bettycrocker.com. On the current website, these small printed cookbooks are called “Recipe Magazines from Betty Crocker”, and you can still subscribe to them. The website has a section on slow cooker recipes.

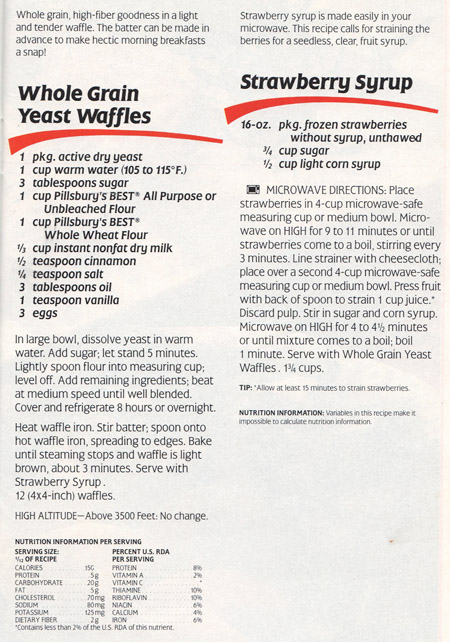
I do have a task this week that I can tie into this cooking blog. The Lyons Garden Club is having a chile cookoff, and I want to contribute a crockpot of chile, albeit not one to enter into the contest (since I am a member). So, I will make the Family-Favorite Chili on page 19 of this Betty Crocker recipe magazine. Family-Favorite Chili is made with hamburger, spices, tomatoes, and beans.

(I find myself typing “chili” and “chile” interchangeably. Which is correct? A web search reveals much controversy. I kind of like the answer at MJ’s Kitchen: a chili is a pepper and a chile is a dish cooked with a chili pepper. Don’t sweat it.)

Here is Betty Crocker’s recipe for Family-Favorite Chile.

FamFavChiliRec
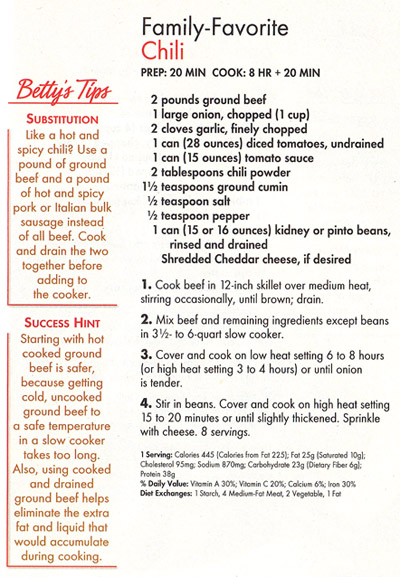
I will of course make some changes. I like to wilt onions a few minutes before adding them to a dish. (And I find it odd that step 3 says to cook until the onions are tender: 3-4 hours.) I like to use a seasoning packet like Two Alarm Chili or Carroll Shelby’s Chili Kit. Boring, but consistent. I have some dry pinto beans and a new pressure cooker, so I will cook my own beans instead of using canned beans. Below is my version.

My Basic Red Chile with Hamburger and Beans
makes a big crockpot’s worth of chile

  • 2 pounds ground beef
  • 1 large onion, chopped
  • 2 cloves garlic, chopped
  • 1 14-ounce can of diced tomatoes
  • 1 15-ounce can tomato sauce
  • a chili kit (Carroll Shelby’s or Two-Alarm or your favorite) or chili powder to taste
  • 1 teaspoon salt (or to taste)
  • 2 cups (more or less) cooked or canned kidney or pinto beans (I used pintos that I soaked then pressure cooked for 20 minutes; I added dried hot peppers and salt before cooking)

Brown the ground beef, then drain off any fat and put it in a crock pot. Heat some olive oil in a small pan and cook the onion (salt it) until it wilts; add the garlic and stir 30 seconds. Add the onion-garlic mixture to the crock pot.

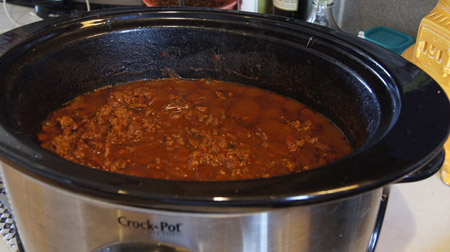
Add the tomatoes, tomato sauce, and seasonings to the crock pot and give the mixture a good stir. Cover and cook on low about 6 hours. Add the beans and check the seasoning, adding more spice or salt to your personal taste. Cook until the chile-bean mixture is heated through.

This chile will hold well on low for another hour or more but you might have to add a little water if it gets too thick.

My ChileThis chile is always good! Not different and unusual, but always welcome for a comfort-food dinner. We usually put cheese and onions on it and serve it with warmed flour tortillas.
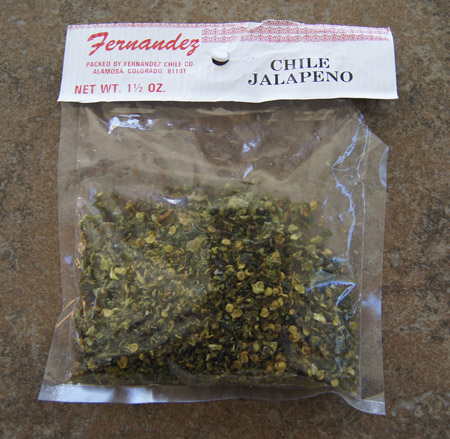
I added some Mexican oregano and some of these dried chiles to this pot of chile:

jalapeno chilisAnd here are the Chili Queens at the Chili Cookoff!

Chili Queens

Photo credit to J. O’Brien, downloaded from Facebook.

250 Cookbooks: Hershey’s Chocolate Recipe Collection

Cookbook #85: Hershey’s Chocolate Recipe Collection, Hershey Foods Corporation, USA, 1989.

Hershey's Chocolate Recipe CollectionThis is a pamphlet with 96 chocolate recipes, each on a “card” that can be torn out of the book along the perforations. The booklet doesn’t have an introduction; the last page gives some tips for handling chocolate. This was one of my Mother’s cookbooklets. She didn’t mark any recipe, nor did she tear one out.

That’s it, short and simple.

I love chocolate and though I have decided to recycle this cookbooklet, some of the recipes do tempt me. But not the ones that rely on cake or muffin mixes or purchased pie shells, just the from-scratch recipes. I note a couple recipes that incorporate ideas I came up with on my own over the years, like putting chocolate chips in muffins and quick breads. Yum, this one sounds good: Mini Chips Blueberry Bread. Chocolate Cherry Upside-down Cake would be lovely. Marble Cheesecake, a delicious combination of chocolate and cheesecake. And Chocolate Mousse Pie (with rum cream topping). And the chocolate waffles.

Sigh. If calories were not an issue . . .

Ah, but I have a solution! Lately I have started baking mini-desserts for the two of us. That way, no leftovers! Serendipity brought me to this innovation. First, the Lyons flood in September 2013. I became involved with Lyons recovery efforts, including shopping support at our local businesses, and I discovered Lyons Buttonrock Bakery. I took to buying one of their small fancy desserts – tiramisu, tarts, flourless chocolate cake, eclairs – to split with my husband for Saturday night desserts. One of our favorites is their cheesecake. Ever the cook, I then wanted to make my own two-person cheesecakes.

I found a couple small springform pans in a local store and went in search of a recipe. Online I found a recipe for a 4.5-inch cheesecake on this great site: Dessert For Two. Her Cheesecake with Honey-ed Peaches is fantastic!

So I decide to make Marble Cheesecake from the Hershey’s Chocolate Recipe Collection, downsizing the recipe to 4.5-inch pans to make “dessert for two”. I’ll need to modify both the batter amount and the baking time – I’ll use the Cheesecake with Honey-ed Peaches recipe as a guideline.

Marble Cheesecake RecipeBelow is my modified version. I have two 4.5-inch springform pans, so I plan make two small cheesecakes, one for Saturday and one for Sunday.

Marble Cheesecakes in Mini-pans
this recipe makes enough dessert for two people for two nights

  • Chocolate Crumb Crust (recipe follows)
  • 12 ounces cream cheese
  • 1/2 cup sugar, divided
  • 2 tablespoons sour cream
  • 1 1/4 teaspoon vanilla, divided
  • 1 1/2 tablespoons flour
  • 2 eggs
  • 2 tablespoons cocoa powder
  • 1/2 tablespoon vegetable oil

Chocolate Crumb Crust

  • 1/2 cup crushed vanilla wafers (about 15 cookies)
  • 2 tablespoons sugar
  • 2 tablespoons cocoa powder
  • 2 tablespoons butter, melted (1 ounce)

First, make the crust, since it needs to bake and cool before you fill it. Heat the oven to 450˚. Crush the vanilla wafers and combine with the sugar, cocoa, and butter. Press the mixture firmly onto the bottom and a little up the sides of 2 (or 3, see my notes below) of 4.5-inch springform pans. Bake for 8 minutes and then let them cool.

Lower the oven to 300˚.

In a mixer, combine the cream cheese, 3/8 cup sugar, sour cream, and 1 teaspoon vanilla, beat until smooth. Add the flour and eggs and beat well, but don’t go crazy and overbeat it because that can cause the cheesecake to crack when it bakes.

Remove about 3/4 cup of the batter to a small bowl. Mix the 2 tablespoons cocoa with 2 tablespoons sugar, then add to the batter in the small bowl along with the oil and 1/4 teaspoon vanilla.

Spoon dollops of the plain and chocolate batters alternately into the pie crusts, ending with the chocolate batter. Swirl gently with a knife to marble the batters. Swirl enough to get any bubbles out of the batter, but do not overswirl or it will not be marbled.

Place the cheesecake pans on a baking sheet and bake at 300˚ for 40 minutes, until the center is “slightly jiggly but not wet when you lightly touch it.” Leave the cheesecake in the oven after the 40 minute baking period, but turn the oven off and prop open the door. After 30 minutes, move the cheesecake to a wire rack on the countertop and let cool another 30 minutes. Then, run a knife around the edges of the pans, loosen and remove the outside rings of the pans, cover the cheesecakes with plastic wrap, and refrigerate at least 5 hours.

Comments

Here are my crust ingredients. The melted butter is in the red bowl. I used real Hershey’s cocoa, although I usually keep a fancier version in my pantry as well.

ingredients for the chocolate crustThe next photo is a few steps later, after the crust is baked and the filling loaded into the springform pans. The two pans already look too full, in my judgement, and I still have more batter left. I put the extra batter in a small ramekin and baked it along with the filled springform pans. From my calculations, it shouldn’t have been too much batter, but it was.

cheesecakes before bakingI was not at all surprised to find that the cheesecakes had cracked when I peeked at them after the 40 minute baking period. At first they were really tall; by the time they had cooled, they had fallen a bit. But you can still see the cracks clearly in the photo below.

baked marble cheesecakeIn spite of the cracks, these taste delicious! Yum and yum again! Half of one of these left me wanting more – more! I dripped a small amount of chocolate sauce and put a couple halved-raspberries on each to dress them up a bit. My husband’s comment: “These could have come from Buttonrock!”

I definitely will make these again. To keep them from cracking, I will try a couple things next time. Obviously – despite my calculations – there was too much batter to fit into two small pans. Next time I will use three 4.5-inch pans. Also, I forgot to put the springform pans on a baking sheet in the oven. Maybe that will help. I look forward to experimenting again with Marble Cheesecakes in Mini-pans.

Favorites: Pearl Balls

“Pearl Balls” are pork meat balls, seasoned with ginger and soy sauce, rolled in soaked rice, and then steamed. I forget when I first discovered these treats, but I always go back to my 1968 The Cooking of China Time-Life Books cookbook when I get a hankering for these. (I have admitted here before that I love meat balls so my current hankering isn’t out of character.)

The recipe below is adapted for my tastes. I believe the fresh ginger and water chestnuts to be essential in Pearl Balls, and I buy the best quality ground pork that I can find. These can be used as appetizers or to round out a Chinese-style meal.

Pearl Balls
serves about 4 as part of a Chinese-style meal

  • 1/2 cup rice, preferably a glutinous or starchy rice like a sushi rice
  • 1 pound ground pork
  • 1/2 cup finely chopped water chestnuts
  • 1 green onion, finely chopped
  • 1/2 cup finely chopped mushrooms (use fresh white or shitake mushrooms, or reconstituted dried shitake mushrooms)
  • 1 teaspoon grated fresh ginger
  • 1/2 teaspoon sugar
  • 1-2 tablespoons soy sauce
  • 3/4 teaspoon salt (adjust this amount to your own taste)
  • 1 lightly beaten egg

Start the rice soaking in a cup of water before you begin the Pearl Balls. About an hour’s soak is enough.

Combine the pork with the rest of the ingredients and mix well. Form the mixture into 1-inch meat balls.

Drain the soaked rice through a strainer and lay it out on a paper towel. Roll one pork ball at a time in the rice, pressing down gently but firmly as you roll so that the rice grains adhere to the meat.

Steam the pork balls for about 30 minutes. I use an electric steamer; a bamboo steamer set in a wok also works.

Serve at once! (Although, I enjoyed one of these cold out of the refrigerator the next day.)

Preparing the Pearl Balls:

pearl ballsCooked Pearl Balls along with Egg Rolls in Phyllo Dough:

Egg Rolls and Pearl Balls

250 Cookbooks: The Wide World of Fillo

Cookbook #84: The Wide World of Fillo, Athens Foods, Cleveland Ohio, 1980.

Wide World of FilloI shake my head at myself. Why did I call this little pamphlet a “cookbook”? It’s only 5.5x4x.12 inches. But I did, back when working on my cookbook database from 2006-2012, leading to my “250 Cookbooks”. So I have to stick with it. A bit obsessive. (I am reading 600 Hours of Edward. Edward is afflicted with OCD and each morning when he wakes up, he records the time [usually 7:38 am] and totals and writes down the number of days in that year that he has woken up at the same time. I totally get it. I get up each morning at exactly the same time. I am involved with databases.)

Small as it is, this pamphlet has about 50 recipes using fillo dough and helpful instructions for working with this thin pastry.

“Fillo” is usually spelled “phyllo” or “filo”. Phyllo is a wheat dough stretched into paper-thin sheets. Wikipedia: “The practice of stretching raw dough into paper-thin sheets probably evolved in the kitchens of the Topkapı Palace”. Hey, I’ve been there! The Topkapi Palace is in Istanbul, Turkey. We visited it in 2013. During our stay in Turkey, we often enjoyed phyllo savory entrees and sweet desserts.

I have stayed away from phyllo dough recipes, thinking them fraught with calories, because you brush butter between the layers of dough before you bake it. But the introduction to The Wide World of Fillo claims that only 2 tablespoons of butter is used per sheet of pastry, resulting in a dish that is “much lower in calories” than comparable fried dishes. I’m still not convinced that this is true. It’s hard to estimate how many calories are added when deep frying. But I don’t enjoy deep frying – too much splattering. An alternative is welcome.

Although phyllo is traditionally used in Mediterranean dishes, this cookbook shows how it can be used in Asian, Mexican, and American cooking. I decide to try a recipe for an Asian food that I usually deep fry: egg rolls. I have tried – with little success – baking egg rolls wrapped in traditional egg roll skins. I did successfully make egg roll crepes in this blog. Maybe phyllo egg rolls will be another alternative to deep frying. (Though it seems weird using an Ottoman cooking method to make a Chinese dish.)

Chinese Egg Rolls Fillo StyleNote that the directions in the above recipe do not tell you when to add the soy sauce. I’ll add at the very end of the stir-fry cooking.

The pamphlet gives the following instructions for forming rolls from a sheet of phyllo dough:

fillo rolls

Egg Rolls in Phyllo Dough
makes about a dozen small rolls

Feel free to swap up any ingredients in this recipe. The amounts stated yield about a dozen rolls. You can use any vegetables you have on hand, and include pork or shrimp or any other meat. Consider the recipe below a rough guide.

  • 1/2 cup finely chopped celery
  • 3/4 cup shredded cabbage
  • 1/4 cup shredded carrot
  • 1/2 cup chopped mushrooms (shitake or button or whatever)
  • 4 green onions, finely chopped
  • 1/2 cup diced shrimp
  • 1/2 cup cooked ground pork or diced cooked port
  • 1/2 cup finely chopped water chestnuts
  • 1/2 cup chopped bean sprouts
  • 1 minced clove garlic
  • 1/2 teaspoon sugar
  • about 1/2 teaspoon grated fresh ginger (you could use dried ginger instead)
  • 2-4 tablespoons soy sauce
  • 1 tablespoon cornstarch (optional)
  • about 4-6 phyllo single sheets
  • melted butter (start with half a cube)

Stir-fry the celery, cabbage, mushrooms, carrots, and green onions in a little hot oil for a minute or two. Add the shrimp and pork and stir-fry just until the shrimp is done. Add the water chestnuts, bean sprouts, ginger, garlic, and sugar. Add soy sauce to taste (and cornstarch if you want) and stir-fry until heated through. Cool to room temperature.

Lay out a sheet of phyllo pastry. I suggest laying the phyllo-sheet-rectangle out with a long side facing you, then making two vertical cuts to cut it into three pieces (see photos). Brush one of the third-sheets with butter, then place about a quarter cup of the filling just above the bottom edge, on the edge closest to you. Fold in the sides and roll up, or simply roll up. Place the roll on a parchment-lined half sheet pan and brush the top with butter.

I had a bit of trouble with the dough breaking, before and during the rolling process. The pamphlet suggests keeping the pastry sheets covered with a wet towel whenever you are not actively rolling it. That was hard to do! See my photos (below).

Bake at 375˚ for 20-25 minutes, until golden brown.

Egg Rolls and Pearl BallsThe egg rolls are golden brown and deliciously flaky. The filling is perfect. And those little rice covered balls? Those are my Pearl Balls.

Comments

These were delicious! They were still a pain to fill and roll up, though. That’s partly because I’m not real patient. As the book states, you should carefully remove a sheet and then constantly keep the dough covered with a wet paper towel. It dries out very quickly. And the dough sheets are so very delicate they want to tear if you just look at them.

I will advise you that it can take a while to gather and chop all the ingredients. Granted, I was making Pearl Balls at the same time, but you can see my efforts in the piles of ingredients below:

egg roll ingredientsHere is the great stir-fried filling:

egg roll fillingI was trying to take photos and butter dough sheets and fill pastries and deal with a couple total rolling failures all at once. I am sure I got a bit of butter on my camera. Anyway. In the photo below, I cut a piece of dough lengthwise into two pieces, then buttered them. Then I put about 4 tablespoons of filling above the bottom edge.

egg rollsIn the next photo, I have folded in the sides of one of the pastry strips and will next roll up the dough.

egg rollsFailure! When I tried to roll up the left-hand one, above, it fell apart! The filling sogged out the bottom dough and it ended up a ball of pastry pieces and filling. What a mess. (Next time I’ll use a bit of cornstarch in the filling so it isn’t so wet.)

How did I solve the problem and roll up the rest of the egg rolls? I cut the pastry into shorter strips (thirds, cut on the horizontal, see below) and did the rolling process as quickly as possible and eliminated the fold-in-the-sides step. Here is the pastry, buttered, with the filling on the bottom:

egg rollsFrom here, I quickly rolled the filled sheet without folding in the sides. It wanted to soak through, but I kept rolling. When done, I cut off the ends.

egg rolls
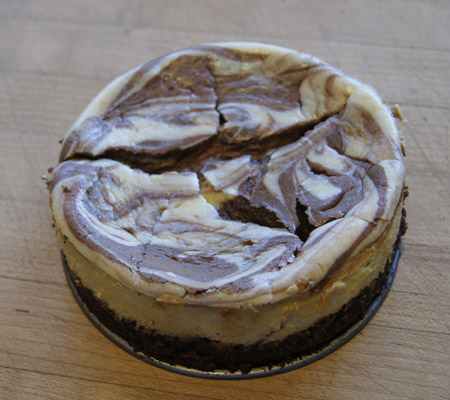
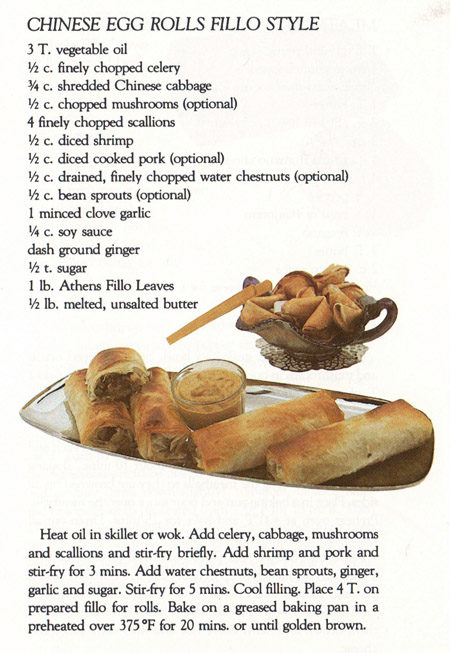
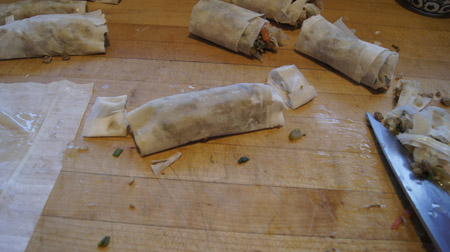
These baked up beautifully (the photo is up above). I would definitely make them again.

The original recipe said to use a pound of phyllo dough; I only used 4 sheets (plus the couple I ruined) which is only about a fifth of a pound. (I do like this larger filling-to-dough ratio.) I used about a quarter cup of butter, so that is about 400 calories total, or an addition of 35 calories per egg roll. I think if you are careful and neat, you could probably use even less butter. So maybe these are a lower-calorie alternative to deep-fried egg rolls. They sure are good.

Will I keep this tiny cookbook? I guess I will. It has good instructions for using phyllo dough and I might try another of the recipes someday.

250 Cookbooks: Healthy Home-Style Cooking

Cookbook #83: Healthy Home-Style Cooking, Classic Pillsbury Cookbook, The Pillsbury Company, 1989.

Healthy Homestyle CookingThis pamphlet-cookbook offers “a contemporary healthful approach to light, sensible and delicious eating.” I can imagine myself 25 years ago, hungry, dieting, waiting in the supermarket check-out line, paging through this cookbook and seeing a few ideas for light meals or desserts.

Most recipes in this cookbook shave off calories by employing low-calorie butter or low-fat milk products. Portion sizes are very small. For instance, Choco-Lite Brownies are only 70 calories each, but that’s because an 8-inch square pan of brownies is cut into 24 pieces. Lots of fresh fruits and vegetables are used in these recipes, as well as whole grains. That’s good.

Today I don’t find much inspiration in the recipes in this cookbook, so I will recycle it. For this blog, I decide to make the “Whole Grain Yeast Waffles” and “Strawberry Syrup”. Oddly enough, this recipe is in the Lively Main Dishes and Light Meals chapter. The lead-in to the recipe says “the batter can be made in advance to make hectic morning breakfasts a snap!” Guess since you make them at night, they are listed with main dishes. Hmm.

Waffles with Strawberry SyrupI have been making a similar yeast-leavened waffle for years; it differs a bit in that it uses fresh milk, no cinnamon, and only all-purpose flour. I like the idea of whole wheat flour in waffles, so I’ll try this new version. And strawberry syrup – I’ll make that too! What a treat this will be for a Wednesday morning.

Whole Grain Yeast Waffles
makes 8-12 waffles

  • 1 tablespoon yeast
  • 1 cup water
  • 3 tablespoons sugar
  • 1 cup all-purpose flour
  • 1 cup whole wheat flour
  • 1/3 cup instant milk
  • 1/2 teaspoon cinnamon (I used a bit more)
  • 1/4 teaspoon salt
  • 3 tablespoons oil
  • 1 teaspoon vanilla
  • 3 eggs

Mix the yeast, water, and sugar and let stand a few minutes. Meanwhile, stir together the flours, instant milk, cinnamon, and salt. Beat the eggs lightly, add the oil and vanilla, then stir into the flour mixture along with the yeast-sugar-water mixture. Mix until well-blended.

Cover with plastic wrap and refrigerate overnight.

Cook the next morning in a waffle iron. My batter was a bit thick for my waffle iron, so I thinned it with a bit of milk.

Strawberry Syrup
makes a little over a cup of syrup

  • 16 ounce package frozen strawberries
  • 3/4 cup sugar
  • 1/2 cup light corn syrup

Put the frozen strawberries in a large bowl and microwave on high for about 10 minutes, stirring every few minutes. The strawberries will come to a boil and soften.

Let the berries cook a bit, then strain through cheese cloth or a chinois. Keep pressing the strawberries through the strainer with the back of a spoon. This takes awhile! You should get about a cup of juice.

Put the strawberry juice in a pan and add the sugar and corn syrup. Bring to a boil and boil one minute. If you prefer, you can put the berry-sugar-corn syrup mixture in a medium bowl and microwave about 4 minutes (until it comes to a boil) and then microwave one more minute.

Here’s my first waffle with strawberry syrup. I couldn’t wait – I took a bite before I crossed the kitchen to the table!
Waffle with Strawberry SyrupComments

The waffles were very good, wheat-y and hearty. And they were easy: no mixing in the morning, just quick waffles. I made them a bit thicker, because the batter only yielded 8 waffles. That makes them 225 calories each.

The strawberry syrup – the strawberry syrup! My thick syrup tasted just like very good strawberry jam. It was great on waffles, and I would love it on ice cream.

A couple drawbacks to this syrup. It took some time to strain and made a total mess of a lot of utensils:

messy sinkAs I stated in my version of this recipe (above), I cooked the syrup in a pan instead of the microwave. Isn’t it lovely?

strawberry syrupThe other drawback to this syrup? It is high in calories. The nutrition information for this recipe states: “Variables in this recipe make it impossible to calculate nutrition information.” That’s weird. I went online to Nutrient Facts and found the calorie content of sugar and corn syrup, and used the calories on the bag of strawberries to calculate that the full batch of syrup has about 1200 calories, and considering my volume, that’s about 75 calories per tablespoon. And I used more than one tablespoon. It is so good I could lap this stuff up.

I haven’t used corn syrup in ages. I was a bit concerned that it contained high-fructose corn syrup, but no, it says right on the package, “no high-fructose corn syrup”.

So the waffles and the syrup are great, but that’s because they are not exactly low-calorie. The cookbook failed me as a low-calorie source, but did not fail to give me a tasty and nutritious meal.