250 Cookbooks: Borden’s Cooperative Housewives Recipes

Cookbook #196: Borden’s Cooperative Housewives Recipes, Borden’s Cooperative, NY,  circa 1925.

Borden Cooperative Housewives Cookbook

I pull a small book out of my “old book section”. Curiously, the cover and spine are blank. The cover is blue cloth over cardboard, like the clip-binders we used in junior high. I open to the first page:

first page
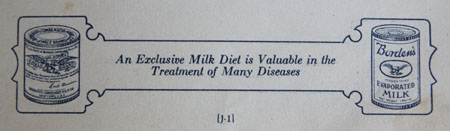
As you can see, the pages are held in with a string tie. The front of each double-sided page is headed with “Borden’s Cooperative Housewives Recipes” and a color illustration. Several recipes follow, and then the bottom of the page has a can of Borden condensed milk on the left, a can of Borden’s evaporated milk on the left, and a saying, like “Every Menu Should Contain Milk or Milk Dishes”.

bottom banner

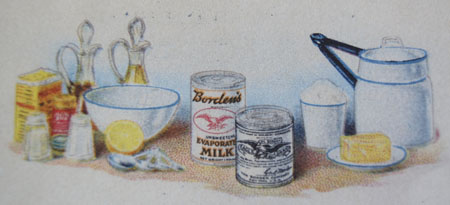
Note the white with blue trim double boiler in the illlustration? To this day, I have one of these vintage double boilers on a shelf in my basement.

double boiler

A couple other pages:

sponge cake pagelobster patties page

The last page of this book invites members to submit the name and address of friends to send to the Recipe Club:

last page

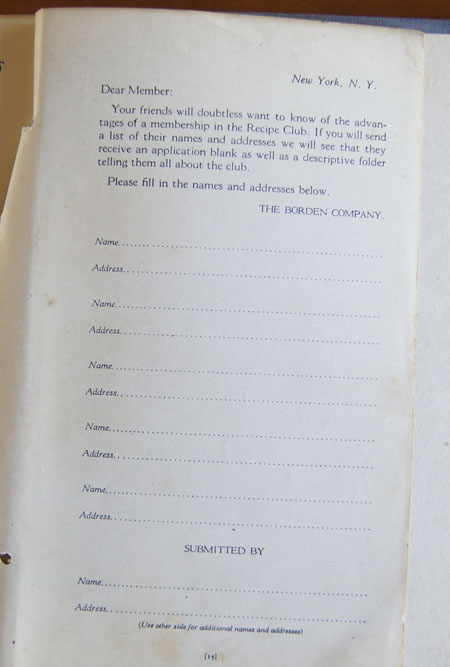
Maybe the mailing address was simply “The Borden Company, New York, N. Y.”?

I am pretty sure this book belonged to my maternal grandmother – she would have been a young mother at the time. There is some handwriting on the back page of the book that looks like hers. So I am almost positive it was her fingers that tied the bow in the string that keeps these pages together. I remember that she could tie perfect bows and that she made her own hats. Mother and I could never tie a good bow.

Memories.

I deduce that Grandma belonged to a “Recipe Club” sponsored by the Borden Company. Probably the company sent her pages on a regular basis, and she would add each page to the book. The pages are numbered with a letter and number, like “B-1”, “E-3”, “G-2”, etc.

There is no publication date in this book. I hit the internet to dig up some information. Michigan State University Libraries (MSU) has this entry for a book on their shelves:

Borden’s Cooperative Housewives Recipes
Publisher: N.Y. Condensed Milk Co. (New York, N.Y.)
1925 (ca.)
21.6 x 14.0 cm
Copyright: Permission is granted from the copyright owner/holder.

The above dimensions match my book. The cover photo is almost the same:

Borden's cookbook
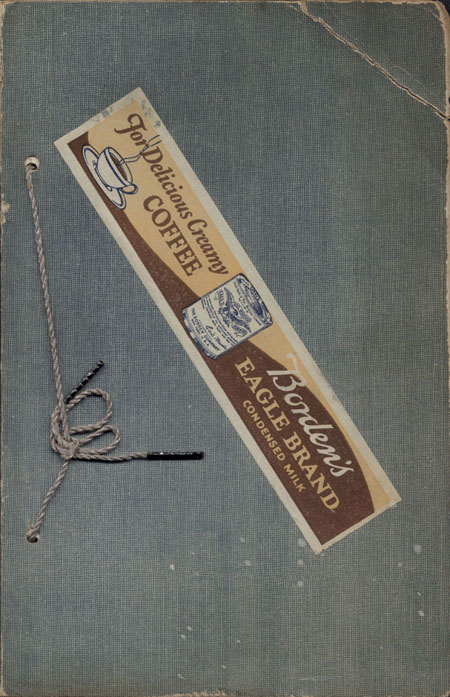
The sticker on the MSU copy reads, “For delicious creamy coffee: Borden’s Eagle Brand Condensed Milk.” Perhaps the sticker on my copy fell off?

The book at MSU is part of the The Alan and Shirley Brocker Sliker Collection, housed with the library’s special collections. And, the entire book is available digitally on their website. Copyright permission is granted, so I feel free to share with you photos and scans of this very old book.

I find one more internet entry pertinent to my Borden’s Cooperative Housewives Recipes on the etsy.com site. A copy of a book that looks like mine was sold through the etsy site – they have photos of the cover and some of the pages. The description reads: “Way back when, Borden’s Evaporated Milk sponsored a recipe club. Each member received recipe installments, and these pages were inserted into a string binding by the Housewife”. They list the publication date as “circa 1920’s”. The pages in my book are in a different order than in either of the copies I viewed online (not surprising) but some are the same.

The Borden company

Gail Borden founded the Borden Company to produce evaporated milk in 1857. The company prospered during the Civil War by selling condensed milk to Union armies. In 1899, the name changed to the Borden Condensed Milk Company, and it became the Borden Company in 1919. It prospered for decades until it suffered significant losses in 1991-1993. In 1997, employees of Borden’s formed “Eagle Family Foods Inc.”, producing Eagle Brand Sweetened Condensed Milk (now a division of Smucker’s). The brand has been bought and sold several times by this point in time (2017).

History of evaporated and condensed milk

Canned evaporated milk was introduced to the American public in 1853 by Gail Borden. The wikipedia version of the story says that on a return trip from England, Borden was devastated by the deaths of several children who drank poor milk from shipboard cows. At that time, fresh milk could only be stored for a few hours before it spoiled – I think that’s why the cows were onboard. Anyway, Borden was inspired to find a way to store milk for long periods at room temperature. He applied a vacuum to fresh milk to pull off a lot of the water, leaving what he called “evaporated milk”.

How did he do this, this chemist asks? A “vacuum” is produced when the atmosphere (air) is removed from a sealed chamber. A vacuum chamber has a lower atmospheric pressure – and at lower pressure, a liquid boils at a lower temperature. In the case of milk, lowering the boiling point of the liquid (mostly water) causes the water to depart the system and leaves the other components of the milk unscathed (because they are not exposed to high temperature). (Rember the old PV=nRT equation you learned in school, where P is pressure and T is temperature? Lower the pressure, lower the boiling temperature. Note that in a pressure cooker the opposite happens: the pressure in increased, and the water boils at a higher temperature.) “Evaporated milk” is stable at room temperature, and when canned will last a long time on a pantry shelf.

How was the vacuum produced in 1857? On wikipedia, I find that methods for producing a vacuum in a chamber were discovered by the 13th century. By the 1800s, several types of vacuum pumps were in use. Borden was impressed and inspired by the vacuum method used by the Shakers to remove water from fruit juices. Likely it was a mechanical pump like the first photo on this page, but I could not find out for sure.

evaporated milkEvaporated and condensed milk as sold today

Each recipe in Borden’s Cooperative Housewives Recipes has evaporated or condensed milk as an ingredient. I know that “evaporated” milk is still sold as “evaporated milk” in a can so labeled. But what is “condensed” milk in today’s lingo? I know that “sweetened condensed milk”, a sugar-sweetened form of evaporated milk, is readily available, but is it the same as “condensed milk”? I need to know this before I cook a recipe calling for this ingredient in Borden’s Cooperative Housewives Recipes.

I go to Wikipedia and look up “condensed milk”. The entry states: “the two terms ‘condensed milk’ and ‘sweetened condensed milk’ are often used synonymously today.” My question is answered.

I do want to note that canned evaporated milk is still often used in cooking, in spite of the readily available fresh milks of today. In some recipes, it works better than fresh milk. I’ve tried fresh milk in pumpkin pie and the pies do not bake up as well as when made with evaporated milk. According to allrecipes.com, canned milk is “the cornerstone of many puddings, including flan, frosting and fudge. Pumpkin pie wouldn’t exist without it”. Canned sweetened condensed milk is a very thick, sweet product that lasts for years in my pantry and I keep it on hand for decadent desserts.

Okay, I feel read to cook a recipe from this book!

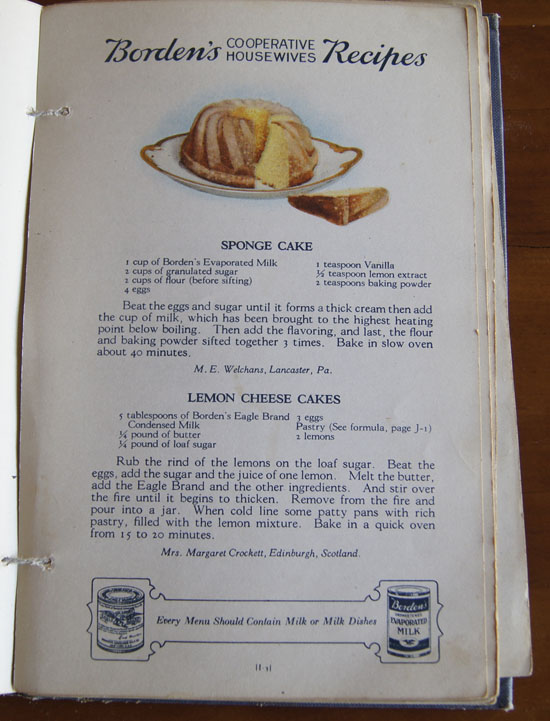
I decide to try “Sponge Cake”.Sponge Cake recipe
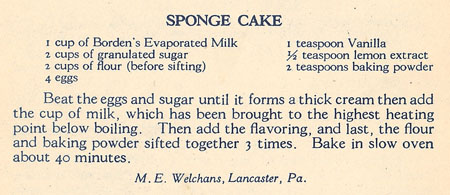
The photo of this cake (one of the photos earlier in this blog) show that it was baked in a bundt pan. I decide not to heat the evaporated milk to just below boiling (this is an unusual step in cake-baking). I guessed a slow oven to be 350˚ F.

Well, I made the cake, and took it out of the oven after 40 minutes. This is how it looked:

fallen sponge cake
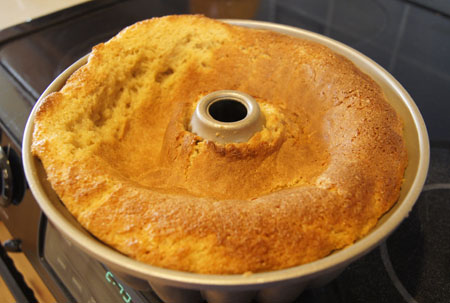
I was so disappointed! This is my planned dessert, and we had company. I showed it to my husband and he sympathized with me.

Then I waited 10 minutes for the cake to cool. I inverted it onto a cooling rack and carefully urged it out of the pan. Lo and behold!
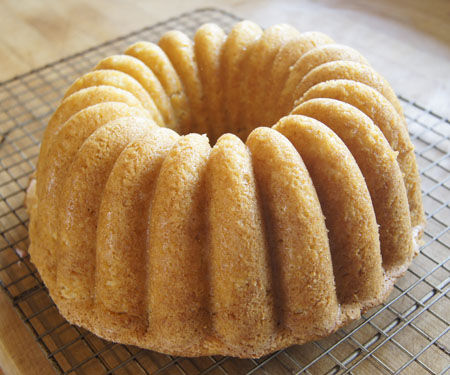
sponge cakeIt’s beautiful!

Why did the cake fall? I suspect the oven temperature. After the fact, I found from Wikipedia that a “slow oven” is 300-325˚ F. Or maybe the step that I skipped – heating the evaporated milk – is important for the outcome of the cake.

I served slices of this cake with sliced, lightly sugared strawberries and whipped cream. I thought the “crumb” of this cake was a little dense, but everyone else simply loved this dessert! If I try a sponge cake again, though, I will compare and contrast with modern recipes for this type of cake.

Flageolet beans

flageolet beansI found an (expensive) bag of heirloom flageolet beans at a little store called “Cured“. Aren’t they pretty? Some of them are creamy tan, and some pale green.

“Cured” is a curious shop tucked near a janitorial supply on about 18th and Pearl in Boulder. I discovered it a few years ago, and now stop to browse whenever I’m in the area. They have an exotic selection of cheese and sausage, and shelves of items like duck fat, olives, crackers, truffles – all sorts of exotic fare. Plus gorgeous loaves of bread. They have a sit-down area for coffee customers. The late morning we were there last week, the store was crowded to overflowing! (Don’t folks in Boulder have to work mornings?)

What to do with these flageolet beans? I went to the website of Rancho Gordo, the company that sells these beans. According to Rancho Gordo, If soaked overnight, flageolets need only about 45 minutes to cook. That’s not long, so I decide not to use the electric pressure cooker that I traditionally use for beans, and instead just let these simmer on the stove top.

Here is how they look just after I put them in a bowl and added water:

flageolet beans

(The photo at the top of this page is of the beans the next morning, after soaking.)

I did add a little salt before cooking, although the Rancho Gordo website advised against it. The cooking liquid from these beans has amazing flavor.

I pretty much followed the recipe for Grilled Shrimp with White Beans, Sausage & Arugula on the Rancho Gordo website. I added a bit of basil, and near the end of the cooking I added a couple fresh, peeled, chopped tomatoes marinated in about a tablespoon of balsamic vinegar for about 30 minutes.

I served these to my bean-reluctant husband for a Saturday night dinner. Surprise! He liked them! And of course I did!

250 Cookbooks: Seal-A-Meal I

Cookbook #195: Seal-A-Meal I, Recipe and Instruction Book, Dazey Products Company, 1976.

Seal-A-Meal cookbook

I bought a “seal-a-meal” by Dazey sometime way back in the late 1970s or early 1980s. I still have it! And it still works. It’s an inexpensive little unit, with a heating bar and a way to hold and press bags over the bar.

seal a mealseal a meal
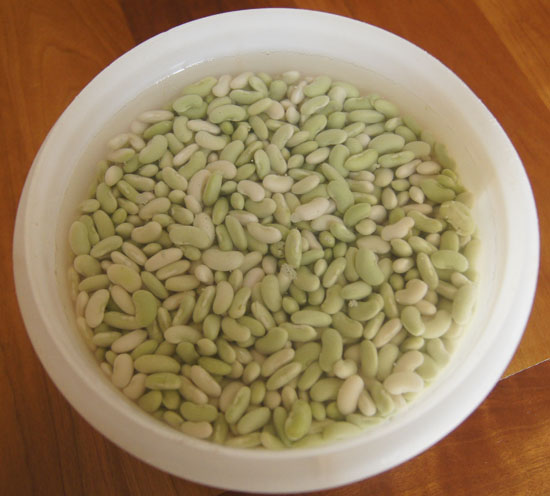
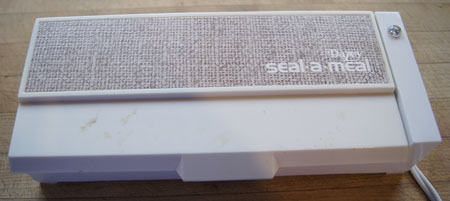
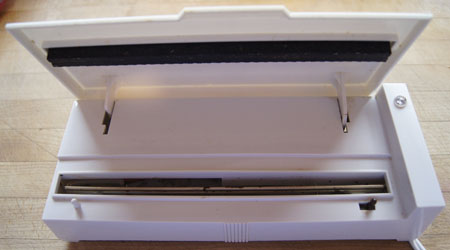
Note the two pegs in the above photo, the white one on the left and the black one on the right. Special bags, or “pouches”, were sold that had holes along the side to latch on to the bags. I have a small roll of this type of this bag material – as you can see in the photo below. See the little round hole in the bottom right corner of the photo?

seal a meal

I searched and searched, but to my knowledge, this type of bag (with holes along the sides) is no longer sold. The Seal-a-Meal® brand now owned by Sunbeam Products (doing business as Jarden Consumer Solutions). The bag sealer units of today use vacuum to remove the air from the bag filled with food, and then heat seal them. Both approaches result in an air-tight, sealed bag, a bag that can be put in a freezer or in boiling water.

There are zillions of reasons to have food or other things in an air-tight bag, or pouch. “Ideas, ideas, ideas” on pages 12-15 of Seal-A-Meal I suggest pouch-sealing food such as tomatoes, vegetables, fruits, eggs, dough for rolls, coffee, even sandwiches. Sportsmen can seal survival kits and fishing gear. Mothers of babies and toddlers can freeze formula and baby foods, and put anything that children shouldn’t touch in seal-a-meal bags. Picknickers can mix up martinis, seal in pouches, and put in the cooler. Seamstresses can store delicate laces and sequins. Teenagers can make water pillows. One can store polished silver in sealed bags.

I contribute this idea: buy meat or fish on sale and seal in the seal-a-meal then freeze; this prevents freezer burn.

How have I used my seal-a-meal? Mostly for short backpacking or car camping trips. I’d make a batch of chile or spaghetti sauce, pouch-seal and freeze it. The meal would go into one of the adult backpacks, while we watched our kids scamper up the trail. The frozen meal acted like an ice block to keep items like cheese cool in the pack. After we reached our campground and set up camp, we’d heat the pouch of food over a camp stove. And enjoy a great meal, with the wind blowing softly in the pine trees, the stars coming out over the Rocky Mountains.

backpacking

My Seal-A-Meal I booklet includes a handful of recipes for cooking foods directly in the bag, like poached eggs and or “Fussless Fudge Sauce”. Another handful of recipes are for main dishes like stew, spaghetti sauce, and chile: you prepare ahead (or prepare a double recipe) and freeze in a seal-a-meal bag for later.

For this blog, I decide to cook a batch of stew meat to “demonstrate” the seal-a-meal process. For a change, I am not going to give you a formal recipe for my stew. Unlike this blog, much of my cooking is done sans recipe. Here goes:

Stew Meat Base

Cut up a chuck cross rib roast – one or two inch chunks – about 3 or 4 pounds of meat (or use pre-packaged stew meat). Toss away any big chunks of fat. Turn on an electric pressure cooker to “brown”, then add about half the meat. Oil in the pan is optional. I found that the first half of the meat I put in the pan browned well and most of the liquid evaporated –  I should have removed it and browned the other half, but I looked at the clock and was running late, so I just tossed in the rest of the meat. In a few minutes, the splattering pile of meat still had a lot of liquid in it, but what the heck, time is ticking. Add a roughly chopped onion and carrot, and maybe 4 chopped garlic cloves. And some salt and pepper. Open a bottle of red wine and pour in a good dollop. Add maybe a cup of water. Cover and seal the pressure cooker, set to “high pressure” for 22 minutes, then let the pressure come down on its own. Well, I let it come down until it was time to leave, when I released the pressure totally and unplugged the unit. I came back maybe 6 hours later. And it was perfect!

This made enough cooked stew meat for 3 meals for 2 people. I divided it in thirds, and put one portion in a pan on the stove top. I mushed up the cooked carrots and onions with a fork: they are there just for flavor. I added chopped carrots, celery, and potatoes, more water, and cooked until veggies were done. Then I thickened with a little cornstarch mixed in a bit of water. It was one of the best stews I have ever made!

I took the other two portions of stew meat base and pouch-sealed. I used two recently-purchased vacuum style seal-a-meal bags and filled each with stew. (I lost the EZ fill gadget that makes it easy to fill bags without getting food on the sides of the upper portion of the bag so there was a bit of food on the edge I wanted to seal – I forged ahead anyway.)

I heated the seal-a-meal unit for 3 minutes, placed the top of the bag on the hot bar, pressed out most of the air, closed the top, and said “one seal-a-meal, two seal-a-meal, three seal-a-meal, four seal-a-meal”, then it was sealed. It sizzled a bit because there was a bit of food in the sealing area, but it still formed an air-tight seal.

seal a meal stew
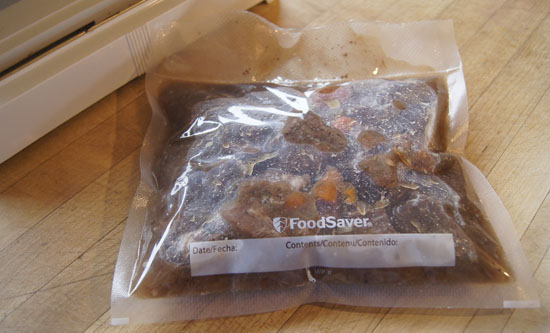
The filled bags are now in my freezer, ready for a couple quick meals.

Comments on food storage, 2017 style

As I used my seal-a-meal this week, I did find the it to be a good method to seal foods for storage. The frozen pouches take up little space in the freezer (compared to a plastic lidded container). The drawback is the time involved (maybe 5 minutes to find and heat the unit and to fill the bag) and the messiness of filling a bag with a wet food like a stew.

Since the advent of seal-a-meal units in the 1970s, plastic bags with nearly air-tight “zip” type seals entered the American marketplace (Hefty and Ziplock brands). Although I wouldn’t freeze something like stew in these bags, I do use them for fresh meats that I’ve bought in bulk; cooked hamburger and sausage; tomatoes, fruits, nuts . . . I use these ziplock-style bags all the time. The advantage over seal-a-meal is that they are quick and easy to fill. Also, I often re-use these bags by rinsing with water.

For leftovers like pasta sauce and chile, I use reuseable, lidded solid plastic containers like Tupperware® or Rubbermaid®. Most of my Tupperware is ancient (they don’t make it now as well as they used to!). Recently, Rubbermaid has come out with a line of “easy find lid” containers that I like a lot because many of the lids are interchangeable between container sizes and the lids are easy to find and the containers stackable. I like them too because they are reusable and thus better for the environment.

And nerdy me, I keep a list of what’s currently in my freezers in Evernote, accessible from my computer, iPhone, and iPad. I have two freezers, one with the refrigerator and one huge one down in the basement. We are 6 miles from the nearest town, and 20 miles from a big supermarket, and I hate to run out of something and have to drive out to a store. Plus I can take advantage of sales. Plus when I was working, I could cook for a whole week on Sundays and store the meals in the freezer.

250 Cookbooks: Mexican Cookery for American Homes

Cookbook #194: Mexican Cookery for American Homes, Gebhardt’s, San Antonio, 1935.

Mexican Cookery for American Homes cookbook

I am not sure how I acquired this cookbook, maybe it was Grandmother’s, or maybe it came from the Ruth C. Vandenhoudt house. One recipe – Chili Meat Loaf – has a handwritten note, but I’m not sure whose writing it is.

Mexican Cookery for American Homes was produced by the manufacturer of a chile powder: Gebhardt. Almost every recipe calls for either Gebhardt’s chili powder or Gebhardt’s canned chili.

An earlier version (c1923) of Mexican Cookery for American Homes is available in full text on the Hathi Trust web site. An even earlier version is now available as a reprint. The back cover of this 2005 reprint, compiled by Andrew F. Smith, a teacher of culinery history, reads:

“The Gebhardt Chili Powder Company was founded by William Gebhardt, a German, who migrated about 1885 to New Braunfels, Texas. Gebhardt opened a café, which served chilis imported from Mexico. To preserve them, he dried and crushed them into powder. He began bottling his powder, and in 1890, he opened a factory to San Antonio. Six years later he trademarked the name “Gebhardt’s Eagle Brand Chili Powder.” The powder became an important ingredient to such an extent that recipes in Texas cookbooks specifically recommended its use. When Gebhardt began marketing chili powder to a wider audience beyond Texas, he ran into a very serious problem-consumers not familiar with Tex-Mex cookery had little idea what to do with it. To help cooks understand Tex-Mex cookery, Gebhardt produced a small 32-page cookery pamphlet. This cookbooklet was originally published about 1908. As such, it was the first English-language booklet published in the United States that focused on Mexican-American cookery. It proved so successful that new editions of it were regularly published through the 1950s. In 1911, Gebhardt sold his company to his brothers-in-law, who expanded their product line to include beans and tamales. During the 1920s, they introduced to the tourist trade Gebhardt’s Original Mexican Dinner Package, consisting of cans of chili con carne, Mexican Style Beans, shuck-wrapped Tamales, Deviled Chili Meat, and a bottle of Chili Powder-all for one dollar. By the 1930s, Gebhardt products were sold throughout the United States and Mexico. The company survived until 1960 when it was purchased by Beatrice Foods, which in turn was acquired by ConAgra in 1990.” (From Amazon description accessed 2017.)

My 1935 edition of Mexican Cookery for American Homes reflects the culture of America at the time – women were the home cooks. I’ve addressed the issue of women-in-the-kitchen many times in this blog, most recently in this post. The foreword (below) to Mexican Cookery for American Homes states in the last paragraph: “Earlier editions of ‘Mexican Cookery for American Homes’ have been welcomed by countless thousands of women.”

MexCookery page 6

I found a post about Mexican Cookery for American Homes on a website by another affectionado of old cookbooks, Wendi. The blog is called “Resurrected Recipes, this is your grandma’s cooking“. Wendi has the same version of Mexican Cookery for American Homes that I do. I like her discussion of the recipes, recipes quite different from the Mexican foods we have today, or even the recipes in the 1950-60s era of cookbooks. She calls some of them silly! Like this recipe for “Gebhardt’s Tamales and Chili with Meat”:

MexCookery page 8

Yup, you put two cans – unopened – in boiling water for 20 minutes! Silly indeed.

I decide to make “Enchiladas, Mexican Style for this blog”. It’s the middle recipe in the scan below – I included the other recipes for curiousity’s sake.

MexCookery page 10

Note that the Mexican style of enchilada is served on flat – not rolled – tortillas. And, you put fried eggs on top. Another twist! I’ve put poached eggs on tortillas and beans to make Huevos Rancheros and we’ve always like them.

This enchilada recipe calls for Chili Sauce on page 36:

MexCookery page 36

I’ll make these pretty much as the recipe reads. Except, I do not want to fry the tortillas, instead I’ll soften them in the microwave. I don’t have Gebhardt’s chili powder, but I have some great chili powder from Savory Seasonings.

Enchiladas with Eggs
serves 2 for dinner

  • 1 small onion, diced
  • 1/4 bell pepper, diced
  • 1 clove garlic, minced
  • 2 tablespoons flour
  • 1 tablespoon hot chili powder
  • 1/2 teaspoon salt
  • 1 cup chopped tomaotes (fresh or canned)
  • 1 cup beef stock (or water)
  • 6 corn tortillas
  • 1/2 to 1 cup grated cheese (I used cheddar cheese)
  • a few diced onions, if desired
  • 1-2 eggs, fried or poached

To make the sauce, cook the diced onion, bell pepper, and garlic in a little oil until soft. Combine the flour, chili powder, and salt, then add to the cooked onion mixture and stir until smooth. Slowly stir in the tomatoes and beef stock (or water) and simmer about 20 minutes.

On each plate, layer 3 tortillas with a little sauce and cheese between each layer. Microwave on high until the cheese and sauce are bubbly – probably less than a minute. Top with fried egg(s) and serve.

Enchiladas with Eggs

I served these enchiladas with a little lettuce, rice, tomatoes in a balsamic vinaigrette, and chayote. (More on chayote below.) This meal was a success! I really enjoyed the mixture of egg, tortillas, cheese and seasonings – a different taste for dinner. Hubby said he’d prefer it with refried beans, more like traditional huevos rancheros. Maybe next time.

Chayote

Chayote is a member of the gourd (squash) family, as I learned when I read my 1928 Salads, Vegetables and the Market Basket. Chayote is common in Latin American cooking, but is not listed in Mexican Cookery for American Homes. Last week I was at my favorite Asian Seafood Market and found a chayote in the fresh produce area. I brought it home because it looked so interesting! I served it with a mixture of tomatoes and balsamic vinegar:

chayote and tomato vinaigrette
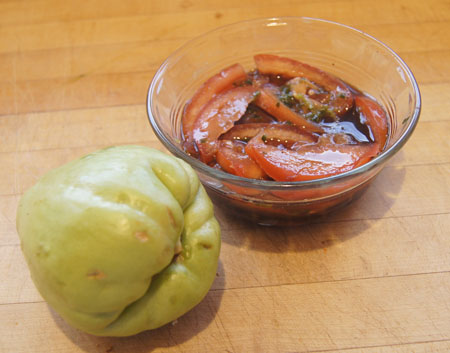
Here’s the sliced, peeled chayote. It tastes like something between an apple and a pear, crunchy and interesting. cut chayote
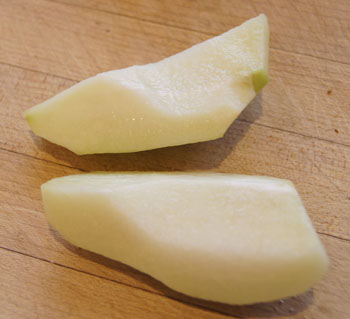
My tomato vinaigrette is a modification of a recipe for “Spicy Balsamic Tomato Salad” that I found on allrecipes.com.

  • 2 tomatoes, cut into thin wedges
  • 1 tablespoon balsamic vinegar
  • 1 tablespoons rice vinegar
  •  basil to taste, dried or fresh
  • 1/4 teaspoon ground ginger
  • salt to taste
  • chayote, peeled and sliced

Combine tomatoes and vinegar and seasonings. Let sit, stirring every 15, until flavors combine, about 1 hour. Combine with sliced chayote and serve.

250 Cookbooks: Salads, Vegetables and the Market Basket

Cookbook #193: Salads, Vegetables and the Market Basket, California Home Economics Association, Southern Section, 3rd ed., 1928.

Salads, Vegetables, and the Market Basket cookbook

Note:This cookbook is in the same series as Pastries and Desserts, 250 Cookbooks entry number 218.

This book was published in 1928! That means Salads, Vegetables and the Market Basket gives a glimpse into the kitchens of America when my own mother was not yet a teen. Here is the foreword:

foreword

This description of “vitamines” is interesting:

vitamines

A web search for Salads, Vegetables and the Market Basket only pulled up one relevant site, the bibliographic entry on the site “Food and Agriculture Organization of the United Nations (AGRIS)”. I did find full text of a related book: The California Home Economics Association, yesterday, today, and tomorrow, 1921-1961 in the digital library of Hathi Trust. I spent a bit of time perusing this history of the California Home Economics Association (CHEA) and the introduction of courses in “Home Economics” to the curriculum of California schools. An excerpt from the forward (note that the century is the twentieth):

CHEA1

(I discussed home economics in when I covered my mother’s text, General Foods Cookbook. I brushed on the topic in The Fannie Farmer Cookbook and Rice – 200 Delightful ways to serve it.)

Secondary schools in California had home economic classes in secondary schools as in the early 1900s:

CHEA2

College courses in home economics were introduced by 1909:

CHEA3The following is the beginning of an appendix in The California Home Economics Association, yesterday, today, and tomorrow, 1921-1961. It dilineates the early introduction of home economics to California schools. Note the last entry on “hand and machine sewing”. I learned sewing (as well as cooking) in junior high in California in the 1950s.
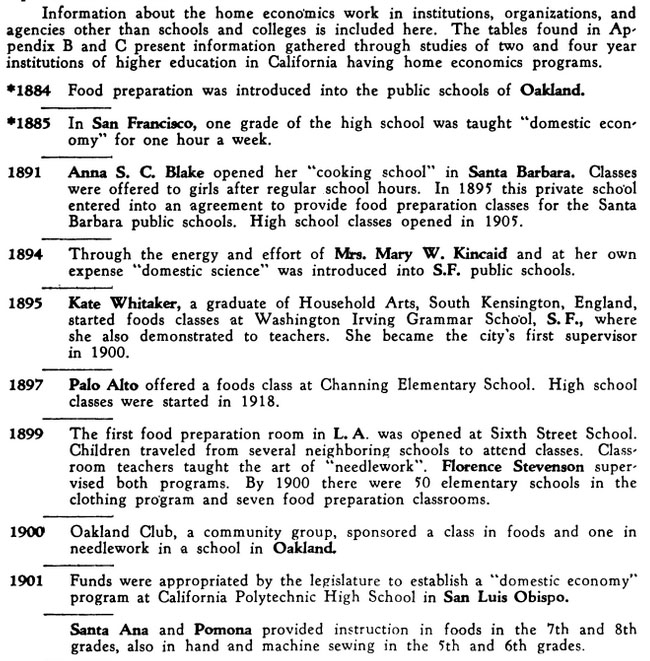
By the 1960s, American home kitchens are influenced by many changes: industrialization, urbanization, suburbanization, working mothers, a higher level of education, and automation.

CHEA4

(I puzzle over the phrase in the above excerpt: “Consider also, the family’s greater emphasis on consumption, less on production.”)

Salads, Vegetables and the Market Basket in my hands, I stand in my sunny kitchen and feel company with all the women who ever stood in their own kitchens, studying how to get the best food – the best health – for their children and spouses. And yes, I say women. I know that men are also cooks, but in the culture of my youth, the home was the where woman belonged. I am so thankful for my college education, and the chance to break some of womens’ bonds to the kitchen and engage in the scientific pursuit of chemistry, enjoying stretching my intellect, hobnobbing with Nobel laureats, studying in the lab where DNA was first synthesized and isolated, creating new experiments for organic chemistry students, creating web sites, and basically, enjoying the heck out of life. But I always come back to my kitchen for comfort.

What shall I cook from this book? The recipes are quite aged. Below are two pages of recipes for salad dressing. They do not include good directions for a true vinaigrette dressing. Cream cheese dressing made with cream cheese and a bit of vinegar does not entice me. Nor am I inclined to make a piquante salad dressing from cooked eggs, mustard, sugar, worcestershire, catsup, oil and vinegar – or potato, gelatin, and sylph mayonnaises (the last has mineral oil in it instead of vegetable oil).

Market BasketMarket BasketSome salads have fancy presentations, like Butterfly Salad, or Banana Canoes.Market Basket

Salads, Vegetables and the Market Basket includes many recipes for cooked vegetables, from broccoli to to collards to chayote to lentils to potatoes to tomatoes. Many times they are cooked in white or cheese sauces, butter and sugar, or baked covered with buttered bread crumbs. I can’t find anything I want to make!

Finally I come upon a recipe for Mint Glazed Carrots (second from the bottom in the scan below). If I cut down on the butter and sugar, these might be a good accompaniment for a meat and potatoes meal.

Mint Glazed Carrots recipe
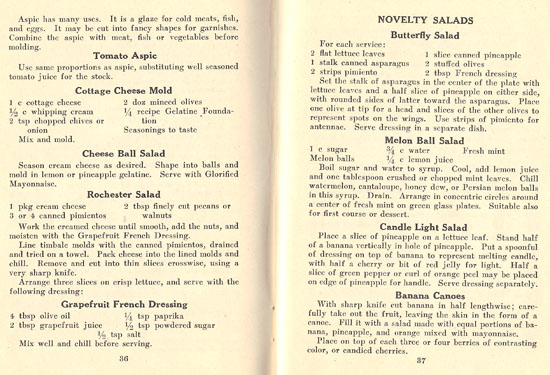
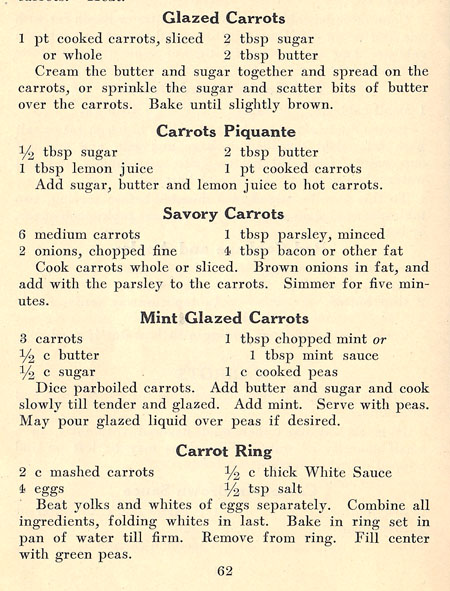
Glazed Carrots with Peas with Mint
serves two

  • 2 medium carrots, peeled and cut in half
  • 2 tablespoons butter
  • 2 tablespoons sugar
  • 1/2-1 tablespoon chopped fresh mint
  • 1 cup cooked peas (about)

Parboil the carrots: put in boiling, salted water, then simmer 10-15 minutes, just until barely fork tender. Dice the parboiled carrots.

Melt the butter in a pan and add the sugar, stir until incorporated. Using medium heat, cook and stir until the carrots are tender and glazed (they do not need to brown). Add the mint.

Scoop the carrots and mint out of the pan and put over cooked peas. (This way, you can leave some of the butter/sugar/calories in the pan.)

Glazed Carrots with Mint and Peas
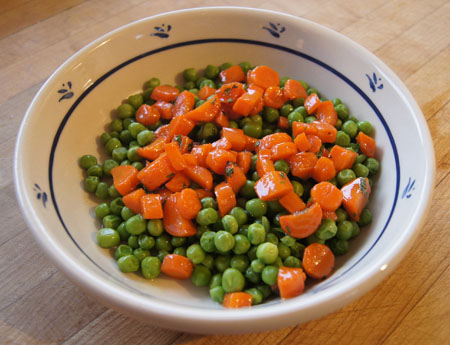
I thought these were good – hubby was less impressed. I love the colors and the bright mint flavor. Yes, they were a bit sweet, but I thought it nice for a change.

Ruth C Vandenhoudt

This name is handwritten on the cover of my copy of Salads, Vegetables and the Market Basket. This tells me that I acquired this cookbook from the Ruth Vandenhoudt house, back when I was a teen. My paternal grandmother was related to Ruth Vandenhoudt, and on Ruth’s passing, relatives were invited to her house to take things from the estate. I found books and books and books – old books with brittle pages and faded covers. A couple were gorgeous, most were just curious and aged. I still have many of these books.