Lamb Stew, with Cinnamon

Lamb Stew with Cinnamon

I created this recipe! And I wrote it down, pretty amazing for me, but maybe not so much since this happened during the last two years, so I had the time since I wasn’t working. I wrote the introductory paragraphs then too.

(2011) This all began with a trip to the Savory Spice Shop on the Boulder mall. I brought home the most wonderful cinnamon that perfumed the house for days. I would come in from outside and think “cinnamon, I must use it in a dish other than a dessert!” In the meantime, I put it in a dessert and muffins. Once I ate a re-heated cinnamon-laden muffin for breakfast, and then hours later, in different clothing and hands washed, I was in the last 5 minutes of a 30 minute stint on the ellipticals at the rec center, and very sweaty, and suddenly I smelled cinnamon wafting around my head! I shook my head in amazement.

So back to the idea for a main dish with cinnamon. I thought back to the Mediterranean cooking class I took a few years ago. Cinnamon was in a chicken dish, and a ground lamb dish. I was thinking more of a stew. So I googled lamb and cinnamon and stew, and found a recipe that I based the following recipe on, with changes in spices made from the cooking class recipes.

Was the recipe a success? Yes! Did I get my cinnamon “fix”? Yes I did. Just the sort of complex flavor mix that I was looking for. Mixed with the lamb aroma, the cinnamon itself wasn’t recognizable as pure cinnamon, but it added a complexity that was simply super. The hint of cayenne picked up the flavor to perfection.

This recipe serves two, generously. Since one of my pet peeves is the restaurant tradition of serving the same serving size to a small woman as a large man, I am reluctant to state the number of servings with a pretension of accuracy. It would serve one guy and two women, is my guess. It serves the two of us with some left over, enough for lunch the next day or for the doggies.

Lamb Stew, with Cinnamon


Serve this over rice or couscous. Flatbreads (naan) make a nice addition too.

  • 1 pound boneless lamb stew meat, cut into chunks
  • olive oil or vegetable oil
  • 1 carrot, diced
  • 1 stalk celery, diced
  • 3/4 of a medium onion, sliced thin
  • 3 cloves garlic, chopped
  • 1/2 t cinnamon
  • 1/4 t cumin
  • a few shakes each of: nutmeg, allspice, cloves, and red (cayenne) pepper (watch the cayenne – not too much! really, just a couple shakes!)
  • salt and pepper to taste
  • a couple bay leaves
  • 3 T flour
  • 1 cup of diced, canned tomatoes – about 3/4 of a 14-oz. can
  • 1/2 cup white wine
  • 1/2 cup chicken stock
  • chopped parsley to taste

Brown the lamb in batches in a little hot oil in a pot on the stove. Don’t crowd it; if you put too many of the lamb cubes in at once, they won’t brown as well. As they brown, remove the lamb cubes from the pan and set them in a bowl.

In the same pot that you browned the lamb in, saute the carrots, celery, and onion in a little oil until soft, adding a little salt to help sweat the vegetables. Add the garlic and the spices and salt and pepper and continue to cook and stir for a couple minutes. Add the lamb back to the pot. Add the flour and stir until it’s incorporated. Finally, add the tomatoes, wine, and stock. (Feel free to add a bit more stock if it looks too thick.)

Cover and simmer for at least 2 hours, probably more like 2 1/2 hours. Check periodically; add more stock if it’s too thick, and check the lamb to see if it’s done. You want the lamb to be falling-apart tender, and it takes awhile. (This could be done in a crock pot. I’d suggest 7-8 hours on low.)

Before serving, add some chopped fresh parsley (if you remember! I always forget).

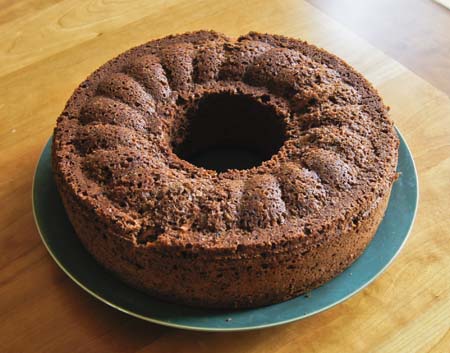
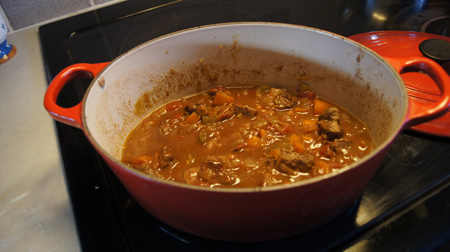
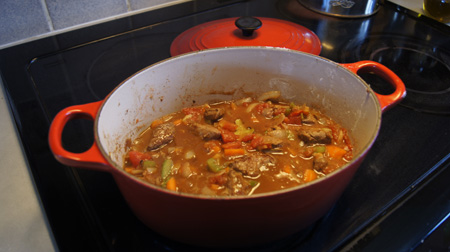
The photo on the top of this post is of the cooked stew. The photo below is before the long simmering step. By the end of the cooking, the celery and onions meld into the sauce and the spices. This really is good, I’ve made it three times and someday I’m sure it will be listed in my “favorites”!
Lamb Stew with Cinnamon, before simmering


250 Cookbooks: Whirlpool Micro Menus Cookbook

Cookbook #17: Whirlpool Micro Menus Cookbook. Better Homes and Gardens, Meredith Corporation, 1979. (Whirlpool trademarks property of Whirlpool Corporation, Benton Harbor, Michigan.)

Whirlpool Micro Menus CB

This one’s easy! I’m not going to keep this cookbook. But it did bring back some memories.

My mother’s brother – my Uncle Lee – got one of the very first microwave ovens. I remember that it was expensive. It must have been in the 1960s, since I was still living at home. We shook our heads at my uncle’s foolishness for wasting his money on such an unproven product. My family all thought my uncle was looney anyway; this was just another in a litany of “bad decisions” he had made.

Researching the web today, I find that the first microwave ovens produced for home counter top use were the Amana “Radaranges” (and this link), in 1967. During the 1970s, microwave ovens steadily declined in cost and many American families decided to buy one. Most people raved about how convenient they were. Not everyone was convinced, though. For instance, me. At the time I was heavily into “natural” cooking, and I just didn’t trust them. In 1975, articles like this one reported that the FDA recalled thousands of microwave ovens due to radiation leakage. Health food nuts claimed they caused cancer and blindness and who knows what else.

My sister, a few years older than me and a working mom at the time, got a microwave oven. Hmm, she and her kids seemed okay. Safety regulations were put in place, and finally even I was convinced of the ovens’ safety. Perhaps partly because I was working in a lab where we used one to melt agar for bacterial plates (and heat up our lunches, right on the lab bench). I think we had the university periodically test the lab’s microwave oven for leakage, although my memory is a bit sketchy. I do remember that our lab helper put an unpeeled hard boiled egg in the microwave and it exploded and made a horrible and stinky mess.

In 1981 we built our own home. To help finance this endeavor, I went back to work full time, even though my firstborn was only six months old. The one thing I demanded was “a microwave oven to save time in cooking”. And so we bought a Whirlpool microwave oven. It had manual controls, nothing digital, and it lasted over 23 years, until I replaced it (even though it sort of worked) with a microwave-convection oven in 2004.

I bought the Whirlpool Micro Menus Cookbook just after I got that first microwave oven. Today I have three such books, and I’ll keep the one that has the best guides for microwaving different types of foods. This book is not the one I will keep – I peeked at my other microwave books and I like their guidelines better.

The book goes a little overboard in the use of the microwave in cooking meals. It begins with cooking a meal of meat loaf, twice baked potatoes, broccoli with cheese sauce, and a pudding, all in the microwave. The microwave is used for every step, even cooking the onions for the meat loaf. That’s a ton of microwaving steps. These days most of us use the microwave only for thawing foods, heating leftovers and burritos, melting cheese, boiling water and the like – not for entire meals.

I searched the book for a recipe to try. Most recipes are the conversion of current (1970s) American standbys to microwave cooking. While searching, I found a post-it and an index card tucked next to the cookbook’s recipe for cinnamon rolls (the microwave can be used in the rising step of yeast breads). The index card is handwritten in my own writing, and I recognize the recipe as my mother’s one for cinnamon rolls. I had been looking for that recipe just last December! I am so happy to have found this recipe!

My blogging is successful. I don’t really expect more than a handful of people to ever read this, but on a personal level, I have accomplished something. I have found a lost and treasured recipe. And, I am getting rid of cookbooks! Just yesterday I pushed in the bookend to close the gaps on the bookshelf.

Okay. So the recipe I tried is “Brown Betty Contemporary-Style”. This recipe seems a little out of place in this cookbook, since it includes honey, oatmeal, whole wheat flour, wheat germ, and sunflower seeds; most of the recipes do not include seeds and whole grains. This dessert takes less than 15 minutes to cook. One of my most common Saturday night two-person desserts is some sort of fruit crisp, cobbler, betty, crumble, or buckle. Briefly, these are baked fruit desserts, topped with a mixture of flour, spices, and a little butter or other fat.

The recipe is below. I am not going to include it in my recipe index because I would not make it again as it is written.

Brown Betty 
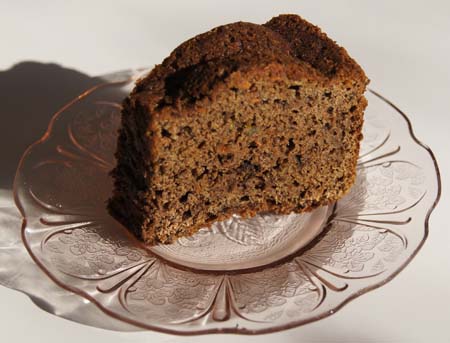
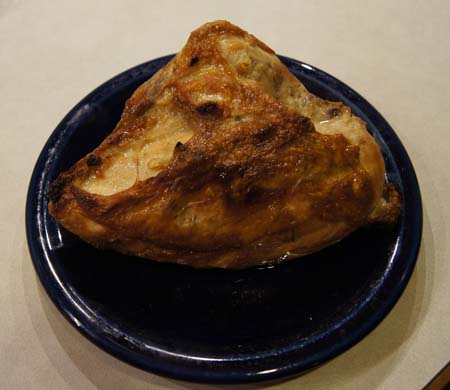
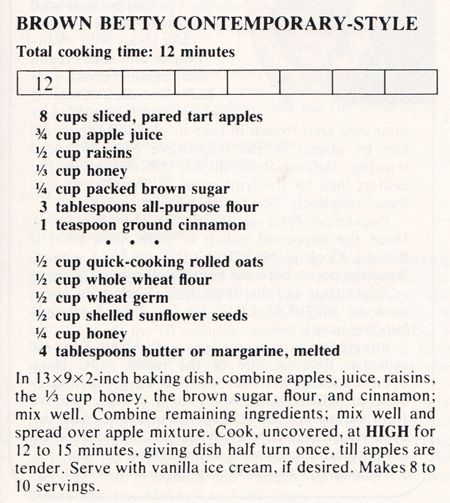
I did like the flavor and texture of this dessert. The honey and sunflower seeds made it taste like a healthy cookie or energy bar. But the top of the “betty” was pale and unappetizing. (I served it with frozen vanilla yogurt to cover it up.) Next time, I would bake this in a conventional oven for at least 30 minutes. That way, it should look better, have more crunchiness, and fill the kitchen with the aroma of cinnamon and apples as it bakes. I am adding it as a “work in progress” to my personal recipe file.
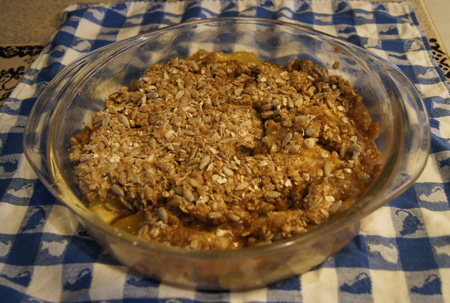
Apple Brown Betty

Here are some nostalgic photos from this book. I love looking at how the women dressed in past decades. This book went to press in the late 1970s – note the dresses and hairdos. (Wasn’t me! I was in blue jeans and favorite T-shirts and my hair was long and uncoiffed.) Compare and contrast these photos with those in the 1964 Bake-Off Recipes cookbook.

Whirlpool Micro MenusWhirlpool Micro Menus

250 Cookbooks: Eating Light

Cookbook #16: Eating Light. Better Homes and Gardens, Meredith Corporation, Des Moines, Iowa, 1985.

Eating Light

This is another low-calorie cookbook that I picked up in the 1980s. I remember that I frequently bought the “women’s magazines” like Better Homes and Gardens during that time, so it doesn’t surprise me that I purchased a book with the same name.

This cookbook is similar to the magazine: glossy, and produced by a company rather than an individual. The recipes have long names and pretty pictures, but not many tempt me to try them. Years ago, I probably picked up some ideas on low-calorie cooking from this book, but today, I find it “old hat”. Not very interesting. Also, they put the nutrition information in the appendix, rather than with each recipe, which I find inconvenient.

I decided to try “Pork Pinwheels with Apricot Stuffing”. I like pork tenderloin, and I like apricots. It’s a new idea (to me) to use dried apricots in a stuffing for pork. And I think the pinwheels might look pretty, and hopefully I’ll be able to add another pork tenderloin recipe to my repertoire.

There is only one other recipe in this book that looks interesting, so I’ll copy that recipe and give this cookbook away.

Pork PinwheelsComments

These turned out pretty good, at least when I made some changes. I’ll type in the recipe below. But first I’ll rant, with a what’s wrong with this recipe discussion.

This recipe makes “6 servings”. Those are dang small servings. Each person would only get about 2 1/2 ounces of pork. Generally a serving of pork is 4 ounces. For the two of us, I weigh out 9-10 ounces of pork for a meal. (The nutrition information on the package of pork tenderloin that I bought states that 4 ounces has 130 calories and 23 grams of protein!)

The nutrition information (at the back of the book) states “191 calories” per serving. Using the information on the packaging of the ingredients, I come up with more like 160 calories per 1/6 of the recipe. And note that I don’t use too many significant figures: it’s silly to say “191 calories” when there so many variables when one actually prepares the recipe. Bread, for instance, has a quite variable calorie content. (I used My Daily Bread so I know exactly how many calories it has.)

The recipe slips in unnecessary calories by employing both butter and apricot nectar. Butter has 100 calories per tablespoon (Nutrient Facts) and can be eliminated by using a non-stick pan (and a tiny amount of olive oil) to wilt the onion and celery. Surprisingly, a can of apricot nectar has 200 calories. And it contains “high fructose corn syrup, apricot juice concentrate, apple juice concentrate”. If/when I make this again, I’ll try to find a better juice choice at Whole Foods.

The recipe calls for “1 pound” of pork tenderloin. Ground meat might be sold in exact 1 pound packages, but the same is not true for pork tenderloin. The one I used weighed 14 3/4 ounces. I went ahead and used it (even though I aim at 9-10 ounces) because to roll up the meat, a certain mass is required. I had leftovers, but the dogs didn’t mind. Be aware, though, that this recipe does not scale down well to only two people.

Broiling is called for in this recipe. But, it does not state whether to set the broiler to high or low. I tried 5 inches from the broiler and the low setting; the pinwheels were burning within 2 minutes. Luckily I checked! I don’t know what kind of broiler they used but mine simply did not work. I changed my oven to “bake”, as reflected in my typed recipe below. I don’t think that using a broiler rack is necessary. The book states that broiling with a rack is a great method because it allows the fat to drip off; my opinion is that pork tenderloin has very little fat in it to drip off. I’d skip it next time.

All that said, the meal was a success. The pinwheels were pretty and the cinnamon was a nice addition. If you want to try these, use my recipe below.

Pork Pinwheels with Apricot Stuffing


With one pound of pork tenderloin, this would serve about 3 people. Adjust the amounts of all ingredients according to the number of people you are feeding and the weight of the purchased pork tenderloin.

  • 1 pound pork tenderloin
  • 2/3 cup chicken broth
  • 1/3 cup finely chopped dried apricots
  • 2 tablespoons chopped onion
  • 2 tablespoons chopped celery
  • 1/8 teaspoon cinnamon
  • salt and pepper to taste
  • 2 cups dry whole wheat bread cubes (about 1/4-inch cubes)
  • 1 1/2 teaspoons cornstarch
  • dash nutmeg
  • 1 cup apricot nectar (try to find one that does not have high fructose corn syrup; perhaps you can find fresh apricot juice)

Heat the broth to almost boiling. Pour it over the apricots and let stand for at least 5 minutes while you prepare the vegetables.

Cook the onion and celery in a tiny amount of olive oil in a non-stick pan until the onion wilts; salt to taste and to sweat the onion. Add the cinnamon and pepper, then add this and the apricot mixture to the bread cubes.

Split the tenderloin lengthwise, cutting to, but not through, the opposite side. Open it out and pound it lightly with a meat mallet until it is about 10 inches by 6 inches. Spread the stuffing evenly over the tenderloin. Roll up jelly-roll style, starting from one of the short (6-inch) sides.

Secure the meat roll with toothpicks or tie with string at 1-inch intervals. Then, cut the meat roll into six 1-inch slices.

Carefully place the meat slices in a lightly greased or Pam-sprayed baking pan. [“Cut side down”? For four of the slices, both sides are cut. Another recipe-rant.]

Baking: I suggest a quick broil on low for a minute or two to brown the tops of the pinwheels. Then, bake these at 400˚ for about 20 minutes. Check with an instant-read thermometer; about 150˚ internal temperature is good. I served these with sides of double-stuffed potatoes and vegetables.

Below is a photo of the pork roll. It’s so bulbous! Toothpicks might work better, since the string kind of squished it and left a mark on the pinwheels after they were cooked.

pork roll before cutting
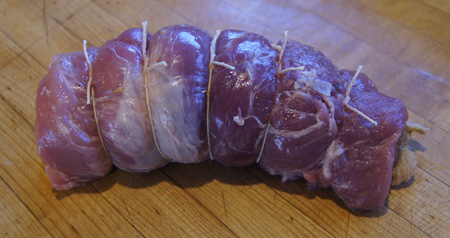
Here it is after I cut two pinwheels. I only cut five in all because I started with a little less than a pound of tenderloin.

cut pinwheels
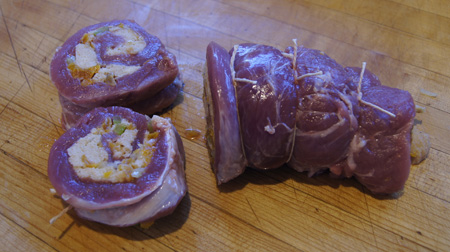
The pinwheels, cooked and plated:

cooked pinwheels

Pretty good!

Favorites and 1990s Blog: Beef Jardiniere Crepes

This favorite recipe for leftover beef in crepes was in my 1990s blog. I’m listing it in both categories because unlike the cookie recipes, which I can  make only rarely, I make this recipe a lot.

I love to make crepes. They are so pretty and yummy. They do take a chunk of time, though, since I always mix them and then let the batter sit for at least an hour before cooking. And pan-cooking the crepes is time-intensive, at least for about 10-15 minutes. This all means that (for me) the time chosen to make crepes is traditionally a slow, leisurely pocket of time, a Sunday afternoon, a time with nothing pressing.

Crepes can be made ahead of time and stored in the refrigerator for several days. For Beef Jardiniere Crepes, I used to make the crepes, filling, and sauce on Sunday, and then on a weekday quickly put them all together and bake. Then it was a 30-minute weekday meal, and delicious and low calorie.

I have watched Alton Brown make crepes on TV, and read about them elsewhere. I make them a little different. I cook both sides, and rarely are my crepes “lacy”. If crepes are lacy, all the good moist filling leaks out. And I really don’t understand why one would only cook one side. Maybe mine are thicker. Maybe mine are better.

I do use a pan sold specifically for crepes. I bought it years ago and it looks like it. It is a cheap, light, non-stick pan with shallow sides. Any 8-10″ non-stick pan will do. To save calories, I lightly coat the pan with non-stick spray (instead of butter) before cooking each crepe. Details on my method are in the text and photos below.

Beef Jardiniere Crepes


I make these a lot. They are yummy, on the low-calorie side, have lots of veggies, and use up leftover roast beef. Plus I just like crepes. [Note to myself in my personal recipe file.]

This recipe serves about 4.

Crepes:

  • 2 eggs
  • 1 cup milk
  • 3/4 cup flour
  • 1/2 teaspoon baking powder
  • 1/4 teaspoon salt

Filling:

  • 1 pound leftover cooked beef, chopped into 1/4-1/2″ dice
  • 1 1/2-2 cups beef broth
  • 1/2 cup chopped onion
  • 1/2 cup chopped celery
  • 3/4 cup chopped carrots
  • 1/2 teaspoon dried basil or fresh basil to taste
  • 1/2 teaspoon dried sage or fresh sage to taste
  • salt and pepper to taste
  • 1 tablespoon cornstarch mixed with 1/4 cup water

Sauce:

  • 1 1/4 cup reserved cooking liquid
  • 1 tablespoon catsup
  • 1 tablespoon red wine (optional, but good)
  • 1/8 teaspoon garlic powder
  • salt and pepper to taste
  • parsley, fresh or dried, to taste
  • 1 tablespoon cornstarch

Place all crepe ingredients in a blender and blend until smooth, stopping and scraping down a couple times, about 1-2 minutes. Let stand at least one half hour before making the crepes, then blend briefly again.

(At this point, you can jump down to making the filling while the crepes rest.)

Heat a non-stick skillet on medium high until a drop of water sizzles when put in the pan. Or, hold your hand an inch above the pan and see if noticeable heat is coming off it. I keep my pan on a setting between 8 and 9 (with 10 being the highest setting). Give the pan a quick spray with something like Pam (do this before cooking each crepe). Measure out about 1/3 cup crepe batter. Hold the pan in one hand and quickly pour the batter into the pan and rotate the pan so that the batter covers the pan. Cook only 10-20 seconds, until golden brown on the bottom. Then, flip and cook the other side. Continue until all crepes are cooked. (Makes 8-10 crepes.)

Cook the onion, carrots, and celery in a small amount of butter or olive oil until the onion wilts, then add the chopped roast beef and the broth and cover and cook 15 minutes.

Pour off 1 1/4 cup of the vegetable-beef cooking liquid and reserve for the sauce. If too much of the liquid has cooked away, make up to this volume with more beef broth. You want to leave a little liquid behind in the vegetable-beef mixture too, so that it is saucy.

Add the 1 tablespoon cornstarch mixed with 1/4 cup water to the vegetable-beef mixture and cook over medium high heat until the mixture thickens. Remove from heat and set aside.

Combine all the sauce ingredients except the cornstarch. If the mixture is cool, you can add the cornstarch directly to it; otherwise, stir the cornstarch into a little water first and then slowly stir it into the sauce. Cook the sauce until thick – this takes just a few minutes.

Note: We like our sauces fairly thick. If I see that the sauce is not thickening as much as I like, I’ll add more cornstarch. This is an individual preference so feel free to make changes.

Fill crepes with vegetable-beef mixture, cover with foil, and bake at 375° for 15-20 minutes. Serve with the heated sauce.

Below is a photo of a crepe just about ready to be turned. See the how the edges are golden brown. And I wasn’t kidding when I said my crepe pan was old and worn – but it works great. crepes
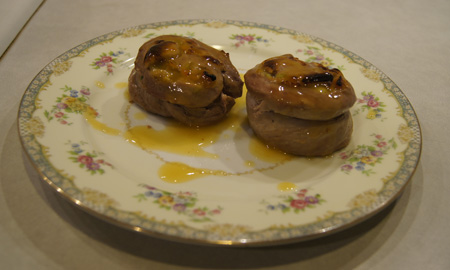
Now the second side cooks:

crepes

 A pile of crepes:crepesThe beef and vegetables cooking:

beef and vegetable filling
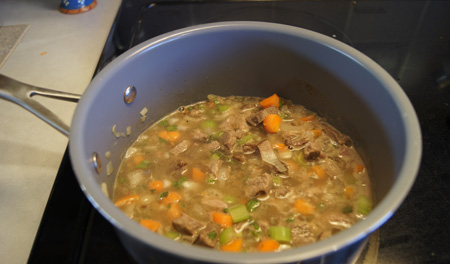
The filled crepes waiting to be covered and baked. I usually have a little extra filling that I put over the top of the filled crepes, it makes them look prettier.

filled crepes
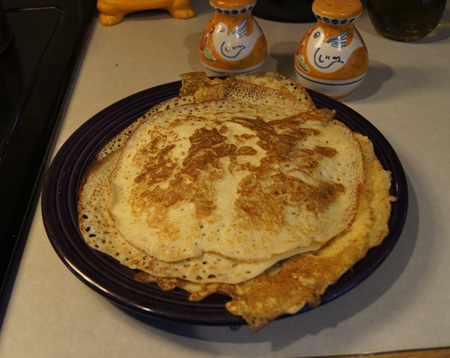
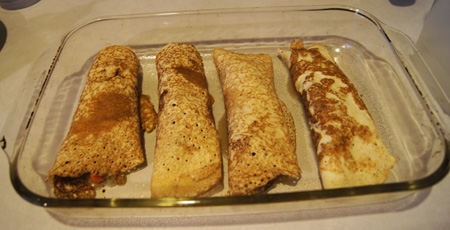
I wasn’t going to take another photo of the prepared crepes or I wouldn’t have chosen the yellow plate. But plated, they looked so pretty (we both commented on them) that I just couldn’t resist. Below is my one-and-a-half crepe serving, my calorie-allotted amount. It was very good.

plated crepes
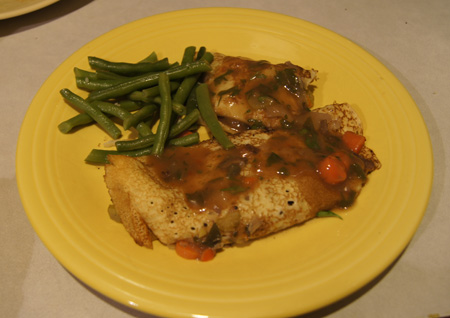
I usually have some leftover crepes. I don’t mind, I like them for breakfast. Sometimes I fill them with cottage cheese, sprinkle with a little cinnamon, roll up and cook in a non-stick pan for a few minutes. Kind of like healthy crepes suzette. Or I just heat them up and drizzle with syrup. Or we have them for dessert, filled with blueberries. Can’t go wrong having too many crepes about.

1990s blog: Main Dishes

I rushed through my 1990s blog cookie recipes at the end of 2012. I wanted to but did not make a single batch of them – that’s why I had almost no photos. Whew, cookie season is over, and I made it through with only virtual cookies!

But even without cookies, I did pack on a few holiday pounds. It’s January and time to eat scantily for a couple months. This is not the time to even think of cookies. The next section of my 1990s blog that I’ll cover is “Main Dishes” and most of them are relatively low-calorie and packed with protein and nutrients. I’ll take us through these recipes slowly, cooking and photographing most of the recipes as I go. I now realize that I already blogged one of these recipes, Chicken Casserole, as a “Favorite”.

The main dishes content in the 1990s blog was short, partly because most of the things I used to cook routinely were done sans recipe. Also, I had just started on that blog/website when, well, I was distracted and my time was spent on a website on an entirely different subject. Life’s like that.

I wrote this for my 1990s blog:

 My collection of main dish recipes is a motley one. Most “main dishes” I cook do not require a recipe, as in cooking a steak and baked potato, hamburgers, fish, etc. Spaghetti is a stand by, as is stir fry, but these don’t require a recipe. Therefore, the recipes that have made their way into this collection are only those that are a bit tough to memorize, those that are a bit more difficult to put together.

“I Was a Weekend Cook”

Yup, that was me. For over thirty years. Sunday would find me making pasta sauce, stroganoffs, stews, chiles, and soups, not to mention yeast and quick breads. I’d cook crepes and rice and pasta and store them in the refrigerator. Many casseroles could be made up to a certain point and then frozen. I’d coat chicken pieces and freeze the whole pan of uncooked chicken in the freezer. These took up a lot of freezer space, so we got a large storage freezer. I used the “timed bake” function of my oven quite often, so that I could come home to the aroma of food cooking and know that dinner would be ready soon, with just a few minutes of last-minute prep. At the time, I thought that many of my methods for the use of freezer and timed bake were unique; I’ll eventually get to these methods and recipes in this blog. I had a few crock pot recipes in my 1990s blog too.

Today my personal recipe documents number in the hundreds of pages. And I get to leisurely cook on weekdays. I’ve come a long ways, baby!

Favorites: Italian-Style Turkey Cutlets

I found this recipe somewhere in a magazine or newspaper way back when: meaning, before I started writing down where and when I got a recipe. It has stood the test of time; I still make it today and I made it when the kids were here too. This recipe is for four people, although now I halve the recipe for just the two of us.

If you can’t find thin turkey breast cutlets, slice a whole breast horizontally. These are best when the crunch-to-juicy-turkey ratio is large.

Today, I generally chop a fresh tomato or two for this dish, since I halve the recipe and who wants half a can of tomatoes leftover. I also use fresh thyme and basil to taste. If you keep the amount of frying oil low and don’t add more mozzarella cheese, this is a great low calorie meal.

Italian-Style Turkey Cutlets

  • 4 turkey breast cutlets or fillets (about 1 1/4 pound for 4 people)
  • 1 egg white
  • 1 tablespoon Dijon-style mustard
  • 1 cup bread crumbs (you will have some leftover)
  • 1/4 cup chopped onions or shallots
  • 1 clove garlic, chopped fine
  • fresh or canned tomatoes (about 2 cups)
  • herbs to taste (thyme, basil, oregano, or an Italian mix)
  • 1/4 cup grated mozzarella cheese

Cook the onion in a saucepan until it wilts, then add garlic and cook 30 seconds. Add the tomatoes and fresh or dried herbs to taste. Salt and pepper to taste. Let this mixture simmer at least twenty minutes while you prepare the turkey cutlets.

Pound turkey cutlets to about 1/4″. If they spread out into huge pieces, cut them into smaller ones. Beat the egg white in one shallow bowl and put the bread crumbs in another shallow bowl. Shake some dry Italian seasoning mix and salt and pepper onto the bread crumbs and mix in.

Slather the Dijon mustard over the pounded turkey cutlets. Then dip them in the egg white, then roll in the bread crumbs.

Heat a non-stick pan until it feels nice and hot when you hold your hand an inch above it. Then drop in a little oil (olive oil is great) and spread it around. Add the breaded cutlets and cook 4-5 minutes on each side until golden. As they cook, heat the broiler in your oven.

Remove the cutlets from the pan and place them on a baking sheet or broiler pan. Divide the grated mozzarella cheese among them, then put them under the broiler and watch carefully until the cheese melts.

Plate the finished cutlets and spoon on some of the sauce. Cooked noodles are a great accompaniment, and a little fresh Parmesan doesn’t hurt!

Here’s a photo of the tomato sauce simmering and the cutlets frying. I use the pan in the back for the broiling step. This whole meal goes together in about 30 minutes. It’s a great meal for a workday. (Or a busy retirement day.)

turkey cutletsHere is the plated meal. I used my own homemade noodles, prepared in a big batch the week before and stored in the freezer. Making the agnolotti from the New Pasta Cookbook a few weeks ago really inspired me to get out my manual pasta maker more often and make my own noodles. Something good has come from my travel through my 250 cookbooks!

turkey cutlets

250 Cookbooks: Baking Without Fat

Cookbook #15: Baking Without Fat. George Mateljan, Health Valley Foods, Inc., Villard, NY, 1996. Baking Without Fat

I like cakes and muffins and quick breads. In order to fit these treats into a healthy eating plan, I always keep my eye out for recipes that are low calorie or low fat, and that add nutritional punch. Hence I picked up Baking Without Fat in the late 1990s. I think I found it on a cold and hungry January day, near the check-out counter at McGuckins in Boulder. (I am always watching calories in January!)

The author of this book is George Mateljan, founder of Health Valley Foods. A Google search reveals that he sold that company and now runs a not-for-profit called The George Mateljan Foundation for the World’s Healthiest Foods. He is the author of a book titled “The World’s Healthiest Foods” (2006).

I admit, I don’t remember cooking any recipe from Baking Without Fat. The recipes call for ingredients I do not keep on hand – for instance, frozen concentrated apple juice, and baby food jars of carrots, sweet potatoes, or prunes. Reading the recipes now, I know I am going to have to go to the store to make any of the recipes in the book.

I take some time to read the introductory chapters. Matelian explains some of the functions of fat in baking. Fat adds a creamy texture and pleasing mouth feel, acts as a carrier for flavor, and can alter the way the flavor is perceived. Fat makes baked goods moist and tender. To make baked goods taste good without fat, the author and others at Health Valley Foods spent “hundreds of hours” in the kitchen to develop a “whole new method” of baking. Here is the basic plan:

  • use nonfat dairy products instead of full-fat ones
  • substitute pureed fruit for fat
  • use egg whites instead of whole eggs
  • highlight natural flavors to make up for the lack of fat

Well, it’s worth a try. I’m a bit hesitant because I’ve clipped and tried a few recipes employing these same strategies over the years, and usually have not been happy with the results. I do like my my Irresistable Low-Fat Brownies but those use non-fat sweetened condensed milk – not pureed fruit – to provide a good mouth feel. Pureed fruit would be a healthier choice because it will add nutritional punch.

The baby food purees called for in the recipes do not appeal to me. I was pleasantly surprised to find that Mateljan gives instructions for making your own purees from apples, apricots, carrots, prunes, pumpkins, and sweet potatoes. This will add more cooking time, but I’m retired! Instead of sugar, the recipes are sweetened with fruit juice concentrates, honey, maple syrup, and molasses. Whole grain flours are advised. Cheesecakes and frostings employ non-fat yogurt and/or yogurt cheese. Fruit crisps are topped with non-fat granola. This all sounds great to my healthy-food conscience, but do these recipes have a chance of tasting good?

For this blog, I chose the recipe “Coco Garden Cake”, which includes chocolate, carrots, zucchini, applesauce, honey, and spices. Mateljan states that pan size is important for good baking results, so I go ahead and make a full recipe for the just two of us. I might have to waste some, but heck, this is like a chemistry experiment! So I gathered the many, many ingredients for this recipe (including a huge jug of honey) and went for it.

Coco Garden Cake Recipe

CocoGardCakeRec2 
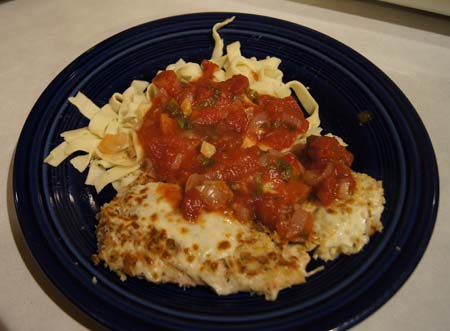
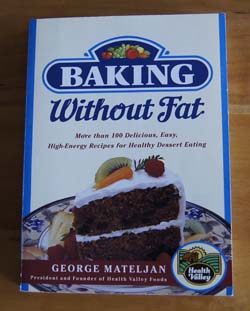
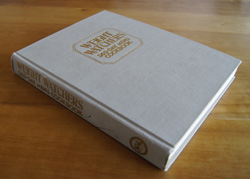
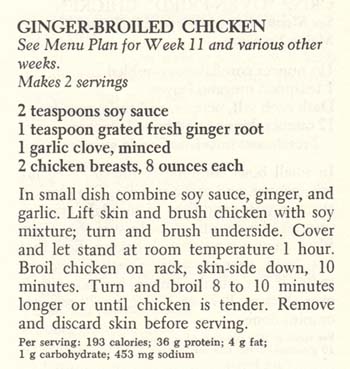
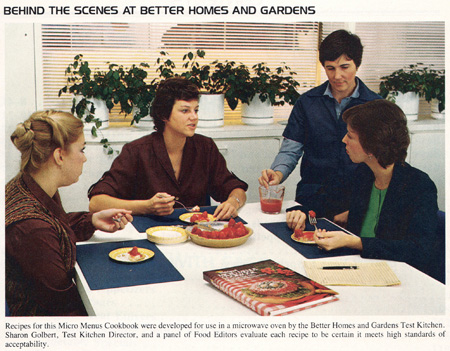
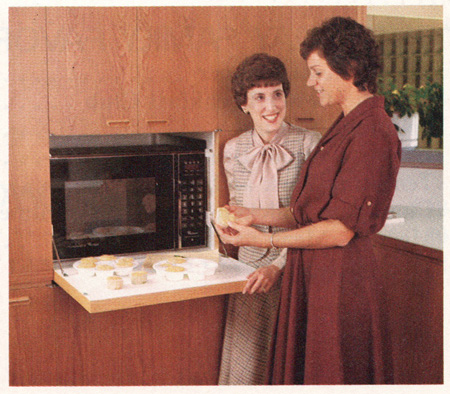
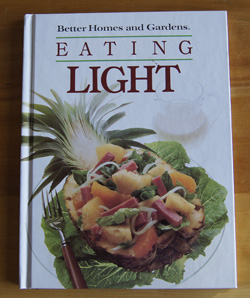
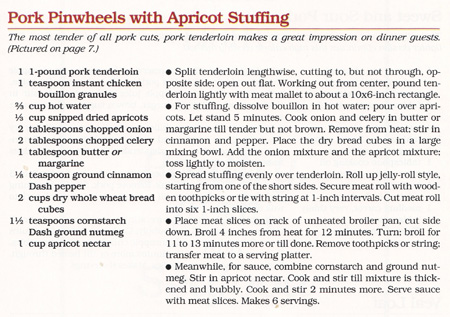
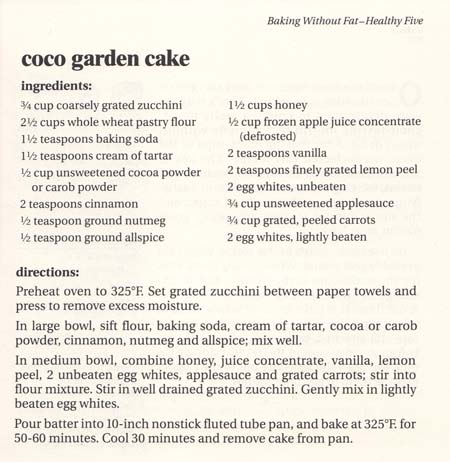
Note the two book excerpts (above). For each recipe in this book, the recipe is on the right page, and a discussion of the recipe, including nutritive information, is on the left. This makes the book feel friendly and personal, like the author really cares that each recipe is well-received.

Coco Garden Cake

  •  3/4 cup coarsely grated zucchini
  • 2 1/2 cups whole wheat pastry flour
  • 1 1/2 teaspoons baking soda
  • 1 1/2 teaspoons cream of tartar
  • 1/2 cup unsweetened cocoa powder
  • 2 teaspoons cinnamon
  • 1/2 teaspoon nutmeg
  • 1/2 teaspoon allspice
  • 1 1/2 cups honey
  • 1/2 cup frozen apple juice concentrate (defrosted)
  • 2 teaspoons vanilla
  • 2 teaspoons finely grated lemon peel (the rind from one lemon)
  • 2 egg whites, unbeaten
  • 3/4 cup unsweetened applesauce
  • 3/4 cup grated, peeled carrots
  • 2 egg whites, beaten to soft peaks

Preheat the oven to 325˚. Set the grated zucchini between paper towels and press to remove excess moisture.

Stir together the flour, baking soda, cream of tartar, cocoa powder, cinnamon, nutmeg, and allspice.

In another bowl, combine the honey, juice concentrate, vanilla, lemon peel, 2 unbeaten egg whites, applesauce, and grated carrots. Stir this mixture to combine (I used the hand mixer to beat the other 2 egg whites, then used the same beaters to combine the honey mixture). Combine the honey mixture with the flour mixture and the drained zucchini and the beaten egg whites. Gently but thoroughly fold the mixtures together; be careful not to over mix.

Pour batter into a 10-inch nonstick fluted tube pan and bake at 325˚ for 55-60 minutes. Cool at least 30 minutes before removing from the pan.

Cocoa Garden Cake

Comments

The above photo is not too impressive; I had a little trouble with the cake sticking to my non-stick pan. Honestly, when I took my first bite of this cake, served as our dessert after a Saturday night dinner, I thought it was a failure. Neither of us commented on it at the time, either favorably or non-favorably. But the next day, I took a little bite mid-day and then had to have another bite. The texture is moist and tender, it’s sweet but not too sweet, and the flavors of chocolate and spices are wonderful. When dessert time rolled around again, my dining partner opted for the cake instead of a low-fat yogurt ice cream cone. I did too. Hmm, this cake is really good! I think it’s better the second day.

And even better the third day, when I decided to take more photos, to show the good texture of the cake. The slice below is 1/16 of the cake, so about 200 calories; it’s a nice hefty chunk of cake for that many calories. (I should have this for breakfast!) I kept grabbing cake crumbs as I was trying to make the “perfect” slice for my photo. That’s when I decided to enter this recipe officially in this blog. It is good! And I’ll try more recipes from this book in the future.

Slice of Cocoa Garden Cake

250 Cookbooks: Weight Watchers 365-Day Menu Cookbook

Cookbook #14: Weight Watchers 365-Day Menu Cookbook. Weight Watchers International, Inc., New American Library Books, 1981.

WW 365 Day Menu CB

This is one of the many diet cookbooks that I purchased over the years. Diets, a fitting topic to cover for a January post, eh? I’ve never taken part in a Weight Watchers program, but I believe that they encourage a good, balanced eating program. So, over the years I picked up a couple of their cookbooks, to get ideas for recipes.

About half of this particular cookbook is taken up by meal plans. As the title indicates, it plans your meals for 365 days – an entire year. I scanned through these menus and they left me uninspired. Then I scanned the rest of the book, which contains recipes for the dishes in the menus. Again, I was uninspired.

Some ingredients are just weird. Like, they call for you to boil skinned chicken necks and backs, to make a dish that is “filling and easy on the budget”. No no no, I’d never do that. Another recipe directs you to whip evaporated skim milk for 15 minutes to make a low-fat dessert. 15 minutes! Maybe that will help burn off calories. But no thank you, if I want a light, calorie-controlled dessert, I’ll buy one of the convenient frozen diet-type desserts that are available today. One recipe calls for “1/3 cup plus 2 teaspoons orange juice”. Now that simply doesn’t make sense. The same recipe calls for “18 ounces vanilla flavored dietary frozen dessert”. I don’t even know where to find that. A salad dressing recipe has a few seasonings added to “1 tablespoon plus 1 teaspoon olive oil and 1 tablespoon white wine vinegar” and serves 4 people for 42 calories a serving; again, exact measuring is called for and each person gets only 1/2 tablespoon of dressing on their salad. Another recipe calls for artificial sweetener and 1/2 teaspoon curacoa extract (what’s that?).

The recipes are a bit nutty on calorie content. For instance, in the recipe I chose (below), it states to use chicken breasts that are “about” 8 ounces each, and gives the calorie content as “193”. Why such a specific calorie value for an estimated ingredient? Today we are so fortunate to websites like Nutrient Facts, where I can quickly look up “chicken breast, meat only, cooked, roasted” to learn that 4 ounces of roasted chicken breast has 180 calories.

This is a cookbook that I will recycle. I found a recipe to try in this book, but only one. This cookbook might work for someone who has no imagination and likes to follow recipes obsessively and likes to think that they know exactly how many calories they are taking in. But that person is not me.

I visited the current Weight Watchers website, and I still think it is a good program. Currently they use some sort of point system to help people make good food choices, and they encourage people to eat fruits and vegetables and whole grains (although they don’t give a lot of details on the website, it’s more like a come-on). They offer encouragement to dieters through online or face-to-face support groups. (I looked at some of the recipes on the current web site, and was again uninspired. Just saying.)

The recipe I chose to try is “Ginger-Broiled Chicken”. I like this simple recipe because it uses freshly grated ginger in a garlic-soy sauce mixture that rubbed under the skin of chicken breasts. The chicken breasts rest at room temperature for an hour before broiling. (This is  unusual, most recipes today direct you to re-refrigerate chicken marinades as soon as possible.) I think the chicken will cook more evenly if it starts the oven broil at room temperature rather than cold. Finally, only after the chicken is cooked is the skin removed. Thus the chicken should stay moist during cooking, and you can remove the higher calorie skin before eating to reduce calories. This might be a good recipe for my repertoire of chicken recipes (currently, there are almost 50 pages of recipes in my personal chicken recipe document!).

Ginger-Broiled Chicken

Ginger-Broiled Chicken

  • 2 teaspoons soy sauce
  • 1 teaspoon fresh ginger, grated
  • 1 clove garlic, minced
  • 2 bone-in, skin-on chicken breasts, about 8 ounces each

Combine the soy sauce, ginger, and garlic and rub this mixture under the skin and all around each chicken breast. Let stand 1 hour at room temperature.

Set your oven’s broiler to a “low” setting and preheat a few minutes. Place the chicken skin side down on a rack in a pan, then put the pan in the oven about 5 inches from the broiler. Close the oven door.

Broil the chicken 10 minutes on the first side. Turn the chicken pieces, then broil another 8-10 minutes. If your chicken pieces are larger than 8 ounces each, it might take another 5 minutes to finish them. They are done when they are nicely browned and about 160˚ when checked with an instant-read thermometer.

Comments

These actually turned out great! The chicken breasts that I purchased were more like 14 ounces each, so I grated a bit more ginger and minced more garlic and soy sauce. The original recipe states only “broil chicken” with no oven settings or specifics such as how far to have the chicken from the broiler. My electric oven has two broiler settings, high and low, and I chose the low setting. I took a tape measure to measure the distance that I placed them from the broiler. It worked, so I incorporated these instructions in my version of the recipe (above).

Here is a photo:

Ginger-Broiled Chicken

It’s lovely and browned, right? I served them with the golden skin still on. The original recipe is dour and directs you to take the skin off. Why not let the diners at least enjoy the look of the browned chicken? I took the skin off before eating it, but I say, let each diner make their own decision. This chicken was moist, tender, wonderfully flavored with ginger and garlic and lightly salted from the soy sauce. I’d make Ginger-Broiled Chicken again!

1990s blog: Peanut Blossoms

This is a popular cookie, I’m sure lots of readers already have the recipe. It’s another favorite from my childhood that I baked for my own kids, included in Christmas packages, and took to TA meetings. If you have never made these classic cookies, go out and get a package of Hershey’s Kisses and start right now.

Peanut Blossoms

  • 1/2 cup margarine
  • 1/3 cup peanut butter
  • 1/2 cup white sugar
  • 1/2 cup brown sugar
  • 1 egg
  • 1 teaspoon vanilla
  • 1 3/4 cups flour
  • 1 teaspoon baking soda
  • 1/2 teaspoon salt
  • chocolate kisses

Cream the butter and peanut butter. Gradually add the sugar and the brown sugar, creaming well. Add the egg and vanilla, beat well. Combine the dry ingredients, then mix them in gradually.

Shape dough into balls using a rounded teaspoonful for each. Roll balls in sugar and place on baking sheets. Bake at 375° for 8 minutes. Remove from oven. Top each cookie with a chocolate kiss, pressing down firmly so cookie cracks around edge. Return to oven; bake 2-5 minutes longer or until golden brown.

This recipe makes about 30-36 cookies: you might as well go ahead and double it and if you have too many, give them away or freeze them. Each 14 oz. package of Hershey’s Kisses has about 90 kisses. Be sure to allow for kisses to be paid out to whomever you ask to unwrap them for you. [This is my note to myself in my personal recipe document.]

Update February 2014

I found this recipe in Cookbook #54: A Treasury of Bake Off Favorites, The Pillsbury Company, 1969 (blog entry). It may not have been the first time this recipe was printed, since this cookbook was a collection of favorite recipes from older cookbooks. But it’s where my mother got the recipe, see her “delicious!” note:

Peanut Blossoms

Please refer to my Cookie Recipe Basics to make sure your cookies turn out!
Read the introduction to my 1990s cooking blog for background information.

1990s blog: Double Crunchers

1990s note: These are sandwich cookies, with the top of the sandwich smaller than the bottom. My mother always made these at Christmas when I was young. (And now I do!)

2012: I haven’t made these in many years, but these are great and unique cookies and belong in this collection. I think of these as one of my mother’s “signature” cookies. Although I associate them with Christmas, they could be eaten any time of year!

Double Crunchers

  • 1/2 cup Crisco
  • 1/2 cup white sugar
  • 1/2 cup brown sugar
  • 1 egg
  • 1/2 teaspoon vanilla
  • 1 cup flour
  • 1/2 teaspoon baking soda
  • 1/4 teaspoon salt
  • 1 cup corn flakes
  • 1 cup oatmeal (quick cooking)
  • 1/2 cup coconut

Combine Crisco, sugars, egg, and vanilla. Stir in flour mixture, add corn flakes, oatmeal, and coconut.

Form teaspoons of dough, flatten with bottom of glass dipped in flour. Bake at 350° for 8-10 minutes. Form (an equal number of) balls of 1/2 teaspoon dough. Bake for 8 minutes.

Chocolate filling: Melt 1 6 oz. pkg chocolate chips with 1/2 cup powdered sugar and 1 tablespoon water. Blend in 3 oz. cream cheese. Beat until smooth. Cool.

Spread filling over larger cookies, top with smaller cookies.

cookies graphic

Please refer to my Cookie Recipe Basics to make sure your cookies turn out!
Read the introduction to my 1990s cooking blog for background information.