250 Cookbooks: Grilling and Barbecue, Cook’s Illustrated Guide

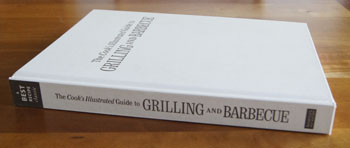
Cookbook #249: Grilling and Barbecue, Cook’s Illustrated Guide, a Best Recipe Classic, by the editors of Cook’s Illustrated, Brookline, MA, 2005.

The Cook's Illustrated Guide to Grilling and BarbecueMy second-to-last cookbook in this 250 Cookbooks blog! Hard to believe this 5-year project is coming to an end.

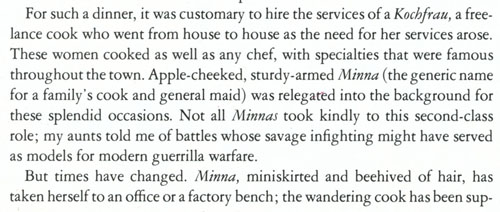
Cook’s Illustrated guide cookbooks are always among my favorites. Besides Grilling and Barbecue, I also have Cover and Bake and Best International Recipe. I’ve discussed the style of Cook’s Illustrated recipes in my previous posts on those two books. Briefly, you don’t just get a recipe, you get pages of discussion about how that recipe was developed – what they tried that did and did not work. Further information about ingredients and techniques is presented in boxes or side notes. I find that a Cook’s Illustrated recipe might take a bit more concentration to follow than common recipes, but the recipes always work for me. These guide books are all big, heavy, hardback, white-covered tomes.

I have eight “grilling” cookbooks, but this is one of my two “go-to” books for barbecue – the other is Weber’s Real Grilling. Weber’s Real Grilling is specific to gas grills, while Cook’s Illustrated Grilling and Barbecue gives for each recipe methods for both charcoal grilling and gas grilling. We have a gas grill, and I have no desire to cook with charcoal. The gas grill is just too easy! I’ll just say “I’m sorry” to those purists who think charcoal is the only way to grill!

Grilling and Barbecue begins with introductory sections on “Outdoor Cooking 101″ and Equipment and Tools for Outdoor Cooking”. They are quite useful and complete.

The first chapter is “Beef”. Strip and rib steaks, porterhouse and T-bone steaks, filets mignons, steak tips, flank steaks, London broil, hamburgers, prime rib, beef tenderloin, veal chops, beef ribs, and beef brisket are each discussed in detail, describing how to get the most out of each cut of beef. Specific recipes, sauces, salsas, marinades, and rubs are suggested, some of which appear in later chapters in the book.

The section on in the Beef chapter on “Does Branding Matter?” catches my eye. It begins: “To guarantee quality, more and more people are looking beyond the confines of their local supermarket butcher case and buying their steaks through mail order sources. These outlets promise all-star beef with a price tag to match”. I read on with interest, since I have tried mail order steaks in the past. The folks at Cook’s Illustrated did a thorough study of both local supermarket and mail order steaks. The steak that won first place in their taste tests is a mail order brand that cost $68/pound (Lobel’s Wagyu, or Kobe-style steak from Oakleigh Ranch in Australia). “We found that money can buy you happiness, if happiness for you is the best steak you ever ate”. But the “good news” is that you don’t have to spend a small fortune “or pay for shipping” to get a great steak. Coleman Natural steak, available at some supermarkets, is only $14 a pound and came in second in their taste tests. (Note the publication date of this book: 2005. We know prices have changed since then.)

Pork, lamb, chicken, turkey and other birds, fish, shellfish, vegetables, and pizza and bruschetta chapters follow in the same detail and style as the beef chapter. Sides and salads, rubs and sauces round out the book.

I think a study “kebabs” would be a good illustration of “Grilling and Barbecue, Cook’s Illustrated Guide“. Sure, I’ve made pork, beef, and chicken kebabs so often I rarely use a recipe, but the meat often comes out dry and chewy, or under-cooked, or unflavorful, and the onions and peppers and other vegetables burned or falling apart. I usually make kebabs the same way, no matter what type of meat I use. Just load up the skewers, brush with a sauce, and put them on the grill – that’s my method. But I decide to use this blog as an opportunity to study how to make really good kebabs. So I turn to the pages and lengthy kebab discussions in this tome – about 4 big pages on average for each type of kebab. Below is what I learn.

First, pork. The problem with pork kebabs is that the pork tastes bland and often dries out on the grill. Cook’s Illustrated tried different cuts of pork, and chose pork loin because it has a full flavor, is tender, and an “appealing resistance when you bite into it”. On their early tries, the pork loin dried out on the grill. To overcome this, they tried both brining and marinating, and chose the marinade method because it not only kept the meat “moist and juicy”, but it added “richness of flavor that was lacking in the lean pork loin”. Also, the oil in the marinade improved the pork’s texture and added other flavors to the meat. Not only that, but cutting the pork loin into 1 1/4 inch cubes and “butterflying” them improved the flavor of this rather neutral meat. To butterfly, each cube is cut almost through at the center before marinating, and then folded back together to skewer as a whole cube. On the gas grill, these cubes cooked best over a “more moderate level of heat” than beef, the grill is covered, and the kebabs are turned a quarter-turn every 2 1/2 minutes for about 9-10 minutes total. Cooking the pork to 145˚ was found to be ideal. A study of fruits and vegetables to accompany the pork on the skewers led them to recommend fresh pineapple in 1-inch chunks, bell peppers in 1-inch pieces, and red onion in 3/4-inch pieces.

Beef kebabs went through a similar study. Results: use top blade (flatiron) steaks or sirloin.  Butterfly 1 1/4-inch beef cubes and marinate in a non-acidic olive oil based herb mixture, use the same vegetable and fruits as in pork cubes, grill over direct high heat, cover down, turning one-quarter turn every 1 3/4 minutes, until meat is browned, about 7-8 minutes total.

Finally, chicken kebabs. Use chicken thighs cut into 1 1/2-inch chunks and marinate in a olive oil and salt, non-acidic marinade. Cook’s Illustrated found “early on” that it was clear that cooking chicken and vegetables together on kebabs “enhances the flavor of both”. After a lengthy study, they chose zucchini, eggplant, mushrooms, bell peppers, onions, bell peppers, small shallots, apples, peaches, pears, and fresh pineapple as appropriate for chicken kebabs. (Cook’s Illustrated doesn’t deem potatoes good for kebabs because they require pre-cooking.) They have a handy table that designates the size to cut each recommended fruit and vegetable and whether or not that fruit or vegetable should be marinated. For grilling, they recommend two skewers per kebab, to facilitate turning them without the chicken and vegetables spinning. Grilling should be done on medium high, uncovered, turning one-quarter turn every 2 minutes, until lightly browned, about 9 minutes total.

I am inspired! I’ll carefully follow their instructions and make all these different types of kebabs this summer. Then I can expand to their recipes for fish and shrimp kebabs.

Am I going to make kabobs for this blog? No! Instead, I want to cook a pork tenderloin for the two of us. This is a cut of pork that I use a lot – it’s tender, lean, often on sale, and a perfect portion for two people (with a little left over for the next day’s lunch). I usually simply sprinkle with salt and pepper and cook over direct medium high heat, turning about four times. Grilling and Barbecue says to brine the pork tenderloin, use a wet rub, and cook over high heat 3 minutes per side.

For copyright protection, I am not scanning in this recipe. Below is my adaptation of the original in Grilling and Barbecue, Cook’s Illustrated Guide.

Grilled Pork Tenderloin with Orange, Sage, and Garlic
serves 2

Pork tenderloin and brine

  • 1 pork tenderloin, about 1 pound
  • 1/3 cup sugar
  • 1 1/2 tablespoons salt
  • water

Wet spice rub

  • 2 cloves garlic, minced fine
  • 1 tablespoon grated orange zest
  • 1 tablespoon chopped fresh sage leaves
  • 1 tablespoon olive oil
  • fresh ground pepper to taste
  • salt to taste

Remove the “silver skin” from the pork tenderloin: simply slide a sharp knife under this thin piece of tendon on the outside of the tenderloin.

Dissolve the sugar and salt in several cups of water in a shallow bowl. Add the tenderloin and refrigerate about 1 hour. While the pork brines, prepare the wet spice rub – simply mix all the ingredients in a bowl.

Remove the tenderloin from the brining solution, rinse, and dry with paper towels. Rub the wet spice rub into the tenderloin.

Heat a gas grill by turning all the burners to high and with the grill covered. Then, open the gas grill and scrape the cooking grate clean with a grill brush. With the burners still on high, lay the wet-rub-coated pork tenderloin carefully on the grill. Close the cover. Turn about every three minutes so that all four “sides” of the tenderloin are browned. Using a quick-read thermometer, check that the meat is at 145˚. If not, cook until it is.

Serve!

Grilled Pork Tenderloin
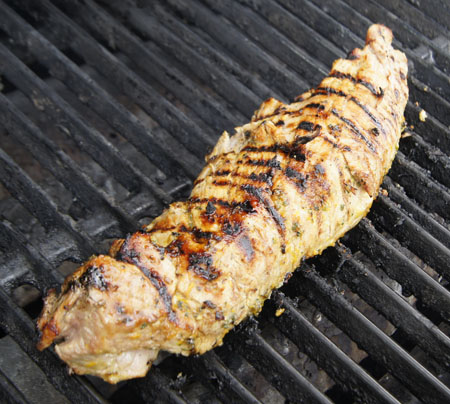
Yum! This was perfect! Moist and flavorful with great grill marks. I served it with a green salad and corn on the cob for a light, healthy, tasty meal.

Thank you, Cook’s Illustrated, for another great recipe.

250 Cookbooks: Crock Pot Stoneware Slow Cooker

Cookbook #241: Crock-Pot® Stoneware Slow Cooker, Owner’s Guide, Rival, JCS/THG (The Holmes Group), 2006.

Crock-Pot Stoneware Slow Cooker cookbook
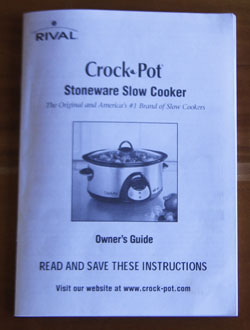
This is my current crock pot. It replaced a nearly-broken one in about 2006. This one has a removable stoneware crock that makes it easy to clean, a high-low setting, and a timer. This is my first crock pot with a timer, and I’d always get one like this from now on.

This is the last of my 11 crock pot cookbooks. Below is a list of those cookbooks and their publication dates, in the order that I covered them for this 250 Cookbooks blog. Crock pots are also called slow cookers, crockery cookers, or stoneware slow cookers. (I am reminded by Crock-Pot® Stoneware Slow Cooker that “Crock-Pot®” is a registered trademark.)

Crock-Pot® Stoneware Slow Cooker is a small booklet, 5×7-inches, 15 pages. Instructions and warranty take up 6 1/2 pages, and recipes 8 1/2 pages. I count 23 recipes. (Actually, there is another 15 pages, but those are upside down and in French.)

I am going to keep this cookbook, largely because it has “official” instructions and also warranty information. And also, the handful of recipes really look like they will “work”. If you read any of my other crock pot posts, you will know that I think crock pots turn good food into indiscernible mush with a bad recipe.

I find this in the question and answer section of the instructions:

QCan I cook a roast without adding water?
A Yes – if cooked on LOW. We recommend a small amount because the gravies are especially tasty. The more fat or “marbling” the meat has, the less liquid you need. The liquid is needed to properly soften and cook vegetables.

This hits home to me, because lately I have been slow-roasting beef roasts in the oven. I might try my crock pot next time.

The first recipe in Crock-Pot® Stoneware Slow Cooker is for Pot Roast of Beef. Someday I’d like to try this recipe and compare/contrast with the method I now use from Cook’s Illustrated (Cover and Bake).

The second recipe is for Beef Bourguignon, and that is what I’ll make for this blog. Another recipe I have my eye on is Chicken With 40 Cloves of Garlic, something I’ve always wanted to make. I might also consult the recipes for meat loaf, pork chops and roast, whole chicken, Swiss steak, French onion soup, jambalaya, and game hens (roasted with no added water).

Here is the recipe for Beef Bourguignon:

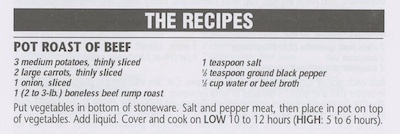
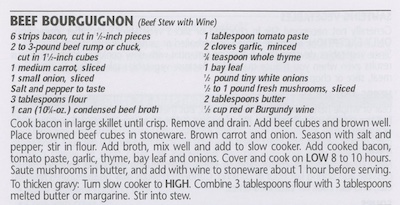
My version is below. I added more stock and more wine, and found that these changes gave just the right amount and thickness of gravy at the end. I used double the amount of tomato paste. I did not add the 3 tablespoons butter plus 3 tablespoons flour at the very end to thicken the broth, but I suggest you do that if you want a really thick gravy.

Beef Bourguignon
serves 6-8, and freezes well

  • 6 strips of bacon, cut in 1/2-inch pieces
  • beef rump, chuck, or cross-rib roast, around 3 pounds, trimmed of fat and cut into 1 1/2-inch chunks
  • 1 carrot, sliced
  • 1 onion, chopped
  • 3 tablespoons flour
  • 2 cups beef stock
  • 1 cup (about) red wine; divided
  • 2 tablespoons tomato paste
  • 2 cloves garlic, minced
  • 1 teaspoon dried thyme, or a few sprigs fresh thyme
  • 1 bay leaf (I used a big fat one recently purchased at Savory Spice Shop in Boulder)
  • 1/2 pound tiny white onions (you could leave these out, but I like them; the ones I used were frozen)
  • salt and pepper to taste
  • 1/2 pound fresh mushrooms, sliced
  • 2 tablespoons butter

Cook the bacon until crisp. Drain and set aside.

In a clean pan, use a little bit of the bacon grease to sauté the beef chunks. Do this in batches and at fairly high heat. (You can anso brown the beef in the pan used to cook the bacon.)

Place the browned beef chunks and the cooked bacon in the crock pot.

Add a bit of oil or bacon fat to the pan used to brown the beef, then add the carrot and onion and cook until brown. Add the 3 tablespoons flour and mix in as well as possible, then add the beef broth; mix well and add the vegetable-broth mixture to the crock pot.

Add about half the wine, the tomato paste, garlic, thyme, bay leaf, and tiny white onions to the crock pot. Add salt and pepper to taste. Stir to mix.

Cook on low for 8-10 hours (in my crock pot, the meat was tender at 8 hours). An hour before serving, sauté the mushrooms in the butter, and add them and some more red wine to the crock pot and continue slow-cooking. (Remove the bay leaf and any fresh thyme sprigs before serving.)

Serve!

Beef BourguignonThis was totally yummy. I loved the rich, dark broth-gravy. I am glad I didn’t add the flour/butter mixture at the end to thicken the gravy. It was rich and thick enough for me as it was – it was indeed “especially tasty”. I’m also glad I added more wine than called for in the recipe. I liked the sautéd mushrooms added for the last hour – their texture and flavor were not lost by 8 hours of cooking.

To serve, I cooked some potatoes, carrots, and peas and stirred them into our servings of bourguignon. I often like stew prepared with potatoes added later, because for the two of us, I usually cook a lot of stew-type meat at once and freeze some for another meal, and potatoes do not keep their texture after freezing. Also, this method opens up variations: you could serve the bourguignon over mashed potatoes, pasta, rice, gnocchi, polenta – you name it. Or keep it without added carbs for a nearly low-carb meal.

I get to enjoy this delicious bourguignon a few more times, and quickly, by thawing the portions I stowed away in my freezer. This recipe was a success!

250 Cookbooks: Cooking of Germany

Cookbook #222: Cooking of Germany, Nika Standen Hazelton and the Editors of Time-Life Books, Time-Life Books, NY, 1969. Foods of the World series; revised 1973, reprinted 1974.

Cooking of Germany cookbookThis is the fifth and last book that I own in the Foods of the World series. Once again, I look forward to discovering another interesting author as I open Cooking of Germany, just as I discovered M. F. K. Fisher in the Cooking of Provinvial France, Emily Hahn in the Cooking of China, Joseph Wechsberg in Cooking of Vienna’s Empire, and Rafael Steinberg in the Cooking of Japan.

Nika Standen Hazelton is the author, and who is she? Let’s see what I can find. She was born in 1908, in Rome; her father was a German diplomat. She studied at the London School of Economics and began a career as a European journalist at the young age of 22, in 1930. In 1940, she emigrated to the US with her husband.

In the States, she started writing cookbooks. Her obituary states she authored 30 cookbooks, and also “was a frequent contributer to the major food magazines and for several decades wrote a column about food, wine and travel for The National Review“.  Her writing style wove memoirs into her recipes, and several of her books remain cookbook standards. Her attitude towards cooking is described as “no-nonsense”. “Searching for Nika Hazelton, the no-nonsense cook” is a delightful 2011 blog entry by Sandra Lee. I chuckled several times at Sandra’s descriptions of this apparently full-of-attitude author.

So I am a bit abashed that I was ignorant of Nika Hazelton’s writing. She belongs among the other important woman authors of food articles and books in the twentieth century, alongside M. F. K. Fisher and Emily Hahn. (And why did I not read and appreciate these female authors of the Foods of the World series when I first received the books in the mail? I have no good answer.)

Nika Hazelton begins the introduction with “when I began to think about this book, I was puzzled . . . should the book be aboutt he cooking of present-day Germany? Should it be about the cooking I grew up with between World Wars I and II? . . . each approach could be illuminating, and each had its drawbacks.” Here is the paragraph that follows these thoughts – note her philosophical tone:

page 6

Her musings continue. “Why write about a bygone age? The Germany of those days is gone forever – and good riddance to it.”

This paragraph describes her decision for the book’s focus:page 6page 7

And:

“As in any cookbook, some readers will miss their own favorites, or question ingredients or techniques that went into making a typical dish. I can only remind them that no book is all-inclusive, and that most traditional dishes of any country come in almost as many versions as there are cooks. This is an asset rather than a fault, for it gives room for pleasant speculation on the whys and wherefores of a dish – pleasant speculation, because food and cooking are pleasant and comforting in themselves.”

“Food and cooking are pleasant and comforting in themselves.” A woman after my own heart.

The introduction is followed by the first chapter: “Surprises of the German Table”. Nika Hazelton writes that the tourist (of the late 1960s) might expect to find a Germany filled with the music of Bach and Beethoven, castles perched high above the Rhine, and Hansel-and-Gretel towns nestled in dark forests. Meals would be a long succession of sausages and sauerkraut followed by sauerbraten and dumplings served with great steins of beer “hoisted by hefty maidens”. But in reality, the tourist would fly in jets over the Rhine castles, and “The Gretels are miniskirted, the Hansels long-haired, and they sway to rock ‘n’ roll in the automobile-choked streets of their age-old towns.” Those automobiles would be Volkswagens. The tourist would find all the expected dishes, but they will be different in flavor and in an incredible variety of forms. And food is sold in “supermoden supermarkets”, offering foods “premixed, freeze-dried, precooked, and, of course, temptingly packaged for impulse buying, along with fresh foods from the world over.”

Here she describes why she thinks Americans are so comfortable with German food:

Cooking of GermanyThis book has wonderful full-page photographs. The photographer was German-born Ralph Crane, who worked for the NY Times as well as Time-Life books. Here is an example of the full-page photos in this book:

Cooking of Germany

The second chapter is “How to Eat Five meals a Day”. I turn to a photo of a man in suit and tie, his wife in dark sweater and trousers. They sit at a table, under an elegant chandelier, complete with candles, flowers, and fancy dishware. She is feeding a bite of her food to the family dachshund. The photo caption tells us they are “dining informally at home”. Oh yes. Informal. (You should see my informal.)

The five-meals-a-day chapter exemplifies Nika Hazelton’s character as she describes not only the food, but the people and the traditions of German cooking. She takes us through a day in the life of a German in the mid-twentieth century, weaving the hours with people coming together and enjoying food, and compares the experiences of Germans today with those of yesteryears.

This paragraph exemplifies the chapter’s tone:

Cooking of Germany

She mentions the grape harvest:

“Incidentally, for those who think that grape harvesting is romantic, with maidens in dirndls wearing Bacchic wreaths in their hair, I have news. Grape pickers wear jeans, sweaters and high rubber boots. The pretty dresses and stupendous beehive hairdos come later, at the Winzerfeste, or local vintners’ fêtes, where the merriment is astonishing indeed.”

At the end of the second (and each) chapter are recipes. Katerfisch, or “Fish for a Hangover” with tomato sauce and pickles, and Röllmopse, or “Rollmops”, are herring rolls filled with onion and pickle, “prized as a pick-me-up on a morning after”. Ah, those Germans.

Chapter 3 is “The Pleasures of Eating Out”. Here is an example:

Cooking of Germany

Chapter 4 is “Old and New Ways of Party Giving”. Again, an example:

Cooking of GermanyCooking of Germany

Nika Hazelton ties her own past with her own present:

Cooking of Germany
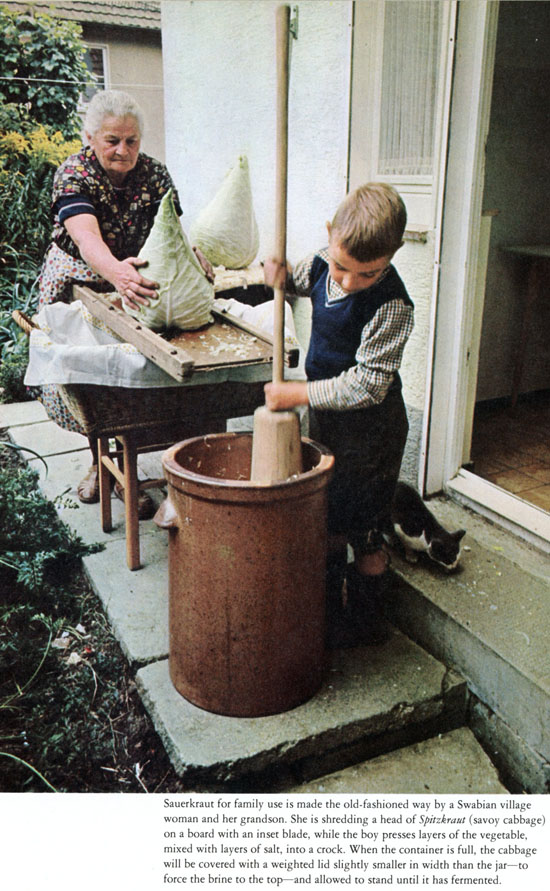
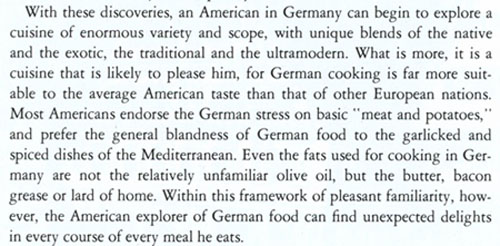
The flavor and of the Cooking of Germany continues to the end of the book. The next chapters are “A Cooking History 2,000 Years Old”, “The Northern Style: Cold-Climate Cuisine”, “The Central Style: Rich and Filling”, “The Southern Style: A lighter Touch”, “Baking Raised to a Fine Art”, and “Festive Revelry and Nostalgic Holidays”. Here are a few thoughts about these chapters.

  • There is a great photo of a potato on page 134. I learn that potatoes are a new world vegetable, and of all the Europeans, Germans were the last import them. Today, potatoes are called “The King” of German vegetables and are used for Schnaps (an alcoholic beverage), dessert dumplings, hot potato salad, potato pancakes, potato soup, and potato dumplings, among other dishes.
  • One of my favorite pages is the photo on page 154 of 26 different kinds of German wursts (sausages). “Everybody rejoices when November kills its pig” is the title of a photo caption.
  • I enjoy the “Baking Raised to a Fine Art” chapter. Wonderful photos of German yeast breads. Photos of desserts, fancy and rich, like the gingerbread house on the cover of the book.

Cooking of GermanyCooking of Germany

Need to mention

I find the recipe instructions in the hard cover and in the accompanying spiral bound booklet very well written. The “late Michael Field suprervised the adapting and writing of recipes for this book. One of America’s foremost food experts and culinary teachers, he wrote many articles for leading magazines.”

Another of the team that put together the Cooking of Germany is the consultant:

Cooking of Germany

As you can see, the consultant was Irma Rhode. Born in 1900, she earned PhD in chemistry. I can imagine that she was the only female in her classes. Heck, I was one of the few women taking chemistry in the 1960s!

Rouladen for dinner

Time to get cooking! I pick up the spiral-bound book of recipes that accompanies the hardcover. I decide to make Rouladen for this blog. These are beef rolls, and the recipe suggests to serve them with spatzle (see scan below)). I’ve made Rouladen before but wow, how long ago was that! We both remember this dish but can’t remember the last time I made it and I can’t figure out why I haven’t made it since.

Rouladen recipeAs suggested in the recipe, I’ll serve it with a little Red Cabbage with Apples.

red cabbage recipe

The rouladen recipe also suggests dumplings or spätzle, but I am going to cheat and use convenient potato dumplings, or gnocchi, sold these days in America as a shelf-stable pasta product. Below is the Cooking of Germany recipe for spätzle. You can see I used this recipe booklet, by the sticky pages at spätzle. I love spätzle! But they take a bit of time to make. (Someday I’ll make them again!)

dumplings pages

I modified the rouladen recipe a bit: I increased the onions, leeks, and parsnip in the cooking liquid, and I added some pepper. I made the sauce a bit differently, as described in my version of the recipe, below.

Braised Stuffed Beef Rolls (Rouladen)
serves 2

  • 1 pound thin sirloin (or top round) steak (my local market sells thin sirloin as “petite sirloin”)
  • 2 teaspoons mustard (I used a brown mustard with seeds, but any type would work)
  • 1/4 cup finely chopped onions
  • 2 slices bacon, each about 8 inches long
  • 1 whole dill pickle, cut lengthwise into halves
  • 1 tablespoon lard (or use butter)
  • 1/3 cup chopped celery
  • 1/3 cup thinly sliced leeks, white part only
  • 1/3 cup chopped parsnip (optional; or substitute a carrot)
  • 1/2 teaspoon salt
  • pepper to taste
  • 1 cup water
  • 1 big sprig of parsley
  • 1 tablespoon butter
  • 2 tablespoons flour

Pound the steak until it is 1/4 inch thick. (I put it in a ziplock bag and pounded with a mallet.) If you are using a single piece of round steak or sirloin steak, cut it into two rectangular pieces about 4 inches wide and 8 inches long after pounding. I found that the petite sirloin steaks worked perfectly, as they were sold already the perfect size for this dish.

Spread each rectangle with a teaspoon of mustard, then sprinkle with 2 teaspoons of onions (save the remaining onions for later). Place a piece of bacon lengthwise down the center. Lay a dill pickle half across the narrow end of each piece and beginning at the pickle end, roll the meat around it, jelly-roll fashion, into a cylinder. Tie the rolls at each end with kitchen cord.

BeefRolls layoutBeefRolls rolled
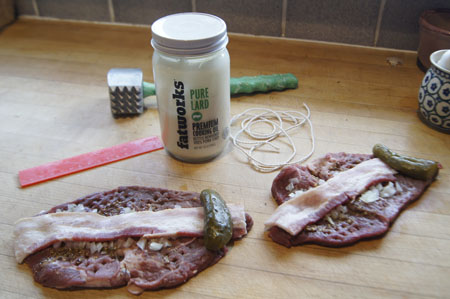
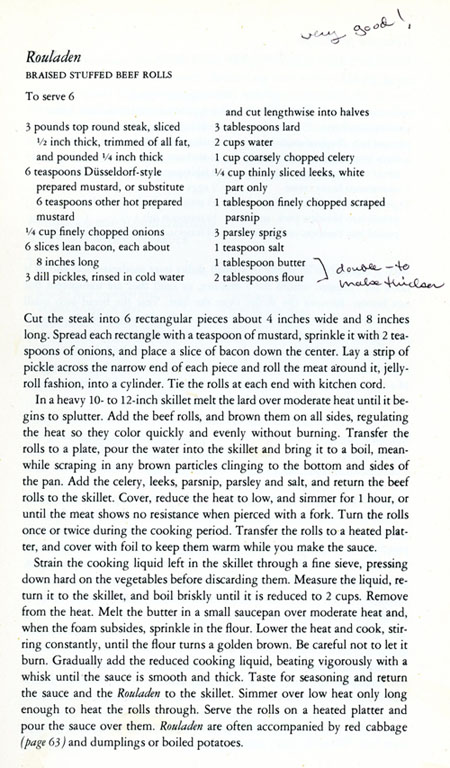
Choose a deep skillet with a heavy lid. I used my old cast-iron stewing pot; a LeCreuset or any heavy cooking pan or pot or skillet would work. Heat the skillet over moderate heat; add the lard (or butter) and heat until it begins to splutter. Add the beef rolls, and brown them on all sides, regulating the heat so they color quickly and evenly without burning. Transfer the rolls to a plate and set aside.

Add the celery, leeks, parsnip, remaining onion, and salt and pepper to the skillet and cook and stir a minute or two to soften the vegetables. Add the water and bring it to a boil, stirring and scraping in any brown particles clinging to the bottom and sides of the pan. Add the parsley. Turn the heat to low and cover the pot. Monitor the pot for awhile: you want a gentle simmer. Let it simmer for an hour or so, turning the rolls once or twice.

Remove the rolls from the pot and cover with foil to keep them from drying out while you make the sauce.

Let the sauce cool awhile in the pot, then scoop the vegetables from the pot with a slotted spoon. Pour the liquid into a gravy separator. Alternatively, if your gravy separator has a strainer-type top, pour the entire contents of the pot through the strainer into the separator. You want these cooked vegetables! Save them!

When the fat has separated from the water layer, pour the water layer into a blender or food processor, or better yet, into the cylindric container that comes with an immersion blender. Add the saved cooked veggies to the liquid, and blend or process or use an immersion blender to homogenize the mixture.

Meanwhile, melt the tablespoon of butter in the skillet until it is foaming, then slowly add the 2 tablespoons of flour, stirring constantly. When all the flour is incorporated, stir a minute or two more, but do not let it burn. Then, slowly and with constant stirring, add the blended broth-vegetable mixture. When it is nicely thickened and bubbly, add the beef rolls, cover the pot, and heat 5-10 minutes to get the rolls to serving temperature.

BeefRolls plated
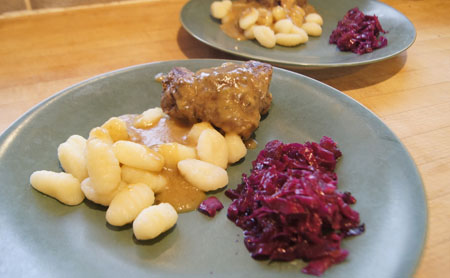
These were delicious! The gravy was amazing, thick and full of flavor. The pickle inside was fun. These remind us of one of our favorite meals, called “little piggies” by my husband’s family. It’s still about his favorite meal  – strips of bacon on strips of round steak, rolled and secured with a toothpick, cooked in a skillet and served over mashed potatoes with gravy. I like the rouladen as made above with tender sirloin steak, because there is less fuss in preparation, and the de-fatted gravy isn’t greasy.

250 Cookbooks: Original SchlemmerTopf Recipes

Cookbook #221: Original SchlemmerTopf® Recipes, Scheurich, circa 2009.

Original SchlemmerTopf Recipes cookbook
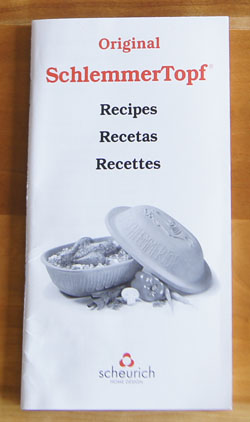
A “Schlemmertopf” is a covered clay baking pot. I wrote a lot of material on clay pots in Römertopf Cooking is Fun, and more in Original Schlemmertopf Recipes, so I won’t repeat that information here.

Original SchlemmerTopf Recipes is the instruction and recipe booklet that came with my current SchlemmerTopf. I bought this clay pot in 2009 (plus or minus a year or two) to bake no-knead breads. The back cover of Original SchlemmerTopf Recipes states that Reston Lloyd Ltd. is the exclusive US and Canada distributor for SchlemmerTopf. They suggest: “Visit our Web Site: www.restonlloyd.com” – so I did, and found that currently Reston Lloyd  offers only the Romertopf® brand of covered clay baking pots.

The bottom section of my SchlemmerTopf® is glazed; the top section is not. This makes it a lot easier to clean than the first clay pot I had. The unglazed top section needs to be soaked in water for about 10 minutes before use. After filling the bottom of the pot with recipe ingredients, the top is added, and the SchlemmerTopf® is put in a cold oven. Only then is the oven turned on, usually to a high temperature, like 425-475˚.

And yes, my last two experiences with clay pot recipes for this blog were very successful! I need to remember to use this pot more often, and no only for baking bread!

Here is the instruction page:

schlemmertopf instructions
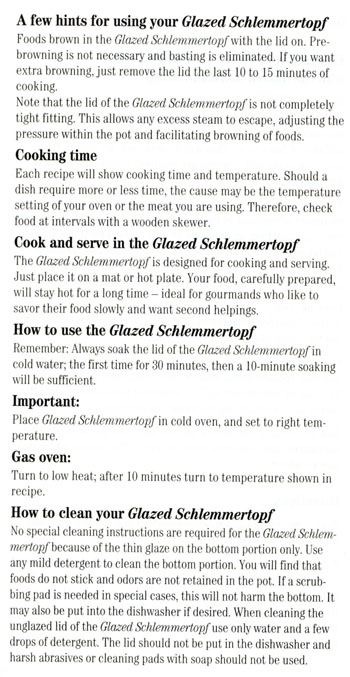
And Six Golden Rules:

6 golden rules
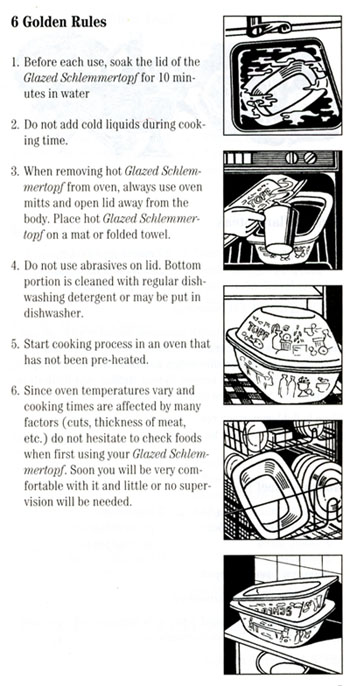
The first 23 pages of this booklet is written in English, then (as far as I can tell) the same instructions and recipes are written in Spanish and then in French. Example recipes are stuffed flank steak, beef stew, meat loaf, beef cabbage rolls, roast beef, chicken shanghai (I made this for another blog entry), chicken paprika, turkey curry, roast game hens, roast duck, and roast salmon. I find these recipes are helpful because they illustrate how to bake a variety of foods in the SchlemmerTopf. But, they are not very inspiring.

Hmmm, shall I keep this small booklet? For a while. But I know I could live without it.

For this blog I decide to make the Roast Beef. Largely because I have a small roast in the freezer!

Roast Beef recipe
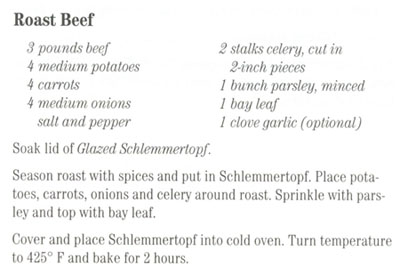
My roast is only about a pound and a half, so I will cut the recipe in half. Note how the recipe (above) does not state what cut of beef to use, nor does it tell me if the potatoes, carrots, and onions are to be peeled or chopped. It does direct the cook to cut the celery in “2-inch pieces”. I decided to peel and cut in half the potatoes, carrrots, and onions.

SchlemmerTopf® Roast Beef
serves 2, with leftovers for sandwiches

  • beef roast, about 2 pounds (I used a bottom round roast)
  • salt and pepper
  • 2 potatoes, peeled and cut in half
  • 2 carrots, peeled and cut in half
  • 2 onions, peeled and cut in half
  • 1 stalk of celery cut in 2-inch pieces
  • 1/4 cup chopped fresh parsley
  • 1 bay leaf

Soak the lid of the SchlemmerTopf® in cold water for at least 10 minutes.

Season the roast with salt and pepper and place in the base of the SchlemmerTopf®. Add the vegetables around the roast, then put the parsley and bay leaf on top.

Cover the SchlemmerTopf®.

Place in a cold oven. Turn the oven to 425˚ and bake for 2 hours. Feel free to open the lid and check for doneness at any time, it won’t affect the baking.

Here is the beef and vegetables, ready to go in the oven.

clay pot roast

And here is the finished roast.

clay pot roast
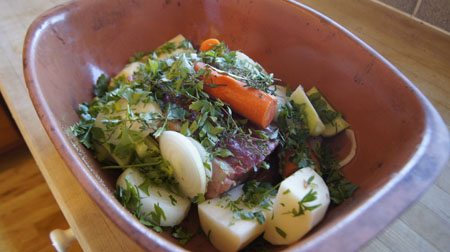
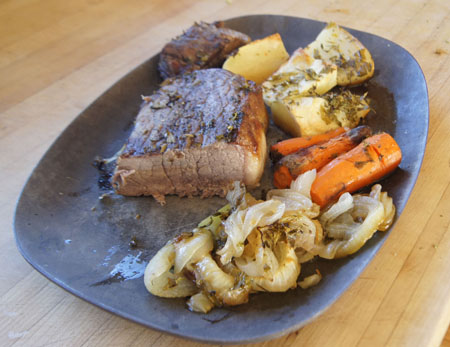
This was good. The potatoes were nicely browned and not mushy inside. I liked the onions too – browned and soft and perfect. I wasn’t able to make a gravy, so I served it with ketchup. (I liked the Römertopf Pot Roast that I made when I covered Römertopf Cooking is Fun. For that pot roast, I used a cross rib roast, lots more seasonings, and was able to make a gravy.)

The leftover beef from this Beef Roast recipe was great the next day, sliced thin in sandwiches. So I’d say the recipe was a success!

250 Cookbooks: Portable Electric Cookery

Cookbook #206: Portable Electric Cookery, Bonnie Brown, Sunbeam Corporation, Chicago, Illinois, 1970.

Portable Electric Cookery cookbookI wrote in my database that Portable Electric Cookery “came with my deep fat fryer”, and it has recipes written for deep fat fryers, electric fry pans, blenders, and electric mixers. I covered the deep fat fryer in Sunbeam Cooker and Deep Fryer, the fry pan in  Hamilton Beach Automatic Heat Control Appliances, and  my old portable electric Sunbeam mixer in Sunbeam Deluxe Mixmaster Mixer.

When I opened this booklet this week, I expected it to be “just another manufacturer’s cookbook”. But no, this one is written by a real person, Bonnie Brown, and her personality is reflected throughout the book. For instance, the table of contents is: Appealing Appetizers, Superb Soups, Magic with Meats, Fabulous Fish . . . you get the idea! Cutesy titles repeating first letters.

And what of the recipes? Surprisingly, I find some that are interesting. We had “Osso Buco” – braised lamb or veal shanks – at a local restaurant and I made it at home because we liked it so much. The Osso Buco recipe in Portable Electric Cookery includes lemon peel and anchovies – I think we’d like that. Savory Lamb Chops, simmered with olive oil, onion, carrots, tomatoes, sherry, and mushrooms sound good. So do the Lamb Shoulder Chops, Pizza Style (simmered in a sauce and covered with mozzarella cheese).

The Perfect Poultry chapter has a lot of recipes for bone-in chicken pieces. Several years ago, stores in my area stopped selling packages of “whole chickens, cut up”, like the “Pick of the Chix” I bought for years. Today I have to buy breasts, thighs, legs, and wings separately, which can be a pain. Or, I have to cut up a whole chicken myself. Anyway, the recipes in this chapter include old standbys like Chicken a la King and Chicken Stroganoff and Chicken with Dumplings, as well as many simmered chicken recipes with a variety of seasonings, like tarragon and ginger. “Flaming Breast of Chicken” is a recipe for boned chicken breasts in a rich egg yolk, mushroom and scallion sauce, cooked in the electric fry pan, and covered with brandy and flamed just before serving.

Candied Sweet Potatoes reminds me of the candied sweet potatoes my mother always made for Thanksgiving. I’ve lost her recipe, but the recipe in Portable Electric Cookery is probably about how she made them. Cherries Jubilee is a cooked-at-the-table recipe that would work well using the electric fry pan, in fact, the recipe says not to use a non-stick pan. Briefly, dark sweet cherries are boiled with a bit of cornstarch, then sprinkled with sugar. Then, you cover them with warmed brandy, ignite the brandy, and spoon the cherries over vanilla ice cream.

Sukiyaki is a dish I learned how to make from my Japanese college roommate, and I always make it in the electric fry pan. The recipe in ortable Electric Cookery is similar to mine. The Delectable Desserts chapter has an interesting recipe for Baked Alaska.

Guess I’ve decided to keep this cookbook. The recipes are from scratch, and include a variety of meats and seasonings influenced by different cultures. I am pleasantly surprised! Most of the recipes, though, I’d cook in my current selection of stove top pans, electric slow cookers, Kitchen Aid mixer, and a food processor rather than a blender.

I like the recipe for “Mandarin Beef” in the “Cooking with a Foreign Flavor chapter”. It has a sauce of ginger, garlic, soy sauce, and tomatoes. Tomatoes in a stir fry is a new twist, so I decide to make this recipe for this blog.

Mandarin Beef recipe
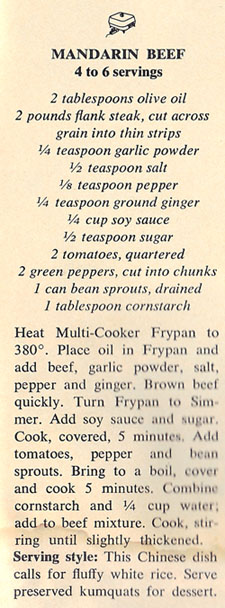
I don’t feel like pulling out my electric fry pan, so I’ll just use one of my stove-top frying pans. For the two of us, I’ll halve the recipe. Instead of the canned bean sprouts, I will substitute with julienned zucchini (I would have used fresh bean sprouts, but forgot to buy them!). I did have mushrooms, so I used them in this dish. And I’ll use fresh ginger and garlic. Tomatoes and fresh ginger and garlic remind me of the base for many dishes my daughter cooked for us in Togo. I think we will like this Mandarin Beef.

Mandarin Beef
serves 2

  • 12-16 ounces flank steak, cut across the grain into very thin strips
  • 2 cloved garlic, chopped fine
  • 1 small piece of fresh ginger, grated
  • salt and pepper to taste
  • 2 tablespoons soy sauce
  • 1/4 teaspoon sugar
  • one tomato, quartered
  • 1 small green pepper, cut into chunks
  • fresh bean sprouts, or julienned zucchini
  • sliced mushrooms (optional)
  • 1 tablespoon cornstarch dissolved in a little water

Heat a little oil in a wok or fry pan. Add the beef, garlic, ginger, and salt and pepper, and brown the beef over fairly high heat.

Turn down the heat and add the soy sauce and sugar and cook and stir about 5 minutes. Add the tomatoes, green pepper, bean sprouts (or zucchini), and mushrooms and cover and cook about 5 minutes. Add the cornstarch/water mixture, and cook and stir until the dish is slightly thickened.

Serve over rice (I used jasmine rice).

Below is a photo of the meat and vegetables ready for the stir fry.

Mandarin Beef

I totally forgot to take a photo of the cooked meal! It smelled so good and we were hungry – that’s my excuse. It was very good and I would make it again.

250 Cookbooks: Natural Cooking

Cookbook #203: Natural Cooking, Barbara Farr, Potpourri Press, Greensboro, NC, 1971.

Natural Cooking cookbookThe title page of this booklet is marked “$1.50” in very neat handwriting. My guess is that I bought it in a Boulder bookstore, way back when. Today I could buy it for $3.95 on Amazon.

The Owl & Company Bookshop comments that Natural Cooking is a “scarce and relatively early natural food cook-book”, referring to the natural food movement that the “hippie” generation took on as its own. Barbara Farr’s Natural Cooking defines natural foods as minimally processed foods, for example, whole grains instead of white flour, foods grown without pesticides, and produce brought from farm to table as soon as possible.

There was a time when all grains and produce were grown without synthetic pesticides, and produce had to be eaten (or home-canned) quickly or it would spoil. In the early twentieth century the “food industry” grew fast, offering food processed to lengthen its shelf life. Home cooks were able to buy canned and packaged foods, and wanted more. Chemists  in the same era discovered and manufactured pesticides for greater crop yield, as well as food preservatives (additives) to give processed foods a longer shelf life. Home cooks of the 40s to 50s latched on to these convenient products.

Then came the “hippie” generation, a sub-set of the “baby boom” generation. Many hippies, children of the 1940s to the 1960s, wanted to go back to nature, and eliminate pesticides and food additives from their foods, as well as eat whole grains and freshly harvested foods (preferrably home grown). (Joni Mitchell: “Give me spots on my apples but throw away the DDT”.)

The hippie generation did not invent the movement for all natural foods. My edition of the Boston Cooking-School Cook Book, published in 1906, recommends whole grains and a balanced diet including fruits and vegetables.

I found Natural Cooking in the bibliography of this book, Secret Ingredients: Race, Gender, and Class at the Dinner Table, by S. Inness. It’s in the chapter “Recipes for Revolution“.

Natural Cooking referenceThe trend for whole grains continues today (2017). I like them because they have much more flavor than plain white bread, or white rice. Whole grains have a low glycemic index, touted in The Glucose Revolution Pocket Guide to Losing Weight as being important both for dieters and diabetics. Today, I see “low glycemic index” bars and foods advertised for fitness affectionados and dieters alike.

I sit down with Natural Cooking and slowly page through. On page 4, “Introduction”, is the quote from the inset (above), “A steaming bowl of soup, a ripe tomato still warm from the heat of the sun, and a loaf of crusty whole-grain bread; all of these are natural foods. On the other hand, a T.V. dinner is unnatural in its concept, unsatisfying in its flavor and unbeautiful to behold!”. I scanned in page 5, below, because it exemplifies the tone of Barbara Farr’s book:

Natural Cooking

Here is an excerpt from page 6, Barbara Farr’s take on food faddists:

Natural Cooking

Even though this is a small collection of recipes, it is quite varied. The recipes in this book are not vegetarian and some include cuts of meat that we less commonly use today, such as oxtails, kidneys, liver, and smoked tongue. Hummus, eggplant, stuffed grape leaves, gazpacho, quiche, and bean soups show the variety of choices. I easily find three recipes I’d like to try: Swedish Limpa, a yeast bread made with beer and a larger proportion of rye flour; Turkish Swedish Meatballs made with lots of yogurt; and Apple Krisp, with raw sugar (Turbinado sugar, like I use for Creme Brulee), honey, apples, and wheat germ.

An aside: I like Barbara Farr’s paragraph on “Sweets”:

Natural Cooking

For this blog, I decide to make the Turkish Swedish Meatballs.

Turkish Swedish Meatballs recipe
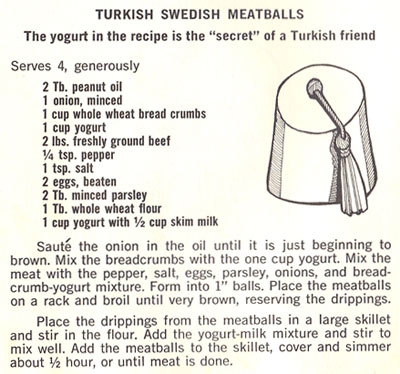
I cut the recipe in half for the two of us. I found the meatballs too sloppy as I formed them, so I added more breadcrumbs. I found it very hard to stir the whole wheat flour into the drippings, so next time I’d use white (AP) flour. (Not worth the trouble using whole grains for this small amount of flour, if it doesn’t work.) Below is my version of this recipe.

Turkish Swedish Meatballs
serves 2-3

  • 1 pound freshly ground beef; I used 90% lean beef from Whole Foods
  • 1/2 onion, chopped fine
  • 3/4 cup whole wheat bread crumbs (I used my homemade whole wheat bread)
  • 1/2 cup yogurt (I used organic, full fat plain yogurt)
  • pepper to taste
  • 1/2 teaspoon salt
  • 1 egg, beaten
  • 1 tablespoon minced fresh parsley
  • 1 tablespoon AP flour
  • 1/4 cup milk
  • 1/2 cup yogurt

Saute the onion in a little oil until it is just beginning to brown. Mix the breadcrumbs with the 1/2 cup yogurt. Mix the meat with the pepper, salt, parsley, onions; add the bread-crumb-yogurt mixture. Form into 1-inch balls. They will not form easily, as this mixture is pretty, well, sloppy:

uncooked meatball
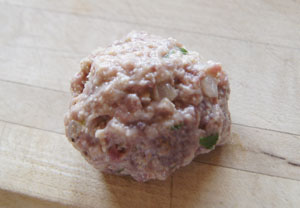
Set the meatballs to rest on a plate or breadboard. Heat your oven to broil. Find a clean broiler pan, or use a rack set over a pan to catch the drippings. Lightly oil the broiler pan or the rack, then place the meatballs on it. Broil the meatballs until they are very brown. This took me 5-10 minutes; I rotated the pan often and turned the oven to low-broil about halfway through.

Take the pan out of the oven and let it cool. Reserve any drippings for the sauce.

Transfer the drippings to a large frying pan pan and stir in the flour (I had so few drippings that I added a bit of olive oil too). Add the milk and stir until smooth. Add the 1/2 cup yogurt. Add the meatballs to the skillet, mix it all together carefully (the meatballs are delicate), then cover and simmer about 1/2 hour, or until the meat is done.

Serve over noodles, rice, or mashed potatoes, or maybe a grain like farro, freekeh, bulgur, or cracked wheat. I used whole wheat linguine.

Swedish Meatballs
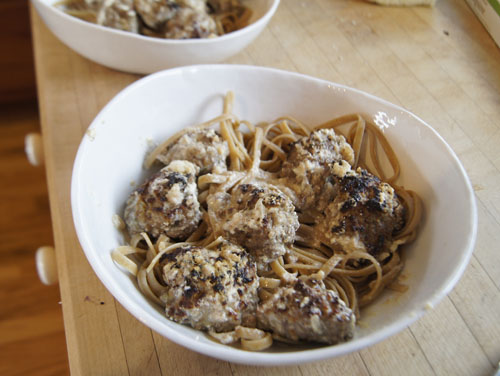
I was surprised at how well these went over! The first comment from my dining-partner was “ummmm, these are good!” I too liked them. Full of flavor and nice and moist.

Next time I might use a frying pan that goes from oven to stove top. Using the broiler was kind of useless, since very little fat came off these meatballs. But the step of browning under a broiler was nice, because it got these delicate meatballs nice and brown without causing them to fall apart. It kept the moisture of the meatballs inside, and after a good simmer in the yogurt sauce, they were absolutely delicious.

I will definitely keep this cookbook!

250 Cookbooks: New Pillsbury Family Cookbook

Cookbook #202: The New Pillsbury Family Cookbook, The Pillsbury Company, Minneapolis, Minnesota, 1973.

New Pillsbury Family CookbookThe New Pillsbury Family Cookbook is one of my three most-used reference cookbooks, alongside McCall’s Cook Book (1963) and the Joy of Cooking (1964). I always reference this book when cooking a good roast, especially a rib eye roast. I also use the fruit pie baking guide. This book is well-used, but entirely readable! It’s great for basic quick bread recipes too. If I want advice on how to cook or bake anything, this is one of the three I consult. Or, if I want to compare recipes.

The tone is straightforward, no “bossiness” like Joy of Cooking. The writing style is not “chummy” either. I am very comfortable with this book and its recipes – I grew up with this type of cooking, and began cooking this way, and still do, a lot of the time. Sure I often cook more twenty-first century, exploring new ingredients and methods, but our day-to-day meals are usually pretty twentieth century. We rarely eat dinner out, and that means I’ve had to come up with meal ideas zillions of times to keep things from getting boring. The New Pillsbury Family Cookbook? I won’t let go of it!

I search the web, and discover that others must also like this cookbook. It’s labelled a “classic cookbook” and also “vintage”. Hey, I resemble that remark! (I bought it when I was only 23.) This is a five-ring loose-leaf binder cookbook. I find that it was also published as a hard-bound book (408 pages, just like mine) and is now selling for as much as $74 when in mint condition (VintageCookbook.com). Guess I’m not the only one who likes classic American cookbooks.

Pillsbury is currently a brand name used by both General Mills (Minneapolis-based) and the J.M. Smucker Company (Orrville, Ohio-based). (Wikipedia.) Pillsbury has a current website with lots of recipes. Note that Pillsbury is also the name on many of the “Bake-Off” booklets that I have covered in this blog.

One thing about this book has always made me smile: cake, candy, and pie sections come before meats and main dishes. Vegetables are last. I like cake first too! . . .  but just now I realize . . . the chapters are in alphabetical order. Geesh, that takes some of the fun out of it!

As I flip through the pages, I note several recipes I’d like to try. I like the “batter” breads in the yeast bread section, like English Muffin Bread and Dilly Casserole Bread. These are no-knead breads, and although not held overnight like the current no-knead breads I make, they give a hole-filled texture, kind of like a crunch, to the finished breads. I note an apple cake that has 2 cups of fresh apples and only 3/4 cup of flour. The Carrot Cake has honey in it, and less oil than the current very good but also very high calorie version that is my standard. It also suggests using whole wheat flour instead of all-purpose flour, and gives directions for baking at high altitude (5200 feet). I made notes on the Brownies and Pumpkin Bars recipes. If I make a pecan pie, I consult this book – and have post-it notes on that page. If I forget the proportions for a graham cracker crust, or want to make a pie crust from vanilla wafers or other cookies, directions are in a nice table on page 147. And page 149 is indespensible to me: a table of how to bake different sizes and kinds of fruit pies.

Once again . . . I really do like this reference book. But let’s go on.

Pages 206-207 hold my post-it notes and magazine clippings for cooking prime rib roasts. These expensive, large roasts go on sale every holiday season, and I usually buy them to cook New Years Eve. Often with “roasted potatoes”, a delightful way to cook potatoes that my daughter and I first enjoyed in England in 2002. Today, I find a recipe for “Citrus Simmered Steak”, thick round steak that is simmered for a couple hours on the stove top. I decide to make this recipe for this blog, since I bought just such a steak yesterday on sale. Sounds like a nice, different mix of seasonings:

Citrus Simmered Steak recipe
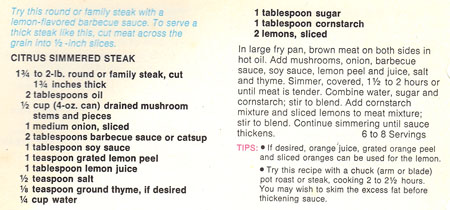
The poultry and game chapter shows signs of “well-use”, but I haven’t marked any recipes. Today I do, though! “Golden Oven-Fried Chicken” is coated with cornflakes, almonds, and Parmesan cheese. Now, I’ve made cornflake-coated chicken for years, but almonds and cheese? No. I will make this recipe soon. (271)

The last chapters chapters show little signs of use. Seafood and outdoor cooking, salads and sauces, vegetables. I find a few basic recipes for mayonnaise, waldorf salad, tomato aspic, salad dressings, and a good selection of sauces, like mornay sauce, veloute sauce, hollandise sauce, cocktail sauce, and barbecue sauce.

Okay, time to cook! The recipe from The New Pillsbury Family Cookbook for “Citrus Simmered Steak” is above; below is my version.

Citrus Simmered Steak is simmered for a couple hours on the stove top, so I decided to pull out my big old cast iron pot. Lately I’ve been using the LeCreuset for braising; it’s nice that it goes from stove tip to oven. But I haven’t used the cast iron pot in ages, and thought I’d re-familiarize myself with the benefits of this pot. I suggest any covered, large pot you have, but the heavier the better.

Citrus Simmered Steak
serves about 4

  • 1 3/4-2 pounds round steak, at least 1-inch thick (often, this cut of round steak is called “London broil” in our supermarkets)
  • 2 tablespoons oil (approximate)
  • 1/2 teaspoon salt (or to taste)
  • pepper
  • 1 small can mushrooms, stems and pieces, drained (these days, “small” mushroom cans are 7 oz.), or use fresh, sliced mushrooms
  • 1 medium onion, chopped or sliced
  • 2 tablespoons ketchup
  • 1 tablespoon soy sauce
  • 1 teaspoon grated lemon peel
  • 1 tablespoon lemon juice
  • 1/4 teaspoon dried thyme
  • 1 tablespoon sugar
  • 1 tablespoon cornstarch
  • 1/4 cup water
  • 1 thinly sliced and seeded lemon

Heat the oil in a large pot on the stove top. Salt and pepper the meat, then cut it into large chunks that will fit into the pot. Brown the meat on both sides. Add mushrooms, onion, ketchup, soy sauce, lemon peel and lemon juice, and thyme. Simmer, covered, for about 2 hours, or until the meat is very tender. Check and stiir occasionally and add a little water if it looks like the mixture is drying out.

When the meat is done, remove it from the pan and set aside. Combine the sugar and cornstarch, then mix in the 1/4 cup water. Add this mixture to the pan and stir into the drippings, heating until bubbly and thick. Add more water if you think it’s too thick. Add the sliced lemon to this gravy, and then add the meat back in. Simmer a few minutes for the flavors to blend.

Slice the steak across the grain (yes, it’s kind of messy to do this). I served the steak-sauce mixture over store-bought gnocchi (because I like them!), but it would also be good over mashed potatoes, rice, or pasta.

Citrus Simmered Steak
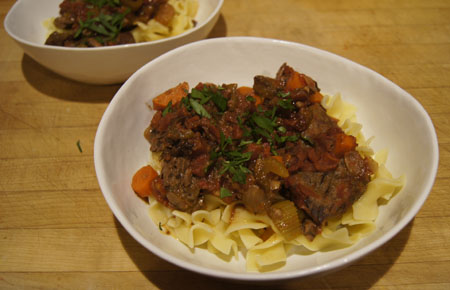
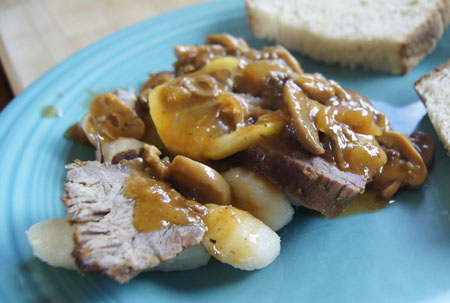
This was tasty and flavorful I left most of the lemons off my husband’s serving because I wasn’t sure he’d like them. The Swiss/round steak was a bit like, well, like “round steak”. I always find this cut of meat rather chewy and flavorless, no matter how I cook it. With the sauce and the long cooking, though, it did make a good week night meal. I scraped the sauce off the leftover meat, sliced it thinly, and it made a yummy sandwich with tomatoes, lettuce, and ketchup. The last bit of leftover meat went into tacos.

Of course, I am keeping this cookbook!

250 Cookbooks: Extra-Special Crockery Pot Recipes

Cookbook #183: Extra-Special Crockery Pot Recipes, Lou Seibert Pappas, Bristol Publishing Enterprises, San Leandro, CA, 1975. A Nitty Gritty Cookbook.

Extra Special Crockery Pot Recipes cookbookI have 10 crock pot/slow cooker cookbooks! Crazy. I discussed the history of crock pots in a previous post: The Electric Slow Cooker Cookbook.

Extra-Special Crockery Pot Recipes is similar in design and layout to The Bread Machine Cookbook II, another “Nitty Gritty Cookbook”. These books are all about recipes – cleanly laid out and easy to follow.

I find lots of different ideas to try in Extra-Special Crockery Pot Recipes. The soups chapter includes the basics (French onion soup) and the slightly exotic (Caldo Xochitl). Next is salads. Salads in a slow cooker? At first I thought: cooked salads? But no, the recipes are for regular lettuce-type salads including leftover slow-cooked chicken or beef. I am often looking for “main dish salad” recipes in the hot summertime.

I’m not tempted by any of the recipes in the fish chapter – fish generally needs only a brief cooking. The poultry chapter includes the basics (poached chicken) and the unusual (Chicken and Cherries Jubilee). “Meats and Casseroles” has lots of ideas. It’s the longest chapter in the book, and I like a lot of the recipes: a wide range from the basic (Meat Balls Stroganoff) to the unusual (Choucroute Garni).

“Breads and Cakes”? Why bake bread in a slow cooker? “There are sometimes occasions when you may prefer not to heat the oven or perhaps you are at a location without an oven, when having a crockery pot makes baking possible.” I remember our relatively recent family reunion in California where the oven in the rental did not work, so we cooked a cake in the barbecue. But hey – we could have looked for a crock pot instead!
The fruits chapter gives recipes for cooked fresh fruit to be used in desserts or for breakfast. “Preserves” has a recipe for apple butter (already made it!) as well as orange marmalade and apricot pineapple jam and a couple chutneys. Beverages? Hot Spiced Cider, Swedish Glugg, and Hot Mulled Wine.

I decide to make Savory Swiss Steak for this blog. Wikipedia says “Swiss steak is meat, usually beef, prepared by means of rolling or pounding, and then braising in a cooking pot of stewed tomatoes, mushroom sauce, or some other sauce, either on a stove or in an oven.” That’s a pretty broad definition – and the recipe in Extra-Special Crockery Pot Recipes definitely falls within it. (I have made Swiss Steak for this blog before, but it was not a slow-cooked version.)

Savory Swiss Steak recipe

Round steak is a very lean meat (nice when you don’t want a fatty gravy) but it can be flavorless or tough. Hopefully this recipe makes it tender and tasty! I think I’ve tried this recipe before, since this page was marked when I pulled the book off the shelf.

Slow Cooker Swiss Steak
serves about 4

  • 1 1/2 pounds round steak
  • 1/4 cup flour
  • 2 teaspoons dry mustard
  • salt and pepper to taste
  • 2 tablespoons butter (or less)
  • 2 tablespoons oil (or less)
  • 1 onion, chopped
  • 2 carrots, chopped
  • 2 stalks celery, chopped
  • 1 16-ounce can diced tomatoes
  • 2 tablespoons Worchestershire sauce
  • 2 teaspoons brown sugar
  • fresh parsley (optional)

Cut the round steak into about 6 pieces. Mix the flour, dry mustard, and salt and pepper. Heat a frying pan and add half of the butter and oil. Dredge the steak in the flour mixture, then fry in the hot butter/oil until browned. (You might need to do this in a couple batches, it depends on the size of your frying pan.)

Remove the meat from the fying pan and put it in the crock pot. Put the rest of the butter and oil in the hot (now empty) frying pan, then add the onion, carrots, and celery. Cook until the vegetables are “glazed” or softened. Add the tomatoes, Worchestershire, and brown sugar; heat, scrapping up the fond. Transfer the entire mixture to the crock pot.

Cover and cook on low about 6 hours, or until the beef is tender. Serve over noodles, mashed potatoes, or rice, with some fresh parsley sprinkled on top (if you have it).

Swiss Steak
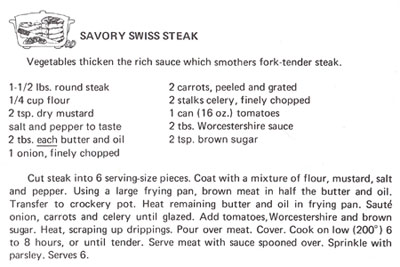
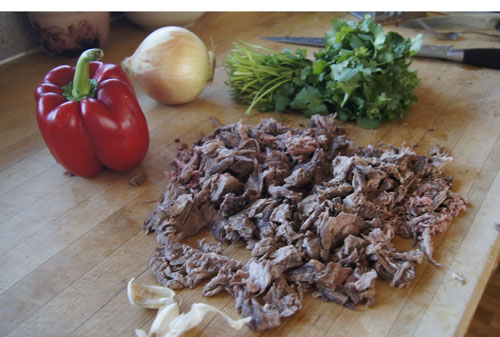
This was excellent! I will make it again. Very tasty and the meat was very tender. There was enough for two meals for the two of us (I froze half for later use).

250 Cookbooks: Elena’s Famous Mexican and Spanish Recipes

Cookbook #179: Elena’s Famous Mexican and Spanish Recipes, Elena Zelayeta, Dettners Printing House, San Franscisco.

Elena's Famous Mexican and Spanish Recipes cookbook

Driving out of Boulder last week, I noticed a new Mexican grocery store. I wanted to go in! I love discovering small stores with interesting ethnic products. I used to get the best corn tortillas from a store in almost the same location. Makes me hungry for Mexican food. Time to pull another Mexican cookbook off my shelf!

And I have only one that I have not yet covered: Elena’s Famous Mexican and Spanish Recipes. I covered another of her cookbooks, Elena’s Secrets of Mexican Cooking, in one of my earliest posts. That book was published in 1958, and this one in 1944. Inside the back cover is the price it originally sold for: $1.50 from May Co. I think I bought it from a used book or junk store, way back when we lived in Boulder. But I am not sure. It could have been my mother-in-law’s – there is some writing in this book that might be hers.

The introduction to Elena’s Famous Mexican and Spanish Recipes is written by Elena’s friend Katherine Kerry, while the introduction to the (later) 1958 book is written by Helen Evans Brown. Her friends just loved her! If you read my other blog entry, you will learn that Elena lost her sight as an adult, but blindness didn’t stop her from cooking. That amazes me so much! Katherine Kerry writes of her friend’s book:

“This book of her own much-used recipes is just one expression of Elena’s love of people, her knowledge of how to make them happy. Each recipe is a shining star of courage, faith and hope, plus a full measure of gastronomic enjoyment for you who use them.”

“Elena is a bouncing ball of pep, gaiety, kindliness and heart – a heart so big it encompasses all she meets.”

Some of the recipes in Elena’s 1944 book were carried through to the later book – “because no book on Mexican cuisine could possibly be without them”.

The first chapter of Elena’s Famous Mexican and Spanish Recipes is “Sopas – Soups”. I learn that there are two types of soup in Mexico: wet and dry. Wet soups are liquid (plus meats and vegetables) and served at the beginning of the meal, dry soups are served next. Dry soups are rice or vermicelli cooked in soup stock, the stock being entirely absorbed in cooking, in effect making them more like our idea of seasoned cooked rice.

“Eggs, Glorified ways of serving them”, the next chapter, has at least one recipe I’d like to try: “Rice Nests with Egg”. In this recipe, bacon is wrapped around a small pile of cooked rice and secured with a toothpick, then topped with a raw egg and baked in the oven. I like this recipe for a couple reasons. One, it sounds good! And two, it illustrates Elena’s Mexican dishes. They are often simple home cooking, and barely our typical ideas of “Mexican” cooking.

Some of the salad recipes look very good, like an avocado salad with pineapple, oranges, fresh mint, lettuce and French dressing. Chiles Rellenos – green chiles stuffed with cheese, dipped in egg batter, deep fried, and served in a spiced tomato sauce – are in the vegetable chapter. I have made them Elena’s way for years! She suggests frying them the day before serving, an idea that might me prepare these delights more often. (Much easier than frying while your guests are there.) Fish, poultry, meats and beans each has its own chapter. (Some of the meats, like tripe, kidneys, rabbit, and pigs feet, I guarantee I’ll never cook.)

“Tortillas, Tacos, Tostadas, Enchiladas and other things made with masa” is the title of another chapter. Elena talks about treating a pan with “hydrated lime” when one makes homemade tortillas. Hydrated lime is not made from limes, instead, it is calcium hydroxide, and is used to help the masa bind together. All of her recipes that include masa (a type of cornmeal) call for purchasing it fresh from a Mexican store. I’m not sure this type of masa is still available, and I ran into problems when I tried making a tamale casserole using the bagged masa that is currently sold in US supermarkets. But in general, her recipes call for store bought tortillas, so it’s not a huge problem. She also mentions an item I’d like to find called “raspadas”, thin tortillas specially made for tostadas.

And last but not least, desserts! Flan, rum and macaroon pudding, Mexican bread and rice puddings, banana pudding, cookies (Little Drunkards sound interesting!), and turnovers are among the sweet recipes in this chapter.

Elena’s Famous Mexican and Spanish Recipes includes several pages of menus for Mexican meals. Below is a great example:

Mexican menus

I do like this cookbook and definitely will keep it. Lots of good recipes, information on historical Mexican cooking, and written by an interesting woman.

For this blog, I decide to make Carne Deshebrada, or Shredded Skirt Steak, Mexican Style:

Shredded Skirt Steak recipe

Usually when I make “shredded beef”, I braise a roast for a long time until it falls apart easily when shredded with a fork. In this recipe, the skirt steak is broiled just to medium rare – sounds like an interesting variation. I found it hard to “shred with a fork”, so I went back and forth using a fork and a sharp knife to shred/chop instead of following the directions. I couldn’t find a green bell pepper, so I used a red one. I like lots of fresh cilantro and garlic so I increased the amounts. And I added the green chiles as suggested. I preferred not to serve this “in soup plates and eaten with soup spoons”. Instead, I kept the meat a little drier by adding less water, and served the mixture in a corn tortilla with grated cheese and salsa.

Shredded Skirt Steak
serves 4

  • 1 skirt steak, about 1 1/2 pounds
  • 1 onion, chopped
  • 2 large tomatoes, peeled and chopped
  • 1 green (or red) bell pepper, chopped
  • 1 teaspoon chile powder (optional)
  • fresh cilantro, 1/4 cup chopped (or to taste)
  • 2 cloves garlic
  • 1 small can chopped green chiles

Cut the steak into several pieces and broil in an oven just until medium rare. Cool, then shred with a fork and a sharp knife.

Fry the chopped onions in a little oil until tender. Add the tomatoes, bell pepper, chile powder, cilantro, garlic, chiles, the shredded meat, and about 1/2 cup water. Salt and pepper to taste. Simmer about a half hour, adding a bit more water if needed to keep the mixture moist. Serve wrapped in tortillas with cheese and salsa.

Below is a photo of the skirt steak after I cooked and “shredded” it.

shredded skirt steak ingredients
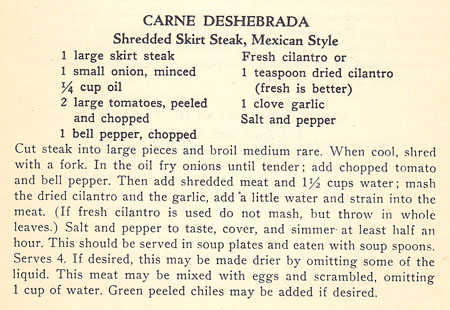
And here is the pan of shredded beef and vegetables, ready to be served.

Shredded Skirt Steak

And how did it turn out? Wonderful! The skirt steak was so, so flavorful! A different experience than my braised style shredded beef. I used “Tortillaland” corn tortillas, half-cooked tortillas that heat up on a dry grill into soft but sturdy tacos. These tortillas were strong enough to stay together, even packed with shredded beef and fixings.

I made another meal using the leftovers by mounding the mixture and some grated cheese in thin flour tortillas, rolling them up, then browning in a big fry pan in a little oil just until all sides were browned. Then, I cut into bite-sized pieces and served with salsa and sour cream. Yum again.

250 Cookbooks: Cover and Bake

Cookbook #177: Cover and Bake, by the editors of Cook’s Illustrated, a Best Recipe Classic, America’s Test Kitchen, Brookline, MA, 2004.

Cover and Bake cookbook

I discovered my first Cook’s Illustrated magazine sometime in the early 2000s. This magazine has no ads – what a treat! I clipped and saved several recipes, then I subscribed to Cook’s Illustrated online. (It’s the only cooking magazine I subscribe to.) I ordered this book, Cover and Bake, and I use it a lot.

Christopher Kimball founded the enterprise that includes Cook’s Illustrated and America’s Test Kitchen, where they develop the recipes in their publications. This “Kitchen” is located in Brookline Massachusetts, and is where the TV show “America’s Test Kitchen” is filmed. Most of my friends who are into cooking love this show!

Cook’s Illustrated recipes always include a lengthy discussion. In their test kitchen, they try each recipe many different ways, and report on their findings. This appeals to my scientific side! Plus, when I follow the directions, the recipes always come out excellent. For instance, their recipe for pie crust taught me how to finally make a tender, easy-to-roll crust. I often browse the site for new ideas, or how to cook . . . anything! I also use their reviews of kitchen equipment to help decide on a new purchase.

The chapters in Cover and Bake are: Assemble and Bake (casseroles), Pot Pies and More, Oven Braises and Stews, Skillet Casseroles, Savory Side Dishes, Breakfast and Brunch, and Slow-Cooker Favorites. My favorite chapters are the pot pies and oven braises and the slow-cooker recipes. I have so many notes in this cookbook!

It will be easy to find a recipe to cook for this blog. I start flipping through the pages. What catches my eye is “Chili Mac”, from the first chapter, Assemble and Bake. I haven’t made many of the casseroles in this book, and it’s time to try one.

Chili Mac is an American comfort food, although I’ve never made it before. It even has its own Wikipedia entry. Briefly, it’s made with meat-bean chili, noodles, and topped with cheese. Sounds good to me!

Because of copyright issues, I am not scanning in this recipe. It’s a relatively recent publication, and the editors are still actively publishing. The original recipe is on pages 80-81 of the Cover and Bake. Page 80 is a two-column discussion of how they got this recipe “perfect”! Page 81 gives the recipe in 1 1/2 columns. This is the typical layout of Cook’s Illustrated recipes: not a fast food publication! I changed their recipe a bit (my adaptation is below).

Chili Mac: adapted from Cover and Bake, America’s Test Kitchen
makes a 9×13-inch casserole, enough to serve 8, depending on appetites

  • 8 ounces elbow macaroni
  • 3/4 cup reserved macaroni-cooking-water
  • 1 1/2 pounds hamburger (I used 90% lean)
  • 2 onions, chopped
  • 1 red bell pepper, chopped
  • 2 tablespoons finely minced garlic (4-8 cloves)
  • 2 tablespoons hot chili powder
  • 1 tablespoon ground cumin
  • 1 14.5-ounce can diced tomaotes
  • 1 28-ounce can tomato sauce
  • 1 tablespoon brown sugar
  • 8 ounces grated cheese, preferably “colby Jack” or a mixture of cheddar and Jack cheese

Cook the macaroni in salted boiling water until al dente. At my altitude of 5300 feet, this took about 10 minutes; it would take less time at sea level. (It’s important not to boil the macaroni too long, as it will continue to cook when the casserole is baked.) Before draining the pasta, reserve 3/4 cup of the pasta water; this will be used later when the casserole is assembled.

As the macaroni cools, cook the hamburger in a large pan or pot, salting to taste. (The original recipe recommends cooking the hamburger in a little oil; it’s up to you.) When the meat is cooked, drain it in a colander to remove (and discard) the fat. Set the meat aside.

Add a little oil to the now-empty pan and cook the onions, red bell pepper, garlic, chili powder, and cumin, stirring, until the vegetables soften and begin to turn brown (about 10 minutes). Add the diced tomaotes, tomato sauce, brown sugar, the 3/4 cup reserved pasta water, and the drained hamburger. Simmer 20 minutes.

Stir the cooked macaroni into the pot and season to taste with salt and pepper. Pour the mixture into a 9×13-inch rectangular casserole and sprinkle with the grated cheese. Bake at 400˚ for 15 minutes, or until the cheese is melted.

Chili Mac
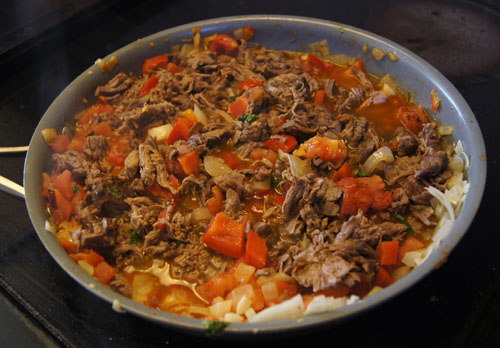
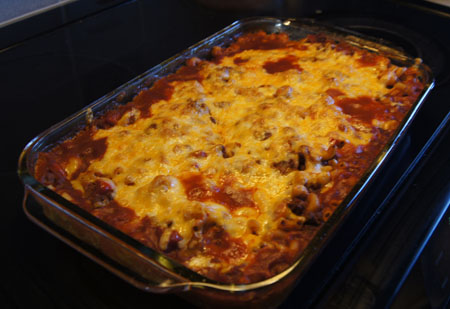
Oh yes, this was good! Yum!

I will definitely keep this cookbook. (And tucked inside is the little Rival Crock-Pot Cookbook that I mentioned in an earlier post.) With fall coming on, I am sure I’ll be back to Cover and Bake soon, looking for warm and hearty meal ideas.