250 Cookbooks: Pressure Cooker

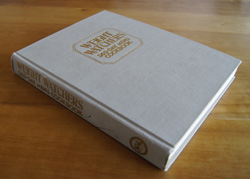
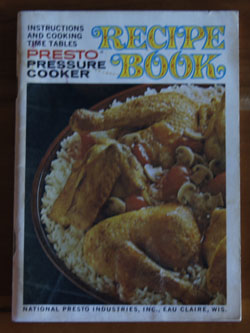
Cookbook #230: Pressure Cooker, User’s Manual, Fagor America, Inc., Lyndhurst, NJ, 1999.

Pressure Cooker cookbook
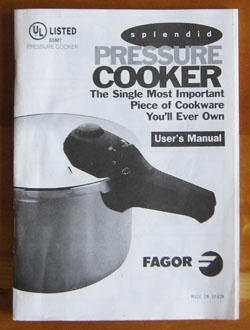
This is the instruction manual that came with the pressure cooker I bought sometime in the early 2000s. I have already talked about that specific pressure cooker in my post Fagor Pressure Cookers, More than 50 Recipes.

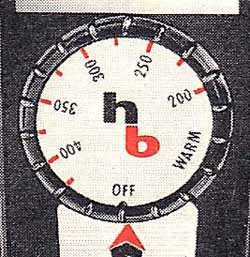
The first few pages detail how to use a stove-top pressure cooker and how long to cook a variety of foods. I now use an electric pressure cooker, so only the cooking time lengths and pressure release times are useful to me. For instance, the length of time to cook chicken is discussed in this section:

page 11page 12

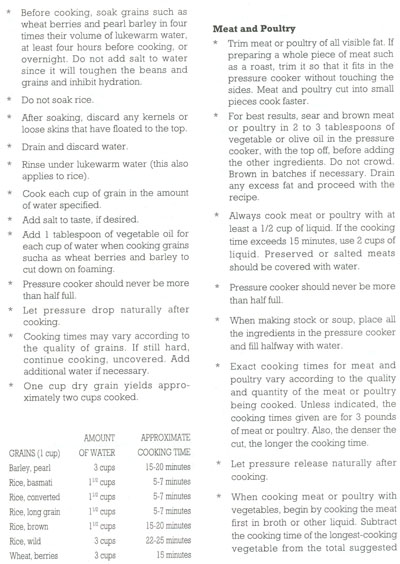
I’ve used this booklet – that note is in my handwriting. The cooking times for chicken correlate well with the times in my current electric cooker instruction booklet (Cuisinart Electric Pressure Cooker).

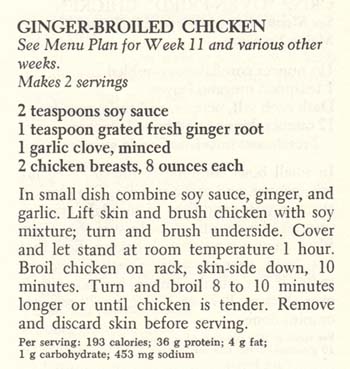
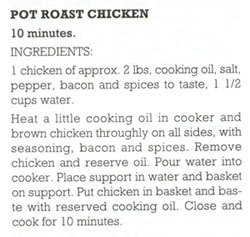
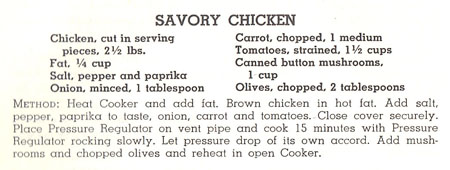
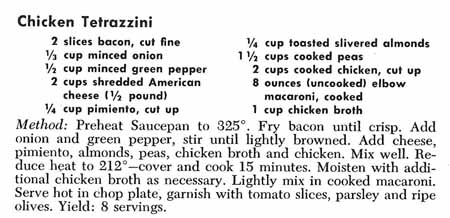
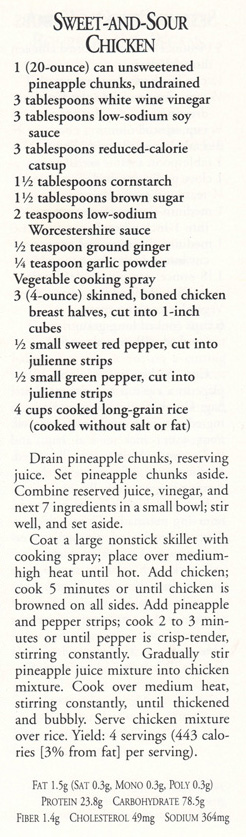
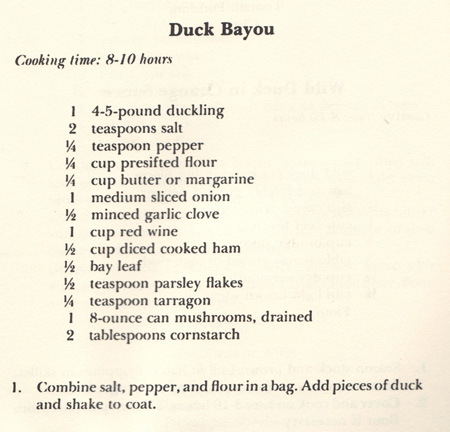
How about the recipes in this booklet? Good recipes might make me keep an instruction cookbook. But Pressure Cooker, User’s Manual, has only 8 pages of recipes, from soups to vegetables to rice and pastas to game and poultry to meat to fish to desserts. The recipes are basic preparations, none have a much flair. Instead, their purpose is to acquaint the new user with the range of foods that can be cooked in a pressure cooker. Here is a typical recipe:

Pot Roast Chicken recipe I don’t need this booklet anymore, since I no longer have a stove-top pressure cooker and since the recipes aren’t very exciting. I will recycle it.

For this blog I will cook chicken in my current electric pressure cooker. I go to Whole Foods to buy a whole chicken, but they are out! This is the day after Christmas and many shelves are bare. Not wanting to travel to another store, I buy bone-in chicken breasts and drumsticks, about 4 pounds worth. Do I need to cook chicken pieces for a shorter time than a whole chicken? According to to the section on Meats and Poultry in Pressure Cooker, User’s Manual (above), the answer is “yes” – 9-10 minutes for pieces, 12-15 for whole. (The chicken-piece cooking time length correlates well with my Savory Chicken recipe.) How much liquid should I add to the pot? Pressure Cooker, User’s Manual states “Always cook meat or poultry with at least a 1/2 cup of liquid. If the cooking time exceeds 15 minutes, use 2 cups of liquid.”

The pressure release method also affects how done the chicken will be in a certain amount of time. Are the pressure release method the same in both sets of instructions? No, they are not exactly alike, as I found when I compared the manual cooker instructions with those in my Cuisinart Electric Pressure Cooker book:

electric pressure cooker times

Comparison:

Manual cookbook instructions

  • slow release
  • 9-10 minutes for cut-up chicken
  • 12-15 for whole chicken (and I noted to cook whole chicken 15 minutes “especially if it’s slightly frozen)
  • 1 1/2 to 2 cups water in their recipe for cut-up chicken in Chicken Casserols

Electric pressure cooker instructions

  • quick release
  • 10 minutes for cut-up chicken
  • 24-28 minutes for whole chicken
  • 1 cup liquid in my recipe for cut-up chicken (Savory Chicken)

In summary, the manual cooker instructions state to cook a whole chicken a little bit longer than chicken pieces; the electric cooker instructions state to cook a whole chicken two and a half times as long. I can see that there are several other variables to control: cut of chicken, weight of chicken, amount of liquid, amount of liquid, length of cooking, and type of pressure release.

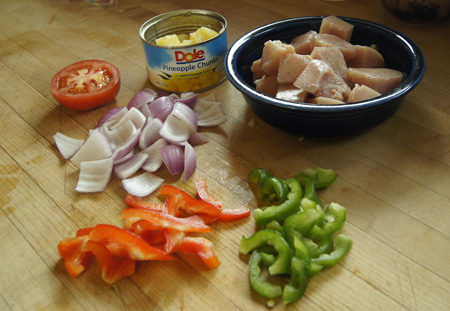
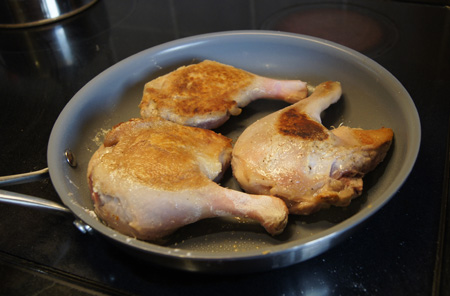
So how the heck shall I cook my odd mixture of thick chicken breasts and drumsticks? I decide to make an educated guess and do an experiment. I will cook my large-sized bone-in chicken breasts and 6 drumsticks in 1/2 cup water (and a little salt) for at least 10 minutes and use the quick release. But as an experiment, I decide to check the chicken after 8 minutes.

Results

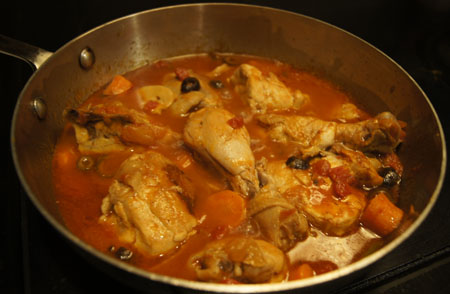
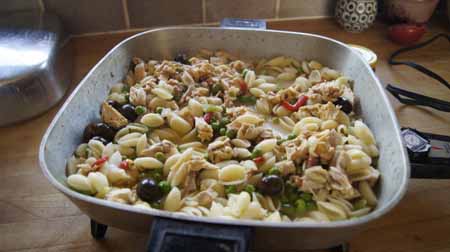
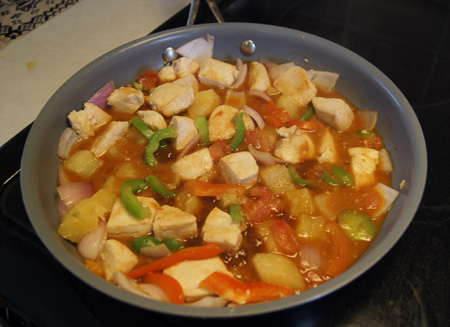
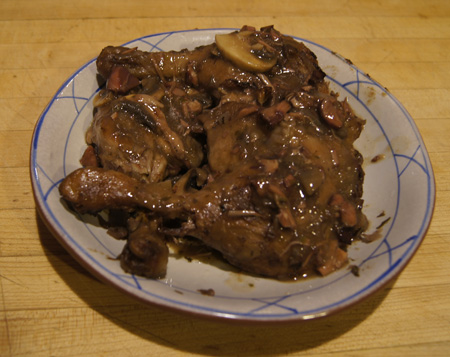
At 8 minutes, the drumsticks were done, but the breasts were kind of “hard”. I took the drumsticks out of the cooker and cooked the chicken breasts 5 minutes longer. Here is my chicken at 13 minutes:

pressure cooked chicken

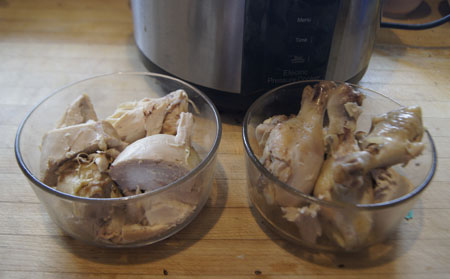
All the chicken pieces are done, but honestly, the breasts were kind of rubbery and dry. Hmmm. I poured the cooking liquid into a measuring cup – it totalled 1 cup. It seems a lot of the juices ran out of the chicken. In the future, I recommend trying more water in the pot at the start, up to 2 cups.

This chicken did make a great chicken salad. Cut up and dressed with mayonnaise, it was just fine, and didn’t taste rubbery. It was also good in chicken soup (made with that cup of chicken liquid). And I have enough chicken for yet another meal too.

This is an experiment in progress! For large chicken breasts, I suggest trying (first) 1-2 cups water, and 12-15 minutes (quick release) cooking time for a whole chicken. If I have a whole chicken, I’d try 16-20 minutes.

I had a fun time with this – I still like doing experiments.

250 Cookbooks: Presto Pressure Cooker Recipe Book

Cookbook #185: Presto Pressure Cooker Recipe Book, National Presto Industries, Eau Claire, WI, 1970.

Presto Pressure Cooker Recipe Book cookbook

I saved this little booklet from way back in the early 1970s, when I got my first pressure cooker, a Presto. That cooker lasted until the late 1990s. It still semi-worked, but the gasket leaked and I don’t think I could find a new one. So I bought a Fagor pressure cooker, as I described in another blog post, Fagor Pressure Cookers. That pressure cooker also failed because of gasket issues. Currently, I own only an electric pressure cooker. It is a dream!

I looked carefully through the Presto Pressure Cooker Recipe Book to see if there are enough good recipes in it to warrant keeping it. Only one – Savory Chicken – catches my eye. So I will recycle the booklet.

I’ll get to that recipe later. As I write this, I have already made the recipe, and it was delicious! In fact, I was so impressed with my electric pressure cooker, that I have to rave about it a little. I cooked the chicken (10 minutes) and meat for a stew (16 minutes) sequentially one afternoon, for a total prep/cook time of maybe 45 minutes. Each recipe made enough for two meals. Each tasted great. Amazing.

I recently covered two methods of braising meats: slow cookers (crockpots) and clay pots. I also often braise meats in a covered range-top to oven casserole (like a LeCrueset). Each has its advantages and disadvantages. Braising in general includes:

  • a browning step in an open pan
  • a covered baking/heating step
  • a final heating step in an open pot to reduce the gravy

Slow cookers generally require a separate pan for the browning step. Most slow cooker recipes take 6-8 hours to cook, which can be good (you can be gone) or bad (often some ingredients in the dish are overcooked). Gravy reduction can be done right in the pot. If the slow cooker has a removable crock, it can be pretty easy to clean, especially if it fits in the dishwasher.

Clay pots do not allow browning/gravy reduction in the pot (but meats cooked in them brown anyway!). Cooking time is about an hour. I find taking the very hot clay pot out of the oven difficult. Gravy must be thickened in a different pan. The pot takes an overnight soak to clean.

LeCruesets allow stove top browning/gravy reduction and are easy to get out of the oven and to clean. Most recipes take a few hours in the oven (and smell delicious all the time!).

Electric pressure cookers are about the best in all of the braising steps. The unit is shaped like a slow cooker, with a light weight non-stick insert (easy to clean). You brown the meats right in the unit using a “browning” setting. Then, you add all the ingredients, seal the unit with the lid, and set the timer to however long you want to cook on high (or low) pressure. It heats up, hisses briefly, then settles into the  cooking time with just a tiny bit of hissing. Pressure is released slowly or quickly with the release knob. If the meat isn’t done enough, or if you want to add another ingredient like potatoes that need a short cooking time, the unit quickly gets back up to pressure. After the pressure cycle you take off the lid and set to the browning cycle to reduce the pan juices. Cook times are short! 15 minutes to cook stew meat! Clean-up is very easy, a quick wash in soapy water is all the insert needs.

(A note about the older style stove top pressure cookers. They allow browning and gravy reduction directly in the pan, and cooking/cleaning steps are short. But, the little pressure regulator/rocker hisses loudly during the cook time. To release the pressure, the heavy hot pot must be taken to the sink and run under cold water. And if the meat is not yet done or you want to add potatoes, it takes a long time to for the pressure cooker to heat up again.)

I found a great website with a lot of recipes for electric pressure cookers: Pressure Cooking Today. I love the author’s statement on the main page – Today’s pressure cookers aren’t the scary pressure cookers your mom used.” That’s exactly how I felt about my manual pressure cookers!

Here is the recipe for Savory Chicken, as printed in Presto Pressure Cooker Recipe Book.

Savory Chicken recipe

The version of this recipe, below, is my adaptaion of Savory Chicken for my electric pressure cooker.

Savory Chicken
serves about 4

  • 1 chicken cut into serving pieces (or buy already cut up)
  • 2 tablespoons olive oil
  • 1 teaspoon paprika
  • 1 small onion, chopped
  • 1 carrot, chopped
  • 1 14-ounce can diced tomatoes
  • salt and pepper to taste
  • 1 small can chopped or whole button mushrooms
  • half of a small can of chopped olives (use the entire can if you want)

Heat the oil in a pressure cooker set to “brown”. Add the chicken pieces and brown all sides. Add the paprika, onion, carrot, tomatoes, and salt and pepper. Cover and seal the pressure cooker. Set to high pressure, 10 minutes. Start the cycle.

Quick-release the pressure regulator. Open the pot and remove the lid. Add the mushrooms and olives. Again set to “brown” and reduce the pan juices to your desired thickness. (I needed the pressure cooker for another recipe, so I did this last step on the stove top.)

Savory ChickenThis tasted great! I served it over rice, but noodles would work well too. The chicken was juicy and tender and very flavorful.

250 Cookbooks: Hamilton Beach Automatic Heat Control Appliances

Cookbook #113: Hamilton Beach Automatic Heat Control Appliances, Hamilton Beach, Racine, Wisconsin, Division of Scovill Manufacturing Company, circa 1970 (no date in booklet).

Automatic Heat Control Appliances CookbookI found my old electric fry pan while organizing my cooking stuff in the basement. I wavered between putting it on the “definitely toss” or the “maybe recycle” pile for several weeks. I haven’t used this fry pan in years, one reason being is that it is missing the little metal circle that enables you to set it at a particular temperature.

Then I found this instruction/recipe booklet: Hamilton Beach Automatic Heat Control Appliances. (Is is one of the “ccok books” listed in my database.) That inspired me to give this appliance one last meal to cook for us!

I carry the fry pan upstairs and wash off the dust and cobwebs. The bottom of the bottom has a small layer of burned-on fat, but I don’t bother scrubbing it off. The top looks like it is water-spotted, but it doesn’t clean up with an SOS pad.

electric fry panThis unit has three pieces: the lid, the fry pan, and the plug-in thermostat. Thus, you can clean the pan by first unplugging the thermostat, then immersing the pan in water to clean. I note a patent number on the plug-in thermostat:

3007028

This US patent was granted in 1961 to G. E. Sorenson for an “Electrically heated device with plug-in thermostat”. (Patent page.) The timing makes sense; I acquired this fry pan about 1969-71. I remember my college roommate making sukiyaki in it. The booklet tells me that the plug-in thermostat also works with a griddle and a saucepan (I had neither).

I decide to make “Chicken Tetrazzini” on page 42 of the booklet. But how am I going to set the temperature?  Hmmm. There is a photo of the dial on the cover of the booklet. Maybe if I scan it?

HB dialOkay – now I’ll print the above and cut it out and tape it to the thermostat. Cool, it works! I’m ready to make the tetrazzini.

Chicken Tetrazzini recipeI will make a half-recipe. Instead of American cheese, I will use regular cheddar cheese. For cooked peas, I will use frozen peas, straight from the bag. Elbow macaroni – !!! – none in my pantry! I don’t feel like driving back to town, so I substitute whole-grain cavatelli. I did pick up pimientos yesterday – I was surprised to find them canned at Sprouts. Pimientos are less prevalent these days than they were in the 1970s. I usually substitute red bell peppers. According to Wikipedia, a pimiento is a chili pepper that is smaller and a bit more sweet and succulent and aromatic than a bell pepper.

Below is my version of Chicken Tetrazzini. I used the electric fry pan, but any stove-top pan could be used.

Chicken Tetrazzini
serves 3-4

  • 1 slice bacon, chopped fine
  • 1/4 cup diced onion
  • 1/4 cup chopped green bell pepper
  • 2 tablespoons pimiento (or use chopped red bell pepper)
  • 1 cup cooked chicken, cut into chunks
  • 3/4 cup frozen peas
  • 2 tablespoons slivered almonds
  • 1/2 cup chicken broth (you may need more)
  • 1 cup grated cheddar cheese
  • olives and parsley (optional)
  • 4 ounces (dry) elbow macaroni (can substitute another type of pasta)

Cook the bacon in a skillet or sauce pan. (I used the electric fry pan set at 325˚.) When the bacon is crisp, add the onion and green pepper and stir until softened. Lower the heat and add the pimientos, chicken, peas, almonds, chicken broth, and cheese. Cover and cook for about 15 minutes. If the mixture gets too dry, add a bit more chicken broth.

Meanwhile, cook the macaroni in salted boiling water. Drain, then add to the chicken mixture. Lightly mix and heat. If you like, add a few olives and some parsley. Serve!

ChickenTetrazziniWe both liked this! It’s tasty and easy.

I’ll keep my electric fry pan. It would be good for the Stylish Meat Balls I made last week, because it is a large pan and maintains a low heat setting. I’m sure I’ll find other uses now that I have rediscovered it.

250 Cookbooks: The Low-Fat Way to Cook

Cookbook #31: The Low-Fat Way to Cook. Oxmoor House, 1993.

The Low-Fat Way to CookI have used this book a lot, both as a reference on low-fat cooking and for recipe ideas. I’ve made the Dijon pork chops and sweet and sour chicken many times, although I’d forgotten about them until I pulled this book from the shelf. This book is an old friend.

This is a large hardcover book with good color photos. The recipes are easy to follow and pleasantly laid out. It’s not very personal; this book has editors rather than an author. Nutrition information is  given for each recipe. Most main dishes are 250-400 calories per serving.

I pretty much cook the way this book outlines. Since it’s a 1993 book, I was already cooking like this when I purchased the book, so I guess I wanted reinforcement and recipe ideas.

So what are low-fat guidelines? Choose lean cuts of meat, poultry without the skin, and fish. Bake or broil instead of frying. Use vegetable cooking spray or when absolutely necessary, reduced calorie margarine. Braise tough cuts of meat (long, slow cooking). En papillote cooking is great – this is cooking in paper packets. Top pot pies are topped with phyllo sheets rather than fat-filled crusts. Choose low-fat dairy products and use egg substitute or egg whites. For baking, use very little oil and incorporate vegetables, fruits and whole grains.

Beyond the above suggestions, this cook book encourages the reader to watch serving size and read labels. Page 17 has a great chart of “serving sizes”.

I like this cookbook a lot better than the Cooking Light Cookbook 1992, which was the first of my 250 Cookbooks posts, and also an Oxmoor book. The recipes in this cookbook don’t call for all sorts of weird ingredients – they call for items I already have in my pantry/refrigerator. Sensible.

So what recipe to try? I am going to “try” Sweet-and-Sour Chicken. Now, I have made this before; I have a post-it next to the recipe stating that it is “pretty, spicy and thick sauce, good with pork too”. But I had forgotten this recipe, and it’s time to try it again.

Sweet-and-sour dishes need to have just the right combination of vinegar and sugar. This is one time when I actually carefully measure the vinegar and the sugar. Other than that, this is a really simple dish. Just stir fry the vegetables and the chicken, then add the sauce and heat. Takes about 10 minutes to cook.

Sweet-and-Sour ChickenThe only thing I disagree with in this recipe is that it calls for reduced-calorie catsup – just ridiculous when you are only using a couple tablespoons in a dish. One tablespoon of regular catsup only has 20 calories! So I used regular catsup. (I always use low-sodium soy sauce so no problem there.)

I have another sweet-sour recipe in my repertoire and I am incorporating an idea from it: onions. I like onions in my sweet-sour dishes, so I include them in my written recipe below. I also like a touch of tomato. And, you can add carrots and use fresh ginger instead of powdered ginger. Hey, recipes are guidelines, not written in stone!

Sweet-and-Sour Chicken
serves 2 people

  • 9-12 ounces of skinned, boneless chicken breasts, cut into 1-inch cubes
  • 1 8-ounce can pineapple chunks (or a 10-ounce can if you can find one)
  • 2 tablespoons vinegar (white, white wine, or red wine)
  • 2 tablespoons soy sauce
  • 2 tablespoons catsup
  • 1/2 tablespoon Worcestershire sauce
  • 1 1/2 tablespoon brown sugar
  • 1 tablespoon cornstarch
  • 1/3 teaspoon ground ginger, or about a teaspoon grated fresh ginger
  • 1/4 teaspoon garlic powder, or one minced clove
  • 1/4 of a small red pepper, cut into julienne strips
  • 1/4 of a small green pepper, cut into julienne strips
  • 1/4 of an onion, cut into 1/2-inch squares
  • optional: diagonally sliced carrots
  • optional: half a tomato, peeled and cored and chopped
  • cooked rice

Drain the pineapple chunks, reserving juice and setting the chunks aside. Combine the juice with the vinegar, and the next 7 ingredients (soy sauce through garlic powder) in a small bowl or measuring cup; stir well and set aside.

Heat a nonstick pan over medium-high heat until it feels hot when you hold your hand an inch above it. Then, coat it with cooking spray and add the chicken and cook 5 minutes or until chicken is browned on all sides. Add the peppers and onion (and carrots or any other veggies you are using) and cook 2-3 minutes, until the veggies are crisp-tender.

Add the pineapple chunks (and the optional tomato) and stir a minute to heat through. Give the pineapple juice mixture a good stirring to distribute the cornstarch, then slowly add it too. Cook over medium heat, stirring constantly, until thickened and bubbly. It only takes a couple minutes.

It’s ready to serve, over your favorite type of cooked rice!

Here are the gathered ingredients:

Sweet-and-Sour Chicken ingredientsAt the preparation point when I took the above photo, I hadn’t decided to add the tomato or not, so it’s sitting there uncored and unpeeled. Below is the cooked dish.

Sweet-and-Sour ChickenYum!

Favorites: Moo Shoo Turkey

If my eyes fall upon the bottle of hoisin sauce in my refrigerator, I think of Moo Shoo Turkey and get a hankering to make this for dinner. Moo Shoo Turkey is really just a stir fry in a flour tortilla, why do I like it so much? Dunno. I included it on the short list of main dishes in my 1990s blog, and I still make it today, in 2013. I am not sure where I got the original recipe, must have been from a magazine or newspaper. It is low-fat, and tasty. It takes a little while to pull together the ingredients, so I won’t say it’s really “simple”. But it’s worth it.

Hoisin sauce is a “sweet and garlicky bean sauce” (Cook’s Thesaurus). I find that different brands taste quite different. I have found it at the Asian Seafood Market, Safeway, and Whole Foods (my current brand). It’s essential for this dish.

I sprouted mung beans to make the bean sprouts for this dish. Why? Because I could. Also, I often find that supermarket bean sprouts (1) come only in a large package and (2) are often slimy by the time I go to use them. If you are in Boulder, though, you can drop by the Asian Seafood Market and buy just the right amount of very fresh bean sprouts, as she sells them in bulk.

Photography: I’m finding that cooked entrees often take terrible pictures. So I’m trying something new, a photo of the ingredients for this dish. They take a pretty picture:

ingredients for Moo Shoo TurkeyMoo Shoo Turkey
serves 2 (depending on appetites)

Combine and marinate at least 30 minutes (can marinate all day):

  • 3 tablespoons soy sauce
  • 1 tablespoon lime juice
  • dried hot peppers (a few shakes)
  • 12 ounces raw turkey breast, thinly sliced

Prepare/gather:

  • 1 clove garlic, minced
  • 1 teaspoon grated or minced fresh ginger
  • 1 carrot, julienned
  • 1 cup shredded cabbage
  • 1/2 zucchini, julienned
  • several mushrooms or shitake, sliced
  • 1 tablespoon soy sauce
  • 1 cup bean sprouts
  • chopped green onions for garnish
  • hoisin sauce
  • 3 flour tortillas

Stir fry the garlic, ginger, and carrot for a couple minutes on medium-high heat (use as little oil as possible). Then add 2 tablespoons of water to the pan, cover, and cook for 1 minute.

Uncover the pan and add the cabbage, zucchini, mushrooms, and the 1 tablespoon soy sauce. Cook a few minutes, until the vegetables soften. Then remove the vegetable mixture from the pan and set it aside in a bowl.

Add the turkey with its marinade and cook until the turkey turns white and liquid is slightly reduced. This will take 5-10 minutes.

Add the vegetable mixture back to the turkey mixture in the pan and add the bean sprouts too. Heat through – just a couple minutes. Sometimes I thicken this mixture with 1-2 tablespoons cornstarch mixed with 1/4 cup water.

Spread flour tortillas with 1-2 tablespoons hoisin sauce each. Microwave them a few seconds to heat and soften, then add the turkey-vegetable mixture and some chopped green onions. Serve immediately.

I’m kind of generous with the hoisin sauce:

Moo Shoo Turkey This looks kind of lonely on the plate. I often serve it with Chinese-style stir fried rice.Moo Shoo TurkeyLonely or not, Moo Shoo Turkey was great once again!

graphic

Favorites: Southwestern Grilled Chicken

I clipped this recipe back in the 80s from the Colorado Daily, the campus newspaper of the University of Colorado, Boulder. Me, a seasoned cook, using a recipe from a campus newspaper, a resource that targets the 18-24 year old crowd! But this is a great dish for families too. I included it on the short list of main dishes in my 1990s blog, and I still make it today, in 2013. It is simple, low-fat, and tasty.

The original recipe suggested serving with grilled or broiled green, red, and yellow bell peppers. Instead, I always serve it with a good, chunky salsa, rice, and warmed corn tortillas.

Southwestern Grilled Chicken
serves 3-4, depending on appetites

  • 8 oz. plain yogurt (Greek yogurt works great)
  • 1/4 cup chopped green onions
  • 8 oz. chopped green chiles (canned work fine)
  • 1 teaspoon cumin
  • 1/2 teaspoon salt
  • 1 tablespoon mayonnaise
  • 1 pound boneless chicken breasts (or chicken tenders)
  • hot salsa (your choice)
  • cilantro (optional)
  • cooked rice

I generally start this in the morning and let the chicken marinade all day, but a couple hours is sufficient.

Combine the yogurt, onions, chilies, cumin, and salt. Remove about 2/3 cup of this mixture, mix it with the tablespoon of mayonnaise, and set it in the refrigerator for later use (it’s a sauce for the cooked chicken).

Put the rest of the yogurt mixture in a bowl and add the chicken pieces. You can make the chicken extra tender by piercing it a lot with a sharp fork. Cover the bowl and set the chicken-marinade mixture in the refrigerator.

About a half hour before dinner time, remove the chicken from the yogurt marinade. Cook the chicken either in a broiler or on the grill:

  • broil about 5 minutes per side 4-5″ from an oven broiler set on high OR
  • grill over medium high direct heat, about 5 minutes per side

The chicken is done when an instant-read thermometer reads about 165˚. If you don’t have a thermometer, check for doneness by cutting into one of the pieces with a knife (it should no longer be pink inside).

Slice the chicken into 1/2″ thick pieces and plate it with the cooked rice. Sprinkle with chopped cilantro if you wish. Serve it with the reserved yogurt mixture and hot salsa. Warmed corn tortillas make a great addition!

Southwestern Grilled Chicken

Chicken Tagine

This recipe became part of my repertoire in 2006. I combined a recipe clipped from a magazine and class notes from the Mediterranean cooking class that I took at the Culinary School of the Rockies (now Escoffier). Input from my daughter’s Moroccan boyfriend and his family helped too. The recipe is now fine-tuned and tested enough to share. I have to tame down the olives and saffron to suit my dining partner; I’m giving options for those (like me) who love these ingredients.

A “tagine” is basically a stew. It gets its name from tagine, a traditional pot with origins in North Africa. A tagine is a flat cooking dish with a lid that has tall, sloping sides. It is meant for long, slow cooking of meats, allowing time for the meat to tenderize, while the cooking liquid constantly condenses on the lid and drops back into the pot. Authentic tagines are earthenware and colorful. I would have loved for my daughter to bring me one home from her travels, but they are a little too big to fit in a backpack. Instead, I purchased a westernized one made by LeCreuset. It has a cast iron base (good for browning meats) and a stoneware lid.

TagineMy tagine recipe can be cooked just as well in any heavy, lidded stove top pan, or baked in the oven in a stove-top-to-oven casserole. When we made a lamb tagine in cooking class, we cooked it both ways, and none of us could tell a difference.

About the olives. My first choice are the big, green “Greek” olives, probably from a market’s open deli section. Do not use the bottled “Spanish olives” used for martinis. Do not use stuffed olives. Greek olives might be called Ionian, Nafplion, or “cracked green”. (Here’s the Cooks Thesaurus reference on olives.) You can use kalamata olives; these are smaller and purplish-black, but they are almost as good in this dish, and are good jarred, so you don’t have to make a special trip to the store. The original recipe called for 2 cups of olives; I cut this down to 1/2 cup so that I could serve it to my dining partner. I’ll usually add more to my own serving, although they are best cooked into the sauce, as they help thicken the dish.

About the “preserved lemons”. This is a Moroccan specialty. They are difficult to find in local stores, but are pretty easy to make. I was given some at my cooking class, and later by some Moroccan friends. But I’ve substituted plain lemons as in the recipe below and find they work fine (at least for this non-connoisseur).

Chicken Tagine


This serves about 4-5 people. It can easily be cut in half for 2-3 people.

  • 8 large boneless, skinless chicken thighs, skinned and cut into big chunks
  • 3/4 cup onion, chopped
  • 2 cloves garlic, minced
  • salt (to taste)
  • 1/2 cup cilantro, minced
  • 1/2 cup parsley, minced
  • 1 teaspoon cumin
  • 1 teaspoon ginger
  • 1 teaspoon paprika
  • 1/4 teaspoon saffron (optional)
  • 1/2 teaspoon pepper (or to taste)
  • 2 average-size potatoes; Yukon golds work well but any will do
  • 2 cups water or chicken stock
  • 1/2 cup Greek green olives (Ionian or Nafplion)
  • 1/4 cup fresh lemon juice (about 1 lemons-worth of juice)
  • grated peel of 1/2 lemon (or use 1/2 of a Moroccan preserved lemon, peel only, chopped fine)
  • 1 1/2 tablespoon cornstarch dissolved in a little water
  • chopped fresh cilantro and parsley for garnish

Cook onions in a small amount of olive oil until they wilt, salting to sweat, then add the garlic and stir for 30 seconds. Add the chicken and stir for several minutes, then add the cilantro, parsley, cumin, ginger, paprika, saffron, pepper, potatoes, and stock.

Simmer, covered, about an hour. (Or, bake in a 350˚ oven, covered, for an hour.) Add olives, lemon juice, and lemon peel. Slowly and with stirring, add the cornstarch and water. Simmer a few minutes until it thickens. Taste and adjust seasonings.

Sprinkle with a little chopped fresh cilantro and parsley and serve over couscous or rice.

Chicken TagineThis is one of my new comfort foods!

250 Cookbooks: The Electric Slow Cooker Cookbook

Cookbook #18: The Electric Slow Cooker Cookbook. Barbara Bean, Henry Regnery Company, Chicago, Illinois, 1975.

The Electric Slow Cooker CookbookI have eleven crock pot/slow cooker cookbooks – guess that says something! Three are copyright 1975. Let’s see, where were we then. We moved to Colorado in 1973, so we were living in Boulder. I was in my first years as a working young woman, and interested in the current healthy-style trends. I used the crock pot to cook beans or inexpensive cuts of meat while I was at work (or at play, thinking back …).

Crock pots (as we know them) had not yet been invented when I grew up. Out of curiosity, I google-searched news articles employing date limits and found the first mention of “crock pot” in 1973. A “crock pot” was demonstrated at a church gathering by a “Mrs. Fred Jones”, and a bride-elect was presented with “an electric crock pot and a lily corsage accented with red roses”. A more traditional search of the web pulled up a Wikipedia entry and another interesting website that discuss the history of the electric crock pot. Its predecessor was the “Naxon Beanery All-Purpose Cooker” developed by the Naxon Utilities Corporation of Chicago. In 1970, Rival bought Naxon and the rights to the Beanery, upgraded the appliance, and called it the Crock-Pot®. The PetitChef website has a graphic of crock pots from different eras. My first one looked just like the “1971” version.

My use of a crock pot has ebbed and flowed over the years. I tried a lot of recipes; some failed, some worked. I used to use the crock pot a lot for my own version of refried beans. I would buy dry pinto beans, soak them, then cook them in the crock pot with a bunch of seasonings. When done, I would mash them with an electric hand mixer while still in the pot. This way, I would have “refried” beans without any fat. In the early 70s, I also cooked soy beans for a soy bean chile.

I consider a slow cooker an essential tool for my kitchen, even if it sometimes sits for months without use. I’m now on my third slow cooker. My first one was a Rival CrockPot® (it got a crack in it), my second one was a “Crock Watcher” by Hamilton Beach (it has a removable crock; the switch wore out). My newest has a timer and a removable cooking crock. Recently, I had a lot of fun using it to make Apple Butter.

The best thing about a crock pot meal? Walking into the kitchen after a long day day at work or play, and finding the house suffused with the aroma of something delicious simmering and ready to be dished up.

What I don’t like about the crock pot is that with the wrong recipe, it can turn a mixture of meat, vegetables, and liquid into an amorphous mass. I’ve learned to choose my recipes carefully. It’s good for breaking down tough, inexpensive cuts of meat, like round steak or chuck roast, turning them into tender and tasty stews and stroganoffs (try it for my Lamb Stew with Cinnamon). I have a good recipe for game hens in a slow-cooker and a great cassoulet  recipe. I’m sure I’ll come across other crock pot favorites when I go through the rest of my cookbooks, and I’ll share those that have become favorites. And, I’ll try to branch out as I go through these eleven crock pot cookbooks.

And I am branching out with my recipe choice from this cookbook: Duck!

Yes, duck. That other poultry. We’ve had it at restaurants a few times but I’ve only cooked it once or twice. So trying this recipe is a bit of a stretch for me. Good exercise!

The duck recipe is not the only recipe that I might eventually try out of this cookbook. I noted about six that look interesting. Years ago, I tried the recipe for Teriyaki Chicken and wrote notes on it. The recipes in this 1975 cookbook are a bit dated, perhaps, but I think they stand the test of time as “comfort foods”. One would not see their simple titles on a recipe in a fancy restaurant, but in my kitchen, after a cold winter day spent outdoors in the Colorado high country? Yes, they have their place. I am going to keep this cookbook. You can see from the photo (at the top of this entry) that it is well-worn.

The recipe I will try is “Duck Bayou”. I think that duck will hold up well in the slow cooker; it probably will retain some texture after a long cook. And it has a distinct flavor to bring to the dish.

Duck BayouDuck BayouRecipe Comments

The dish turned out to be a success. I probably will cook it again, and I think it’s interesting enough to share. I did run into some issues, though, both at the store and in the cooking.

First, duck can be hard to find. I was lucky to find three leg-thigh pieces at the counter at our local groovy store. They had frozen whole (and expensive) ducks in the freezer display, but I’m cooking for two, and that was too much; I didn’t want to cook an entire duck for two people. I wrote the following recipe for two people, and if you have more to serve, buy a whole duck and cut it into pieces yourself.

Second, the recipe said to cook for 8-10 hours on low. I checked my duck at 6 hours, and found that the liquid was almost evaporated and the duck was starting to char. I immediately removed the food from the cooker.

The problem with the cooking time might be that the original recipe was written for a tall, round slow cooker. Mine is large and oval-shaped. Also, I downsized the recipe but still used a large slow cooker. Two approaches fix the problem: less cooking time and more liquid.

I made a few other changes as I cooked this recipe: more herbs, chicken stock, extra wine added at last step, fresh mushrooms. My modifications are incorporated in the version below.

Duck Bayou

This recipe is written for 2-3 people, depending on appetites. Double the recipe (using a whole duck) and it will serve 4-6 people.

  • 3 pieces of duck (breasts or leg-thighs)
  • 1 teaspoon salt
  • 1/4 teaspoon pepper
  • 1/2 cup flour
  • oil or butter for frying the duck
  • 3/4 of a medium onion, chopped
  • 1 clove garlic, chopped fine
  • 1 cup red wine, divided
  • 1/2 – 1 cup chicken stock or water
  • 1/2 cup diced ham
  • 1 bay leaf
  • 1 tablespoon chopped fresh parsley, or 1 teaspoon dried parsley
  • 1/2 teaspoon tarragon (dried, more if you have fresh tarragon)
  • 1 cup sliced or chopped fresh mushrooms
  • 1 tablespoon cornstarch

Carefully trim the fat and any excess skin from the duck pieces. Duck skin tends to pack a lot of fat.

Combine the flour, salt, and pepper in a paper bag. Add pieces of duck and shake to coat.

Put a small amount of oil (I used olive oil) or butter in a frying pan. Add the duck pieces and brown well on all sides. Place in slow cooker.

In the same pan, saute the onion until it wilts, then add the garlic and saute 30 seconds. Add 3/4 cup wine, 1/2 cup stock (or water), ham, bay leaf, parsley, and tarragon. Bring to a boil. Pour over top of duck in slow cooker.

Cover and cook on the low setting for 6 hours. (If you double the recipe and have a tall, round slow-cooker, it can probably cook for 8 hours, but check it at 6 hours and add more stock if necessary.)

Remove the duck from the slow cooker. Add 1/4 cup red wine to the cooker. If there is only a small amount of sauce in the cooker, add some chicken stock until you have at least a cup of sauce. Add the mushrooms to the slow cooker and turn the heat to high. Cook about 10 minutes, until the mushrooms are done. Taste the sauce and add a bit more salt, pepper, tarragon, and/or parsley to taste.

Dissolve the cornstarch in a small amount of water, then add to the sauce. Cook on high until the sauce thickens.

(If you prefer, you can pour the sauce into a pan and cook the mushrooms and thicken the sauce on the stove top.)

Serve the duck with the sauce; rice is a good accompaniment. I served it over a white-brown-wild rice medley.

Here are the duck pieces browning. Actually, the main purpose of this photo is to show off my new, “green” non-stick pan:

browning the duck piecesHere is the cooked dish. The photo is here for proof that I actually cooked the recipe; it isn’t really very pretty. But it tasted good!

Duck Bayou (cooked)


Favorites: Italian-Style Turkey Cutlets

I found this recipe somewhere in a magazine or newspaper way back when: meaning, before I started writing down where and when I got a recipe. It has stood the test of time; I still make it today and I made it when the kids were here too. This recipe is for four people, although now I halve the recipe for just the two of us.

If you can’t find thin turkey breast cutlets, slice a whole breast horizontally. These are best when the crunch-to-juicy-turkey ratio is large.

Today, I generally chop a fresh tomato or two for this dish, since I halve the recipe and who wants half a can of tomatoes leftover. I also use fresh thyme and basil to taste. If you keep the amount of frying oil low and don’t add more mozzarella cheese, this is a great low calorie meal.

Italian-Style Turkey Cutlets

  • 4 turkey breast cutlets or fillets (about 1 1/4 pound for 4 people)
  • 1 egg white
  • 1 tablespoon Dijon-style mustard
  • 1 cup bread crumbs (you will have some leftover)
  • 1/4 cup chopped onions or shallots
  • 1 clove garlic, chopped fine
  • fresh or canned tomatoes (about 2 cups)
  • herbs to taste (thyme, basil, oregano, or an Italian mix)
  • 1/4 cup grated mozzarella cheese

Cook the onion in a saucepan until it wilts, then add garlic and cook 30 seconds. Add the tomatoes and fresh or dried herbs to taste. Salt and pepper to taste. Let this mixture simmer at least twenty minutes while you prepare the turkey cutlets.

Pound turkey cutlets to about 1/4″. If they spread out into huge pieces, cut them into smaller ones. Beat the egg white in one shallow bowl and put the bread crumbs in another shallow bowl. Shake some dry Italian seasoning mix and salt and pepper onto the bread crumbs and mix in.

Slather the Dijon mustard over the pounded turkey cutlets. Then dip them in the egg white, then roll in the bread crumbs.

Heat a non-stick pan until it feels nice and hot when you hold your hand an inch above it. Then drop in a little oil (olive oil is great) and spread it around. Add the breaded cutlets and cook 4-5 minutes on each side until golden. As they cook, heat the broiler in your oven.

Remove the cutlets from the pan and place them on a baking sheet or broiler pan. Divide the grated mozzarella cheese among them, then put them under the broiler and watch carefully until the cheese melts.

Plate the finished cutlets and spoon on some of the sauce. Cooked noodles are a great accompaniment, and a little fresh Parmesan doesn’t hurt!

Here’s a photo of the tomato sauce simmering and the cutlets frying. I use the pan in the back for the broiling step. This whole meal goes together in about 30 minutes. It’s a great meal for a workday. (Or a busy retirement day.)

turkey cutlets
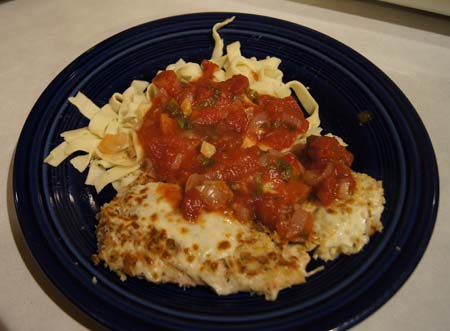
Here is the plated meal. I used my own homemade noodles, prepared in a big batch the week before and stored in the freezer. Making the agnolotti from the New Pasta Cookbook a few weeks ago really inspired me to get out my manual pasta maker more often and make my own noodles. Something good has come from my travel through my 250 cookbooks!

turkey cutlets

250 Cookbooks: Weight Watchers 365-Day Menu Cookbook

Cookbook #14: Weight Watchers 365-Day Menu Cookbook. Weight Watchers International, Inc., New American Library Books, 1981.

WW 365 Day Menu CB

This is one of the many diet cookbooks that I purchased over the years. Diets, a fitting topic to cover for a January post, eh? I’ve never taken part in a Weight Watchers program, but I believe that they encourage a good, balanced eating program. So, over the years I picked up a couple of their cookbooks, to get ideas for recipes.

About half of this particular cookbook is taken up by meal plans. As the title indicates, it plans your meals for 365 days – an entire year. I scanned through these menus and they left me uninspired. Then I scanned the rest of the book, which contains recipes for the dishes in the menus. Again, I was uninspired.

Some ingredients are just weird. Like, they call for you to boil skinned chicken necks and backs, to make a dish that is “filling and easy on the budget”. No no no, I’d never do that. Another recipe directs you to whip evaporated skim milk for 15 minutes to make a low-fat dessert. 15 minutes! Maybe that will help burn off calories. But no thank you, if I want a light, calorie-controlled dessert, I’ll buy one of the convenient frozen diet-type desserts that are available today. One recipe calls for “1/3 cup plus 2 teaspoons orange juice”. Now that simply doesn’t make sense. The same recipe calls for “18 ounces vanilla flavored dietary frozen dessert”. I don’t even know where to find that. A salad dressing recipe has a few seasonings added to “1 tablespoon plus 1 teaspoon olive oil and 1 tablespoon white wine vinegar” and serves 4 people for 42 calories a serving; again, exact measuring is called for and each person gets only 1/2 tablespoon of dressing on their salad. Another recipe calls for artificial sweetener and 1/2 teaspoon curacoa extract (what’s that?).

The recipes are a bit nutty on calorie content. For instance, in the recipe I chose (below), it states to use chicken breasts that are “about” 8 ounces each, and gives the calorie content as “193”. Why such a specific calorie value for an estimated ingredient? Today we are so fortunate to websites like Nutrient Facts, where I can quickly look up “chicken breast, meat only, cooked, roasted” to learn that 4 ounces of roasted chicken breast has 180 calories.

This is a cookbook that I will recycle. I found a recipe to try in this book, but only one. This cookbook might work for someone who has no imagination and likes to follow recipes obsessively and likes to think that they know exactly how many calories they are taking in. But that person is not me.

I visited the current Weight Watchers website, and I still think it is a good program. Currently they use some sort of point system to help people make good food choices, and they encourage people to eat fruits and vegetables and whole grains (although they don’t give a lot of details on the website, it’s more like a come-on). They offer encouragement to dieters through online or face-to-face support groups. (I looked at some of the recipes on the current web site, and was again uninspired. Just saying.)

The recipe I chose to try is “Ginger-Broiled Chicken”. I like this simple recipe because it uses freshly grated ginger in a garlic-soy sauce mixture that rubbed under the skin of chicken breasts. The chicken breasts rest at room temperature for an hour before broiling. (This is  unusual, most recipes today direct you to re-refrigerate chicken marinades as soon as possible.) I think the chicken will cook more evenly if it starts the oven broil at room temperature rather than cold. Finally, only after the chicken is cooked is the skin removed. Thus the chicken should stay moist during cooking, and you can remove the higher calorie skin before eating to reduce calories. This might be a good recipe for my repertoire of chicken recipes (currently, there are almost 50 pages of recipes in my personal chicken recipe document!).

Ginger-Broiled Chicken

Ginger-Broiled Chicken

  • 2 teaspoons soy sauce
  • 1 teaspoon fresh ginger, grated
  • 1 clove garlic, minced
  • 2 bone-in, skin-on chicken breasts, about 8 ounces each

Combine the soy sauce, ginger, and garlic and rub this mixture under the skin and all around each chicken breast. Let stand 1 hour at room temperature.

Set your oven’s broiler to a “low” setting and preheat a few minutes. Place the chicken skin side down on a rack in a pan, then put the pan in the oven about 5 inches from the broiler. Close the oven door.

Broil the chicken 10 minutes on the first side. Turn the chicken pieces, then broil another 8-10 minutes. If your chicken pieces are larger than 8 ounces each, it might take another 5 minutes to finish them. They are done when they are nicely browned and about 160˚ when checked with an instant-read thermometer.

Comments

These actually turned out great! The chicken breasts that I purchased were more like 14 ounces each, so I grated a bit more ginger and minced more garlic and soy sauce. The original recipe states only “broil chicken” with no oven settings or specifics such as how far to have the chicken from the broiler. My electric oven has two broiler settings, high and low, and I chose the low setting. I took a tape measure to measure the distance that I placed them from the broiler. It worked, so I incorporated these instructions in my version of the recipe (above).

Here is a photo:

Ginger-Broiled Chicken

It’s lovely and browned, right? I served them with the golden skin still on. The original recipe is dour and directs you to take the skin off. Why not let the diners at least enjoy the look of the browned chicken? I took the skin off before eating it, but I say, let each diner make their own decision. This chicken was moist, tender, wonderfully flavored with ginger and garlic and lightly salted from the soy sauce. I’d make Ginger-Broiled Chicken again!