250 Cookbooks: New Crockery Cooker Cook Book

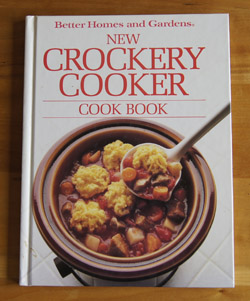
Cookbook #63: The New Crockery Cooker Cook Book. Better Homes and Gardens, Meredith Corporation, Des Moines, Iowa, 1987.

New Crockery Cooker CookbookThis is my third crock pot cookbook entry; I have eleven in all. Please see my first crock-pot entry for a brief history of crock-pots.

I used this cookbook a lot. I found a bunch of clippings in the back, and scraps of paper and notes in/on several pages. The cover is dirty with food spots (but cleanable!). I got my inspiration for my Botched-up Cassoulet recipe from this cookbook. Even today, I am noting about ten main dish or stew recipes I’d like to try (or cook again). Soups are included in this cookbook and look fine, but I usually just toss together soups sans recipe. The New Crockery Cooker Cookbook has a chapter on breads to accompany the main dishes; I am marking down a few to try.

So I do still like this cookbook. By the 80s, the preponderance of pre-packaged mixes in recipes in everyday cookbooks diminished. I’m talking about mixes like spice seasoning packages and biscuit-type products, that sort of thing. I like the way this book employs tapioca in the recipes as a thickener. I appreciate the authors’ admission that crock pots cook chicken to a pulpy mass; they suggest freezing chicken pieces before adding to the pot so that it cooks to perfection. The New Crockery Cooker Cookbook is sensible and useful (IMHO).

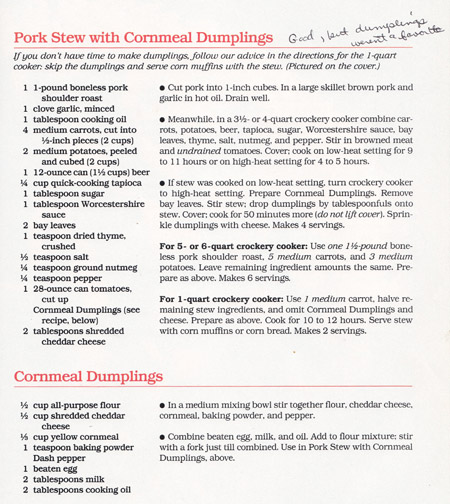
For this blog, I choose to cook Pork Stew with Cornmeal Dumplings. Except, I will not make the dumplings because I wrote a note to myself that my family did not like them. The cover of this cookbook (above) shows a photo of this stew (with dumplings). Here is a scan of the recipe:

Pork Stew with Dumplings recipeI know from experience that potatoes and carrots will turn to mush after “9-11 hours on low or 4 to 5 hours on high”. Maybe this is just a problem of my own current crock pot, but I will change this recipe by adding the potatoes and carrots in the last hour of the cooking time.

Instead of the dumplings, I will serve the stew with Parmesan-topped french bread. Corn muffins would be great too, or better yet, my corn sticks (that I should add to this cooking blog!).
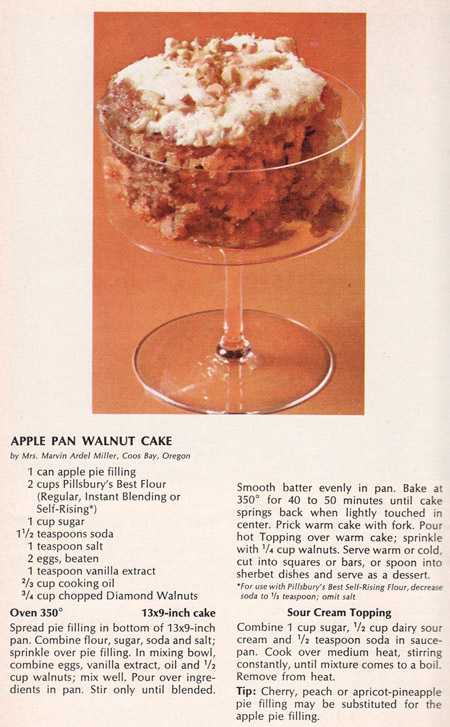
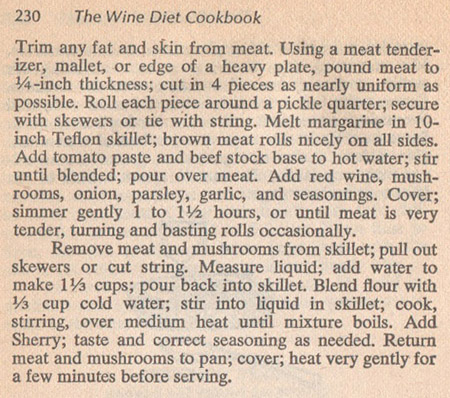
Pork Stew
serves 2-4, depending on appetites

  • 1 pound boneless pork, cut into 1-inch chunks
  • 1 14-ounce can diced tomatoes
  • 1 12-ounce can beer
  • 1 clove garlic, chopped fine
  • 1 tablespoon sugar (optional, not sure I’d use again)
  • 1 tablespoon Worcestershire sauce
  • 2 bay leaves
  • 1 teaspoon dried thyme
  • 1/4 teaspoon ground nutmeg
  • 1/2 teaspoon salt (or to taste)
  • 1/4 teaspoon pepper (or to taste)
  • 3 tablespoons quick cooking tapioca
  • 1/2 – 1 cup water (may or may not need)
  • 2 carrots, cut into about half-inch chunks
  • 2 potatoes, peeled and cubed (if you use red potatoes, you could leave the skins on)

Brown the meat in a little oil in a frying pan; add to crock pot. Then, rinse the good browned drippings in the pan into the crock pot, using maybe the tomatoes, the beer, or a little water.

Add the tomatoes, beer, Worcestershire sauce, sugar (if using), bay leaves, thyme, nutmeg, tapioca, and salt and pepper to the pot. Stir it all up, cover, and set the crock pot your choice of low or high temperature.

After 6 hours on low or 3 hours on high, add the potatoes and carrots. Cook until the potatoes and carrots are done: probably another two hours on the low setting or one hour on the high setting.

Note: If you really know your crock pot, use your own knowledge to adjust the cooking time. Mine cooks pretty hot. I checked it several times during the cooking and added more water. Unfortunately, especially with the step of adding the potatoes and carrots near the end, this recipe cannot be left unattended for the entire day.

Comments

This stew is good. I messed up and added only a 14-ounce can of tomatoes instead of the suggested 28-ounce can! (Maybe that’s why I had to add more liquid during cooking.) But it still turned out fine. I might try using more tomatoes next time. I found the taste a little too “sweet”, it almost was like a sweet-and-sour pork dish (I felt like I should have added pineapple). My dining partner liked it “as is”, though.

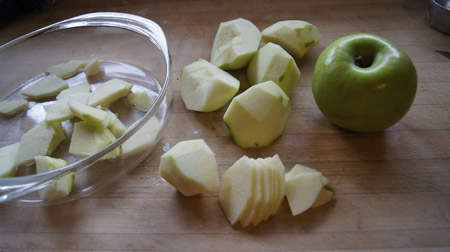
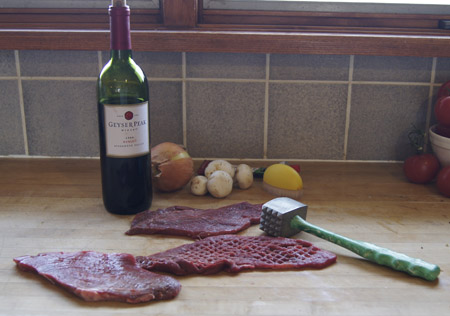
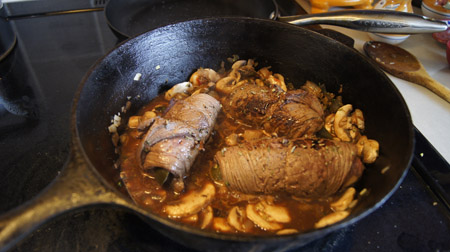
Here are the pork cubes, browning. I decided to rinse the brownings into the stew pot, as noted in my directions (above).

browning the pork cubes
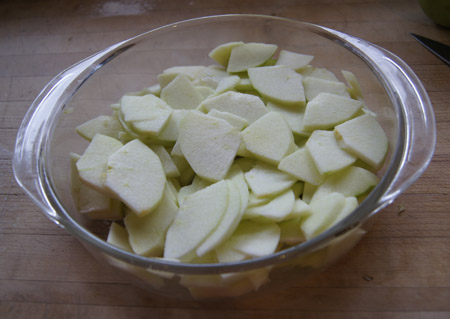
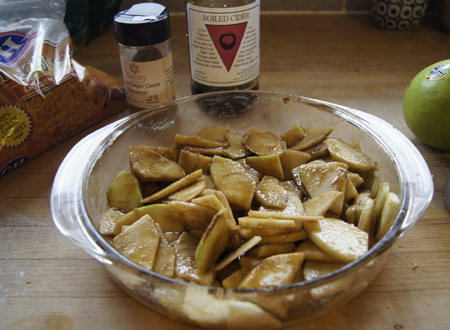
My ingredients up to the potatoes and carrots are below. Note that I used fresh thyme and I ground my own nutmeg; next time I’ll just used dried thyme because it just wasn’t worth the bother. There is a new box of tapioca because I had searched my cabinets for minute-tapioca and found two old boxes with expiration dates of 2002 and 2008, respectively. (Guess it’s been awhile since I needed tapioca!) And the Dale’s Pale Ale: I’m in Lyons, and that’s our local brewery!

Pork Stew ingredientsDuring the cooking time, I had to stir and add water several times. It stuck to the bottom sides of my crock pot. I suggest using 3 tablespoons tapioca (as in my ingredient list) instead of the 1/4 cup, because it got pretty thick. I may not have had this issue if I had used the called-for amount of tomatoes. But also, as I stated before, I know my crock pot, and I know it cooks hot. It’s really too big of a crock pot for two people.

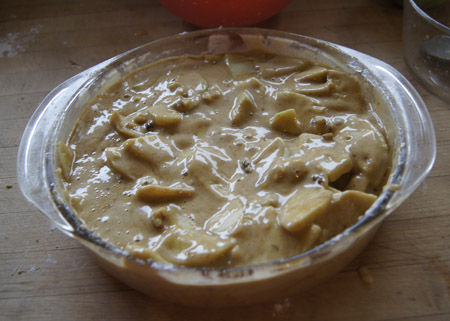
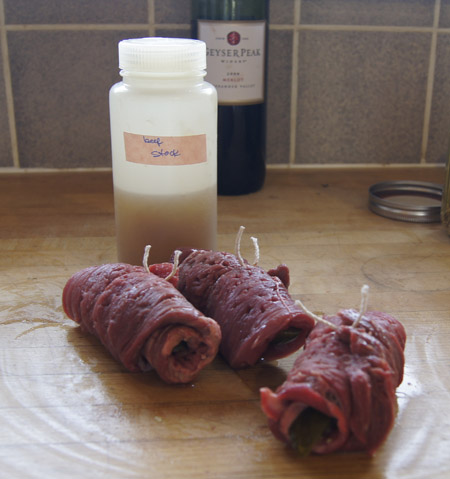
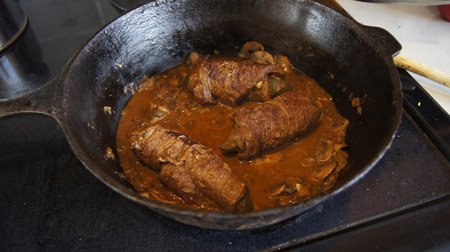
Here it is, nearly finished, with the potatoes and carrots added.

Pork Stew
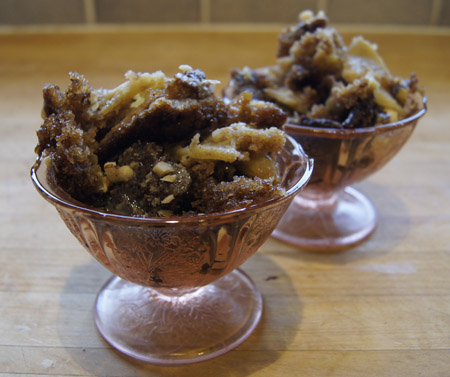
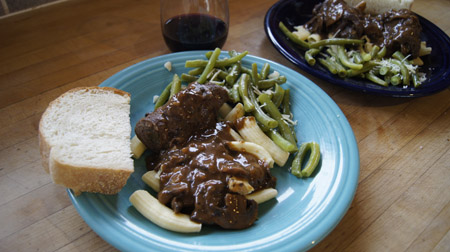
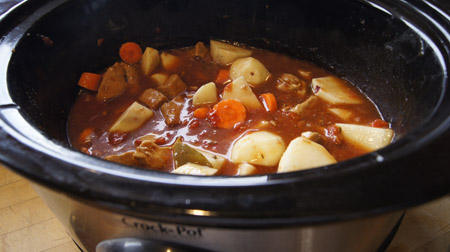
It was good, I’d give it 3 stars out of 5. I’ll probably make it again. It is a good change of pace from my usual southwestern-style spicy pork stews.

250 Cookbooks: A Homemade Life

Cookbook #62: A Homemade Life. Molly Wizenberg, Simon & Schuster, NY, 2009.

A Homemade LifeA Homemade Life emerged from Molly’s blog, Orangette. I discovered Orangette from necessity. I had this container of the cutest little artichokes that I had bought on a whim from Whole Foods. I had no idea how to cook them. So like many modern-day cooks (this was 2008), I googled “baby artichokes” and came to Molly’s blog.

I love the way she writes. Always a story begins a chapter or a blog entry. Eventually she gets to the recipe, but by then the how-to-cook-it is almost an afterthought. Don’t let that statement fool you, since I’ve never been disappointed with any of her recipes. I made the Braised Baby Artichokes with Garlic, Thyme, and Parmesan and they were wonderful. I have made them many times since (see this entry from my other blog). Sometimes I make them with a slight variation, but that’s what her recipes are all about: you can make it exactly like the recipe, or not. “Whichever way you like.” (Page 205 of A Homemade Life.)

I purchased A Homemade Life because I just couldn’t get enough of Molly’s writing. This book resides in my “reading” room, not on my cookbook shelf. Her writing reminds me of some of the articles I have enjoyed in Bon Appetit and sure enough, she is one of their contributors.

One more thing: her photos in the blog are wonderful. Molly used solely a film camera until just this last year, and she has such an fine eye for photography. (Photos, food, writing – hmm, sounds like my interests. But I’m more scientific and techie than creative. I just dabble in a bit of all of my interests.)

I was following Orangette daily until about a year ago, when Google Reader was discontinued. I took a break from RSS feeds for awhile. But then, The Old Reader came to my attention, and I came back to Orangette and my other favorite feeds. I was hooked again. Reading her latest entries, I just had to pull A Homemade Life from the shelf and read it again. And try a recipe. I chose: “French-Style Yogurt Cake with Lemon”.

Out of respect to Molly Wizenberg’s copyright: I am not copying or scanning this recipe into my blog. Here is her entry for French-Style Yogurt Cake in her blog. The recipe in the book is pretty much like that blog entry. Except she also suggests “replacing the vegetable oil with a fruity, round-flavored olive oil; it brings a subtly richer flavor and wonderful fragrance.”

I made this cake using meyer lemons, one of her variations. I also substituted 1/2 cup of ground almonds for 1/2 cup of the flour, and I used a mixture of canola and extra virgin olive oil for the 1/2 cup of oil. Here is my cake:

French-Style Yogurt Cake with LemonI was hesitant to serve this for Saturday night dessert. I usually serve a fruit crisp or a cobbler, or ice cream and strawberries, or something chocolate. A plain lemon cake? Am I going to get boos?

We finish dinner and our wine. Time for dessert. I cut a small wedge for each of us. “Here you go.”

My first bite. I let out a huge sigh. Heavenly. Subtle. Absolutely wonderful.

I cautiously look over to my husband. Yay! He is also reveling in the taste! Yes, this cake is that good. Fancy-bakery quality good.

Molly’s book and blog remind me: Cooking is an experience, an exploration. I will add in “experiment” (ever the chemist). What a wonderful difference in attitude from my last entry, The Busy Lady Cookbook.

I’ll end with a quote from Molly: “That’s the beauty of a repertoire: that in drawing from a whole world of recipes, you wind up making your own.”

p.s.

My lemon cake fell a bit in the center. That’s because I live at 5300 feet and had made no adjustments to the recipe. (This post prompts me to add a reference to high altitude baking recipe adjustments.) I made this again a few weeks later and made the following very successful adjustments to get a slightly domed cake:

  • 1 3/4 teaspoon baking powder (instead of 2 teaspoons)
  • 1 cup less 1 tablespoon sugar (instead of 1 cup)
  • baked at 365˚ for 35 minutes (instead of 350˚)

p.p.s.

Here is another lemon cake, the one that I grew up with.

Favorites: Lemon Cake

My mother and aunt made this recipe for years and years. My sister and I still love this cake. My blog entry on Molly Wizenberg’s recipe for French-Style Yogurt Cake with Lemon reminded me of this old favorite.

Today, I do appreciate the subtle tastes and textures in the French-Style Yogurt Cake with Lemon. A tiny slice of that cake makes me very happy. But there is still a place in my repertoire for this sixties lemon cake made from a cake mix and lemon jello. It remains an old favorite.

I grew up in a house on a half-acre in Southern California. We had a lemon tree in the yard, and my mother would go out back and pick lemons from that tree to make this cake. I remember making lemonade too from those lemons . . . dipping graham crackers into the sweet-sour juice just until they almost gave way, savoring the soaked crackers and then downing the lemonade on a hot and sultry summer day of childhood.

Lemon Cake

  • 1 box yellow cake mix
  • 3/4 cup vegetable oil
  • 1 pkg. lemon jello
  • 3/4 cup water
  • 4 eggs

Mix together and beat for 4 minutes. Pour batter into a lightly greased 8 1/2 x 11 1/2-inch pan.

Bake at 350˚ for 45 minutes.

While the cake bakes, mix 2 cups powdered sugar with the juice and rind of two large lemons.

Remove the cake from oven and make fork holes in the top. Pour the sugar-lemon juice mixture over the cake.

We always served this cake directly from the pan. It’s a great traveling cake, and always a hit.


Reference: High Altitude Baking Adjustments

Aside

We live in Colorado at about 5300 feet altitude. Below are the guidelines I have gathered over the years to help me convert a recipe for sea-level so that a cake will not fall when baked in my oven. I don’t always use all of these methods in a recipe; I try a few of them and make notes for the next time I make it.

  • increase baking temperature by 25˚
  • use 1/8-1/4 teaspoon less leavening – baking powder or baking soda – for each teaspoon called for in the recipe
  • fill pans no more than 1/2 full
  • use 2 tablespoons less sugar per cup
  • increase liquid by 2-4 tablespoons per cup
  • do not overbeat the eggs
  • decrease shortening in very rich cakes (Baker’s Chocolate and Coconut Favorites)
  • increase the eggs in angel food or sponge cakes (Baker’s Chocolate and Coconut Favorites)

250 Cookbooks: Pillsbury Busy Lady Bake-Off Recipes, 17th annual

Cookbook #61: Pillsbury Busy Lady Bake-Off Recipes, 17th annual. The Pillsbury Company, 1966.

Busy Lady Bake-Off CookbookThis is another of my mother’s Bake-Off Cookbooks. So far I’ve done three Bake-off years: 1964 (Cookbook #4) and 1959 (Cookbook #10) and 1963 (Cookbook #27). I refer you to the 1964 blog post for a more thorough discussion of these booklets and an explanation of Mother’s rating system for recipes.

Looks like my mother barely used this Bake-Off Cookbook. She marked two recipes, “Macaroon Cookie Cake” and ”Nutty Fudge-Wiches” as “Good“, but that’s it. None of the recipes look familiar to me.

“Busy Lady” is the theme throughout the book. Look at this:

Busy LadyThe busy lady of 1966 took care of the baby, golfed, served a cake, and shopped. Always in a dress!

Shortcuts abound for the busy lady. Dessert recipes in this cookbook employ self-rising flour, cake mixes, packaged frosting, pudding mixes, canned pie filling, and even ice cream to shorten time spent in the kitchen. Main dishes include canned corned beef, canned chicken, frozen french fries, gravy mix, canned vegetables, and canned and dried soups. This is not a “from scratch” cookbook.

I am a “from scratch” cook, and I had trouble finding a recipe I liked enough to try in The Pillsbury Busy Lady Bake-Off Recipes cookbook. I will keep this cookbook only for the sake of nostalgia!

For this blog, I decided to try “Apple Pan Walnut Cake”. It is semi-nutritious, with apples and walnuts, and the sugar and fat content is not terrible.

Apple Pan Walnut Cake Recipe I will make my own apple pie filling from scratch (I want this to be good, not fast!), and I will cut the recipe in half.

Apple Pan Walnut Cake
serves about 6-8

For the apples:

  • 2 large apples, such as Granny Smiths or any tart cooking apple, peeled, cored, and sliced into fairly thin slices
  • 1/2 cup brown sugar
  • 1 teaspoon cinnamon
  • 3 tablespoons boiled cider, or apple juice (optional)
  • 1 teaspoon vanilla
  • 2 tablespoons flour

For the batter:

  • 1 cup flour
  • 1/2 cup white sugar
  • 3/4 teaspoon baking soda
  • 1/2 teaspoon salt
  • 1 egg
  • 1 teaspoon vanilla
  • 1/3 cup vegetable oil
  • 1/2 cup (generous) chopped walnuts

For the topping:

  • 1/2 cup white sugar
  • 1/4 cup sour cream
  • 1/4 teaspoon baking soda

Slice the apples into an 8- or 9-inch round pan or a 8×8-inch square pan. Add the brown sugar and mix it into the apples with your fingers; let the mixture set a few minutes. Add the cinnamon, boiled cider (if you are using it), and the two tablespoons flour and mix.

Combine the 1 cup flour, white sugar, baking soda, and salt. Sprinkle this mixture over the apples.

Whisk together the eggs, vanilla, oil, and most of the walnuts (save a few for the top of the cake). Pour the mixture in the pan. Take a big spoon or spatula and gently mix it all up, only until just blended, like when you are making muffins.

Meanwhile, combine the topping ingredients (sugar, sour cream, baking soda) in a saucepan and stir and heat just until it boils.

Bake at 350˚ for about 35-40 minutes, until the cake springs back when you touch it in the center. Make fork holes in the cake and pour the topping over it. Sprinkle the reserved walnuts on top.

Comments

Success! This is a good, homey dessert. I will add it to my repertoire of apple-nut semi-healthy desserts.

I used granny smiths and after I peeled them, I cut them into quarters and cored them. Then I sliced them thinly crosswise (not lengthwise) across each quarter, so that each apple piece is small. I thought this would better resemble “canned apple pie filling”.

Apple Pan Walnut CakeI didn’t use the entire two apples, because I felt the pan was full enough when I got to this point:

Apple Pan Walnut CakeTurns out I was right, because when I baked the cake, it almost overran the pan. Next, I added the brown sugar and rubbed it into the apples. This macerates the apples, drawing out some of the juice and softening them.

Apple Pan Walnut CakeI looked at the apples in the pan and thought: boiled cider! They begged me to pour a couple tablespoons over them. Cinnamon too. I stirred in a couple tablespoons flour before I added the dry flour mixture and the wet batter mixture. This is pretty much how I’d prepare apple pie filling if I were making it from scratch. Why pull a can from the shelf, containing preservatives and sugar and who knows exactly what, when I can make it using fresh apples?

Below is after the wet and dry ingredients were added and mixed with the apples. This is why it’s called a “pan” cake: the mixing is done in the pan and not in a mixing bowl. That busy lady needs to go out and play golf, no time to mix up a batter in a bowl.

Apple Pan Walnut Cake

Here is my baked cake, after the topping was added. Not terribly pretty. As I said, it almost overran the pan. Next time I would use fewer apples or an 8-inch square pan with a touch more capacity.

Apple Pan Walnut CakeIn spite of its looks in the pan, Apple Pan Walnut Cake looked pretty darn good in the  depression roseware that I inherited from Nana, my father’s mother.

Apple Pan Walnut CakeI learned from my previous cookbook that this roseware was given away – not sold – during the depression. They put it in boxes of oatmeal as a sales tactic. Movie theaters had “Dish nights, collect a complete set of fine dinnerware completely free. Anything that was free in the 1930s received a warm welcome.”

This dessert was certainly a warm welcome. Nutty and apple-y and almost like a pudding. Yum.

250 Cookbooks: The Wine Diet Cookbook

Cookbook #60: The Wine Diet Cookbook. Dr. Salvatore P. Lucia and Emily Chase, M.S., The Piper Company, NY, NY (Abelard-Schuman also listed), 1974, Bantam Edition, 1976.

The Wine Diet CookbookI bought this book back in the 70s. I love wine and I have to watch calories, so I thought: a wine diet, perfect! Sort of tongue in cheek though, since I know from experience that wine sometimes ruins my personal dieting strategy.

I believe in keeping small amounts of your choice foods in a diet, especially if your diet is long term. Too much denial will derail any healthy eating plan. So for me, wine and chocolate are included – but in moderation. And wine (like chocolate) is good for you. According to the authors of this book: “Wine is a food; a source of energy for work and body maintenance.”

A brief outline of the wine diet is on page 10:

“The Magic Number: 1200. The total daily calorie budget for these menus is approximately 1200, including a 4-ounce glass of table wine with dinner each night. . . . We have selected a 1200-calorie program because at this calorie level it is possible to include the basic elements needed for good nutrition and still give the slimmer a chance to average as much as a two-pound loss per week.”

I agree with the 1200 calories per day for dieting, and that was my goal when I used to (obsessively) count calories. But my 1200 total was without wine, and I was never able to give up a treat of fruit in the afternoon for a glass of wine at dinner.

The authors state that “a glass of table wine brings relaxation and satisfaction that adds greatly to the slimmer’s enjoyment of the meal”. “Wine is a stimulating and a most salutary nutritional element.” “Very little will power will be needed to diminish the volume of a meal.” That may work for some people, but not always for me. Instead, one glass can tempt me to have another glass, and too much wine decreases my will power to stop eating.

This book might work for someone besides me. The diet plan is sensible, including a good balance of carbohydrates, protein, and fruits and vegetables. Diet margarine and low-fat milk products are employed to shave calories, and all recipes are explicit in portion amounts and calories. Daily menu plans are outlined. Wine is used in many of the recipes, adding flavor without adding calories.

Not many of the recipes in this book beg me to be tried. I appreciate the reminder to use more wine in cooking to boost flavor, but today I find no other benefits in this 50 year old cookbook. I will recycle the The Wine Diet Cookbook.

Before recycling: for this blog, I will cook “Dilly Beef Rolls”.

Dilly Beef Rolls RecipeDilly Beef Rolls RecipeKind of a cute idea, rolling round steak around a dill pickle. I will use the dill pickles I made last summer. I will skip the “2 tablespoons diet margarine” and use a few drops of olive oil instead. For the “1 teaspoons beef stock base” and “1/2 cup hot water”, I will substitute my own beef stock. I buy tomato paste in a tube, so that’s easy. I see no need for instant-blending flour; it’s almost as easy to use regular flour mixed with a little water. California Red Table Wine? No, I won’t leave that out! Not sure the bottle in the refrigerator is Californian, but it’s red. And I have sherry too. Okay, this should be fun. I get to get out my ancient meat mallet too, that’s always fun.

Let’s see if this recipe can turn a usually tough and bland round steak into a flavorful, low-fat meal. My version of the recipe follows.

Dilly Beef Rolls
serves 2-3

  • 9-12 ounces round steak – buy the “thin cut” if possible
  • 1 large whole dill pickle, quartered lengthwise
  • 1/2 of a medium onion, chopped
  • 1 clove garlic, chopped
  • 1/4 pound sliced mushrooms
  • 1/2-3/4 cup beef stock
  • scant 1/2 cup red wine
  • 1 tablespoon tomato paste
  • thyme, about 1/2 teaspoon (I used fresh thyme)
  • marjoram, about 1/2 teaspoon (I used dried)
  • salt and pepper to taste
  • 1 tablespoon flour
  • 1 tablespoon dry sherry
  • fresh chopped parsley to taste

Cut the round steak into 2 or 3 equal pieces, then pound with a mallet to 1/4-inch thickness. Roll each piece around a pickle quarter, and tie the center with string.

Heat a (coverable) cooking pot until it feels hot when you hold your hand an inch above it. Add a small amount of olive oil and tilt the pan to spread the oil. Lower the heat to medium, then add the round steak rolls and brown them on all sides. Remove them from the pan and set them aside on a plate.

Add a few more drops of oil to the pan. Add the onions and sweat them with a little salt, cooking until they are soft. Add the garlic and mushrooms; cook and stir until the mushrooms are wet and soft. Add the broth, wine, tomato paste, thyme, and marjoram; stir. Add the beef rolls and any of the pan juices that have collected on the plate.

Cover the pot and lower the heat to maintain a very gentle simmer. Cook for at least an hour and a half, until the meat is nice and tender.

Remove the beef rolls and cut the strings off. Set them aside while you finish the sauce.

To the sauce in the pot, add the 1 tablespoon flour mixed into a little broth (or water) to a smooth paste. Stir until mixed in well; add more broth (or water) if the sauce looks too thick. Add the sherry and chopped parsley. Heat the sauce to a simmer, then add the beef rolls back in and heat it all up. At this point, you can let your dinner “hold” until you are ready to serve.

Serve these dilly beef rolls with any starch, such as mashed potatoes, rice, or pasta.

Comments

I was lucky to find very thin round steak. In the photo below, I have already pounded one of the slices with my ancient mallet.

Dilly Beef RollsThe focus in the photo below is on my dill pickles. Yes, I canned them myself last summer! They are gorgeous, aren’t they?

Dilly Beef RollsI found that these rolls hold together fine with just one piece of string in the middle. Beef rolls formed around a crumbly stuffing are a lot harder to manage. Note my container of homemade beef stock. (I should talk about how I make and store it sometime.)Dilly Beef RollsI browned the beef rolls in my heavy cast iron pot. Lately I’ve been using my LeCreusets a lot, but this old pot with its heavy lid works really well for stove-top braising. Below is the mixture of beef and vegetables and seasonings before the long simmer.

Dilly Beef RollsThe mixture after cooking looks just a little different, but the meat has changed in character from tough to soft. It smells really good, too.

Dilly Beef RollsPlated:

Dilly Beef RollsNote the glass of wine! On a weeknight! Just had to go with the advice of The Wine Diet Cookbook. It’s a small glass, a measured 4 ounces, not very much.

These beef rolls taste really good. I’ll make them again! The dill pickle inside gave them the flavor of a sauerbrauten. The gravy, while low in fat, was very flavorful! And I even forgot the parsley. I did put a little chopped fresh oregano on the green beans, though.

Note the pasta – it is homemade. Last week I got out my old pasta machine and made a big batch of these large macaroni noodles (and froze them in portions). That pasta machine will surely be the focus of a future blog post. The bread is homemade too, a result of my recent acquisition of a new sourdough starter. All is yummy.