Cream Puff Shells

Cream puffs are little pillowy clouds of pastry that can be filled with wonderful things. Like strawberries and whipped cream! Way back when, I found a recipe for Strawberry Cream Puffs and liked the recipe so much that I hand-wrote it on a recipe card.

I got it in my mind to make cream puff shells this week – for Valentine’s Day dessert. Pretty red strawberries, very lightly sweetened, mixed with cool whip, inside puffy shells, perhaps with a little thin chocolate syrup drizzled on top . . . a dessert worthy of Valentine’s Day but, actually, light in carbohydrates. Why? Because cream puff shells are made from flour, butter, and eggs. There is only 1/2 cup of flour divided amongst 8 cream puffs, so about 50 flour calories per serving. Yes, there is a lot of butter, but . . . actually, only 1/2 tablespoon per serving, or another 50 calories. I can live with these values on the semi-low-carb diet that we are striving to pursue.

So, cream puffs. Where is my recipe? I search first in my recipe box. The recipe card is not there. I must have left it somewhere else, perhaps tucked in a cook book. I can’t find it in any books, though. Maybe I transferred the recipe to a document? I searched my “desserts” document – it is not entered there. I had almost given up, when I decided to do a wider search. Luckily I found my notes on and a recipe for cream puffs in my “appetizers” document. Below is what I wrote to myself a few years ago.


“The recipe in the Joy of Cooking (p. 597) was probably my old standby, and/or the Strawberry Cream Puffs recipe on the recipe card, until I tried the recipe below in 2010. The Joy of Cooking recipe is 1 C flour, 1 C water, 1/3 C butter plus 4-5 eggs.

“In 2010, I went to cooksillustrated.com and found their recipe, a recipe that exactly measures the eggs, and gives a temperature for the water/flour/butter mixture, and uses the Cuisinart. I tried it and liked how the cream puffs turned out. This recipe eliminates the long hand-beating of the eggs into the water/flour/butter mixture. What a relief to toss the hand-beating task! It also uses the half sheet pans and parchment that I just found out about in a recent CSR class [this dates to mid-2000s]. Although, be aware that this method makes a mess of the food processor bowl, so plan to put it in the dishwasher. I made one and a half sheet pans of the puffs, dropping by teaspoonfuls, rather than piping with a pastry bag. Never have got one of those! [Have one now!]”


Below is my new version of the Cooks Illustrated recipe. It is almost the same as the published one, but I eliminated the step that dries the cooked cream puffs in the oven. The puffs do not seem not wet inside so I skip that step.

Note: Cream puff pastry (actually, cream puff paste) is the same as Pate a Choux. (See From Julia Child’s Kitchen, pages 548-550.)

Cream Puffs, adapted from this recipe: cooksillustrated.com

  • 2 eggs
  • 1 egg white
  • 5 tablespoons butter, cut into chunks
  • 1 ounce whole milk (2 tablespoons)
  • 3 ounces water (6 tablespoons)
  • 1 1/2 teaspoon granulated sugar
  • 1/4 teaspoon salt (use less if using salted butter)
  • 1/2 cup flour

Heat the oven to 425˚. You need it hot when you are ready to put the pan of puffs in the oven. Also prepare a half sheet pan by placing a piece of parchment paper on it.

Mix together the 2 eggs and the egg white in measuring cup. If it measures more than 1/2 cup, discard the excess. Set aside.

Bring butter, milk, water, sugar, and salt to boil in saucepan over medium heat. Keep an eye on it, stirring occasionally until it reaches full boil (the butter should be fully melted). Immediately remove the pan from heat and stir in flour with a wooden spoon until combined and mixture clears sides of pan. This takes a little hard work, but only about a minute. Return the pan to low heat and cook, stirring constantly, using a smearing motion, for 3 minutes, until the mixture is “slightly shiny with wet-sand appearance and tiny beads of fat appear on bottom of saucepan”. If you have one, use an instant-read thermometer to check the temperature of this dough – it should get to 175 to 180˚.

Immediately transfer the hot dough mixture to a food processor. Process for 10 seconds to cool slightly. With machine still running, gradually add the eggs in steady stream (takes less than a minute). When all eggs have been added, stop the machine and scrape down sides of bowl. Then, process for about 30 seconds until a smooth, thick, sticky paste forms.

These are ready to bake immediately. Drop the dough onto the parchment-lined baking sheet. For large puffs, I make 8; you can also make a dozen or so smaller puffs. You can used this same dough to make elongated puffs for eclairs.

The best way to form cream puffs is by using a pastry bag. I do own one of these now, but haven’t yet used it for puffs. Sounds like a lot of mess to clean the pastry bag after use! But I am sure the puffs or eclairs would be a lot prettier than my free-form ones.

Bake 15 minutes in the 425˚ oven (do not open oven door during this cooking time). After these 15 minutes, reduce the oven temperature to 375˚. Continue to bake for another 8-10 minutes, until golden brown and firm (puffs should not be soft and squishy – you can open the oven at this time to check). Carefully transfer the puff to a wire rack to cool.

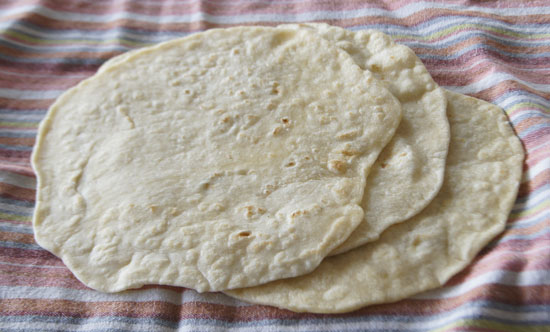
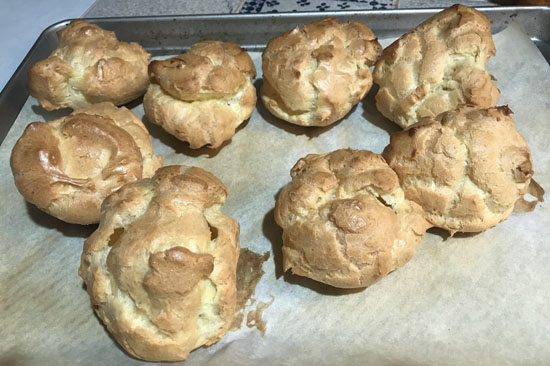
The original recipe says to cut a slit in the side of each puff, turn off the oven, prop open the oven door, and leave them for about 45 minutes, until crisp. Julia Child’s recipe also includes this step. I sure it is worth trying, but I am happy with my un-crisped cream puffs. The big free-form, un-dried puffs that I make for stuffing with strawberries and whipped cream are in the photo at top of this page. I find them perfectly acceptable!

You may have leftover puffs. From the original recipe: “Cooled puffs can be stored at room temperature for up to 24 hours or frozen in zipper-lock plastic bag for up to 1 month. Before serving, crisp room temperature puffs in 300-degree oven 5 to 8 minutes, or 8 to 10 minutes for frozen puffs.”

Tortillas

Homemade flour tortillas! Don’t they look delightful? And the tortillas in the above are my first try. My first try! I came across several recipes on the web and decided on a King Arthur Flour recipe. I’ve been using King Arthur flour and their web site for years. Turns out I was correct in choosing a recipe from this dependable site, as you can see from my photo!

The above tortillas are made with all-purpose flour and lard. After several trials with different fats and flours, I decide the recipe just below is my favorite go-to method. Below that, I go into the trials I did with different ingredients.

Flour tortillas – my “go-to” recipe

  • 2 1/2 cups all-purpose flour
  • 1 teaspoon salt
  • 1/4 cup olive oil
  • 7/8 to 1 cup water, heated for 1 minute on high in the microwave

In a bowl, mix the flour with the salt. Add about a half-cup of the warmed water and all of the olive oil. Mix together with a spoon. Add more water only as necessary for the dough to hold together. I usually end up mixing the dough with my hands. You want the dough to be smooth and not-sticky.

Turn the dough onto a lightly floured breadboard and knead a few times, until the dough forms a ball. Divide the dough into 8 equal sized pieces (by weight, if possible), form each portion into a ball, and let sit, covered with a cloth or bowl, for 2-3 hours at room temperature.

Place a heavy, flat pan or skillet on the stove top. If possible, use a cast iron griddle. Use a paper towel to wipe a bit of oil on the pan. Turn the heat to about medium and let it slowly heat for several minutes. The pan is ready when you feel good heat when your hand is about 3/4 inch above the pan. You do not want it smoking hot. I use a remote temperature sensor and try to get (and keep) the pan at about 400˚.

While you are waiting for the pan to heat, start rolling the balls of dough into 8-inch circles on a lightly floured board. I say “lightly floured” because if you use too much flour, the flour will stick to the tortillas through the cooking process. Start cooking (next paragraph) as soon as the pan is ready; I usually roll and cook a single tortilla, rolling the next one as the previous one cooks.

Put a tortilla on the pan and let it sit for about 20-30 seconds on the first side. It is ready to flip when light brown spots appear on the underside (peek!). Flip, and cook the other side of the tortilla the same way.


Trials

For the ingredients, you can choose from several fats: lard (traditional), butter, shortening, or vegetable oil. I chose lard for my first try. It came from lard in a jar that I bought at Whole Foods over a year ago. The original recipe calls for 1 teaspoons baking powder, but I left it out for Try 1.

Try 1: Simple Tortillas (with lard and all-purpose flour)
Begin these tortillas several hours before you plan to cook them.

  • 2 1/2 cups all purpose flour
  • 1/2 teaspoon salt
  • 1/4 cup lard
  • 3/4-1 cup water

Mix the flour with the salt in a bowl. Divide the lard into chunks, then add it to the flour-salt mixture. With your fingers, carefully work the lard into the dough, until the lard is in small bits, each coated with flour. You could use a pastry blender or a food processor to do this, but I liked doing it “by hand”. From King Arthur flour: “Coating most of the flour with fat inhibits gluten formation, making the tortillas easier to roll out.”

Microwave 1 cup of water for one minute. Pour about 3/4 of it into the dough and immediately mix it in with a spoon or fork. Add more water only as necessary for the dough to hold together. Put the dough on a breadboard and knead a few times, until the dough forms a ball.

Divide the dough into 8 equal-sized pieces: I used a scale. Set them out at room temperature, well-covered, for about 2 hours.

Cook the tortillas about 30 seconds per side.

Results for Try 1: The tortillas looked great, but either they didn’t have enough salt or the lard was too strong a taste. Although, in burritos, the taste was hardly noticeable.


Notes: I think the “trick” in this recipe is having the dough rest for a couple hours before rolling. While browsing the web, I found other flour tortilla recipes that called for a rest before rolling, from 15 minutes to 2 hours. I chose the 2 hours, as per my own experiences with breadmaking, especially no-knead doughs. Flour does something magical when mixed with water and allowed to sit.

Another trick is rubbing the flour with a solid fat before adding the water. This makes the gluten in the flour separated by bits of fat, and it rolls out easier. How will oil work? That will come in another try.

I left the baking powder in the KA Flour recipe out. Why? The first time I simply forgot it. Later, I read this on the Mexican Please website: “And regarding the baking powder … sometimes I use it and sometimes I don’t. It will make them a little bit thicker and fluffier. That works great if you want the tortillas to double as flatbread or pita. If you want a thinner, traditional tortilla then you can omit the baking powder.” I do like my tortillas “traditional”, but I will try baking powder in one of my sets of trials.


Tries 2 and 3: Simple Tortillas (with solid vegetable shortening, all-purpose or white whole wheat flour, increased salt)

  • 1 1/4 cup all-purpose OR white whole wheat flour
  • 1/2 teaspoon salt
  • 2 tablespoons solid vegetable shortening (Crisco)
  • 3/8 to 1/2 cup water

Combine ingredients, form into balls, let rest, and cook as in Try 1.

Results: Both the all-purpose and the white whole wheat flour doughs were easier to roll into 8-inch circles than in Try 1, which was made with lard. The flavor was great in each. The whole wheat flour ones took a bit less water when mixing. They definitely have a whole wheat flavor and seem a bit heavy. I liked them better, hubby preferred the all-purpose flour ones

Notes: The pan heat: 400˚ is the target according to KA. I got the pan to 400˚ by heating on medium high for several minutes. I used the remote temperature thermometer that we use for pizzas. I found that the pan kept heating up at medium high. By the time I was on the 7th tortilla, I had the pan all the way down to 3. It was great to cook them at this temperature – no burning at all on the batch.


Tries 4 and 5: Simple Tortillas (all purpose flour with olive oil, increased salt – as in tries 2 and 3 – with and without baking powder and with salt)

  • 1 1/4 cup all-purpose flour
  • 1/2 teaspoon salt
  • 1/2 teaspoon baking powder OR without
  • 2 tablespoons olive oil
  • 3/8 to 1/2 cup water

Mix the flour with the salt. Add baking powder to one try and leave it out of the other try. Add about half of the hot water to each try and then all of the olive oil and mix it all together. Add more water to each “trial”, but only as necessary for the dough to hold together. Put the dough on a breadboard and knead a few times, until the dough forms a ball. Divide each dough into 4 equal sized pieces, roll each into a ball, and let sit 2-3 hours at room temperature.

Results: In general, the olive oil trials needed less water. In fact, the tortillas were a bit smaller, and you might want to roll out only 3 from a small batch (1 1/4 cup flour size). Both the olive oil trials yielded tortillas that were more pliable than the lard or shortening trials. The tortillas made with baking powder really puffed up on cooking! After cooking, both types – with and without baking powder – were almost interchangeable.

Here is one of the baking powder tortillas after a few seconds of cooking:

The same one after a few more seconds. Note how high it has puffed!

Here is a comparison of a baking powder tortilla (left) verses one without baking powder (right). The sides we are seeing are the second sides cooked. Note that the non-baking powder tortilla has smaller brown spots.

Notes: The cast iron pan kept heating up as I cooked the 8 tortillas. I started with the burner at setting 6-7 to preheat to 400˚ on my remote temperature sensor. When I added the first tortilla, I turned the burner down to 6. As I continued the cooking additional tortillas, the temperature creeped up, and I turned it the burner down to 4 or 5. The pan temperature still creeped up, and was 570˚ after I cooked my last tortilla. They were not burning at 570˚, but do keep aware of temperature changes of the cast iron pan. Cooking 8 tortillas only took about 8 minutes.


Conclusions

From my tests and tastings, I like best the tortilla method that calls for olive oil, all-purpose flour, and no baking powder. This will be my go-to recipe. I’ll probably try different types of flour – cassava, barley flour, whole wheat pastry flour, perhaps others – and different mixtures of flours, like half all-purpose and half a different flour. I use more salt than in the original recipe.

The whole wheat versions are healthier, and quite acceptable, but the others are softer and my husband likes them better, so white flour tortillas are my go-to at the moment.


My modified recipe for flour tortillas

  • 2 1/2 cup all-purpose flour
  • 1 teaspoon salt
  • 1/4 cup olive oil
  • 7/8 to 1 cup water

Mix the flour with the salt. Add about three-quarters of the hot water, all of the olive oil, and mix it all together with a spoon. Add more water only as necessary for the dough to hold together.

Put the dough on a breadboard and knead a few times, until the dough forms a ball. Divide each dough into 8 equal sized pieces (by weight, if possible), form each portion into a ball, and let sit 2-3 hours at room temperature.

Cook each side of the tortillas on a pre-heated flat pan pan. If possible, use a cast iron griddle. You do not need to oil the pan for these tortillas. If possible, monitor the temperature of the griddle with a remote sensor.