250 Cookbooks: Knudsen Recipes

Cookbook #212: Knudsen Recipes, Knudsen, Knudsen Creamery Co. of California, 1958.

Knudsen Recipes cookbook

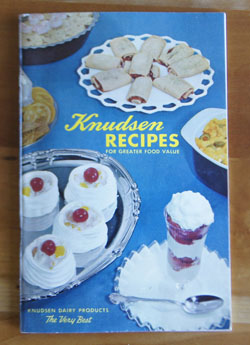
This is the third of my mother’s “Knudsen Recipes” cookbooks that I have covered: 1953 was the first, 1955 the second.

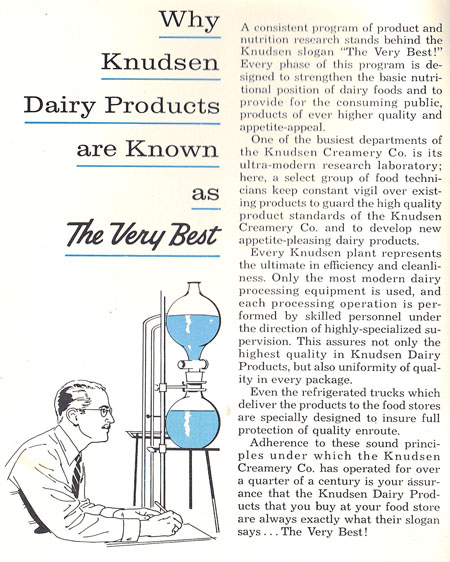
I like this edition because it is very much like the 1955 version. Again, the first page illustrates a male chemist in the lab. This time he is dripping something from a big round separatory funnel into a round bottom flask. If he adds much more solution, it will definitely overflow. Plus, why is the lower flask suspended? He is not heating that flask, and it would make more sense to have it on a solid surface, and to use an erlenmeyer flask. (The organic chem lab teacher in me never quits.)

scientist
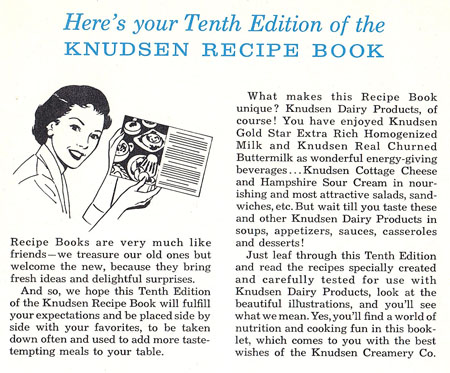
And as in the 1955 edition, it is a woman who is doing the cooking, or at least reading the cookbook.

cookThe first section is Appetizers and Spreads. Mother marked several: Crab Meat Canapes, Salami-Julienne Spread, and Cheese Onion Balls. These are all made with cream cheese, cottage cheese, and/or sour cream, with additions of canned or frozen products. During the 50s, and especially during the cocktail hour, these types of appetizers were a mainstay of American cookery.

appetizers
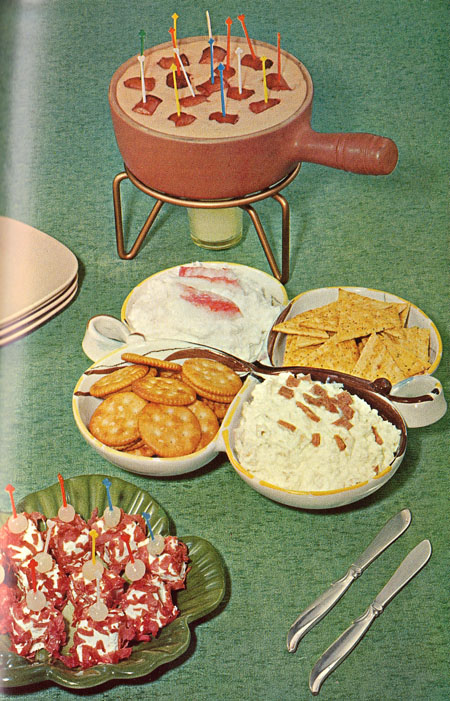
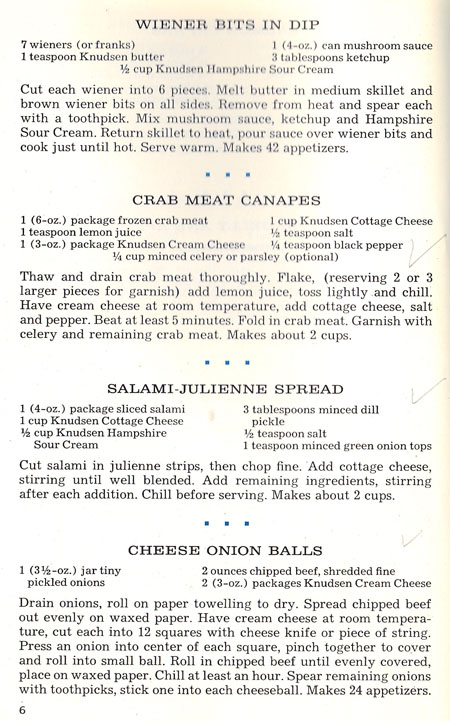
Here is a photo of some of the appetizers:

Next is Salads. Mother put a check mark on “Carrot and Red Cabbage Salad”. I thought about making this salad, since I like the combination of carrots and cabbage, but this recipe has more sour cream than I think I’d like. A “Full Meal” salad mixes leftover cooked meat with canned or fresh vegetables and a lot of cottage cheese and sour cream. Not for me. Nor are the molded salads. I guess this whole chapter is just not for me!

In the Main Dishes chapter, most of the recipes use about a cup of sour cream and/or cottage cheese per recipe. “Spaghetti with Beef in Hampshire” is a dish of steak, herbs, canned mushrooms, canned tomato soup, Worcestershire sauce, and sour cream, cooked and served over spaghetti. “Spaghetti Cheese Pie” is cooked spaghetti spread in a pie pan and covered with bacon, mushrooms, eggs, cheddar cheese, and cottage cheese and then baked. Both of these typical homey 50s recipes might taste good, but just aren’t the way I cook today. “Baked Potato, The Great American Dish” – baked potatoes with sour cream and chives – was also in the 1955 edition of Knudsen Recipes.

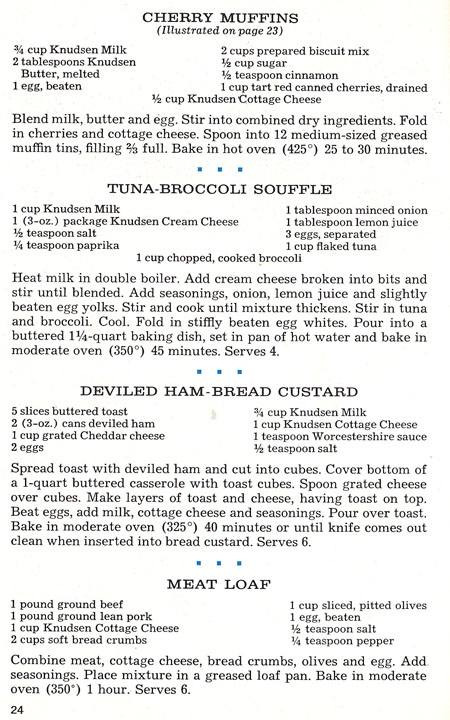
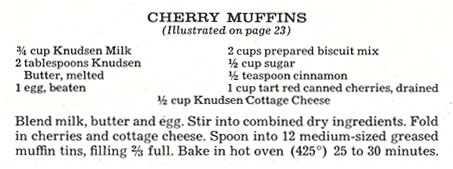
Right in the middle of the Main Dishes chapter I find a recipe for “Cherry Muffins”. Why here? I really don’t know. But I like the recipe, because I am always looking for new muffin recipes and this one has cottage cheese (protein and calcium) in the batter along with a can of tart red cherries (tart cherries are supposed to be good for you). Note all of the recipes on the page below: they are good examples of the type of recipes in this cookbook.

main dishes

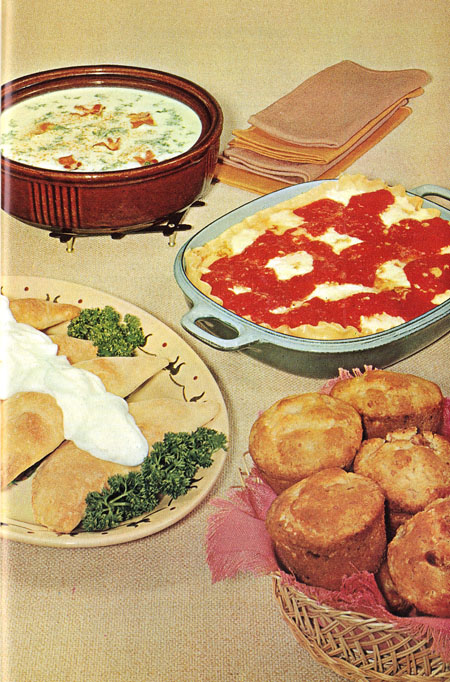
Perhaps Cherry Muffins were meant to be served with supper, or on a buffet, as in the photo below. The muffins are in the lower right hand corner:

main dishes

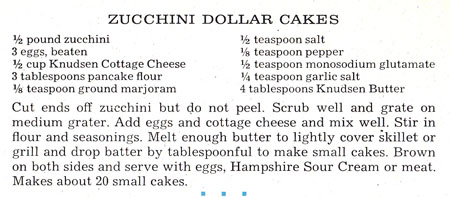
Also in the Main Dish chapter is the following recipe for “Zucchini Dollar Cakes”. I think the recipe sounds kind of good. And it might come in handy in late summer, when all those zucchini squashes are out there.

zucchini dollar cakes

In the Vegetables chapter, most of the vegetables are heavily sauced. Except “Broccoli in Almond Sauce”, which has just a little sour cream. But it calls for frozen broccoli. I prefer a little seasoning on lightly cooked fresh vegetables. I do like the idea of adding cottage cheese to mashed potatoes, one of the other recipes in this section.

Desserts and Sweets is the best chapter for recipes that include sour cream and cream cheese, in my opinion. We expect desserts to have calories, and getting those calories from milk products might be better for us. Examples are: “Cream Cheese Pie”, “Cheese Cake”, “Viennese Apple Strudel” (with cream cheese, butter, and a lot of apples), and “Sour Cream Boston Cheese Cake”. I am marking “try” on the recipe for “Hampshire Sour Cream Spice Cake”, with cottage cheese, sour cream, and lots of spices. It is baked in a bundt pan.

The closing pages of Knudsen Recipes include lists of menus, ideas for using Knudsen products for “weight control for better health”, and a table of calories in a few foods and recipes in this cookbook.

caloric quotaNext is a rave for all the good things about yogurt, hoop cheese, and milk. “Looking for New Ideas? Ways to use cottage cheese” lists a page of ideas. The following one is my favorite. “The men like this with old-fashioned hot potato salad.”

“Looking for New Ideas? Ways to use sour cream” is next, and here is my favorite from that list. “Gourmets babble?”

And that’s the book. I decide to make the “Cherry Muffins” for this blog. Here is the recipe (again):

Cherry Muffins recipeThe first issue I need to address in baking these muffins is the “2 cups prepared biscuit mix”. Biscuit mix, or “Bisquick”, was a staple in American kitchens in the 1950s. It is still available today. Should I purchase a box of Bisquick to make this recipe? I think not. I have no other use for it, and in general, I like cooking from scratch, so that I know my ingredients. Luckily, at some time in the recent past I had copied from the web search results for a substitution for biscuit mix:

“For each 1 cup biscuit mix (like Bisquick) called for in a recipe, use 1 cup all-purpose flour, 1 1/2 teaspoons baking powder, 1/2 teaspoon salt and 1 tablespoon vegetable shortening.”

I decide to use a combination of unbleached all purpose flour and whole wheat pastry flour, and to use butter instead of vegetable shortening. Also, the cottage cheese I have is very salty, so I am going to cut down the amount of salt. Below is my version of “Cherry Muffins”.

Cherry Muffins
makes 12

  • 1 cup all purpose flour
  • 1 cup whole wheat pastry flour (you can use all purpose flour instead)
  • 1 tablespoon baking powder
  • 1/2 teaspoon salt
  • 1 teaspoon cinnamon
  • 1 egg
  • 1/2 cup sugar
  • 3/4 cup milk
  • 1/2 cup cottage cheese
  • 4 tablespoons melted butter, preferably unsalted
  • 1 cup (one can, 13 oz.) tart red cherries, unsweetened, the kind used to bake cherry pies

Combine the flour(s), baking powder, salt, and cinnamon. Set aside.

Put the egg in a good sized bowl and whisk it a few times. Add the sugar, milk, cottage cheese, and melted butter. Mix well.

Chop the drained cherries. These cherries will be very wet and soft, and I didn’t get them totally drained. No problem, just scoop them into the bowl with the wet ingredients.

Combine the wet ingredients with the dry ingredients and stir just until mixed. Put into 12 muffin cups. Bake at 400˚ 20-22 minutes, until golden brown and test done with a toothpick.

Cherry Muffins
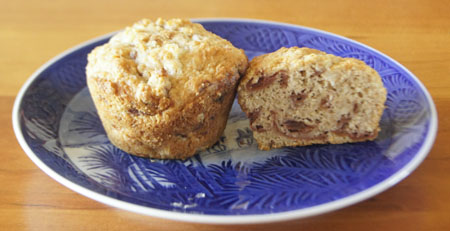
These were a lot better than I expected! I was concerned that the cherries would not lend enough flavor to the muffins, but I was very wrong. Also, I often use vegetable oil in muffins, but used butter in these. Same calories, but what a difference in texture! These almost taste like pie crust.

Success! I was able to use healthy ingredients, like tart cherries and cottage cheese, to make delicious morning muffins. Probably current and future readers will find nutritional problems with my recipe, as opinions and science are in flux. But for now, I will enjoy my semi-healthy muffins!

250 Cookbooks: Weber Gas Grill Cookbook

Cookbook #210: Weber Gas Grill Cookbook, Weber-Stephen Products, 2005.

Weber Gas Grill cookbookThis booklet of 26 recipes must have come with our Weber gas grill. I have forgotten all about this cookbook, since soon after getting the grill I purchased Weber’s Real Grilling, a large cookbook with tons of recipes.

Today as I open this 8 1/2 x 11-inch booklet, I am so very glad I rediscovered it! It is formatted much like Weber’s Real Grilling, and I invite you to read that post for background information.

First are three recipes for grilling steak, including a recipe I’d like to try: “Marinaded Flank Steak”. Next is baby back ribs with a “spiced apple cider mop”. Onions and green peppers are doused with beer in a foil pan and grilled alongside bratwurst in “Bratwurst & Beer”.

“Gaucho Grill with Chimichurri Sauce” grills a mixture of chicken, sausages, and flank steak, all rubbed with a homemade chimichurri sauce before grilling and served with more of this sauce. “Gyros Roast” is interesting, but sounds like a lot of work. First you pound a slab of lamb and a slab of round steak, rub herbs on the lamb, top with the round steak, roll up this lamb-herb-beef sandwich, tie with string, and grill 1 1/2 hours. Both the Gaucho Grill and Gyros Roast would be good recipes if cooking for a crowd.

“Rack of Lamb” and “Leg of Lamb” are other group-sized recipes. Not sure they would work for a couple, since what would I do with the leftovers? “Spicy Lamb Kabobs” would work well for two people, though. The lamb cubes are marinaded in red wine vinegar, lemon juice, orange rind, green onion, cinnamon, and cloves . “Pecan-Stuffed Pork Chops”? Sound great – I have baked stuffed pork chops, but never done them on the grill.

“Ricotta Chicken” begins with a whole chicken. You remove the backbone and slice the chicken in half lengthwise. Then you push a mixture of ricotta cheese, Parmesan cheese, egg, and herbs under the skin. Finally, you grill it. Sounds good, but a bit of work.

“Cornish Hens with Mandarin Sauce” would probably be good. I have never grilled stuffed game hens. I marked “Tandoori Chicken” as good, and now I decide to cook this dish for this blog.

“Chicken Fajitas” and “Grilled Chicken Pitas” are nice, everyday meals. There are recipes for sea bass and tuna, if I am every able to find these expensive fishes. A recipe for salmon doesn’t inspire me, and I know I’ll never try the shrimp recipe, because it has curry in it.

I rarely grill vegetables. This book has recipes for grilled tomatoes, red peppers stuffed with fresh mozzarella, corn on the cob in the husk, stuffed potatoes, and squash with peppers. Doubt I’ll use these recipes, although I do love fresh mozzarella and red peppers.

The last recipe is for “Paradise Grilled”. This is grilled pineapple, and I love grilled pineapple! This recipe includes a glaze, which I really think is unnecessary. Grilled pineapple is great on its own, or maybe over ice cream.

At the very end of Weber Gas Grill Cookbook is a 3-page grilling guide. Weber’s Real Grilling has grilling guides, but they are scattered throughout the book. The one in Weber Gas Grill Cookbook is much more concise, and I think it is more useful.

I definitely will keep this cookbook. I am going to store it tucked inside the big Weber’s Real Grilling (my favorite grilling cookbook) so that I don’t forget about it, and also for ready access to the grilling guide.

“Tandoori Chicken” is the recipe I chose for this blog. It is the only recipe I marked in this cookbook – I marked it with a post-it as “excellent”.

Tandoori Chicken recipe

I will make it exactly like the recipe, except we’ll skip the chutney and cucumbers. I can tell this is a recipe that is “up my alley”, since I have all of the ingredients on my shelves or in my refrigerator.

Tandoori Chicken
serves 4-5

  • 2 cups plain yogurt
  • 1 tablespoon minced or grated fresh ginger
  • 2 cloves garlic, minced
  • 2 teaspoons paprika
  • 1 1/2 teaspoons cinnamon
  • 1 teaspoon cumin
  • 1 teaspoon ground coriander (or crushed coriander seed)
  • 1/4 teaspoon cloves
  • 1/2 teaspoon salt
  • 1/2 teaspoon pepper
  • 3 pounds chicken pieces

Combine all of the marinade ingredients, and then add the chicken. Refrigerate at least 6 hours or overnight.

When ready to cook the chicken, remove it from the marinade, saving the marinade. Boil the marinade for 1 minute: it will be used to baste the chicken in the last part of the grilling step.

Heat a gas grill with all burners on until it is very hot. Then, turn off half of the burners (or two-thirds, depending on the size of your grill) and let the temperature drop to about 350-375˚. Place the chicken pieces skin side up on the grill over indirect heat.

Cook for about 45 minutes, until done, as indicated by a quick read thermometer, or observing that the “juices are running clear”. Brush with the boiled marinade during the last 15 minutes or so of grilling time.

Note that this recipe does not call for turning the chicken pieces. I like grill marks on both sides, so I turned them once to skin side down for about 5 minutes. I put them over the direct heat, and I shouldn’t have! They tasted great, but were a bit blackened. Next time, I might try placing them skin side down first, over indirect heat, for a few minutes, then turn them skin side up for the remainder of the cooking.

Tandoori Chicken
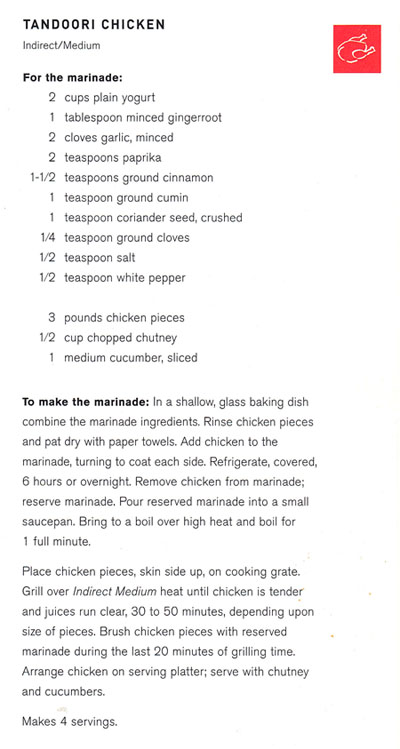
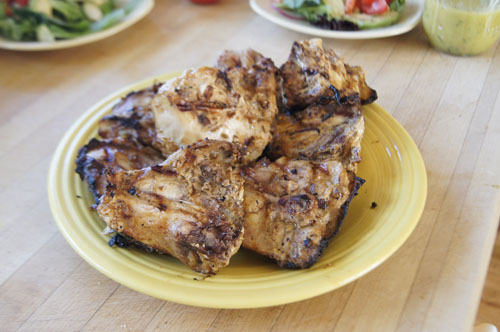
These tasted great! The yogurt marinade makes them not only well seasoned, it also makes them very tender. (I put the blackened side down for the photo. They would have been so much prettier if I hadn’t tried something experimental!)

I served the Tandoori Chicken with a fresh lettuce salad with wonderful tomatoes from our local fruit stand, fresh vinaigrette dressing using my garden’s herbs, corn on the cob, and a loaf of sourdough bread from our local Button Rock Bakery. Topped the meal off with fresh peach and apricot pie, fruits again from our local stand.

Ah, I love the days of summer with fresh local produce. And I enjoy re-discovering a good cookbook.

250 Cookbooks: Kitchen Science

Cookbook #208: Kitchen Science, Revised Edition, Howard Hillman, Houghton Mifflin Company, Boston, 1989.

Kitchen Science cookbook

The following is a quote from Howard Hillman, found in the foreword to this revised edition of Kitchen Science:

“By popular demand, we’ve expanded Kitchen Science, by 25 percent. It was fun because we love to eat, cook, and experiment (a friend affectionately nicknamed us ‘mad scientists in the kitchen’).”

I love this book! Mad scientists in the kitchen, much like me.

From the preface:

“Find yourself a recipe, and you can cook one dish. Teach yourself the science of cooking, and you can cook creatively forever. Creative cooking requires love, imagination, art, and science.”

I bought this book for myself when I was a working chemist. I even loaned it to some of my students over the years. I am very happy to revisit this book for this blog – Kitchen Science has laid on the shelf way too long. Out of curiousity, I checked to see if Howard Hillman has updated Kitchen Science, and sure enough, there is a revision released in 2003.

The first chapter of Kitchen Science covers cooking equipment, for example: how to choose a good knife and how to sharpen it; the advantages/disadvantages of different types of pans.

The next chapter, cooking methods, covers the usual stove top and oven methods, but with a much more scientific twist. Example: “Heat cooking is chemistry. When you increase the heat, you increase the velocity of the molecules in a food. The greater the speed, the more the molecules collide.These microscopic crashes can alter the molecular structures, creating new molecules and changing the color, flavor, and texture of the cooking food.” He also answers questions like “Is there a difference in temperature between lightly and vigorously boiling water?” (no) and “Does salt raise the boiling point of water?” and “Is braising best done in the oven or on to of the stove?” and “What causes a lid to stick to a pan?”

I learn in the “Meats” chapter that a “bloody red steak” isn’t really bloody, instead, the red color comes from myoglobin, a constituent of muscle. Furthermore, myoglobin undergoes chemical changes as its temperature rises, going from pink to drab brown. Thus, the red color in “blood rare” steaks is actually pink myoglobin. “London broil” has been a popular dish since I was a little kid. Today’s markets sell thick round steak as “London broil”. However, true London broil used to be flank steak, a cut of meat that has long fibers and is taken from the side or “flank” of the cow. After World War II, Americans took up the “fashionable backyard sport of barbecuing”, and since each steer has only two flank steaks, butchers began merchandising the relatively abundant round steak as “London broil”. Hillman discusses the pros and cons of salting meat before or after cooking. And beyond beef, he writes that free range chickens have more flavor because exercise developes more flavor in their muscles.

On the topic of fish, Hillman explains that freshwater fishes have more “small, annoying bones” than marine fishes, because salt water has a higher specific density, thus fish in the ocean have a greater buoyancy and that buoyancy allows them to have a heavier bone structure. Lobster claws are secured with rubber bands because lobsters are cannibals, and unless their claws are disabled they will eat each other while they are held in lobster tanks.

I have often run across recipes that say to “scald milk”. I tend to skip this step, always feeling a bit guilty. But no more! From Kitchen Science: “Scalding has two primary purposes: to kill pathogenic microorganisms and to destroy certain enzymes that would keep emulsifying agents in the milk from doing their thickening job.” But today, this book explains, when you buy pasteurized milk, about the only kind of milk offered in US stores, both of these tasks have already been accomplished. Yay! I can now ignore directions to scald milk!

How about drinking chocolate milk as a source of calcium? Well, chocolate has oxalic acid in it, and this chemical inhibits the digestive system’s ability to absorb calcium. So not such a good idea. Unsalted butter is better for cooking because the salt content of salted butter can vary from brand to brand. Recipes from “virtually all serious cookbooks are based on the use of sweet (unsalted) butter”. I have gradually changed my recipes over the past several years to use sweet butter, and now I know why. Pages 110-112 give a great method for clarifying butter, and I’ll definitely use this method next time a recipe calls for it.

Eggs are the next chapter. To this day, I use the method described in Kitchen Science to boil eggs. First, I use a push-pin to make a hole in the less-pointed end of the egg. You see, after an egg is laid, the yolk and albumen shrink and an air pocket forms between the less pointed end and the shell. When you put the egg in hot water to boil, this area can expand and crack the shell. That’s not only annoying, it makes the boiling water all white and yucky! So I poke a hole in the flatter end of each egg shell, and gently lower the egg into boiling water, and happily watch a stream of air bubble out of the egg. Almost never do these poked egg shells crack in the boiling water. (More on this technique below.)

My interest in chicken eggs may come from my time in graduate school. Here is the title of my master’s thesis: “The effect of methylene bridged monoribonucleotides on transformation of chick embryo fibroblasts by Rous sarcoma virus” (by Patricia Louise Feist, University of Colorado, 1976). For this research project, I had to incubate fertilized chicken eggs for about 9 days in a special small egg incubator (which was re-discovered in the attic storage of the old chemistry building in the 2000s). Each egg had to be placed in the incubator with the flatter end up, otherwise the air sac would break and the whole egg would become infected with bacteria. When you buy a carton of eggs, they should always be sold with the flatter end up. But, I often find them upside down in today’s markets. Perhaps this is because they are sterilized before being sold, a process which oddly enough makes them require refrigeration. In Togo, eggs were not sterilized, and stored at room temperature, and were just fine because unsterilized eggs have a natural protection.

I digress! Back to Kitchen Science. “What is the difference between a fruit and a vegetable?” Here is the excerpt:

fruits vs vegetables

Now I think I’ll call tomatoes “fruit-vegetables”.

“Sauces and Thickeners” is the next chapter. I took a cooking class on sauces and the information in this chapter correlates with what I learned there. Emulsified sauces intrigue me. I guess it’s from all those times I shook up solutions in a separatory funnel, and often had a nasty emulsion at the interface of the aqueous and hydrocarbon layers. Emulsions in the lab were a pain in the neck, but an emulsion in a salad dressing is a wonderful thing. Kitchen Science has several “experiments” on making emulsified and other sauces, like Hollandaise, Vinaigrette, and Maltese Falcon Custard, and Mornay Sauce. How fun! I’d like to make them all.

In the “Seasonings” chapter, I learn that kosher salt is better than regular salt for sprinkling on food like corn on the cob because the salt crystals are larger and because they have a more jagged configuration, and thus cling better to food surfaces. “Kosher salt is so named because it was specially developed as an aid for Jews who adhere to kosher dietary laws, one of which requires that as much blood as possible be removed from meat before it is cooked; the characteristics of kosher salt make it better suited for drawing out the blood”. MSG, monosodium glutamate, highlights the flavor of salt, but leaves a peculiar off-flavor. Hot chili peppers are more popular in tropical (hot) zones because they cool the body, perk up the appetite, and add zest to a bland diet (veggies and seafood in the tropics are bland, according to Kitchen Science). Hot chilis are a preservative, swamp the telltale tase of spoilage, reduce the incidence of diarrhea, and aid digestion by accelerating the flow of gastric juices.

“Oils and fats” explains that an oil is a fat, but it is common practice to use the term “fat” for those fats that are in a solid state at room temperature. Shortening can be made from animal or vegetable fat; those based on vegetable oil are made solid by hydrogenation.

I learned something about unbleached flour in the baking chapter. (I also discussed unbleached flour here.) According to Howard Hillman, unbleached flour has a more natural taste because it has not been treated with bleaching chemicals. However, unbleached flour must be aged for several months to strengthen its gluten content; bleaching artificailly ages the flour so it can be sold right away. Thus, bleaching the flour is not only a cosmetic preference demanded by the consumer, as I always thought, but also a way to get a product to market faster. I learn that sifting flour is no longer necessary (yay!), because “Most modern baking recipes are based on the measured volume of unsifted flour, partly because the flour sold today is not as compacted as it was in our grandparent’s day. But even if the flour of yesteryear didn’t need sifting for lightness, it probably would have been best to sift it anyway to remove insects and other impurities.”

Pages 258-262 give and describe a list of about twenty common food additives. Granted, it’s not as complete as J. Michael Lapchick’s book The Label Reader’s Pocket Dictionary of Food Additives, but this list is still useful.

The last chapter is a potpourri of science facts about foods. In this chapter is a 6-page principle-illustrating recipe on how to make a souffle. I think I’ll review this section next time I make a souffle for dinner (one of our favorite meals).

For this blog, I decide to boil eggs. Ha, what can be easier? Who needs a recipe? Well, there are a lot of controversies on how to properly boil an egg. Some start in cold water, for instance. As I stated above, I always use the method described in Kitchen Science. (Please read the first sections of this blog entry to find out why I poke holes in the eggs before boiling.)

Hard Boiled Eggs

Step 1. Bring a pot of water to a rolling boil, then turn the heat down a bit so that it’s boiling but a little calmer. If it is a huge rolling boil, the eggs might hit each other while cooking, increasing the chance that they will break. But it’s important to have the water boiling because this recipe is carefully timed, and you need the water at a predictable temperature.

Step 2. While still in the carton, study the eggs you will cook. The top side should be the flatter end of the egg, the end where the air sac resides.

eggs in carton
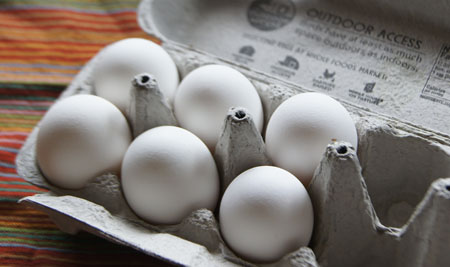
I took the eggs out of the carton in the same order and laid them on a cloth with the upper ends to the right for each egg. Note how hard it can be to find the flatter end – sometimes both ends look the same.

eggs on cloth
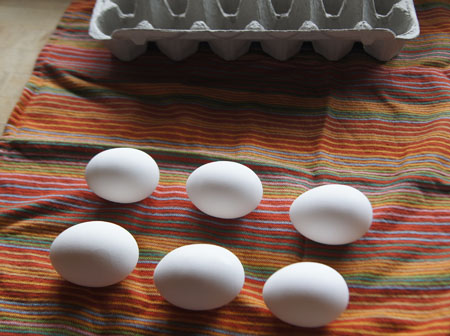
Below is a close-up of these same eggs. I am tilting one egg, flat side up:
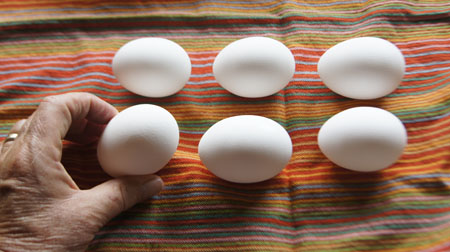
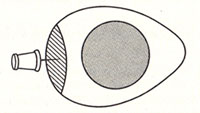
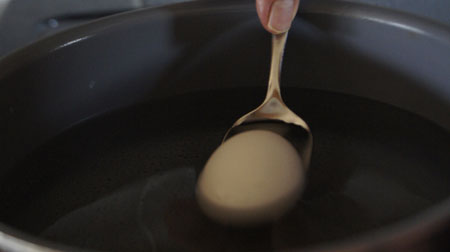
eggs close up

Poke the flat side of each egg with a pushpin. Two illustrations follow. The first is an illustration I copied from Kitchen Science, where the hashed lined represent the air sac between the egg white/yolk and the egg shell:

poking an egg

This next illustration is me poking the egg with a pushpin:

push pinPoked hole:

hole in egg

Step 3. Gently lower each egg in the boiling water and watch for bubbles coming out of the egg. If air bubbles rather than egg white comes out, you have chosen the correct end. If egg white comes out, quickly remove the egg and save it for a different use.

lowering egg
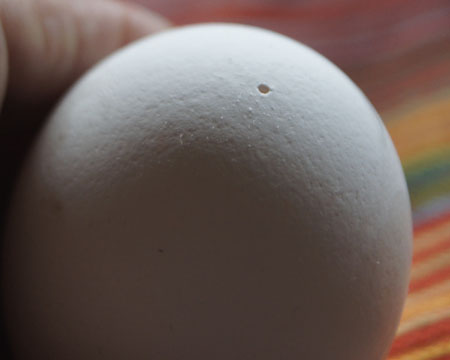
As careful as I was to remove the eggs from the carton properly and poke what looked like the flatter end, one of the eggs had been put in the carton upside down was thus in the wrong orientation (the upper left egg in the pattern of six). Instead of bubbles, white goo came out when I lowered it into the boiIing water. I removed it immediately. Here is the gooey egg white coming out of the hole in the upper left egg:

egg leaking

Step 4: As soon as all the eggs are in the water, set your timer! Kitchen Science says to boil the eggs 12 to 15 minutes if you are at sea level; boiling them longer can make them turn dark green around the edges of the egg yolk.

I have always boiled eggs 20 minutes, but my kitchen is at 5300 feet. Is 20 minutes really the proper time I should use? I will do a little experiment today, and cook 3 of the eggs for 15 minutes, and 3 of the eggs for 20 minutes.

I measured the temperature of the boiling water, and it was 202˚ F.

Step 5: When your timer dings, remove the pot from the stove and immediately place the eggs in cold water to stop the cooking.

Kitchen Science says it is easier to peel the eggs when hot. So, after 5 minutes in cool water, I removed them and peeled them. And yes, the shells came off easily.

I cut each of the 6 eggs in half. In the photo below, the 15-minute eggs are on the top of the plate, and the 20-minute eggs are on the bottom.

eggs cooked
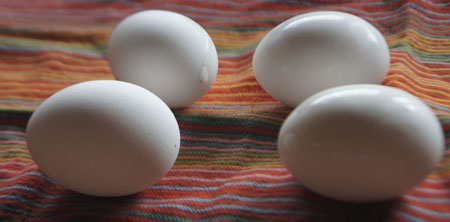
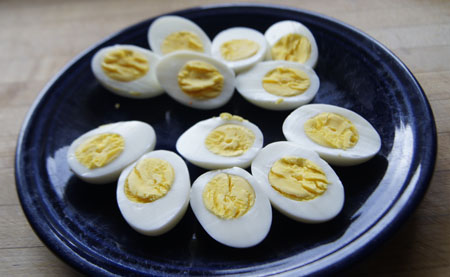
Conclusion: In my opinion, the 15-minute eggs were a bit undercooked. Here is a close-up, with a 15-minute egg on the left, and a 20-minute egg on the right:

eggs cooked closeup
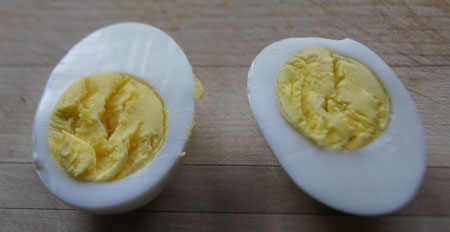
Neither has a dark green discoloration on the sides of the yolk.

So, the 20 minutes I have always used is the best time to hard boil eggs at my altitude. Maybe I did this experiment years ago, when I first got this book. But it totally makes sense that it will take longer to hard boil eggs if my boiling water is 202˚ F instead of the sea level standard 212˚ F.

It was getting to be lunch time, and I couldn’t resist putting a little salt on an egg and scarfing it up. So good! I made deviled eggs from the rest (added a little mustard and mayonnaise to the yolks, topped with a bit of paprika). We both love deviled eggs. They were gone early the next day.

Simple hard boiled eggs. A good lesson in science, and a good thing to eat.

250 Cookbooks: International Recipes

Cookbook #208: International Recipes.

International Recipes cookbook
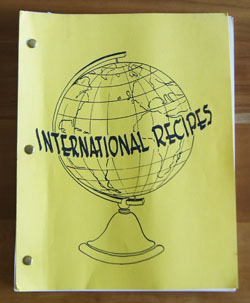
No author, no publisher, no publication date! This is the only cookbook in my collection with none of that information. It is a community-style cookbook, typed and copied, with black and white hand-drawn illustrations. The paper and cover are 3-hole punched, and it is held together with brad-style paper fasteners.

Community cookbooks were often sold as fundraisers. Usually the recipes are attributed to different contributors, but not in International Recipes. Or at least, the organization behind the cookbook is given. Maybe someone will see my photos and recognize this cookbook! Here is the first page:

International RecipesI read through this entire book, and am impressed with the author’s work. She (I assume it was a woman, at least) set up each section with an entire menu of recipes for the particular international cuisine. She referenced a sauce from one section (a raspberry sauce) that might go with a recipe from another section (a pecan torte). Because of the consistent writing style and the cross-references, I think this book was all written by one person, although she may have collected ideas from friends of different cultures. The recipes call for canned or processed items, like bean sprouts, canned shrimp and crab, and cake mixes; canned coconut milk was not available; there are several gelatin salad recipes; and microwaves and food processors are not mentioned. All of these facts lead me to believe it was produced in the sixties or seventies. Plus, it was prepared on a typewriter, not a computer.

I decide to put in the time and go through each international recipe section and take notes. Here goes!

India: Curried Chicken Balls, Curried Shrimp, Indian Puria (a deep fried dough), Chutney (onions, apples, raisins, prunes, plums, cloves, nuts, sugar, vinegar and spices), Curried Fruit Bake (canned peaches and pears baked with butter, sugar, and curry powder), and condiments (like peanuts, cooked eggs, coconut). The Curried Shrimp serves 12, and takes 2 1/2 quarts of cooked shrimp! It also calls for 9 cups of coconut milk, with instructions for how to make this from milk and canned shredded coconut.

Poland: Barszcz (a soup made from beet juice drained from canned beets), Potrawa Kurczecia z Ryzem (stewed chicken), Zucchini w sosie (zucchini with paprika and cream), Salata (lettuce salad), Tort Marcepanowy (raspberries, sugar, yellow cake mix, almond paste).

Japan: Chicken noodle soup, Cucumber and Crab Meat Salad, Japanese Rice, a Sukiyaki similar to the recipe I got from my Japanese roommate, Mandarin-Orange Dessert (gelatin, cream cheese, whipping cream, apricot juice, mandarin oranges).

Germany: Rinds Rouladin (thin steak rolled around bacon, dill pickle, onion), Green Bean Salad, Flan Tart (German Fruit Pie), Melba Sauce (raspberries, recommended to use in another section, Vienna, with the Pecan Torte).

France: Rock Cornish Hens with French Chestnut Stuffing (calls for canned French chestnuts), Tomato Stuffed with Mushrooms (ripe tomatoes, mushrooms, sour cream, Roquefort cheese, fines herbes, sherry, almonds), Coffee Cream (milk, gelatin, sugar, instant coffee, egg yolks, shipping cream, Curacao, chocolate).

Greece: Abrak (grape leaves stuffed with lamb and rice), Braised Lamb (meatballs with onions, tomatoes and lemon juice), Stuffed Tomatoes and Eggplants (Gemistes Domates me Melzana, kefaloteri cheese), Vegetable Salad (cabbage, string beans, capers, olives, beets), Baklava (the dough is made from scratch!).

China: Sweet and Sour Meat Balls (battered and deep fried), Bean Sprout and Snow Pea Salad (canned bean sprouts and garden lettuce), Buns Stuffed with Shrimp (from-scratch yeast dough, steamed), Almond Cookies.

In the Latin Countries: Mexico, a mixed garden salad and Kahlua with ice cream; Brazil, a rib eye roast marinaded in vinegar, burgundy wine, gin, onion juice, bay leaves, garlic, tarragon, tabasco; Nicaragua, spiced cooked bananas; Spain, potatoes whipped with cream cheese, green pepper, butter, green onions, pimento, saffron, cheddar and parmesan cheeses, and then baked; Portugal, cinnamon bread (a yeast bread).

Swedish Smorgasbord: I have good coverage of Smorgasbord in my book the Encyclopedia of Cooking Volume 10. Below is the section on Swedish Smorgasbord in International Recipes.

International RecipesInternational RecipesHungary: Hungarian Gulyas (like a goulash), Wilted Cucumbers, Cole Slaw, Cream Apples.

Indonesia: Marinated Lamb (lamb cut in small cubes rolled in a ground-to-a-paste mixture of onions, garlic, salt, chili peppers, coriander, cumin, saffron, and ginger, then browned and simmered; Green Beans in Coconut Milk (again, a recipe for making coconut milk), Date and Fig Sauce (for ice cream or cake).

Italian: Antipasto, Chicken Tetrazini (different from my recipe), Parmesan Pinwheels (pastry mix with Parmesan cheese and olives), Caesar Salad, Biscuit Tortoni (a frozen dessert made with macaroon crumbs, whipping cream, sugar, beaten egg whites).

English Menu: Cornish Pasties, Yorkshire Salad (lettuce, green onions, molasses, vinegar), Devonshire Cream over Fruit (cream cheese, sour cream, whipping cream).

Russian: Pirozhki (meat filled pastries), Yablonnick (cooked apples), Beef ala Stroganoff, Health Salad a la Kiev (cucumbers, raw carrots, apples, tomatoes, lettuce, sour cream, lemon juice), Torte (a rich dessert with raspberry preserves and coconut).

I decide to keep this cookbook. I find it interesting! Plus I’d like to try the Chinese buns stuffed with shrimp, the Japanese salad with wilted cucumbers and crab meat, the Indonesian marinated lamb, and Abrak (grape leaves stuffed with lamb and rice).

For this blog, I choose to make Herb Rolls, a Viennese recipe. The entire section for the cooking of Vienna is below, to show you how the recipes are laid out and illustrated. I’d also like to make the Pecan Torte someday, and maybe put one of the raspberry sauces on it.

International RecipesInternational Recipes

I’ll make the Herb Rolls in my breadmaker and see how it goes. I don’t need 3 dozen rolls, so I’ll halve the recipe. Still a lot for two people, but I think these will freeze well. I like the honey in the recipe, and the all-bran cereal will add some fiber. I chose poppy seeds (instead of caraway), and added the seeds and the chopped parsley when my breadmaker “beeped” to signal it was time to add seeds to a loaf (thus they do not get grinded into the dough). I’ll use bread flour (especially since I’m flush off writing my last post on French Bread).

It’s important to make this bread on a preheat dough cycle, because the bran cereal needs some time to soak and become mushy.

Herb Rolls (breadmaker instructions)
makes 16

Add the following ingredients to a bread machine in the order given:

  • 1 cup water
  • 3/4 cup all-bran cereal (I used the “buds” form; either would work)
  • 4 tablespoons butter, cut into chunks
  • 1 teaspoon salt
  • 1 tablespoon honey
  • 2 3/8 cup unbleached bread flour

Set the machine to a preheat dough cycle that has a rising step and push the start button. Have ready to add at the “beep” that signals time to add seeds, raisins, nuts or the like:

  • 1 1/2 tablespoon chopped fresh parsley
  • 1 generous teaspoon poppy seeds

While the dough kneads and rises, set out at room temperature 2-3 tablespoons butter (preferrably unsalted) so that it softens. Add to this butter minced garlic, 1-2 medium cloves.

When the dough is ready, take it out onto a breadboard and knead it a few time to spread the yeast around. Then, cut the dough into two equal pieces. Roll each piece into a circle about 10-12 inches in diameter. Put half of the softened butter-garlic mixture on top of each circle, then cut each into 8 pie shaped pieces. Roll each pie shape, starting from the pointy end:

Herb Rolls dough
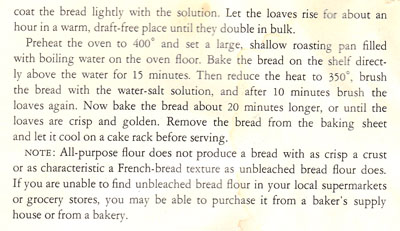
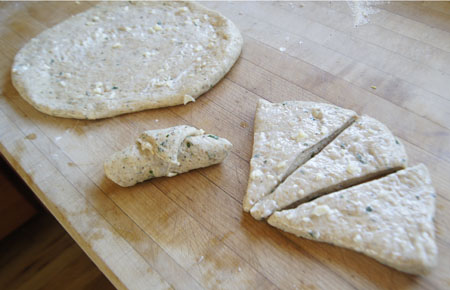
I put the rolls on 2 parchment-lined half sheet pans and let them rise about 20 minutes (my kitchen was warm). I learned from experience that the rolls bake up best if you tuck the pointy ends under the rolls.

Herb Rolls risen

Bake for 25 minutes at 400˚.

Herb Rolls
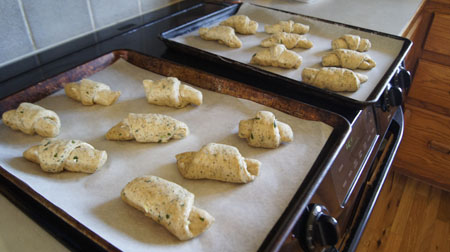
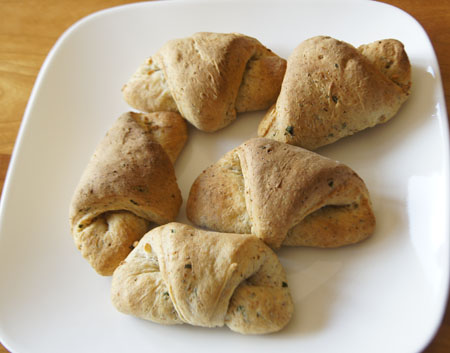
A “yum” for this recipe! These are soft and tasty, and fun to make. The bread machine method worked great. I put some of the rolls in the freezer for later use. Yes, I’d make these again!

250 Cookbooks: Foods of the World Supplement Number One

Cookbook #207: Foods of the World Supplement Number One, Time-Life Books, NY, 1968, revised 1974.

Foods of the World Supplemnt One cookbook
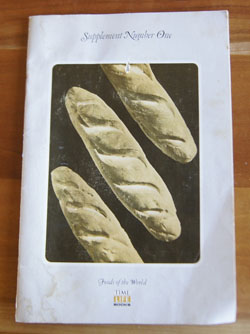
I own 5 of the 27 Foods of the World volumes produced by Time-Life Books, and have covered 4 of them so far: Cooking of Provinvial France, Cooking of China, Cooking of Vienna’s Empire, and Cooking of Japan. I subscribed to the series for a time – they came in the mail. The Foods of the World Supplement Number One was a “bonus”, according to the “memo to the subscriber” in the preface. I find today that the Foods of the World cookbook series is important enough to have its own Wikipedia entry. And a few online sellers offer the entire set for about $200. Although there are 27 volumes in the entire series, there are only 2 supplements: the one I have and one on deep frying.

Foods of the World Supplement Number One is 25 pages long, and “bound” with two big staples. (The Foods of the World series each came as one traditionally bound book and a spiral bound recipe booklet.) Each page of this supplement is marked with cutting lines, so that “the recipe pages may be clipped for insertion in your Recipe Booklets”.

Here is the list of contents:

  • A Primer on Rice
  • Menu Suggestions
  • An American Approach to French Bread
  • Tomato-Cheese Pie
  • Casserole-Roasted Chicken with Vegetables
  • Cheese Pie (Crostata di Ricotta)
  • Rabbit Stewed in White Wine Sauce
  • A Shopper’s Guide to Foods and Utensils

The “Primer on Rice” discusses rice around the world, rice in the US, a diagram of a kernel of rice and how it is milled into different products, and ways of cooking rice. Since I almost always cook rice in my electric steamer, I really don’t need this information. But, I think I’ll clip out these pages and put them in the extensive rice section in my Encyclopedia of Cookery Volume 10.

“Menu Suggestions” is a two-page list of menus combined from 4 volumes of the Foods of the World series. Since I don’t own all of those 4 volumes, it isn’t very useful to me.

“An American Approach to French Bread” discusses the difficulties of making good French bread in home kitchens:

page 12Note in the above discussion that in France, most people buy their bread fresh daily in the bakeries, or boulangerie. (We saw the truth of this when we visited Paris.) So why even try baking French bread in America? I think because good French bread might have been hard to find here, even in bakeries. Or, unbleached bread flour was hard to find in the U.S. Or, Julia Child and others saw a challenge and rose to it! The recipe for French on the page following the above excerpt was adapted in the Foods of the World Kitchens from a combination of a number of recipes other than Julia Child’s.

I’ll get to that recipe later, since I too wanted to make good French bread at home. I studied the recipe in Foods of the World Supplement Number One a lot! The pages around this discussion and recipe are obviously well-used. Over a period of years, I made my own changes and baked a lot of these French loaves. I will make French bread for this blog and share my discoveries.

“Tomato-Cheese Pie” (Tarte à la Tomate) is a main dish pie using pâte brisée, or pie crust. Their crust recipe calls for flour, chilled butter, chilled shortening, and water, but not any of my beloved vodka, so if I decide to make this pie I would use my own recipe. The pie filling is Gruyère chese slices topped with drained tomato slices, salt and pepper, fresh basil, a little Parmesan cheese, and melted butter. Sounds like a very rich meatless pizza! Yes, I’m sure Tarte à la Tomate would be good, but dang rich.

“Casserole-Roasted Chicken with Vegetables” (Poulet en Cocotte Bonne Femme) is a lovely roasted chicken, prepared in a stove top to oven casserole, such as a LeCreuset. The chicken is first seasoned with garlic, thyme, salt pork, and browned, and then baked with small white onions, carrots, potatoes cut in 2-inch olive shapes, and a Bouquet garnie. The sauce is finished on stove top. Like Tomato-Cheese Pie, this recipe sounds very good.

“Cheese Pie” (Crostata di Ricotta) begins with a pasta frolla, a pastry crust made with flour, butter or lard, egg yolks, sugar, Marsala, lemon peel and salt. This crust is put in a spring form pan, then topped with a filling of ricotta cheese, sugar, flour, salt, vanilla, orange peel, egg yolks, white raisins, candied orange peel, candied citron, and slivered almonds or pine nuts. This is a “dessert” pie, and I doubt I’ll ever make it.

“Rabbit Stewed in White Wine Sauce” (Sauté de Lapin au Vin Blanc) is a dish I’ll never make! I am too used to watching bunny babies and bunny adults scampering around my yard. They are cute to look at, and they are not for dinner, in my opinion.

“A Shopper’s Guide to Foods and Utensils” lists, by state, about 80-100 firms that accept mail orders. Addresses are given, but not phone numbers. And of course no web sites, since this is a 1974 publication. There are several listed in Denver, Colorado:

  • American Tea, Coffee and Spice Co. on Champa Street is no longer in business.
  • Cassidy’s Delicatessen on East Third Avenue is no longer in business.
  • May D&F Gourmet shop on 16th and Tremont Place. May D&F has changed to Macy’s bu there is a May D&F museum in Denver.
  • Denver Dry Goods Co. on 16th and California. Denver Dry goods has a Wikipedia entry only as a “historical” store.

So “A Shopper’s Guide to Foods and Utensils” is not very helpful to me any more!

Okay, I am to the end of this booklet. At first, I think to cut out and save the bread recipe and notes, and the tomato cheese pie and the roasted chicken recipe. But then, well heck, might as well keep the whole booklet!!

I will make French bread for this blog:

French breadFrench bread

Seeing this recipe again, I realize how familiar it is to me. Ages ago, before I even had a breadmaker or access to unbleached bread flour, when I was supplementing all-purpose flour with gluten flour, I worked again and again to make a great loaf of French bread. Since that period of time my breadmaking has gone through a couple of evolutions, first using a KitchenAid mixer to knead the dough, then a breadmaker to knead and rise the dough, then to no-knead breads as well as breadmaker breads. I haven’t returned to this old recipe in years. This should be fun!

To start, I will incorporate my own suggestions when I make it in my kitchen today in 2017. Note that I two-thirds the recipe and made two baguettes instead of three. This is because I had purchased this two-loaf baguette pan:

baguette pan
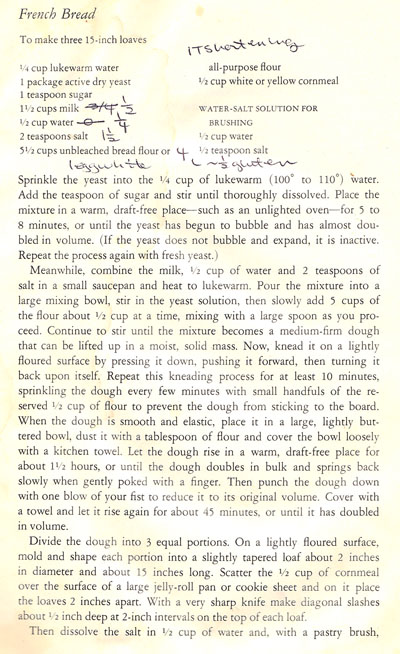
I also added 1 egg white to the dough. I forget where I got that idea, but I found it essential for making a good loaf. I also added 1 tablespoon shortening – I forget why. I discovered early on the advantage of adding vital wheat gluten flour to my loaves, so the changes I made to the recipe include using 1/2 cup gluten flour in the total 4 cups of flour, (the rest was all-purpose flour).

Today, I am able to buy unbleached bread flour, a flour that Julia Child said was not available in America in the 1970s. This type of flour has a high gluten content, so I will not add additional gluten flour. Since th 1990s, I have used a breadmachine to knead and rise my kneaded breads, so I will do so with this recipe too. I like butter better than shortening, so will make that substition. I know my Red Star Active Dry Yeast very well, since I buy it in bulk and store it in my freezer. I never pre-proof this yeast, I just toss it in the breadmaker and I know my breadmaker and that it rises bread at a consistent temperature. I will eliminate the second rise. After I form the loaves, I will let it rise only 20-30 minutes before baking – as I said, I know my yeast, and this shorter time should work.

French Bread
makes 2 baguettes

  • 3/4 cup water
  • 1/2 cup milk
  • 2 1/4 teaspoons active dry yeast (this is equivalent to one small package)
  • 1 teaspoon sugar
  • 1 1/2 teaspoons salt
  • 1 tablespoon butter (preferrably unsalted)
  • 4 cups unbleached bread flour (King Arthur flour brand)
  • some cornmeal or semolina for the baking pan
  • a mixture of 1/2 teaspoon salt in 1/2 cup water for brushing the bread.

Put the water, milk, yeast, sugar, salt, butter, and unbleached bread flour in a bread machine. Set the cycle to a dough cycle that includes a pre-warm step, a kneading step, and a rising step. At the end of the cycle, take the dough out of the machine and set in on a bread board.

Form the dough into two long loaves, about 15 inches long (I used a tape measure!) and about 2 inches in diameter. I set the loaves in my two-baguette pan that I had lightly greased and shaken with cornmeal. You can also use a half-sheet pan lined with parchment paper and sprinkled with cornmeal or semolinal.

Preheat the oven to 400˚.

Let the dough rise 20-30 minutes, or until it has just crested the top of the pan. Next, you need to slash the tops of the loaves. (I had to take them out of the pan to do this.) With a very sharp knife, make diagonal slashes on the tops of the loaves, about 1/2 inch deep at 2-inch intervals.

French bread dough

(Put the slashed bread back in the pan if necessary.)

Brush the tops of the loaves with the salt water mixture.

Bake the loaves in a 400˚ oven for 15 minutes. Open the oven and again brush the tops of the loaves with the salt water mixture. Lower the oven temperature to 350˚ and bake for 10 minutes. Again brush with salt water, then bake another 20 minutes at 350˚.

French Bread
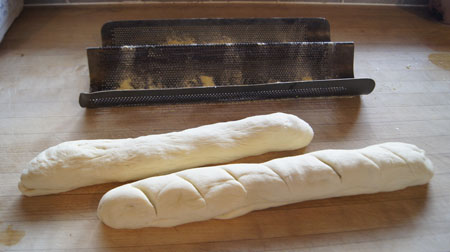
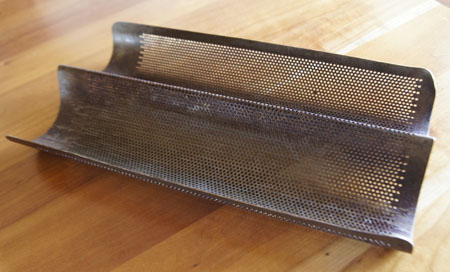
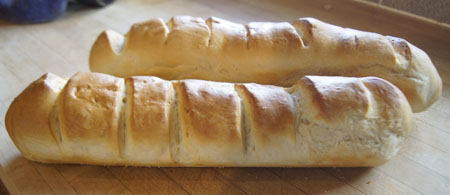
I am very pleased with the results. Granted, I made some of the slashes too deep so it may not look perfect, but the crust is golden brown and good and crunchy. The inside has a good “crumb”, sort of halfway between kneaded breads and no-knead breads. (No-knead breads are more like the artisan loaves we buy locally.) I like the flavor, too. Some chefs argue that true French bread has no milk or butter in it, but I like it this way.

Success! I am glad I re-found and updated this French bread recipe. I will definitely make it again.

Note: I have the cookbook From Julia Child’s Kitchen and will cover it sometime in the near future. I’ve been putting it off since I know it will be a project! But I will look to see if she includes a French bread recipe and if so, what that recipe is.