Many older cookbooks refer to oven temperatures as very slow, slow, moderte, hot, very hot, and extremely hot. In my Encyclopedia of Cooking, Volume 11, I found this handy table that translates these terms into degrees fahrenheit.
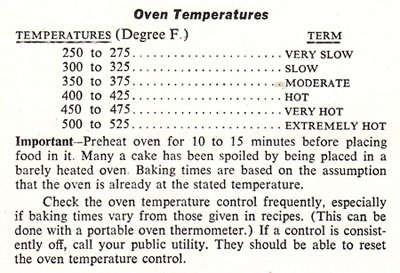

Many older cookbooks refer to oven temperatures as very slow, slow, moderte, hot, very hot, and extremely hot. In my Encyclopedia of Cooking, Volume 11, I found this handy table that translates these terms into degrees fahrenheit.
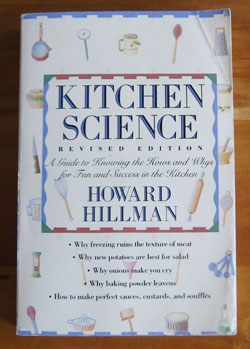
Cookbook #208: Kitchen Science, Revised Edition, Howard Hillman, Houghton Mifflin Company, Boston, 1989.
The following is a quote from Howard Hillman, found in the foreword to this revised edition of Kitchen Science:
“By popular demand, we’ve expanded Kitchen Science, by 25 percent. It was fun because we love to eat, cook, and experiment (a friend affectionately nicknamed us ‘mad scientists in the kitchen’).”
I love this book! Mad scientists in the kitchen, much like me.
From the preface:
“Find yourself a recipe, and you can cook one dish. Teach yourself the science of cooking, and you can cook creatively forever. Creative cooking requires love, imagination, art, and science.”
I bought this book for myself when I was a working chemist. I even loaned it to some of my students over the years. I am very happy to revisit this book for this blog – Kitchen Science has laid on the shelf way too long. Out of curiousity, I checked to see if Howard Hillman has updated Kitchen Science, and sure enough, there is a revision released in 2003.
The first chapter of Kitchen Science covers cooking equipment, for example: how to choose a good knife and how to sharpen it; the advantages/disadvantages of different types of pans.
The next chapter, cooking methods, covers the usual stove top and oven methods, but with a much more scientific twist. Example: “Heat cooking is chemistry. When you increase the heat, you increase the velocity of the molecules in a food. The greater the speed, the more the molecules collide.These microscopic crashes can alter the molecular structures, creating new molecules and changing the color, flavor, and texture of the cooking food.” He also answers questions like “Is there a difference in temperature between lightly and vigorously boiling water?” (no) and “Does salt raise the boiling point of water?” and “Is braising best done in the oven or on to of the stove?” and “What causes a lid to stick to a pan?”
I learn in the “Meats” chapter that a “bloody red steak” isn’t really bloody, instead, the red color comes from myoglobin, a constituent of muscle. Furthermore, myoglobin undergoes chemical changes as its temperature rises, going from pink to drab brown. Thus, the red color in “blood rare” steaks is actually pink myoglobin. “London broil” has been a popular dish since I was a little kid. Today’s markets sell thick round steak as “London broil”. However, true London broil used to be flank steak, a cut of meat that has long fibers and is taken from the side or “flank” of the cow. After World War II, Americans took up the “fashionable backyard sport of barbecuing”, and since each steer has only two flank steaks, butchers began merchandising the relatively abundant round steak as “London broil”. Hillman discusses the pros and cons of salting meat before or after cooking. And beyond beef, he writes that free range chickens have more flavor because exercise developes more flavor in their muscles.
On the topic of fish, Hillman explains that freshwater fishes have more “small, annoying bones” than marine fishes, because salt water has a higher specific density, thus fish in the ocean have a greater buoyancy and that buoyancy allows them to have a heavier bone structure. Lobster claws are secured with rubber bands because lobsters are cannibals, and unless their claws are disabled they will eat each other while they are held in lobster tanks.
I have often run across recipes that say to “scald milk”. I tend to skip this step, always feeling a bit guilty. But no more! From Kitchen Science: “Scalding has two primary purposes: to kill pathogenic microorganisms and to destroy certain enzymes that would keep emulsifying agents in the milk from doing their thickening job.” But today, this book explains, when you buy pasteurized milk, about the only kind of milk offered in US stores, both of these tasks have already been accomplished. Yay! I can now ignore directions to scald milk!
How about drinking chocolate milk as a source of calcium? Well, chocolate has oxalic acid in it, and this chemical inhibits the digestive system’s ability to absorb calcium. So not such a good idea. Unsalted butter is better for cooking because the salt content of salted butter can vary from brand to brand. Recipes from “virtually all serious cookbooks are based on the use of sweet (unsalted) butter”. I have gradually changed my recipes over the past several years to use sweet butter, and now I know why. Pages 110-112 give a great method for clarifying butter, and I’ll definitely use this method next time a recipe calls for it.
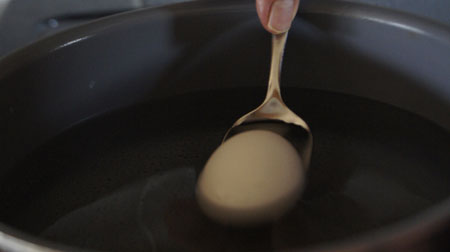
Eggs are the next chapter. To this day, I use the method described in Kitchen Science to boil eggs. First, I use a push-pin to make a hole in the less-pointed end of the egg. You see, after an egg is laid, the yolk and albumen shrink and an air pocket forms between the less pointed end and the shell. When you put the egg in hot water to boil, this area can expand and crack the shell. That’s not only annoying, it makes the boiling water all white and yucky! So I poke a hole in the flatter end of each egg shell, and gently lower the egg into boiling water, and happily watch a stream of air bubble out of the egg. Almost never do these poked egg shells crack in the boiling water. (More on this technique below.)
My interest in chicken eggs may come from my time in graduate school. Here is the title of my master’s thesis: “The effect of methylene bridged monoribonucleotides on transformation of chick embryo fibroblasts by Rous sarcoma virus” (by Patricia Louise Feist, University of Colorado, 1976). For this research project, I had to incubate fertilized chicken eggs for about 9 days in a special small egg incubator (which was re-discovered in the attic storage of the old chemistry building in the 2000s). Each egg had to be placed in the incubator with the flatter end up, otherwise the air sac would break and the whole egg would become infected with bacteria. When you buy a carton of eggs, they should always be sold with the flatter end up. But, I often find them upside down in today’s markets. Perhaps this is because they are sterilized before being sold, a process which oddly enough makes them require refrigeration. In Togo, eggs were not sterilized, and stored at room temperature, and were just fine because unsterilized eggs have a natural protection.
I digress! Back to Kitchen Science. “What is the difference between a fruit and a vegetable?” Here is the excerpt:
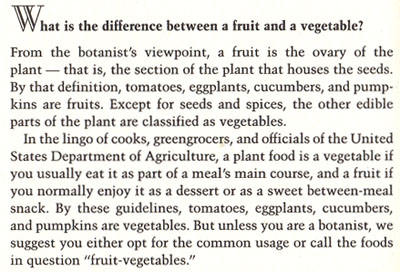
Now I think I’ll call tomatoes “fruit-vegetables”.
“Sauces and Thickeners” is the next chapter. I took a cooking class on sauces and the information in this chapter correlates with what I learned there. Emulsified sauces intrigue me. I guess it’s from all those times I shook up solutions in a separatory funnel, and often had a nasty emulsion at the interface of the aqueous and hydrocarbon layers. Emulsions in the lab were a pain in the neck, but an emulsion in a salad dressing is a wonderful thing. Kitchen Science has several “experiments” on making emulsified and other sauces, like Hollandaise, Vinaigrette, and Maltese Falcon Custard, and Mornay Sauce. How fun! I’d like to make them all.
In the “Seasonings” chapter, I learn that kosher salt is better than regular salt for sprinkling on food like corn on the cob because the salt crystals are larger and because they have a more jagged configuration, and thus cling better to food surfaces. “Kosher salt is so named because it was specially developed as an aid for Jews who adhere to kosher dietary laws, one of which requires that as much blood as possible be removed from meat before it is cooked; the characteristics of kosher salt make it better suited for drawing out the blood”. MSG, monosodium glutamate, highlights the flavor of salt, but leaves a peculiar off-flavor. Hot chili peppers are more popular in tropical (hot) zones because they cool the body, perk up the appetite, and add zest to a bland diet (veggies and seafood in the tropics are bland, according to Kitchen Science). Hot chilis are a preservative, swamp the telltale tase of spoilage, reduce the incidence of diarrhea, and aid digestion by accelerating the flow of gastric juices.
“Oils and fats” explains that an oil is a fat, but it is common practice to use the term “fat” for those fats that are in a solid state at room temperature. Shortening can be made from animal or vegetable fat; those based on vegetable oil are made solid by hydrogenation.
I learned something about unbleached flour in the baking chapter. (I also discussed unbleached flour here.) According to Howard Hillman, unbleached flour has a more natural taste because it has not been treated with bleaching chemicals. However, unbleached flour must be aged for several months to strengthen its gluten content; bleaching artificailly ages the flour so it can be sold right away. Thus, bleaching the flour is not only a cosmetic preference demanded by the consumer, as I always thought, but also a way to get a product to market faster. I learn that sifting flour is no longer necessary (yay!), because “Most modern baking recipes are based on the measured volume of unsifted flour, partly because the flour sold today is not as compacted as it was in our grandparent’s day. But even if the flour of yesteryear didn’t need sifting for lightness, it probably would have been best to sift it anyway to remove insects and other impurities.”
Pages 258-262 give and describe a list of about twenty common food additives. Granted, it’s not as complete as J. Michael Lapchick’s book The Label Reader’s Pocket Dictionary of Food Additives, but this list is still useful.
The last chapter is a potpourri of science facts about foods. In this chapter is a 6-page principle-illustrating recipe on how to make a souffle. I think I’ll review this section next time I make a souffle for dinner (one of our favorite meals).
For this blog, I decide to boil eggs. Ha, what can be easier? Who needs a recipe? Well, there are a lot of controversies on how to properly boil an egg. Some start in cold water, for instance. As I stated above, I always use the method described in Kitchen Science. (Please read the first sections of this blog entry to find out why I poke holes in the eggs before boiling.)
Step 1. Bring a pot of water to a rolling boil, then turn the heat down a bit so that it’s boiling but a little calmer. If it is a huge rolling boil, the eggs might hit each other while cooking, increasing the chance that they will break. But it’s important to have the water boiling because this recipe is carefully timed, and you need the water at a predictable temperature.
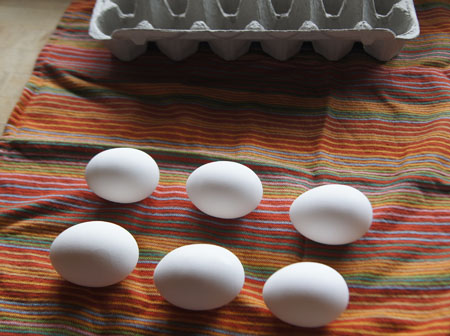
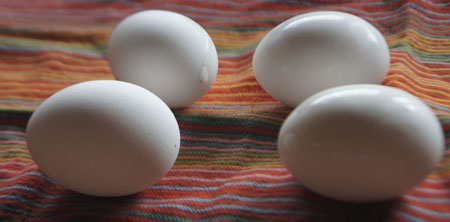
Step 2. While still in the carton, study the eggs you will cook. The top side should be the flatter end of the egg, the end where the air sac resides.
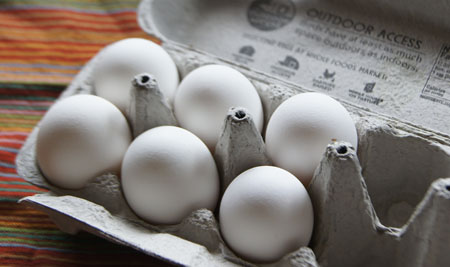 I took the eggs out of the carton in the same order and laid them on a cloth with the upper ends to the right for each egg. Note how hard it can be to find the flatter end – sometimes both ends look the same.
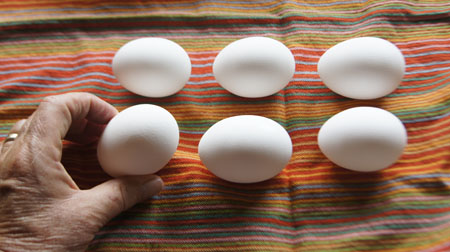
 Below is a close-up of these same eggs. I am tilting one egg, flat side up:
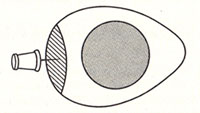
Poke the flat side of each egg with a pushpin. Two illustrations follow. The first is an illustration I copied from Kitchen Science, where the hashed lined represent the air sac between the egg white/yolk and the egg shell:
This next illustration is me poking the egg with a pushpin:
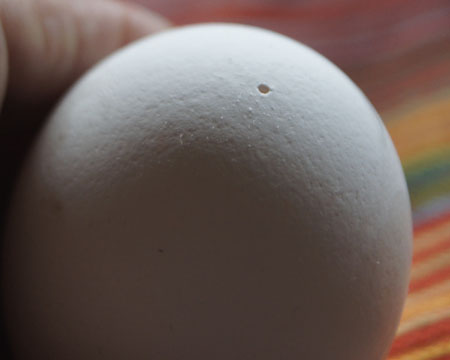
 Poked hole:
Step 3. Gently lower each egg in the boiling water and watch for bubbles coming out of the egg. If air bubbles rather than egg white comes out, you have chosen the correct end. If egg white comes out, quickly remove the egg and save it for a different use.
 As careful as I was to remove the eggs from the carton properly and poke what looked like the flatter end, one of the eggs had been put in the carton upside down was thus in the wrong orientation (the upper left egg in the pattern of six). Instead of bubbles, white goo came out when I lowered it into the boiIing water. I removed it immediately. Here is the gooey egg white coming out of the hole in the upper left egg:
Step 4: As soon as all the eggs are in the water, set your timer! Kitchen Science says to boil the eggs 12 to 15 minutes if you are at sea level; boiling them longer can make them turn dark green around the edges of the egg yolk.
I have always boiled eggs 20 minutes, but my kitchen is at 5300 feet. Is 20 minutes really the proper time I should use? I will do a little experiment today, and cook 3 of the eggs for 15 minutes, and 3 of the eggs for 20 minutes.
I measured the temperature of the boiling water, and it was 202˚ F.
Step 5: When your timer dings, remove the pot from the stove and immediately place the eggs in cold water to stop the cooking.
Kitchen Science says it is easier to peel the eggs when hot. So, after 5 minutes in cool water, I removed them and peeled them. And yes, the shells came off easily.
I cut each of the 6 eggs in half. In the photo below, the 15-minute eggs are on the top of the plate, and the 20-minute eggs are on the bottom.
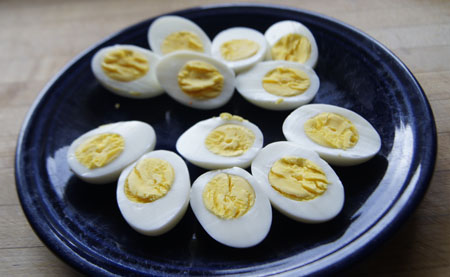 Conclusion: In my opinion, the 15-minute eggs were a bit undercooked. Here is a close-up, with a 15-minute egg on the left, and a 20-minute egg on the right:
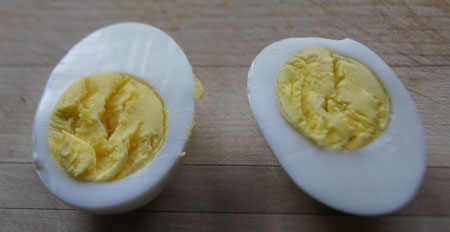 Neither has a dark green discoloration on the sides of the yolk.
So, the 20 minutes I have always used is the best time to hard boil eggs at my altitude. Maybe I did this experiment years ago, when I first got this book. But it totally makes sense that it will take longer to hard boil eggs if my boiling water is 202˚ F instead of the sea level standard 212˚ F.
It was getting to be lunch time, and I couldn’t resist putting a little salt on an egg and scarfing it up. So good! I made deviled eggs from the rest (added a little mustard and mayonnaise to the yolks, topped with a bit of paprika). We both love deviled eggs. They were gone early the next day.
Simple hard boiled eggs. A good lesson in science, and a good thing to eat.
We live in Colorado at about 5300 feet altitude. Below are the guidelines I have gathered over the years to help me convert a recipe for sea-level so that a cake will not fall when baked in my oven. I don’t always use all of these methods in a recipe; I try a few of them and make notes for the next time I make it.
Shortenings
In all of my cookie recipes, do not substitute one type of shortening for another. If it says “margarine”, do not use butter. If it says “vegetable shortening”, do not use margarine. I can’t guarantee a recipe will work if shortening substitutions are made. In general, I am not a fan of margarine, but if you are going to make cookies, you want them to turn out as good cookies.
Mixing batter
Most drop cookie batters begin with mixing the shortening and sugar, and then adding eggs. I always use a stand mixer and beat the shortening and sugar on high until fluffy, lower the speed to crack in the eggs, and beat again blend on high until fluffy. Then, add the combined dry ingredients and mix only until they are all mixed in.
Flour
Unless otherwise stated, I use unbleached all-purpose flour for cookies. I always measure flour for cookies by dipping a measuring cup into a large canister of flour and shaking it level. This isn’t the most scientific or re-producible method, but that’s what I do. Occasionally I’ll add a little more flour to a batter if the first pan of cookies flattens out too much.
Mixing dry ingredients
I don’t sift. I do mix with a spoon the flour and other dry ingredients (baking powder, baking soda, salt, spices) in a bowl. I use all purpose flour.
Melting chocolate
I often use the microwave. I use the high setting and check and stir every half a minute. If melting chocolate with butter or margarine, it’s often more convenient to use a pan on the stove top.
Miscellaneous ingredients
Use real chocolate chips and real vanilla.
Baking
Many of my older recipes state to bake either on greased or ungreased baking sheets. Today (2012), I bake all cookies on parchment lined half sheet pans. I haven’t re-made some of the older recipes, so some of the greased/ungreased nomenclature may be included in the recipes. It actually can make a difference in how the cookies “bake up”, meaning, how much they spread out as they bake.
And always preheat your oven before putting in the cookies.
I use the chart on page 70 of my Weber’s Real Grilling (2005) cookbook:
rare 120-125˚ F (USDA recommends not cooking meat this rare)
medium-rare 125-135˚ F (USDA recommends 145˚ F)
medium 135-145˚ (USDA recommends 160˚ F)
medium-well 145-155˚ F
well-done 155˚ F + (USDA recommends 170˚ F)
The lower values are “chef standards”. The USDA does not agree, so use these lower values at your own risk. The chef standards listed above agree with several of my other grilling cookbooks.