Cookbook #13: The New Pasta Cookbook. Joanne Glynn, Tormont Publications, Montreal, Canada, 1993.

Pasta is one of my favorite foods. Sometime in the early 1980s I bought a manual pasta maker, and sometime in the 1990s I received as a gift an electric pasta machine. I must have picked up The New Pasta Cookbook around the time I got the electric pasta machine. I don’t think I’ve ever made any recipe from this book, it’s clean and has no notes written in it.
This is a glossy cookbook with lots of photos, including pretty pictures of many different types of pasta. Some recipes use ready-made pasta, others include instructions for making the pasta from scratch. Lots of interesting variations on pasta sauces and pasta dishes are included. But for some reason, I just don’t “bond” with this book. The author doesn’t write personal notes, either in a foreword or with the individual recipes. Many recipes seem high calorie, although no nutrition information is included. I don’t like the layout of the recipes.The recipes have long names: “Fresh Carrot Pasta with Cream and Mint”, “Spicy Ricotta Agnolotti in Herb Leaf Pasta”, “Sauce of Leeks, Gruyere, and Cream”. Why do I mention this? A pet peeve. Long recipe names are distracting and pretentious, in my opinion.
It took me several times of going through this book to find a recipe I wanted to try. I chose one of the long-name recipes: “Seafood Agnolotti with Coriander and Zucchini”. Agnolotti is a filled pasta, similar to ravioli, but these are folded-over circles instead of filled squares. The recipe calls for preparing the pasta from scratch. The filling is a mixture of fish, shrimp, ricotta, spinach, fontina cheese, and coriander (cilantro). The sauce is light, just zucchini and butter: sounds good, but my eating partner likes heavy sauces and he is not a fan of zucchini. I will make a regular tomato sauce to sauce the agnolotti, and I will also prepare a variation on the zucchini sauce.
I have set myself up for a long task: pasta from scratch, a filling, and two sauces to prepare. I will have to focus carefully on the sauces, since I will be going off-recipe so that I can create something both of us will enjoy. Here is what lies ahead for me:


It’s a Wednesday afternoon. I find my old manual pasta maker, dust off the cobwebs (literally). I used to use it a lot! I remember making pasta at least once a month when the kids were little. I’d make a full batch and freeze extra noodles for quick mid-week meals. Where did I find the time, raising kids and working full time? And why did I stop making fresh pasta? I think I stopped because stores now offer fresh pastas that are almost as good. I also use no-bake lasagne noodles (Barilla); soaked in hot water, these make a quick lasagne or can be rolled to make manicotti.
But I seem to recall that homemade, fresh pasta just can’t be beat. And now I have the time to see if my memory is correct.
The Project
I am first going to describe how I prepared this dish, and then I will write down the recipe as I revised it.
Freshly mixed pasta dough needs to rest 30 minutes to an hour before it can be rolled out. So the first thing I do is prepare the pasta dough. I use the recipe that I was given at a cooking demonstration when I first bought my manual pasta maker:

I like semolina flour in my pasta dough, and I know this recipe works. I’m not going to all this work using an untried dough recipe. I put the flours, salt, eggs, olive oil, and a couple tablespoons of water in my big stand mixer, and start it mixing on a low speed. Then I add more water in small portions until the dough almost holds together. This is a judgement call, and I was pleased that it all came back to me, I just “knew” when it was right. This day, I added 3 tablespoons of water.
I took the dough out of the mixer and pressed it into a big ball. Then I covered it with plastic wrap and set it on the counter to rest. In the photo, you can see how the dough “almost” holds together.

Time to start the filling. Note that the New Pasta Cookbook’s recipe calls for poached fish and cooked shrimp, but gives no instructions for either task. I decide to poach the seafoods in hot water seasoned with lemon, cilantro, wine, and salt. I brought this mixture to a boil:

I added the fish to the pot and covered it, then removed it from the heat. After two minutes, I added the shrimp (shrimp should never be overcooked). I waited another two minutes, then strained the mixture through a colander. When cool enough to handle, I picked out the fish and the shrimp, chopped them into small pieces, and put them in a bowl.
Next, I cooked the spinach. Spinach really cooks down. I put half of a 5-ounce package of fresh spinach in a pot and added a little water, brought it to a bowl, then turned off the heat. In a few minutes it was done. I drained it through a colander, squeezed out most of the liquid, and chopped the spinach (it measured about 1/4 cup). I added it to the bowl with the fish and shrimp, then I added the remaining filling ingredients.
By this time, at least 30 minutes had passed, so it’s time to roll the pasta. Boy, this all comes back to me! This is fun, pushing the dough through the pasta roller. My pasta maker has six settings. I started on setting 1 (thickest) and pushed one-quarter of the dough through, turning the crank. Then I folded that piece in two and rolled it through once more. Next I changed to setting 2 and rolled it through once, setting 3 once, and so on all the way to setting 5. By this time, the sheet of dough was quite large, so I chopped it in half and put each piece through setting 6. After I rolled all the dough in this manner, I had 8 thin sheets of dough. I covered them with plastic wrap to keep them from drying out too much.

Time to fill and cook the agnolottis. I start a pot of water boiling as I lay the first sheet of pasta out on my counter. I take my very ancient biscuit cutter and start cutting out circles. I have to push down very hard because it’s not very sharp!

I use my fingers to spread an egg wash on each circle, then add a small amount of filling, then fold the agnolottis over and crimp with a fork.


I quickly learned that I couldn’t use too much filling or the dough would crack when folded. I also learned that the agnolottis like to stick to the bread board, so I transferred them to a lightly floured parchment paper.
Once I had about a dozen agnolottis formed, I put them in boiling, salted water. They took about 4 minutes to cook.
I just had to try one! I carefully removed one with a slotted spoon and when it was still almost too hot, I put it in my mouth. 
Absolutely heavenly! Perfect perfect perfect! The photo doesn’t do them justice, though.
Okay! Time to cook the rest of the little pastas. Now I can rest easy, I know they will make a great meal.
What happened, though, is that I cooked a lot of them, then got tired. I had enough for about three people when I stopped cooking the agnolottis. I had thought I’d make extra for another meal, but I had been in the kitchen for three hours and enough is enough. I froze about half the dough sheets for a future meal. I did a calculation, and I figure that if I had made the recipe according to the one in the cookbook, I would have enough for 8 people, not 4 as stated in the recipe. I had a lot of filling left over, but oh well. There is also a lot of wasted dough, since cutting circles leaves a lot of unusable dough pieces. (Square raviolis make better use of a sheet of dough. Ravioli is more environmentally proper. Ha.)
While I was making the agnolottis, I also prepared a baked tomato sauce. The New Pasta Cookbook has a recipe for this, and it appealed to me because I could just pop it in the oven and forget about it.
 I followed this recipe almost as written. I didn’t drain the tomatoes; I used an immersion blender to crush them; I chopped the onion, garlic, and basil in a mini-chopper. It turned out great:
 I finished the pasta and the tomato sauce about an hour before meal time. Just before we ate, I quickly sauted julienned zucchini and a mixture of mushrooms in a little butter.
To serve, I lay the agnolotti on each plate, then put a little sauce and zucchini-mushroom mixture on and around the pastas.
When I sat down to eat, I shoveled in about three pastas and then stopped to breathe. They were that good. Delicate, bursting with flavor, and perfectly complemented with my two sauces.
These were so successful that I will keep this cookbook, try more recipes, while aware that the recipe might take a long time to prepare. I read the back of the book and learned that in 1985 the author opened a fresh pasta business, supplying a chain of retail shops. I’m sure that she has a lot of help when she prepares her recipes. I need a sous chef!
The Recipe: Seafood Agnolotti
This recipe makes enough for 2-4 people, depending on appetites. It makes extra pasta dough, which can be frozen, uncooked, for later use.
Pasta:
- 1 1/2 cup all purpose flour
- 1/2 cup semolina flour
- 1/2 teaspoon salt
- 2 eggs
- 2 tablespoons olive oil
- 2-4 tablespoons water
Put the flours and salt in an electric mixer bowl, then add the eggs and oil. Turn the mixer to a low speed and mix until the eggs are incorporated. Continue mixing while adding water, one tablespoon at a time, just until the dough holds together. Remove the dough and push it into a large ball, cover with plastic wrap, and let stand at least 30 minutes.
Divide the dough into four pieces. Use a manual pasta maker to roll each portion into a long thin sheet, going sequentially through the settings on the roller from 1 (thick) to 6 (thin). If a sheet gets too unwieldy, cut it in half. Cover the sheets of dough with plastic wrap or damp towels.
Filling
- 2 ounces white fish, uncooked (cod, sole, halibut, haddock, etc.)
- 2 ounces raw shrimp, shell removed
- lemon, cilantro, and wine for poaching fish
- 1 tablespoon finely chopped cilantro (this is fresh coriander)
- 1/4 cup fine bread crumbs
- 1 1/2 tablespoons grated fontina cheese
- 1/8 teaspoon salt
- about 1/2 ounce fresh spinach
- 1/3 cup ricotta cheese
Bring a pot of salted water to a boil, then add lemon wedges, a few sprigs of cilantro, and a dash of white wine. Add the fish and cover the pot and remove from the heat. Let stand 2 minutes. Add the shrimp and let stand an additional 2 minutes. Drain through a colander. Pick out the fish and shrimp and place in separate piles; chop each finely (especially the shrimp, or it will poke through the agnolotti), then place in a bowl.
Put the fresh spinach in a pot – a half ounce is probably about a cup. The amount of spinach is not critical, since about all it brings to this dish is a bit of color (well, a few nutrients too). Add about a half cup of water to the pot, cover, and bring to a boil. Remove from heat, and when cool enough to handle, put the spinach through a colander and squeeze out all the moisture. Chop it finely and add to the fish and shrimp.
If necessary, make fresh bread crumbs in a food processor, or use packaged bread crumbs. Add these to the other filling ingredients along with the fontina and ricotta cheeses, a little salt, and a tablespoon of chopped cilantro.
Making the agnolotti
Beat an egg in a small bowl – it is used to seal the pasta. Set a pot of salted water over high heat to bring it to a boil.
Place a sheet of dough on your working surface. Use a cookie cutter or the rim of a glass (about 2 inches in diameter) to cut out circles of dough. Use a brush or your fingers to paint the beaten egg around the rim of each circle. (I used my fingers and I got the entire circle “painted” but hey, I’m a messy cook.)
Put a little filling in the center of each circle, then fold over to form a half-moon shape. (You will learn that you cannot fill these too full, or they will burst through the dough when you fold them over.) Press the sides of the circle together and go around the cut edges with a fork, or a zigzag pastry wheel or a crimper cutter if you own such a tool.
As the agnolotti are filled, place them on a lightly dusted piece of parchment. When you have enough to fill a pot (about 10-12), put them in to cook for about 4 minutes. Meanwhile, go back to making more agnolotti.
Remove cooked agnolotti with a slotted spoon and place them in a colander. Make agnolotti and cook agnolotti until you have used all the filling, or until you think you have enough to serve as many people as you have for dinner.
As the agnolotti cool in a colander, they probably won’t stick together, but watch them. I didn’t rinse them. When completely cool, you can put them on a large dish or in a bowl.
At serving time, these are tricky to heat back up. I microwaved them briefly, but a couple burst and made a mess in the microwave. The best way is probably to run hot water over them, or put them into a simmering sauce just before serving.
Wrap and freeze any unused pasta dough. If you have extra cooked agnolotti, you can freeze them.
Sauce 1: Baked Tomato Sauce
This makes more sauce than you will need for 2-4 people; any extra can be frozen.
- 28 ounce can of whole, peeled tomatoes (undrained)
- 2 cloves garlic (or more)
- 1 small onion, cut in chunks
- lots of fresh basil (at least a couple tablespoons when chopped)
- 1/4 cup extra virgin olive oil
- chili flakes
- 1/3 cup fine bread crumbs (fresh if possible)
- 1/3 cup grated Parmesan cheese (fresh if possible)
Put the tomatoes in a deep baking dish. Use an immersion blender in pulses to break up the tomatoes a little, without turning them into a puree. Alternatively, mash them with a fork.
Put the garlic, onion, and basil in a food processor and pulse a few times. You want these finely chopped, but not pureed. Stir the mixture into the tomatoes along with the olive oil, then sprinkle with a few chili flakes.
Mix the bread crumbs and the Parmesan cheese, then sprinkle over the top of the tomato mixture. Bake – uncovered – in a 400˚ oven for 45 minutes.
Don’t break the crust until the sauce is being tossed through the pasta; large crunchy bits should remain.
Sauce 2: Zucchini and mushrooms
- 1/2 of a zucchini
- 2-4 ounces mushrooms (plain old white ones, or see if you can a mixture of interesting-looking types at your local store)
- olive oil to taste
Slice the zucchini into thin strips, julienne-style. Chop the mushrooms. Heat the oil in a pan and cook the zucchini for a minute or two, then add the mushrooms and cook a few more minutes, until the mushrooms are cooked. Drizzle with olive oil. Feel free to add garlic, basil, or Parmesan cheese, or even some cilantro.
Put it all together
Warm the agnolotti (if necessary) by running some hot water over them. Place them on a warm serving plate, if possible. Arrange, to taste, the tomato and zucchini-mushroom sauces around and on top of the agnolotti.
Serve! Enjoy!
250 Cookbooks next post

 This is one of my favorite cookbooks! I store it in my kitchen cabinet with other cookbooks that I use a lot (like my Joy of Cooking). I rely on it for the Denver Cheesecake that I make at Christmas. I love the Creamy Banana Coffee Cake, with bananas, cream cheese, spices, and pecans, baked in a bundt pan. It’s my reference for baklava. I have notes and scrap papers throughout this cookbook.
 The above recipe calls for whipping cream, and I’ll substitute it with milk to save calories. I want to serve these as small, appetizer-sized crepes, so I will make the crepes smaller. I will halve all amounts to serve three instead of six. Other than that, I plan to pretty much follow this recipe.
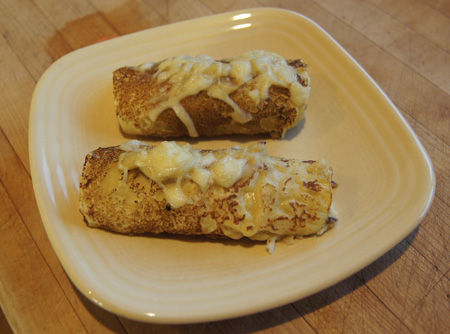
 This 1992 cookbook gathers several hundred recipes from the magazine Cooking Light. (The magazine is still in publication in 2012.) The recipes include appetizers, breakfasts, breads, main dishes, and desserts. All are slanted towards a low-calorie, low-salt diet.
 I don’t know why the printed recipe states to drain the pineapple and reserve the juice. It isn’t used in the recipe, and no explanation for saving the juice was given.
 Yummy!