Favorites: Fish Cakes with Sauce

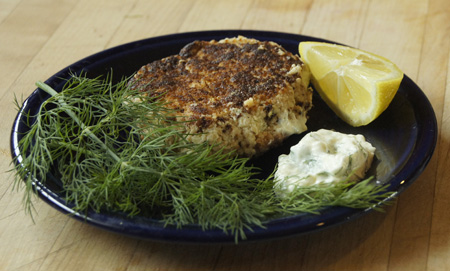
This recipe is based on one I clipped from a printed BonAppetit magazine, date unknown. I first tried these fish cakes in 2009, and modified the recipe several times to settle on the version below. What’s kind of nice about this entree is that you can use frozen fish. I choose frozen mahi mahi, simply because I can always find it as a wild caught product in our local stores. Cooked as is from the package, it can be tough. But chopped up in these dill-seasoned fish cakes, it is a yummy delicacy.

I state to use “12 ounces” of fish because that’s the size package it’s sold in. Any fish will probably work. I’ve been successful with tuna, mahi mahi, and cod. If you don’t have quite 12 ounces of a fish filet, add a few scallops to make up the weight.

If you don’t have fresh dill, use any fresh herbs you have, like oregano and basil.

The recipe makes 4 fish cakes. It will serve 2-4 people, depending on appetites. For the two of us, I usually have a leftover fish cake that tastes good the next day!

Sauce:

  • 1/4 cup mayonnaise
  • 1/4 cup yogurt (substitute the yogurt with mayonnaise if you prefer)
  • 2 tablespoons lemon juice (fresh) (go ahead and squeeze 3 tablespoons, since you will need 1 tablespoon for the fish cakes)
  • 1 tablespoon lemon zest
  • 2 tablespoons pickle relish
  • 1-2 tablespoons horseradish (this depends on how hot your horseradish is and how much you like the taste of horseradish)
  • 2 tablespoons chopped fresh dill (go ahead and chop 3 tablespoons, since you will need a tablespoon for the fish cakes)
  • 1/4 cup chopped green onions (go ahead and chop 1/2 cup, since you will need 1/4 cup for the fish cakes)

Fish cakes:

  • 2 cups fine bread crumbs, divided (process about 3 slices of sandwich bread in a food processor)
  • 1/4 cup chopped green onions
  • 1 tablespoon chopped fresh dill
  • 1 tablespoon lemon juice
  • 1 egg, lightly beaten
  • 12 ounces mahi mahi, or other boneless, darkish fish (this is a good time to use economical frozen fish)
  • olive oil

Mix the sauce ingredients and set aside.

Put 1 cup crumbs in a large bowl (for the fish cakes), and place about a cup in a dish (for coating fish cakes).

Cut the fish into large chunks and put it in a food processor. Using very short on/off pulses, very coarsely chop it (do not form a paste).

Add the processed fish to the breadcrumbs in the bowl; then gently mix in the egg, 1 tablespoon of the sauce, 1/4 cup green onion, 1 tablespoon of lemon juice, 1 tablespoon chopped dill, and a little salt.

At this point, you can let the mixture stand for an hour or so, covered in the refrigerator. The original recipe did not say to do this, but I did it and it worked.

Shape the fish mixture into 4 – 3 1/2″ round cakes. Thickly coat both sides with the breadcrumbs in the dish.

Heat a large non-stick pan over medium high heat. (I always hold my hand an inch above the pan and when I can feel a good heat coming off the pan, I know it’s ready. Don’t heat it to the smoking stage.) When the pan is hot, add enough olive oil to lightly cover the bottom of the pan. As soon as the oil is shimmering, carefully add the fish cakes. Cook until cooked through and nice and brown and crispy, about 4-5 minutes per side.

Serve immediately, with the sauce and fresh lemon wedges.

Fish Cakes

Favorites: Chicken Casserole

Sometimes I just have to share a weekday favorite. As I wrote to myself in my personal “recipes” document: “I make this a lot! It’s one of our comfort foods.” This recipe graduated from a little handwritten index card to permanent status on my computer(s). It’s Thanksgiving-timely since you can use leftover turkey instead of chicken. I can’t remember where I got the recipe; all I know is that I took the time to put write it on a recipe card sometime in the 80s. I liked it enough that I included it on the short list of main dishes in my 1990s blog.

This is a casserole that I know will taste good. I can make it and feel no pressure at all whether or not dinner will be a success. I like to make it in a deep, round casserole rather than a short square or rectangular dish. When I make it for the two of us, I use a little less than a can of soup, and nudge the amounts of the other ingredients down a bit.

Enjoy.

Chicken Casserole

Serves 3-4.

  • about 1-2 cups cooked rice, I often use a mixture of wild rice and brown rice
  • 2 cups cooked chicken (or leftover turkey)
  • 1/4 pound cooked fresh mushrooms (don’t use canned unless you have to)
  • 1 10 3/4 ounce can cream of mushroom soup mixed with 1/2 cup milk
  • 1 small can sliced black olives
  • 1 cup grated cheddar cheese
  • 1/2 cup sliced almonds

Use a 3 quart casserole. Put in rice, then chicken, then mushrooms, pour soup mixture over top. Add olives, then cheese, then almonds. Bake at 350 degrees 45 minutes or until hot.

My Daily Bread

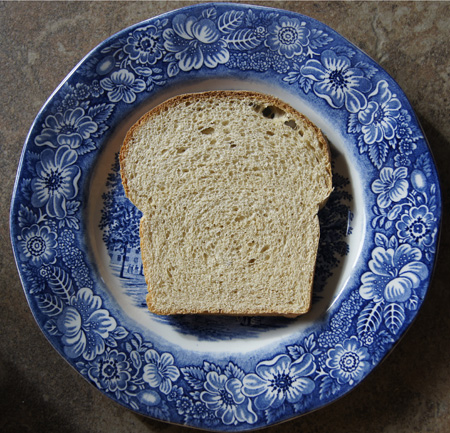
slice of bread

This is the bread I make every week for my sandwiches. Whole wheat and hearty but soft and pliable.

I am not going to try to teach you guys how to make yeast bread. Lessons for that skill are covered by a multitude of books, or passed on by family members or friends, or learned in a cooking class. But I will share my own methods and tips as I go along in this cooking blog. And a little philosophy.

I learned how to make bread soon after I was out on my own. I wanted to make cookies, pies and cakes, but couldn’t afford the calories. So I turned my love of baking to yeast breads. I remember when I was twenty-one and living in Huntington Beach, California. I was in the kitchen of a funky old house, kneading bread. Someone knocked at the door, and I went to answer with whole-wheat-dough-messy hands. It was Jehovah’s Witnesses, and they started giving me advice on how to make bread!

It was the 1970s, and I of course was bra-less, wearing beat-up jeans. Hippie time. My first loaves made from heavy wheat flour were dense and heavy and flat. But the smell, the smell! Freshly baked bread, even heavy bread, smells wonderful.

I grew up a little and moved to Colorado and got a real job. I continued to hone my bread making skills, gleaning knowledge from books and magazine articles and later, online communities. Like those Jehovah Witnesses, everyone had their opinions on how to make the best bread.

I learned how to combine flours to make a healthy and light loaf of bread. At first, I hand-kneaded my breads. Yes, there is a sense of accomplishment in this task, and the elastic, perfectly kneaded loaf feels good under your hands. But I’m not the most patient person. My results were inconsistent, but I kept going, I still kept baking.

I received as a gift a KitchenAid mixer in the 80s, and soon I employed it to knead bread. That made a huge difference in the consistent outcome of my bread loaves. I watched the bread as it kneaded and adjusted the flour and liquid as necessary to get a smooth, elastic loaf.

That went on for a decade or so. Then I was given a bread machine, and wow, was I hooked. Today I use a bread machine to knead most of my loaves of bread (there are no-knead breads too, but that’s another post). The machine controls kneading as well as rising factors; you can plan your time because you know exactly when it will be read to bake. I’m a chemist, and the more factors you can control in an experiment, the more you are able to play around with ingredients. I prefer to bake my loaves in a conventional oven, though. I just don’t like taking a loaf out of a bread machine and having to take out the little mixing paddles from the bottom of the loaf. Currently I am on my third bread machine, I wore out one, and I keep an older one in case I want to knead two kinds of bread at the same time!

Again bringing in my chemist-background lab experience, I weigh my flours and carefully measure the liquids. There is no better way to consistently get the proper liquid/flour proportions in a loaf. I also  watch a loaf as it kneads in the bread machine and add more flour or liquid as necessary. I still have occasional failures, when I experiment a little too much! But “My Daily Bread”, the recipe below, works for me week after week.

I am not going to force my method of bread making on anyone. I’ll give you tips, but no more. Take them or leave them. You can only learn how to make yeast bread by many tries, many failures, many successes. With practice, each person figures out their own way to make perfect bread. Each person works with currently available ingredients and equipment, societal fads, and their own preferences. Each person finds their own way, and their way is as good as any other, as long as it’s enjoyable.

Bread making is a journey, like life.

Here is my daily bread, my staple for sandwiches and toast. It is high in fiber, while still making a bread that slices for sandwiches and toast. I know my ingredients, so I am assured that there are no preservatives or excess sugars or fats. I trust this bread to keep me healthy, as well as provide great taste!

My Daily Bread

Two thin slices of this bread (60 grams) have about 100 calories.

  • 1 cup buttermilk
  • 1 tablespoon vegetable oil
  • 1 tablespoon sugar
  • 1/2 teaspoon salt
  • 1/2 teaspoon baking soda
  • 12 ounces flour (see below)
  • 1 tablespoon active dry yeast

Each week, I vary the types of flours that I use. I always use about 1/3 cup gluten flour, a half-cup of all purpose flour, and a large amount of white wheat flour (King Arthur Flour). Sometimes I include about a half-cup of oat or other whole grain flour, and a few tablespoons wheat germ, hi-maize high fiber flour, or flax seed meal. What is important is that the weight of the flours is 12 ounces. (If you add too much whole grain flour other than white wheat flour, the bread will not rise well and the cooked loaf will be dense.)

If I have leftover cooked hot cereal, barley, or rice, I sometimes add it too (about a half cup). But if I do, then I’ll watch closely as the bread kneads, and add a bit more flour if necessary.

Put all the ingredients in a bread machine and set to the dough cycle. Watch the dough as the machine kneads it. Sometimes a paddle will not rotate and needs some fixing. Sometimes the flours are too dry, and you see just lots of clumps instead of a ball of dough. If this happens, add more liquid by the tablespoon until it forms a ball. Sometimes the dough is too sticky; if this happens, add more flour by the tablespoon until the dough looks smooth and elastic. Most machines will knead and rise a loaf of bread in about 1 1/2 hours.

When the bread machine signals that it is done, remove the dough from the machine.
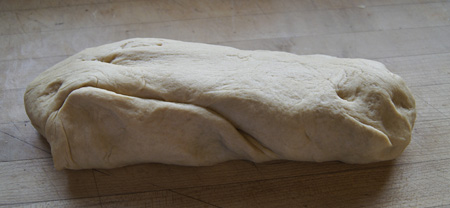
dough

Next, fold in thirds and push it around a little to re-distribute the yeast, then form it into an oblong that will fit into an 8 1/2 x 4″ loaf pan.
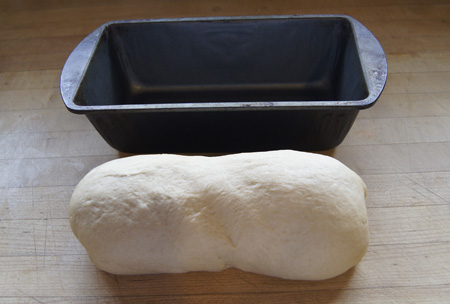
into pan

Place it in the loaf pan and set it in a warm and non-windy part of your kitchen. I usually put it on the top of the stove. Start preheating your oven to 385˚.
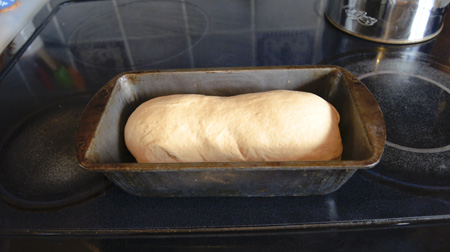
before rising

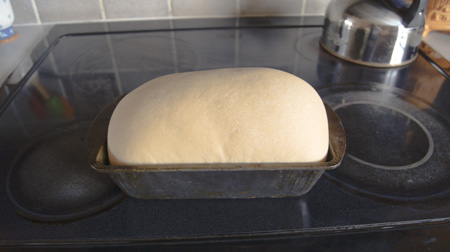
Let the loaf rise until it’s double in bulk, or until it has risen above the edges of the loaf pan. In the summer, this might take only 20 minutes. When my kitchen is cool in the fall or winter, it might take 45 minutes. Here’s a well-risen loaf:
risen

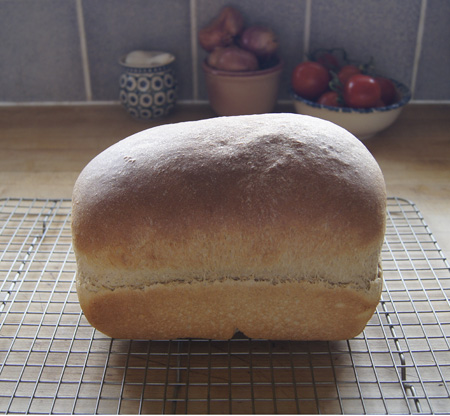
Bake at 385˚ for 20 minutes. Take it out and let it cool. It’s tempting, but if you cut it now and eat a hot slice, it really messes up the loaf for later neat-slicing. (I don’t always follow this rule <grin>)
baked loaf

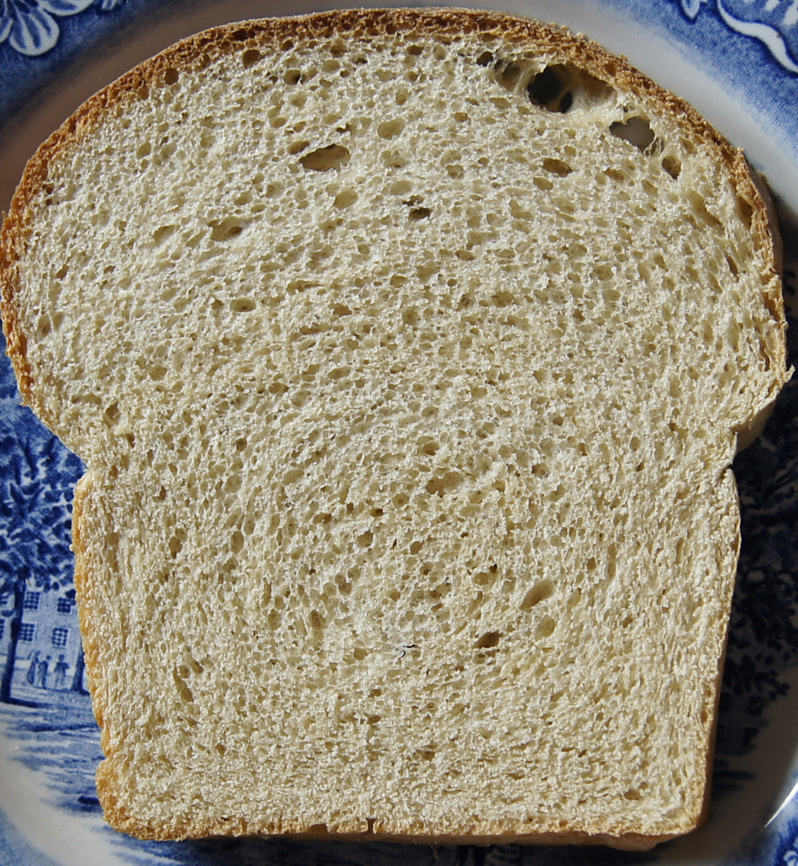
Here’s a close-up of the great crumb and texture of this bread. Click on this photo and it will get even larger:
slice of bread

I do love my bread! It’s great for sandwiches, and great for toast!

Favorites: Tortilla Flat breads

tortilla flat breads

Several years ago I ran across an interesting recipe in a King Arthur Flour catalog for yeast-dough tortillas. At the time, I had just taken a class in Middle Eastern cooking where I had learned a great way to make flat bread pizzas by cooking them on an indoor grill pan. The King Arthur recipe could be adapted to grill pan cooking, I thought. I just had to try it!

Now, a little bit about King Arthur Flour. This is a company that specializes in ingredients for baking. I learned about them through a “user group” in the late 90s. User groups preceded listserves and I guess, now, Facebook as a way of people with like interests to share ideas. Anyway, the consensus at that time was that King Arthur flours are the best for baking. I ordered them through the catalog, liked them, and eventually found that this brand of flour is sold at Whole Foods and now even Safeway. Today I only buy this brand of flour.

There are drawbacks to King Arthur flour recipes, though. This a company that sells baking ingredients (and related cookware), so their recipes often have a long list of different types of flours. They are, after all, trying to sell their products. I can forgive them for that. The take-home lesson is: Substitute when necessary. Feel free to use all-purpose flour for any of the specialized flours called for in a recipe.

Some of the specialized King Arthur flours or ingredients I have tried and now keep on hand. For instance, I like their “Hi-maize® Natural Fiber” because it adds fiber and lightness to loaves. In the recipe below, free to substitute it with all-purpose flour. I am a huge fan of gluten flour, but you can use all-purpose flour. I also have their Salsa Seasoning.

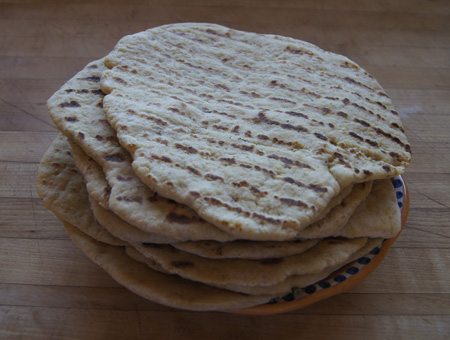
Cooked on a grill pan, these tortilla flat breads come out thick, unlike any tortillas that you find in stores. They are more like pita or naan bread. But the mixture of cornmeal, all purpose and whole grain flours, dry milk, and seasoning make these into a sensory sensation. They do take a bit of time to prepare, but if you are cooking for two you will have extras to freeze away, or if you have company you could make them ahead of time.

I usually serve them topped with beans and taco meat and cheese, popped into the microwave for a minute. Then lettuce and tomatoes and salsa. You can pick them up like a little pizza, or roll them like a taco, but they are soft so they are also cut-able with a fork.

This recipe makes 10 flat breads. They freeze wonderfully, and you can pull out a few for a very quick and impressive meal.

Tortilla Flat breads

This recipe is based heavily on the King Arthur Flour recipe for tortillas. I’ve written this for the bread machine; if you don’t have one, refer to the original recipe for kneading and rising instructions.

  • 1/2 cup cornmeal
  • 1 1/2 cups boiling water
  • 1 1/2 cups all-purpose or white whole wheat flour (or a mixture)
  • 1/2 cup barley flour or oat flour (I rarely keep oat flour around, so I process oatmeal in the food processor and measure a half cup)
  • 1/2 cup Hi-maize® Natural Fiber (from King Arthur Flour)
  • 2 tablespoons vital wheat gluten (I swear by this, but use all-purpose if you have to)
  • 2 tablespoons vegetable oil
  • 1/3 cup dry milk
  • 3/4 teaspoon salt
  • 1 1/2 teaspoons yeast
  • 1 1/2 teaspoons salsa seasoning, optional (from King Arthur Flour)

A good substitute for the salsa seasoning:

  • 1 teaspoon oregano (preferably Mexican oregano)
  • 1/2 teaspoon basil
  • 1/4 teaspoon chili powder
  • a few shakes of garlic and onion powders, maybe a few shakes of cumin

Place the cornmeal in the bucket of a bread machine. Pour the boiling water over it and stir a little. Let it cool for about 10 minutes.

Add the remaining ingredients and set the bread machine to the dough cycle (this should include both kneading and rising). Peek a few times as the bread is kneaded, and add a little flour if it is too sticky (looks wet), or a little water if it is too dry (if it is just a bunch of unconnected bread clumps). The dough should become elastic, but stay quite soft.

When the bread machine cycle is finished, take the dough out onto a floured bread board. Divide it into 10 balls.

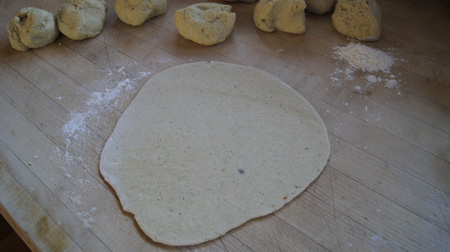
Heat a grill pan to medium-high heat. While it heats, start rolling the balls of dough into rough circles about 7-8″ in diameter. I usually start cooking the tortillas as soon as I have a couple rolled, then work rolling and cooking at the same time. If you want to roll them all out before you start cooking, you should cover the rolled ones to keep them from drying out.

roll out the tortillas

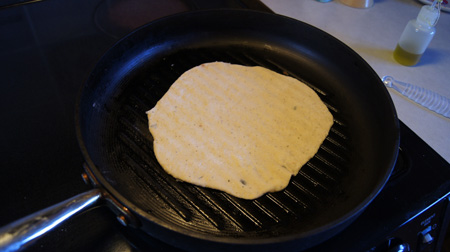
Your grill pan is ready when you hold your palm an inch above its surface and feel the heat coming off it. Don’t heat it until it smokes. Drop a little oil on the surface (I prefer olive oil) and brush it across the surface. Then put a tortilla on it and let the first side cook about a minute. The first side is done when you peek and see nice grill marks.

cooking the first side of the tortillaFlip the tortilla and cook the other side. Note the great grill marks!
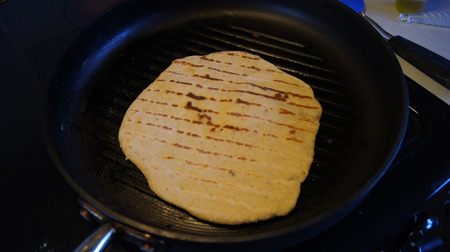
cooking the second sideContinue rolling and cooking until all the tortillas are cooked.

Used these topped with beans, spicy meats, cheese, lettuce, and salsa, like a tostada. Or wherever your imagination takes you!