Sioux Chef’s Indigenous Kitchen

Clockwise: agave nectar, oregano leaves, brown tepary beans, white tepary beans, juniper berries, and dried New Mexico chile.

The Sioux Chef’s Indigenous Kitchen by Sean Sherman with Beth Dooly, University of Minnesota Press, Minneapolis, London, 2017. This book Tcame to me as a gift from my daughter. For a year it’s lain on the table by my reading chair, and I’ve spent hours flipping through its pages, admiring the photos, learning about the relationship of the land and indigenous peoples, and enjoying the stories of living with the bounty of our beautiful surroundings. But cook from the recipes? Well, I did make something with dandelion greens, but that is as far as I got. It’s not easy finding all the ingredients to make the recipes, and I gave up.

That changed when I came upon an article in a November issue of the New York Times: Sean Sherman’s 10 Essential Native American Recipes. Now I’m off and running to make “Tepary Beans with Chile-Agave Glaze”. I am re-inspired!

My first step is to gather my ingredients. Kind of like, turning on the oven. A start. It would be great if I could find the ingredients on our three acres of Colorado land, but the grasses and dandelions are brown with winter, we have no cedar branches, no wild grains, no fish, and I am not about to kill one of our bunny rabbits.

So I take my search instead to local and online stores. For Tepary Beans with Chile-Agave Glaze, I am searching for brown tepary beans, white tepary beans, agave nectar, and juniper berries. I also need chestnuts for a stuffing recipe, so I add these to my search list, as they are another of the foods discussed in the Sioux Chef.

Tepary Beans

First, the beans. The Sioux Chef tells me that beans are the “backbone of Native cuisine . . . add body to soups, stews, and salads . . . pureed, they become a dough for fritters, burgers, and croquettes”. And so many native beans they have! On pages 40-41, Sherman lists 22 kinds. A few I recognize: anazazi, black turtle (black beans), great northern, lima, navy, pinto, rice (wild rice), and southern peas (black-eyed peas). I learn that tepary beans are native to the Sonoran Desert of Arizona and Mexico. Their flavor is “earthy and pronounced”.

I turn to the internet for a source of tepary beans. Helpfully, the article in the NY Times gives me a link to Ramona Farms. On that site, I learn that tepary beans, or bafv, are among the world’s most drought-resistant edible beans. Ramona Farms is on the Gila River Indian Reservation in Arizona. Its proprietors are Ramona Button and her husband Terry. They work to preserve indigenous species of plants, including teparies, which had become almost extinct by the late 1970s. Luckily, the couple discovered that Ramona’s father had left “a few seeds of the white and brown tepary beans in glass jars in a trunk in the old adobe house that [Ramona] grew up in”. From this source, they are now able to offer them for sale to the local population and luckily, to interested foodies like me.

I add both brown and white tepary beans to my online cart at Ramona Farms. Then I add some “parched pima cornmeal”, just to try it. It is touted as “Hand harvested, hand parched, hand processed and packed to order! Great in cornbread. You will be surprised at the flavor the roasting adds to your cornbread. Get creative and make your own masa!” This parched cornmeal sounds interesting – I look forward to using it in cornbread. (P.S. A few days after I checked-out my Ramona Farms online cart, I get a personally written shipment confirmation. Nice touch.)

Agave

Agave nectar is the next ingredient on my search list. I learn from the Sioux Chef that indigenous peoples employed tree sap, honey, agave, and fruit as sweeteners. “Our ancestors relied on sweet foods for energy; they played an important role in a healthy diet and were not considered indulgences.” Generally, sweets were eaten throughout the day, for energy, as opposed to the European convention of having sweets after a big meal.

Agave “nectar” is more accurately called a “syrup”, as it is cooked down from the core of agave plants. Agave are big leafy plants of the species agave americana or agave tequilana (blue agave); they are also known as the century plant or American aloe. And yes, agave juice is fermented and distilled to make mescal. Tequila!

I kind of figure I can find agave nectar at Whole Foods, and I am correct. I have the choice of different brands and different types: light agave, blue agave, raw agave, or amber nectar. I decided to choose an agave nectar as close as possible to what the indigenous populations might have used, so I put a bottle of the dark, unfiltered agave nectar in my basket. Later, I find online that unfiltered agave nectar has more minerals than the other types. I also learn that light agave nectar has a mild flavor, amber nectar bit more caramel-like flavor, and dark or raw agave strong caramel notes and a distinctive flavor. If it is labeled “blue agave”, it is specifically made from that species of agave. The main sugar in agave nectars is fructose. Fructose is about one and a half times sweeter than sucrose, the main sugar in cane sugar (suggesting you would need less of it to sweeten a dish) and agave nectar has a relatively low glycemic index. This article on Healthline.com explains current nutritional thoughts on agave (2019).

Just what does agave taste like? I open my bottle of raw agave nectar and gently put a clean fingertip in . . . taste it . . . YUM! It’s less viscous than honey, and is very sweet with a pleasant flavor all its own. Not honey, not maple syrup, not brown sugary, just gently agave.

Juniper berries

Juniper berries are next. Decades ago, we actually had juniper plants in our planters, but (understandably) I did not save any seeds. Probably I will have to go to the Savory Spice Shop in Boulder for these, but I decide anyway to check while at Whole Foods. Voila! I find them in the spice section, near the bulk foods. A spice jar of dried juniper berries for less than 5 dollars.

According to the Sioux Chef on juniper: “We rely on the peppery astringent notes of juniper to do the work of pepper in our food . . . Fresh or dried, it’s best crushed before adding; note the the flavor is quite strong. Substitute with pepper.” This description in the first pages of the book illustrates how helpful the author is in helping his readers know how to use unusual ingredients, and how to substitute if necessary. On page 181, he states of the juniper: its “dusty blue berries are peppery and give foods a ginny edge”. The book includes includes photos and descriptions of juniper and also bergamot, sage, cedar, mint, staghorn sumac, mustard, and rose hips.

Chestnuts

Chestnuts are the final search item on my list. I check the index and flip to page 141 of the Sioux Chef. “Until the early 1900s, American chestnut trees filled our forests from Georgia to Canada, stretching west through Ohio to southern Wisconsin, Minnesota, and Iowa.” Around the turn of the twentieth century, “plant hobbyists introduced Asian chestnut trees and inadvertently imported a fungus”. Turns out, this fungus invaded American chestnut trees and decimated the population. Today’s American chestnuts are a hybrid variety.

I am a girl of the western US, California and Colorado, and have never seen chestnuts on a tree nor had them as a tradition in family meals. Never had “chestnuts roasting on an open fire”. Have no idea what they taste like. When I run across a Thanksgiving stuffing casserole recipe with chestnuts, I decide to make it. I find chestnuts at Whole Foods, a large jar of them, peeled and in some sort of liquid. Fifteen dollars! I get them anyway.

On to cooking!

As I finish writing the above sections, I get a notice from the post office that the tepary beans from Ramona Farms are at the post office. I will pick them up today, and I am pretty excited, just to think, they are heritage beans, grown by indigenous food devotees in Arizona. I am able to help support them as well as taste a bit of what the folks who used to live on our continent ate before us Europeans came and built supermarkets. So, to the post office I go! Then, home to cook.

Tepary Beans with Chile-Agave Glaze, adapted from Sean Sherman’s recipe in the New York Times

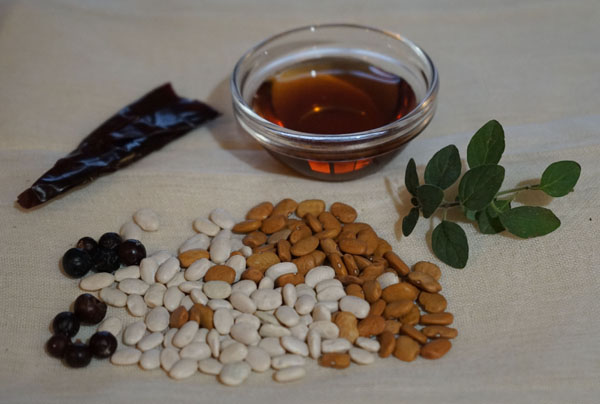
I studied Sherman’s recipe in the NY Times, then just plunged in. I did not measure exact ingredients, I treated it as a no-recipe recipe (ala Sam Sifton, NY Times). I used the vegetable oil I had around (the recipe suggests sunflower oil), and I used generic salt (the recipe calls for sea salt, which I learn from the Sioux Chef was a traded commodity, used often as currency). For the chili powder, I used pulverized dried New Mexico chilis. These were quite hot, so you may have to adjust the chile powder you use or the amount (I used about half a tablespoon). The juniper berries are my own addition to the recipe, and totally optional.

ingredients

  • tepary beans
  • agave nectar, preferrably unfiltered
  • salt (sea salt if you have it)
  • chile powder (use dried, pulverized New Mexico chiles or use jarred commercial chile powder)
  • onions
  • vegetable oil (calls for sunflower oil; I used a blend of canola and other oils)
  • oregano (dried, fresh, Mexican or European)
  • optional: a couple juniper berries, crushed

instructions

Begin the night before by soaking the tepary beans. I used 1/2 cup white and 1/2 cup brown tepary beans. First, pick over the beans, then put them in water to cover by a couple inches. (I actually soaked them two nights, the second night in the refrigerator.) After the soak, drain them and pick over again.

Put the tepary beans in a pot and cover with several inches of water. Add a teaspoon or so of salt. Bring to a boil and then simmer for about two hours, checking a few times for done-ness.

As an alternative cooking method in the future, I might try:

  • a slow cooker: First on high for an hour, then on low for 6-8 hours.
  • a pressure cooker: Soak a cup of tepary beans overnight, drain, then place in a pressure cooker with 2 cups water and some salt. Set the cooker to high pressure, 35 minutes, then allow the pressure to release naturally for 5 minutes before a quick pressure release. (Verified 2022. 35 minutes on high gets them almost soft, and the water above the cooked beans is sufficient. I removed a bit of that water and cooked the beans without pressure until the mixture was as I liked it and the beans done. I came up with this method using my studies of my electric pressure cooker in 2020.)

When the beans are tender, drain them. I ended up with 3-4 cups. Try to remember to save 1/2 cup of the cooking liquid (you sort of need it later).

Measure out as many tepary beans as you like for the meal at hand. I used one cup cooked beans and saved the rest for a chili or the like.

Saute about 1/4 cup onion in a tablespoon or so of vegetable oil until the onion is soft. Add the cooked, drained tepary beans and stir a few minutes. Taste for salt and adjust as to your liking. Add a tablespoon of agave nectar, half a tablespoon of chile powder, and about a half cup of the reserved bean-cooking liquid (or plain water, if you forgot); cook down until the water has evaporated and the beans are nicely glazed. Add a crushed juniper berry (if you have it, otherwise use some black pepper) and a scant teaspoon of dried oregano (Mexican oregano if you have it). Taste, and adjust seasonings. I ended up adding more agave nectar – my chiles were quite hot so I added no more of those. I served with a few fresh oregano leaves.

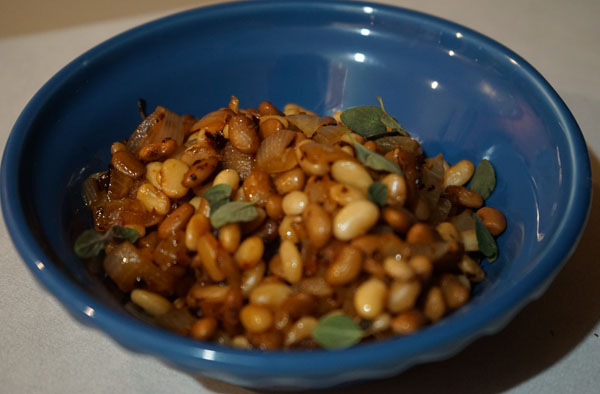
I liked these a lot. The tepary beans are earthy, and small and firm. The agave glaze makes them just wonderful.

Dynamic Duo Delights

How can you go wrong? These cookies are made with M&M’s®, peanut butter, cocoa, cream cheese, butter, brown sugar . . . these are so good they are sinful.

How did I come to make these on a warm summer day? Well, we were going up to the mountains to spend a few days with our kids and their young families. I get to be “Grandma”, and that means I get to make some cookies to bring. Yay! I perused my old cookie recipes and came upon these “Dynamic Duo Delights”. Hadn’t made them in decades. Now’s the time.

Dynamic Duo Delights

  • 3/4 cup butter plus 2 tablespoons butter
  • 1 cup brown sugar plus 1/4 cup brown sugar
  • 1 cup white sugar
  • 8 ounces cream cheese, softened
  • 1/2 cup peanut butter (I used the crunchy style)
  • 1 1/2 teaspoons vanilla
  • 2 eggs
  • 2 1/2 cups flour
  • 1 teaspoon baking powder
  • 1/2 teaspoon salt
  • 3 tablespoons cocoa
  • 2 cups plain M&M’s

Beat together the 3/4 cup butter, 1 cup each brown and white sugars, cream cheese, and peanut butter, then add the vanilla and eggs. Stir in flour, baking powder, and salt.

Divide the dough in half and place each half in a bowl. Add 2 tablespoons butter, 1/4 cup brown sugar, and the cocoa to one bowl of dough. Add 1 cup of M&M’s to each bowl of dough.

For each Dynamic Duo cookie, take a bit of the dough with cocoa and a bit of the dough without cocoa. Push together to form one rounded teaspoonful of cookie dough, then drop onto an ungreased cookie sheet. Continue with all of the cookies.

Bake the cookies at 350˚ for about 12 minutes, just until they are nicely browned.

Makes about 5 dozen cookies.

Enjoy!


*The photo above is my first food-blog photo taken with my new camera, a Sony alpha 7II. Sadly, my old Sony alpha died suddenly on our trip to the Alps this summer. Good bye old-friend Sony camera. Welcome to the fold, my new full-frame Sony.

ginger

I like fresh ginger in my cooking. Problem is, I cook for two, and I only use ginger once a week or so. So I don’t go through a lot. And all too often I have to toss a rancid piece of ginger buried in the vegetable tray.

A few weeks ago I was (somewhere) online and ran across a solution. What you do is peel the ginger and cut it into chunks. Then freeze it in a baggie or small container.

Next time you want some ginger for that stir fry or this wonderful Baked Cod With Crunchy Miso-Butter Bread Crumbs on the NY Times website, grab that frozen ginger. Grate up a bit while it’s still frozen, and you have it! I find that grating it while still frozen makes the ginger finer than it turns out if you grate it fresh and unfrozen.


Tamales, my style

Tamales are great, but kind of a pain to make. At least, that’s my usual feeling about them. Since I’ve entered my retirement phase of life, though, I have more time to cook, so I’ve been exploring different types of potentially lengthy recipes. Tamales are my current project.

A couple years ago I entered a tamale recipe in my “Main Dishes” document. Not sure I’ve explained my “recipe documents” before. Perhaps I should take a second to describe these? It’s like this. Back in the 1990s I began entering my recipes in a word-processor document using, of course, Macs. It began as one document in Word. Then I split into categories and put them in Framemaker. After Adobe stopped making an Apple version of Frame, I moved them all to Apple’s Pages. I sometimes treat my recipe documents like a diary – I talk to myself in them. My tamales entry is a great example of this trend of mine, and it’s also the recipe that is the focus of this blog entry.

So here we go, my tamale recipe in my Main Dishes document:

“Can’t believe I’ve never written down a recipe for tamales! Guess I always use the recipe on the back of the masa harina or the tamale kits I used to buy (Melinda’s?).”

[Actually, it was Melissa’s. On their site: “Melissa’s Tamale Kits take all the pain out of preparing a delicious, impressive meal”. The kit includes clean corn husks, masa, and a recipe. I used to find these kits at Safeway.]

“Anyway. I bought some masa marina from Bob’s Mills. No recipe on the package. I could find nothing in my notes, so I checked Cooks Illustrated. They included fresh corn! (and baking powder). I compared with a recipe in the Mexican cookbook that I got from Mother. I drew up a recipe mid-way between the two on amount of lard, and yes, I used lard. I steamed them in my stove top bamboo steamer. These were great.”

“The filling can be anything almost. I used some (wet) pork green chile and a few sliced whole olives and a little cheese mixed in. I would have liked queso fresco. John likes a sauce on top, but not a fresh salsa. Try some enchilada sauce on his. I am happy with no or very little sauce, but even my preference can be swayed by how wet the filling is. The cooked masa stands out better if the filling isn’t too wet.”

Below is the recipe I wrote down then (a couple years ago) and it is the recipe I used exactly last week. I know when a recipe is perfect in my recipe documents by the fact that when I make it, I make no new changes. That is this one!


Note: This recipe is supposed to make 10 tamales, the folded style. I only make 6 because this is the way I like them! The top is open or only lightly covered by the husks. This is how they made them at the Zolo Grill in Boulder, back a few years. It allows the tamales to be fluffy and full of filling, rather than a smashed paste of filling between thick layers of masa.

Tamales, my style
makes 6 large, serves maybe 3

  • 1 cup masa
  • 1/2 cup fresh or frozen corn
  • 1/4 teaspoon salt
  • 3/4 teaspoon baking powder
  • 40 grams lard (about 3 tablespoons; you could substitute vegetable shortening)
  • water
  • filling of your choice (suggestions below)

Soak 6 corn husks in boiling water (clean them if necessary). They take about an hour to become nice and pliable.

Cook the corn for a few minutes in boiling water (on the stove top or in the microwave). Drain it. Process the corn in a small or large food processor or just chop it fine. Put this corn in a measuring cup and make the volume to 1/2 cup with water.

Put the masa, salt, and baking powder in a food processor and pulse a couple times. Add the lard in chunks and process briefly until the lard is in less than pea-sized lumps. Dump into a bowl. Add the corn/water mixture and mix the dough until it is wet. Add more water in small amounts, mixing after each addition, about a couple tablespoons total. You want the dough to hold together but do not work it too much.

Lay out 6 corn husks and divide the dough among them. Spread the dough to within an inch or so of the corn husk edges. Add filling on top. Tie the ends with string, like in my photo at the top of this page.

Steam about 30 minutes. I use a stove top bamboo steamer set inside a wok.

If you like, serve with a sauce like enchilada sauce.

Fillings

These are just suggestions! I do like cheese in chunks in my open tamales, as they melt into a nice gooey mess.

Chicken: Cook a boneless chicken breast in boiling water until done. Chop into pieces, or shred with a fork. Saute in a pan with onions and garlic, then add chiles and tomatoes (salsa, fresh, hot tomato sauce, or some other sort of mixture). I like sliced olives too. Add cumin and chili powder and cilantro and other seasonings as desired. Cook until flavors combine, then cool. Fold in chunks of jack cheese before laying the filling atop the tamale dough.

Pork or beef: Use you favorite homemade pork or green chili. Aim for up to a half-cup of filling per tamale.

Beyond that, use your imagination. Zolo’s makes wild mushroom tamales. I’ve seen sweet potato ones too. Or turkey, fish, duck with mole sauce, pumpkin . . . just use your imagination.

Cream Puff Shells

Cream puffs are little pillowy clouds of pastry that can be filled with wonderful things. Like strawberries and whipped cream! Way back when, I found a recipe for Strawberry Cream Puffs and liked the recipe so much that I hand-wrote it on a recipe card.

I got it in my mind to make cream puff shells this week – for Valentine’s Day dessert. Pretty red strawberries, very lightly sweetened, mixed with cool whip, inside puffy shells, perhaps with a little thin chocolate syrup drizzled on top . . . a dessert worthy of Valentine’s Day but, actually, light in carbohydrates. Why? Because cream puff shells are made from flour, butter, and eggs. There is only 1/2 cup of flour divided amongst 8 cream puffs, so about 50 flour calories per serving. Yes, there is a lot of butter, but . . . actually, only 1/2 tablespoon per serving, or another 50 calories. I can live with these values on the semi-low-carb diet that we are striving to pursue.

So, cream puffs. Where is my recipe? I search first in my recipe box. The recipe card is not there. I must have left it somewhere else, perhaps tucked in a cook book. I can’t find it in any books, though. Maybe I transferred the recipe to a document? I searched my “desserts” document – it is not entered there. I had almost given up, when I decided to do a wider search. Luckily I found my notes on and a recipe for cream puffs in my “appetizers” document. Below is what I wrote to myself a few years ago.


“The recipe in the Joy of Cooking (p. 597) was probably my old standby, and/or the Strawberry Cream Puffs recipe on the recipe card, until I tried the recipe below in 2010. The Joy of Cooking recipe is 1 C flour, 1 C water, 1/3 C butter plus 4-5 eggs.

“In 2010, I went to cooksillustrated.com and found their recipe, a recipe that exactly measures the eggs, and gives a temperature for the water/flour/butter mixture, and uses the Cuisinart. I tried it and liked how the cream puffs turned out. This recipe eliminates the long hand-beating of the eggs into the water/flour/butter mixture. What a relief to toss the hand-beating task! It also uses the half sheet pans and parchment that I just found out about in a recent CSR class [this dates to mid-2000s]. Although, be aware that this method makes a mess of the food processor bowl, so plan to put it in the dishwasher. I made one and a half sheet pans of the puffs, dropping by teaspoonfuls, rather than piping with a pastry bag. Never have got one of those! [Have one now!]”


Below is my new version of the Cooks Illustrated recipe. It is almost the same as the published one, but I eliminated the step that dries the cooked cream puffs in the oven. The puffs do not seem not wet inside so I skip that step.

Note: Cream puff pastry (actually, cream puff paste) is the same as Pate a Choux. (See From Julia Child’s Kitchen, pages 548-550.)

Cream Puffs, adapted from this recipe: cooksillustrated.com

  • 2 eggs
  • 1 egg white
  • 5 tablespoons butter, cut into chunks
  • 1 ounce whole milk (2 tablespoons)
  • 3 ounces water (6 tablespoons)
  • 1 1/2 teaspoon granulated sugar
  • 1/4 teaspoon salt (use less if using salted butter)
  • 1/2 cup flour

Heat the oven to 425˚. You need it hot when you are ready to put the pan of puffs in the oven. Also prepare a half sheet pan by placing a piece of parchment paper on it.

Mix together the 2 eggs and the egg white in measuring cup. If it measures more than 1/2 cup, discard the excess. Set aside.

Bring butter, milk, water, sugar, and salt to boil in saucepan over medium heat. Keep an eye on it, stirring occasionally until it reaches full boil (the butter should be fully melted). Immediately remove the pan from heat and stir in flour with a wooden spoon until combined and mixture clears sides of pan. This takes a little hard work, but only about a minute. Return the pan to low heat and cook, stirring constantly, using a smearing motion, for 3 minutes, until the mixture is “slightly shiny with wet-sand appearance and tiny beads of fat appear on bottom of saucepan”. If you have one, use an instant-read thermometer to check the temperature of this dough – it should get to 175 to 180˚.

Immediately transfer the hot dough mixture to a food processor. Process for 10 seconds to cool slightly. With machine still running, gradually add the eggs in steady stream (takes less than a minute). When all eggs have been added, stop the machine and scrape down sides of bowl. Then, process for about 30 seconds until a smooth, thick, sticky paste forms.

These are ready to bake immediately. Drop the dough onto the parchment-lined baking sheet. For large puffs, I make 8; you can also make a dozen or so smaller puffs. You can used this same dough to make elongated puffs for eclairs.

The best way to form cream puffs is by using a pastry bag. I do own one of these now, but haven’t yet used it for puffs. Sounds like a lot of mess to clean the pastry bag after use! But I am sure the puffs or eclairs would be a lot prettier than my free-form ones.

Bake 15 minutes in the 425˚ oven (do not open oven door during this cooking time). After these 15 minutes, reduce the oven temperature to 375˚. Continue to bake for another 8-10 minutes, until golden brown and firm (puffs should not be soft and squishy – you can open the oven at this time to check). Carefully transfer the puff to a wire rack to cool.

The original recipe says to cut a slit in the side of each puff, turn off the oven, prop open the oven door, and leave them for about 45 minutes, until crisp. Julia Child’s recipe also includes this step. I sure it is worth trying, but I am happy with my un-crisped cream puffs. The big free-form, un-dried puffs that I make for stuffing with strawberries and whipped cream are in the photo at top of this page. I find them perfectly acceptable!

You may have leftover puffs. From the original recipe: “Cooled puffs can be stored at room temperature for up to 24 hours or frozen in zipper-lock plastic bag for up to 1 month. Before serving, crisp room temperature puffs in 300-degree oven 5 to 8 minutes, or 8 to 10 minutes for frozen puffs.”

Tortillas

Homemade flour tortillas! Don’t they look delightful? And the tortillas in the above are my first try. My first try! I came across several recipes on the web and decided on a King Arthur Flour recipe. I’ve been using King Arthur flour and their web site for years. Turns out I was correct in choosing a recipe from this dependable site, as you can see from my photo!

The above tortillas are made with all-purpose flour and lard. After several trials with different fats and flours, I decide the recipe just below is my favorite go-to method. Below that, I go into the trials I did with different ingredients.

Flour tortillas – my “go-to” recipe

  • 2 1/2 cups all-purpose flour
  • 1 teaspoon salt
  • 1/4 cup olive oil
  • 7/8 to 1 cup water, heated for 1 minute on high in the microwave

In a bowl, mix the flour with the salt. Add about a half-cup of the warmed water and all of the olive oil. Mix together with a spoon. Add more water only as necessary for the dough to hold together. I usually end up mixing the dough with my hands. You want the dough to be smooth and not-sticky.

Turn the dough onto a lightly floured breadboard and knead a few times, until the dough forms a ball. Divide the dough into 8 equal sized pieces (by weight, if possible), form each portion into a ball, and let sit, covered with a cloth or bowl, for 2-3 hours at room temperature.

Place a heavy, flat pan or skillet on the stove top. If possible, use a cast iron griddle. Use a paper towel to wipe a bit of oil on the pan. Turn the heat to about medium and let it slowly heat for several minutes. The pan is ready when you feel good heat when your hand is about 3/4 inch above the pan. You do not want it smoking hot. I use a remote temperature sensor and try to get (and keep) the pan at about 400˚.

While you are waiting for the pan to heat, start rolling the balls of dough into 8-inch circles on a lightly floured board. I say “lightly floured” because if you use too much flour, the flour will stick to the tortillas through the cooking process. Start cooking (next paragraph) as soon as the pan is ready; I usually roll and cook a single tortilla, rolling the next one as the previous one cooks.

Put a tortilla on the pan and let it sit for about 20-30 seconds on the first side. It is ready to flip when light brown spots appear on the underside (peek!). Flip, and cook the other side of the tortilla the same way.


Trials

For the ingredients, you can choose from several fats: lard (traditional), butter, shortening, or vegetable oil. I chose lard for my first try. It came from lard in a jar that I bought at Whole Foods over a year ago. The original recipe calls for 1 teaspoons baking powder, but I left it out for Try 1.

Try 1: Simple Tortillas (with lard and all-purpose flour)
Begin these tortillas several hours before you plan to cook them.

  • 2 1/2 cups all purpose flour
  • 1/2 teaspoon salt
  • 1/4 cup lard
  • 3/4-1 cup water

Mix the flour with the salt in a bowl. Divide the lard into chunks, then add it to the flour-salt mixture. With your fingers, carefully work the lard into the dough, until the lard is in small bits, each coated with flour. You could use a pastry blender or a food processor to do this, but I liked doing it “by hand”. From King Arthur flour: “Coating most of the flour with fat inhibits gluten formation, making the tortillas easier to roll out.”

Microwave 1 cup of water for one minute. Pour about 3/4 of it into the dough and immediately mix it in with a spoon or fork. Add more water only as necessary for the dough to hold together. Put the dough on a breadboard and knead a few times, until the dough forms a ball.

Divide the dough into 8 equal-sized pieces: I used a scale. Set them out at room temperature, well-covered, for about 2 hours.

Cook the tortillas about 30 seconds per side.

Results for Try 1: The tortillas looked great, but either they didn’t have enough salt or the lard was too strong a taste. Although, in burritos, the taste was hardly noticeable.


Notes: I think the “trick” in this recipe is having the dough rest for a couple hours before rolling. While browsing the web, I found other flour tortilla recipes that called for a rest before rolling, from 15 minutes to 2 hours. I chose the 2 hours, as per my own experiences with breadmaking, especially no-knead doughs. Flour does something magical when mixed with water and allowed to sit.

Another trick is rubbing the flour with a solid fat before adding the water. This makes the gluten in the flour separated by bits of fat, and it rolls out easier. How will oil work? That will come in another try.

I left the baking powder in the KA Flour recipe out. Why? The first time I simply forgot it. Later, I read this on the Mexican Please website: “And regarding the baking powder … sometimes I use it and sometimes I don’t. It will make them a little bit thicker and fluffier. That works great if you want the tortillas to double as flatbread or pita. If you want a thinner, traditional tortilla then you can omit the baking powder.” I do like my tortillas “traditional”, but I will try baking powder in one of my sets of trials.


Tries 2 and 3: Simple Tortillas (with solid vegetable shortening, all-purpose or white whole wheat flour, increased salt)

  • 1 1/4 cup all-purpose OR white whole wheat flour
  • 1/2 teaspoon salt
  • 2 tablespoons solid vegetable shortening (Crisco)
  • 3/8 to 1/2 cup water

Combine ingredients, form into balls, let rest, and cook as in Try 1.

Results: Both the all-purpose and the white whole wheat flour doughs were easier to roll into 8-inch circles than in Try 1, which was made with lard. The flavor was great in each. The whole wheat flour ones took a bit less water when mixing. They definitely have a whole wheat flavor and seem a bit heavy. I liked them better, hubby preferred the all-purpose flour ones

Notes: The pan heat: 400˚ is the target according to KA. I got the pan to 400˚ by heating on medium high for several minutes. I used the remote temperature thermometer that we use for pizzas. I found that the pan kept heating up at medium high. By the time I was on the 7th tortilla, I had the pan all the way down to 3. It was great to cook them at this temperature – no burning at all on the batch.


Tries 4 and 5: Simple Tortillas (all purpose flour with olive oil, increased salt – as in tries 2 and 3 – with and without baking powder and with salt)

  • 1 1/4 cup all-purpose flour
  • 1/2 teaspoon salt
  • 1/2 teaspoon baking powder OR without
  • 2 tablespoons olive oil
  • 3/8 to 1/2 cup water

Mix the flour with the salt. Add baking powder to one try and leave it out of the other try. Add about half of the hot water to each try and then all of the olive oil and mix it all together. Add more water to each “trial”, but only as necessary for the dough to hold together. Put the dough on a breadboard and knead a few times, until the dough forms a ball. Divide each dough into 4 equal sized pieces, roll each into a ball, and let sit 2-3 hours at room temperature.

Results: In general, the olive oil trials needed less water. In fact, the tortillas were a bit smaller, and you might want to roll out only 3 from a small batch (1 1/4 cup flour size). Both the olive oil trials yielded tortillas that were more pliable than the lard or shortening trials. The tortillas made with baking powder really puffed up on cooking! After cooking, both types – with and without baking powder – were almost interchangeable.

Here is one of the baking powder tortillas after a few seconds of cooking:

The same one after a few more seconds. Note how high it has puffed!

Here is a comparison of a baking powder tortilla (left) verses one without baking powder (right). The sides we are seeing are the second sides cooked. Note that the non-baking powder tortilla has smaller brown spots.

Notes: The cast iron pan kept heating up as I cooked the 8 tortillas. I started with the burner at setting 6-7 to preheat to 400˚ on my remote temperature sensor. When I added the first tortilla, I turned the burner down to 6. As I continued the cooking additional tortillas, the temperature creeped up, and I turned it the burner down to 4 or 5. The pan temperature still creeped up, and was 570˚ after I cooked my last tortilla. They were not burning at 570˚, but do keep aware of temperature changes of the cast iron pan. Cooking 8 tortillas only took about 8 minutes.


Conclusions

From my tests and tastings, I like best the tortilla method that calls for olive oil, all-purpose flour, and no baking powder. This will be my go-to recipe. I’ll probably try different types of flour – cassava, barley flour, whole wheat pastry flour, perhaps others – and different mixtures of flours, like half all-purpose and half a different flour. I use more salt than in the original recipe.

The whole wheat versions are healthier, and quite acceptable, but the others are softer and my husband likes them better, so white flour tortillas are my go-to at the moment.


My modified recipe for flour tortillas

  • 2 1/2 cup all-purpose flour
  • 1 teaspoon salt
  • 1/4 cup olive oil
  • 7/8 to 1 cup water

Mix the flour with the salt. Add about three-quarters of the hot water, all of the olive oil, and mix it all together with a spoon. Add more water only as necessary for the dough to hold together.

Put the dough on a breadboard and knead a few times, until the dough forms a ball. Divide each dough into 8 equal sized pieces (by weight, if possible), form each portion into a ball, and let sit 2-3 hours at room temperature.

Cook each side of the tortillas on a pre-heated flat pan pan. If possible, use a cast iron griddle. You do not need to oil the pan for these tortillas. If possible, monitor the temperature of the griddle with a remote sensor.


Enchilada Sauce, revisited

enchilada sauce

My last adventure in making enchilada sauce was in 2013. I made “Red Chile Sauce”, a sauce meant for enchiladas, according to a recipe in my 1972 Sunset Mexican Cook Book. The sauce I made captured the flavor that I wanted – a deep chili flavor similar to the canned enchilada sauces that I find on store shelves. It was just a bit, well, bitter or something, and it was thin. It was a big batch, and I eventually used it all up, but each time I cut the enchilada sauce with a good amount of canned tomato sauce and spices. I haven’t made it since. I went back to canned enchilada sauce.

Five years later, I am going through my browser bookmarks. I run across a blog post titled Homemade Enchilada Sauce on the Circle B web site. This site is authored by a woman about my own age who also grew up in the 1950s in Southern California. She too was on a quest for homemade enchilada sauce – as she put it, “a killer enchilada sauce”. After a couple years of search, she found a recipe in a cookbook on her own shelf, “Mexican Family Cooking”, a collection of “family recipes handed down from Mothers, Aunts and Grandmas”. (Oddly enough, she posted her enchilada sauce blog post about the same time I posted my Mexican Cook Book post.) Her sauce was a lot more successful! I was on the right track though – starting with dried chiles.

Here are the secrets. Begin as I did with a package of dried chiles. But, do not toast them, and do not use the chile cooking liquid to add back to the sauce. I think this is why mine tasted bitter – both the toasting and the adding the liquid back. After cooking and draining, blend the chiles with fresh water (and a lot of garlic!). Add sugar and a good amount of salt and season the sauce with chile powder and cumin. Add a tablespoon of tomato paste. Thicken the sauce with a roux made of cooking oil and flour. Let simmer awhile until the flavors blend.

Boy oh boy, this enchilada sauce is absolutely the best I have had – ever! It is just heavenly. Rich, red, thick, and spicy. It captures the essence of the canned enchilada sauces that we are used to, but it goes to a whole new level of goodness. It’s hard to believe I made a quart of this sauce and only used a tablespoon of tomato paste because it looks like there is a lot more tomato than than just that in it.

I can now type the recipe from memory. I cite the Circle B website as my reference. The recipe below is essentially that recipe, but I used olive oil instead of vegetable oil. I highly recommend olive oil in this, it made it extra rich tasting. Also, I added less water for a thicker sauce. I was also rather heavy-handed when I added the cumin and chile powder. And, I used a food processor instead of a blender.

I got my chiles at a local store, either Safeway (produce section) or a Mexican grocery. I had several bags in my pantry, as making enchilada sauce has haunted me. The type of chile is not specified on the bag, it just says “New Mexico Chile, 3 oz.”, and the brand is Badia. I don’t remember how long these have been in my pantry, so these dried chiles might have been a bit old. Nevertheless, they worked!


Everybody should have enchilada sauce this great. Come to my house and I’ll give you some!

Enchilada Sauce

Note: this recipe makes over a quart of enchilada sauce. When I tried doubling the sauce, I found it overwhelmed my food processor and strainer (and patience). So, my advice is to make one recipe at a time.

  • 3-4 ounces dried Mexican chiles (see note above)
  • enough water to cover the chiles in the pot
  • 4 cloves garlic
  • 1 1/2 tablespoon red chile powder
  • 1 teaspoon cumin
  • 1 tablespoon salt
  • 1 tablespoon sugar
  • 4-5 cups water
  • 1/4 cup olive oil
  • 5 tablespoons flour
  • 1 tablespoon tomato paste (generous)

Take the seeds and any pith out of the dried chiles. You don’t have to be ultra-careful in removing every last seed.

Put the cleaned chiles in a medium pot and cover with water. Bring to a boil and simmer for 20 minutes.

Pour the chiles and their cooking water through a colander. (I used a regular colander, not a fine one.) Remember: you want the solids, not the liquid. Transfer the drained chiles to a food processor. Toss the cooking liquid and rinse the colander.

Add the garlic, chile powder, cumin, salt, and sugar to the chiles in the food processor. Add enough of the 4-5 cups of water for a good slurry to form. Process the mixture several minutes, until the particles are pretty fine.

Set up your rinsed colander over a big bowl. Pour through it the pureed chile mixture. Press the puree in the colander to get as much of the sauce through as possible, leaving behind any bits of chilis and seeds. Remember: this time, what goes through the colander. Rinse the food processor with some water and put this through the colander too.

In a good sized sauce pan, heat the olive oil. Add the flour and stir for several minutes over medium heat, until the flour just starts to show a bit of brown. Carefully add the tomato paste and stir for a minute. Then, carefully stir in the pureed, strained chile mixture. Add more of the 4-5 cups water until the thickness of the sauce is to your liking. I left mine pretty thick!

Heat and stir the sauce for 5-10 minutes minutes to blend flavors. Adjust the seasoning to your own taste – feel free to be creative! Add hot pepper powder (like cayenne) if you want your sauce with more kick.

Use immediately, or store in the refrigerator for a few days or the freezer for a lot longer.

stock

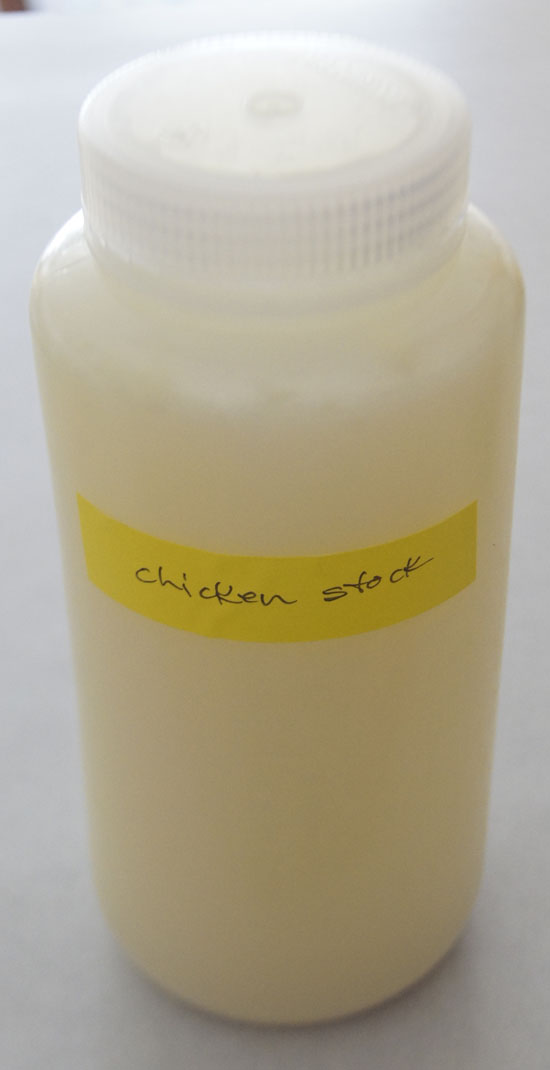
The trick to my chicken and beef stocks is not how they are made, but how they are stored. I put the stocks in wide mouth in Nalgene® high-density polyethylene bottles and store them in the freezer. (Also at Cole palmer.)

Advantage? You can pull a bottle of stock out of the freezer, microwave on high for several minutes, and pour your homemade stock into a dish you are making within a few minutes. If you don’t use the whole bottle, put it back in the freezer for next time. That way, you know your stock. Much more than you know the stock out of a box from the market. You can make it preservative free, organic, salt-free, or seasoned as you like.

And it is less expensive. I made 8 liters chicken stock (8.5 quarts, 136 ounces), an amount equal to 4 1/4 boxes of purchased stock (packaged in 32 ounce packages), for $8.50 (an organic chicken). If you purchase quality, organic stock, that is about $15.

Another advantage is that you are storing the stock in a freezable container. Thus, you simply put it back in the freezer. When I use purchased stock from a box, I often store it in the refrigerator, thinking I will use the rest soon. But often I do not, and have to throw it out in a few days or weeks.

Plus it is a stock, not a broth. Stocks are made using the bones.

My stock is much more concentrated than the water-y stock I find in the store-bought boxes.

I took a large, whole organic chicken and put it in my big 12 quart pot. I added water to cover (and more, nearly to the top of the pot), some celery and carrots (not even necessarily chopped), some salt and maybe some oregano, and simmered several hours. I stop the simmering about the time the chicken is falling off the bone.

Then I strain it through a wire strainer. It might take several batches to strain all of the stock. When the entire pot has been put through the strainer, I “rinse” the bones, meat and skin with some water.

Next, I portion the stock into large, covered containers, like big rubbermaid containers with a good lid. I refrigerate it overnight. The next day, I take it out of the refrigerator and skim off the hardened fat.

The remaining stock is a bit viscous, so I let it warm up for an hour or two. Then, I funnel it into the Nalgene bottles.

I also make my own beef stock and store it in my Nalgene bottles. It is more expensive to make, and I typically use a pressure cooker and the following recipe:

Ingredients: 3 pounds beef shanks and oxtails, a mixture
Toss them in oil and then brown them in the pressure cooker (large one) on both sides. Add several carrots (not peeled) and a bunch of celery, peppercorns and 1/4 t salt. Fill pressure cooker to 2/3 volume with water, and pressure cook 50 minutes (start timing when the first hiss becomes apparent). Let cool before opening. Strain through a colander, then line a colander with cheesecloth and strain again.

This makes less stock than the chicken stock recipe, since my electric pressure cooker only holds 6 quarts. I treat my beef stock like liquid gold – it is dark brown and wonderful. So, so much better than common beef broth from the stores. Sometimes, if I have leftover beef bones from a rib roast or the like, I make my beef stock in a matter more like my chicken stock. But the small batch pressure cooker beef stock is the best.

Once I made fish stock. I got some fish bones from Whole Foods and followed a recipe from somewhere on the web. But it was stinky, and I don’t use it often, so I never made it again. I’ve made vegetable stock, I think, but I don’t use it very often and would have to find a recipe.

I do not keep any type of bouillon cubes or granules in my pantry any more. I spoil myself with my own chicken and beef stocks! The trick is storing them in microwave-able bottles in the freezer.

Pressure Cooker Recipe Websites: Summary

So far, I have covered seven web sites of pressure cooker recipes. Each post was fairly long, as I was using the posts to study my topic: pressure cooking in an electric pressure cooker. I have learned a lot, and I have a good list of recipes to try. As I stretch out to more sites on the internet, I’m finding a lot of repetition in the recipes. But often, in each collection, there are a few gems. As to learning pressure cooking techniques? Time to “take it to the kitchen” and practice, practice, practice.

This current post will now be the only bookmark I need to access all of the web sites I like for pressure cooker recipes. The content of this current post will change as I find and add in more sites.

These are the sites I have covered so far:

  1. Serious Eats and my blog post on Serious Eats
  2. AllRecipes.com and my blog post on AllRecipes.com
  3. Pressure Cooking Today and my blog post on Pressure Cooking Today
  4. The Kitchn and my blog post on The Kitchn
  5. Instant Pot® and my blog post on Instant Pot®
  6. Peggy Under Pressure and my blog post on Peggy Under Pressure
  7. Genius Kitchen and my blog post on Genius Kitchen

More sites, as I find them:

Skinny Taste

The author of the site, Gina Homolka, is the author of several Skinny Taste cook books. I like her cooking philosophy: “eat seasonal, clean, whole foods and maintain good portion control” and her life philosophy: “exercise + a well balanced diet + good sleep = a happy life”. I also like the organization of the web site because each recipe has an associated diet-type icon, for instance, low-carb, keto, kid friendly, whole 30, freezer friendly, etc. And the dishes are interesting, like Morrocan meatballs and shredded harissa chicken. Often a recipe has both slow cooker and pressure cooker directions.

Amy plus Jacky pressurecookerrecipes.com

This is a growing collection of recipes for the Instant Pot. The recipe section that first caught my eye is “Instant Pot Chinese Takeout Recipes”. Oh wow! Shumai! These are little dumplings that I have been making for years, although I spell it “Shui-Mai”. They only take 3 minutes in the pressure cooker. Hopefully my bamboo steaming racks will fit in my cooker (they do!). General Tso’s chicken wrap has great flavorings and could adapt easily to a low-carb meal. And for pot roasts, a question I’ve had to consider: “It’s so confusing! How long should we cook pot roast in the pressure cooker? 20 minutes, 45 minutes, 75 minutes, 90 minutes, or ??? Let’s discover the BEST Pot Roast cooking time through this pressure cooker experiment!”. Definitely a site to keep an eye on.

Brit + Co pressure cooker recipes

Brit + Co is a media company that “inspires, educates and entertains real women with a creative spirit”. Most of the site is about everything but food. However, the section on pressure cooker recipes, inspired by the current “rage” in popularity of instant pots, has some good recipe ideas. For instance, I like the recipe for steal cut oats with carrots and spices. I’ll explore the page on how to cook artichokes. The recipes are not located on-site, instead they are links to on other sites, some of which I have already reviewed. So, the link above is not only a source of ideas, but a source of other sites that have pressure cooker recipes.

Taste of Home

Taste of Home is a commercial and a community site. They publish a magazine and books, but also accept user-contributed recipes. It takes a long time for the main page to load in (even with a fast connection!), and the “about us” is at the very bottom of that page. So here is a convenient link to what Taste of Home is all about. The section on pressure cookers touts 100 recipes. Some of the recipes strike me as “why cook that in a pressure cooker?” Especially breakfast french toast or waffle bake and dessert cakes or anything that takes less than 30 minutes on the stove top. It’s like these recipes are written for a young adult living in a kitchen that does not have a stove and they have to use an instant pot to cook everything. (I have had this same thought at several other sites.) The recipes interesting to me are Sweet and Sour Pork (boneless pork loin, 10 minutes quick release), Nutty Apple Butter (a good use for apples on the wane, peanut butter, 8 minutes in the pressure cooker vs my recipe that takes10 hours in a slow cooker), Apple Cranberry Grains (wheat berries and quinoa), and Pork Pozole (boneless pork ribs, canned hominy added after 20 minutes for another 5 minutes).

Real House Moms

Real House Moms is a site written by people like you and me, with a professional interface, a newsletter, lots of recipes, ideas for do-it-yourself, parenting issue discussions, and more. Aubrey is the main author, with a host of contributors: “Real Housemoms started as a way to share recipes with friends, now I just have a lot more friends!” Bloggers and others can apply to be a member of the RH team of contributors. The pressure cooker section has 25 recipes. I might try the French dip sandwiches, Korean beef, chicken and rice, and chicken faux pho (a paleo Vietnamese chicken dish).

Hip Cooking Pressure Cooking

Pressure Cooker Recipes 7

Pressure Cooker recipes: Genius Kitchen

My bookmark for Genius Kitchen has in the url “food.com” as the domain name. Now it redirects to “geniuskitchen.com”. Hey, what happened! I find out on the site:

You’ve probably noticed that Food.com looks a little different. The site officially transitioned into our new Genius Kitchen experience in 2017, but don’t worry, everything you love about Food.com is still available on Genius Kitchen, including your favorite recipes.”

I am one of the many cooks who accessed food.com, starting in about 1999. Sometimes because I knew the site had many recipes, sometimes because I was searching for how to cook something and that site popped up in the search results. “Genius Kitchen” is a better name, it has more character! I learn on Wikipedia that it is now part of the Discovery Inc. portfolio. Discovery Inc. operates “factual television” networks, including the Discovery Channel, Animal Planet, Science Channel, Food Network, and the Travel Channel.

Genius Kitchen joins home and professional cooks into a cooking community. There are tons of recipes – and over half a million are user generated! It has videos of food preparation, and delightful “shows” like Carnivorous with Courtney Rada. Genius Kitchen features a “community-inspired activity feed that allows users to add reviews, tweaks, questions and photos, breaking food news”. With apps and social media support, you can access the recipes you have saved from wherever you are.

The site has ads. Oh well.

I truly appreciate the site map for navigation, which makes it simple to find specific topics.


Genius Kitchen Pressure Cooker Recipes

When you do a search using “pressure cooker”, you get a whole page of recipes with a photo and title and link; you can narrow search for “pressure cooker chicken” and come up with a handle-able number of recipes that are, indeed, only for pressure cooker chicken (on one site I use, “pressure cooker chicken” will pull up some recipes that are chicken cooked conventionally). At the time I accessed this page, there were143 results.

The recipes below are ones I’d like to try, or simply examples of the type of recipe one can find on the site. There is a print function for each recipe that I can use to save it as a pdf.

Frozen-To-Fabulous 30 Minute Pressure Cooker Chicken and Mushrooms This is the recipe that I saved as my original bookmark for the food.com site. It calls for frozen chicken thighs and a 20 minute, quick release cooking method. It calls for two cans of mushroom soup! I usually just keep one such can in my pantry. (The Kitchn has a recipe for 30-Minute Pressure-Cooker Cacciatore Chicken that calls for frozen chicken drumsticks.)

Pressure Cooker Chicago Steak Roll Ups These use round steak, a cut that is often cheap and often livery tasty. They might do well in the pressure cooker, though. I would probably stuff them with something other than the suggested butternut squash.

Chicken and Dumplings I love chicken and dumplings, and have several recipes for this treat – but not a pressure cooker one.This recipe calls for bone-in, skinless chicken breasts.

Pressure Cooker Hungarian Chicken I like the seasonings in this dish, but the pressure cooking is a bit unusual. First, you cook on high pressure for 5 minutes, then on low pressure for 7 minutes. (Recall: most recipes on this site are user-contributed, so there is less consistency in recipe instructions.)

Lamb Shanks With Garlic and Port Wine The title says it all! Lamb, garlic, and wine go well together.

Giant Instant-Pot Pancakes Why would anyone do this? Pancakes are so simple on the stove. And this giant pancake looks more like a cake – and takes 40 minutes to prepare! Oh well, someone would probably like it.