Favorites: Pie Crust

The pie crust recipe that I used for years came from my mother. Hers was always perfect. Mine always tasted great, but was always difficult for me to roll out without tearing. I just lack a certain patience, I guess (well, I know). I kept using her recipe out of – well, maybe a bit of loyalty, or an acceptance that they did taste very good in spite of their looks, or maybe a laziness to find a new recipe that worked for me.

My mother’s recipe for a single pie crust is:

  • 1 cup flour
  • 1/2 teaspoon salt
  • 1/3 cup Crisco
  • 2 tablespoons water

You mix the flour and salt then cut in the shortening using a pastry blender, sprinkle in enough water so that the dough just holds together, form into a ball, and roll out on a floured cloth. For a double crust, you mix the water with some of the flour first instead of sprinkling it in.

Mother's Crust Recipe

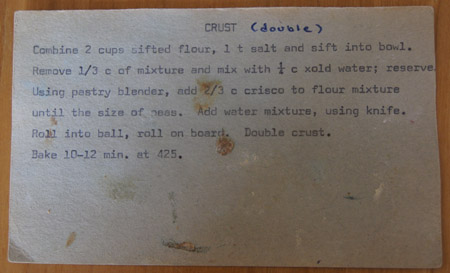
My well-used recipe card. I typed the crust recipe onto a 3×5 rectangle of colored paper when I left my parent’s home.

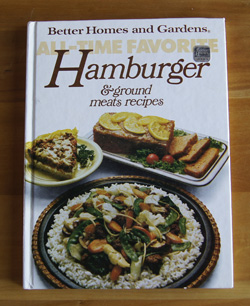
The above recipe is almost exactly the same as the recipe in All-Time Favorite Pies. That one uses a bit more flour and water, but is still a flour-salt-shortening-water pie crust recipe.

I never looked forward to making pie crust, it was more like planning for an upcoming battle.

Finally, I decided to take on the project of finding a new pie crust recipe. I searched the web for recipes and advice, and tried several different recipes, came on one that worked for me, then nudged the method until I was satisfied with the results. I make about 4 pies a year, so it took me a few years to come up with my final version!

My recipe is heavily based on one I found on Cook’s Illustrated, under the auspices of America’s Test Kitchen (and Christopher Kimball). Their recipe title is “Foolproof Pie Dough for a Single-Crust Pie” (dated 2007). I don’t want to step on any copyright toes, and give full credit for the development of this crust to Cook’s Illustrated! My version below just gives a couple nudges that help me make this dough perfect each and every time I use it.

The trick to this recipe is: Vodka!

Pie Crust
makes more than enough for a 9-inch crust

Note: this recipe can be doubled or fractionated – I have tried both variations with success. The amounts below make more than enough dough for a single crust, but that’s kind of nice because it gives some leeway for impatient dough-rollers. Or, take the extra dough, sprinkle with cinnamon and sugar, roll up, and bake 10 minutes at 375˚ for little treats. (That’s what my mother always let us do!)

  • 1 1/4 cup flour
  • 1/2 teaspoon salt (warning! if you do not use unsalted butter, you must use less salt!)
  • 1 tablespoon sugar
  • 6 tablespoons cold unsalted butter, cut into chunks
  • 1/4 cup cold Crisco (aka vegetable shortening), cut into 2-4 pieces (it’s gooey even cold, so “cutting” isn’t really the proper term here)
  • 2 tablespoons cold vodka (hey, just store some vodka in the freezer at all times!)
  • 2 tablespoons cold water (I put a few ice cubes in water for a few minutes, then measure the 2 tablespoons)

Get out your food processor. If you don’t have one, use a pastry blender or two knives instead. But the food processor really, really helps. I have never tried this crust without using a food processor.

Put 3/4 cup of the flour and all of the salt and sugar in in food processor and pulse a couple times just to mix.

Add all of the butter and vegetable shortening. Process for 10 seconds and check. It should look like “cottage cheese curds” and there should be “no uncoated flour”. If it is not yet to the cottage cheese point, pulse one or two times and re-check. In my experience, largish chunks of butter remaining in this dough are okay. It’s better to under-process than to over-process.

Open the food processor and scrape down the sides of the processor bowl. Add the remaining 1/2 cup flour and quickly pulse 4-6 times.

Remove the dough from the food processor and dump it into a regular bowl.

Mix the vodka and water. (Keep in mind that you might not need all of this vodka-water mixture.)

Sprinkle most of the vodka-water mixture over the dough. Using a rubber spatula, press the dough together until it sticks together and is “tacky”.

The exact amount of “tackiness” after the vodka/water is added isn’t terribly precise. The times I’ve tried this, it definitely wasn’t sloppy, and each time had a different degree of “holding together” when pressed against the sides of the bowl. Somewhere between sloppy and falling apart is best. Add the vodka/water slowly and if you add it all and still need more wetness, go with straight vodka. You want it to hold together so it will roll out easily, but too sloppy a dough creates a less-tender crust.

If you are a seasoned pie crust maker and the tacky mixture just seems too wet, know (from this chemist) that the vodka will evaporate and by the time you roll it out, it will no longer be tacky.

After mixing in the water/vodka, flatten the dough into a 4-inch disk, wrap in plastic, and refrigerate before rolling.

In my experience, this crust recipe works mixing together the night before, but take it out of the refrigerator an hour before rolling. It also works mixing the day-of, but make sure you put it in the refrigerator a couple hours before rolling.

Roll out on a lightly-floured cloth (like a flour sack cloth). When the crust is large enough to fit the pan, fold the cloth over to fold the dough, then gently transfer to the pie pan and fit and flute. Bake as directed in your pie recipe.

It rolls like a dream! Even I can do it!

I wrote myself a note on my final version of the new recipe: “And so with this, I leave behind Mother’s recipe for Crisco-flour-water-salt crust. That one was always flaky and wonderful, but this one rolls out in a manner more suited to my patience. It looks good, and tastes good. And, can be made ahead of time. And it means I now keep vodka in the freezer!”

Favorites: Beer Can Chicken

“We are having Beer Can Chicken for dinner.” “What’s that?” my daughter [who has been living abroad] asked.” “Well, you take a whole chicken and put it on a beer can and grill it.” “Do you . . . open the beer can?” “Yes!”

Beer can chicken recipes have been circulating amongst my Colorado friends for several years now. My recipe is based on one posted by the Culinary School of the Rockies (now Escoffier School of Culinary Arts, Boulder) in 2009. I tweaked it a bit, and have made it a lot!

I highly recommend Oskar Blues Old Chub as the beer for this recipe. I’m kind of partial to Oskar Blues, since this brewery started out in my town of Lyons. During the September floods in 2013, Oskar Blues helped our community with grants to businesses and individuals.

Oskar Blues was one of the first breweries to sell their microbrew in cans. Old Chub is a very hoppy IPA, and works great in this recipe.

Beer Can Chicken
serves about 4

  • 1 whole roasting chicken
  • 1 open 12-ounce can of beer, preferably a flavorful microbrew
  • 1 tablespoon brown sugar
  • 1 teaspoon each: garlic powder, onion powder, ground mustard powder, and chili powder
  • 1 teaspoon paprika – use smoked paprika if you have it
  • 1/2 teaspoon cayenne pepper
  • a couple tablespoons fresh herbs, if you have them on hand; I have used thyme, mint, basil, and oregano
  • salt and pepper to taste
  • olive oil

Rinse the chicken and pat it dry.

Mix the brown sugar with all the spices and herbs. Rub the chicken with some olive oil, then rub in the spices. Rub them in the cavity, under the skin that covers the breast, and on the outside of the chicken.

Preheat a gas grill to 350˚. The chicken needs to be cooked over indirect heat. My grill has 3 burners, so I set the first and third burners to medium high, and leave the middle burner off. Then the chicken has room in the middle to stand up without touching the gas grill cover when it is closed.

Hold the chicken upright (legs down) and place it on top of the beer can so that the can easily slides into the cavity. Use the legs to balance the chicken upright on the grill. (Yes, this can be a bit tricky the first time you do it!)

Close the lid. Grill the chicken at 350˚ for 1 hour to 1 hour 15 minutes. With my grill, I find that I need to check every 15 minutes or so to make sure that the grill is still at 350˚. The chicken is done when it is golden and at least 165 degrees.

Transfer the chicken (minus the beer can!) to a platter and serve!

Favorites: Lemon Cake

My mother and aunt made this recipe for years and years. My sister and I still love this cake. My blog entry on Molly Wizenberg’s recipe for French-Style Yogurt Cake with Lemon reminded me of this old favorite.

Today, I do appreciate the subtle tastes and textures in the French-Style Yogurt Cake with Lemon. A tiny slice of that cake makes me very happy. But there is still a place in my repertoire for this sixties lemon cake made from a cake mix and lemon jello. It remains an old favorite.

I grew up in a house on a half-acre in Southern California. We had a lemon tree in the yard, and my mother would go out back and pick lemons from that tree to make this cake. I remember making lemonade too from those lemons . . . dipping graham crackers into the sweet-sour juice just until they almost gave way, savoring the soaked crackers and then downing the lemonade on a hot and sultry summer day of childhood.

Lemon Cake

  • 1 box yellow cake mix
  • 3/4 cup vegetable oil
  • 1 pkg. lemon jello
  • 3/4 cup water
  • 4 eggs

Mix together and beat for 4 minutes. Pour batter into a lightly greased 8 1/2 x 11 1/2-inch pan.

Bake at 350˚ for 45 minutes.

While the cake bakes, mix 2 cups powdered sugar with the juice and rind of two large lemons.

Remove the cake from oven and make fork holes in the top. Pour the sugar-lemon juice mixture over the cake.

We always served this cake directly from the pan. It’s a great traveling cake, and always a hit.


250 Cookbooks: Hamburger & Ground Meats Recipes

Cookbook #51: Hamburger & Ground Meats Recipes. Better Homes and Gardens, Meredith Corporation, Des Moines, Iowa, 1980.

Hamburgers and Ground Meats RecipesHamburger ideas: More! This is the second hamburger-recipe cookbook I’ve covered in this blog. Ground meats are a mainstay in my freezer, great for easy and tasty mid-week meals. I’m always on the lookout for new recipes to try, even if I only cook the recipe once. “Variety is the spice of life.”

I’m going to keep this cookbook. Sure, it’s over 30 years old, but people ate well back then, too. I want to try the Crepe-Style Manicotti, Swedish Burgers, Greek-Style Crepes, and Sausage Quiche. I found a recipe for “main dish crepes” that I had been looking for for years. I was surprised to find recipes that incorporate feta cheese – I didn’t discover feta cheese until about ten years ago. I also found a recipe for “oven meatballs” that I think I used to make a lot. Baked meatballs can be low-fat, and meatballs freeze well, great for quick thawing to pop into a spaghetti sauce.

For this blog, I chose “Hearty Mexican Casserole”.

Hearty Mexican Casserole RecipeIt wasn’t until I was halfway through cooking this dish that I realized it was a lot like the “Wyoming-Mexican Casserole” that I have been making for years. Sure enough, it is exactly the same recipe that I typed it onto an index card in the 1970s. I probably clipped it from a Better Homes and Gardens magazine. I remember it being touted as “John Wayne’s favorite casserole”. When I google that phrase today I come up with a different recipe, one with chiles and eggs and evaporated milk. I guess I was wrong about John Wayne.

I’m killing two birds with one stone with this blog entry, sharing a favorite recipe and covering one of my 250 cookbooks.

Hearty Mexican Casserole
or, “Wyoming-Mexican Casserole”
serves about 4

  • 1/4 cup chopped onion (I used more like a half cup)
  • 1 pound ground beef
  • 3/4 cup finely chopped ham
  • 1/4 cup taco sauce (I used a bottled, chunky salsa)
  • 1 1/4-ounce envelope taco seasoning mix OR use 1 teaspoon each: cumin, chile powder, and oregano (preferably Mexican oregano)
  • salt to taste
  • 10 ounces spinach, cooked (can use frozen spinach)
  • cooking oil
  • 12 corn tortillas
  • 1 cup sour cream
  • 1 cup grated jack cheese

Cook the onion in a little olive oil, then remove them from the pan and set aside. Brown the ground beef (drain off fat if necessary), then add back in the onions along with the ham, taco sauce, and seasonings. Add the spinach and some water (about a half cup) and simmer 5-10 minutes.

Cook the tortillas in hot oil until just limp. Alternatively, you can steam or microwave the tortillas to soften them.

Spoon about 1/3 cup of the meat mixture on each tortilla; roll up. Place the filled tortillas, seam side down, in a greased baking dish (13×9-inch). Cover and bake at 350˚ for 30-35 minutes or until heated through. Uncover; spread sour cream over tortillas. Sprinkle with cheese. Bake for 5-10 minutes more, until the cheese is melted.

Comments

These are actually enchiladas. And they are good! Here is the mixture before it was rolled into the tortillas:

Hearty Mexican CasseroleI made a half recipe and baked them in a 7×11-inch pan. I like these scrunched up next to each other. Here they are, ready for their first phase of baking:

Hearty Mexican CasseroleAnd here they are, sour cream and cheese on top and baked, ready to be plated next to avocado-tomato-queso-fresco salads:

Hearty Mexican CasseroleTime to enjoy a great meal!

Favorites: Cheater’s Chiles Rellenos

My “real” recipe for chile rellenos calls for deep frying the rellenos. They are wonderful, but I rarely make them because of the fat calories the frying adds to the dish (not to mention the time-consuming and messy process of deep frying the egg-battered stuffed chiles).

Instead, I make this cheater’s version a lot. This recipe is from my own index card collection and probably entered my repertoire in the 1970s.

Cheater’s Chiles Rellenos
serves 4

  • 6 eggs, separated
  • 1 tablespoon flour
  • 1/4 teaspoon salt
  • 1 4-oz. can green chilies, diced
  • 1/2 lb. Jack cheese, sliced thin or grated
  • salsa or a spicy diced tomato sauce like rotel
  • optional: sour cream

Beat egg whites until soft peaks form. Beat egg yolks lightly, add flour and salt and mix until smooth. Fold in whites until well blended. Turn half the mixture into a greased 12x8x2-inch baking dish. Cover with chiles and cheese. Top with remaining egg mixture.

Bake at 325˚ about 25 minutes. Top with salsa and sour cream.

Half a recipe: I made a half recipe and baked it in a 4 1/2 x 6 1/2 x 1 1/2-inch small Le Creuset baking dish. I baked it at 350˚ about 25 minutes. It puffed up over the top of the baking dish and turned out pretty and perfect.

Favorites: Fresh Peach Pie

Peach fest 2013! Another of my long-time favorite peach recipes.

This is my mother’s recipe. The peaches are not baked, they are just laid in a baked crust. It’s best eaten the day you make it, so have company over!

This is the pie to make when you have lots of perfectly ripe peaches, peaches so good that they barely need a pie to make them better.

Fresh Peach Pie

  • 2 1/2 – 3 pounds fresh peaches
  • 2 tablespoons lemon juice
  • 2 1/2 tablespoons cornstarch
  • 1 cup sugar
  • 1/2 cup water
  • 1 baked pie crust (9-inch)
  • whipped cream

Mash enough of the peaches to make 1 cup of pulp (save the rest for slicing into the pie). Combine pulp, sugar, cornstarch, and water and cook until thick. Cool.

Slice the rest of the peaches and put in a baked 9-inch pie shell. Sprinkle with the lemon juice. Pour cooked mixture over fresh peaches in pie shell.

Serve with whipped cream.


Favorites: Sour Cream Peach Muffins

I’ve been making these for years. I probably clipped the recipe from a magazine or newspaper.

Inspiration for adding this recipe today is from my September 2013 Just Peachy post. It’s time for a peach fest!

Sour Cream-Peach Muffins
makes 12 muffins

  • 1 cup chopped peaches
  • 1 cup sour cream (or yogurt)
  • 1 egg
  • 1/4 cup margarine or butter, melted (or use vegetable oil)
  • 1 tablespoon baking powder
  • 1/4 teaspoon baking soda
  • 1/4 teaspoon salt
  • 2 cups flour
  • 1/4 to 1/2 cup sugar (depending on sweetness of peaches)

Mix peaches, sour cream, and egg, stir in margarine. Combine dry ingredients, then stir into the wet ingredients just until blended.

Put into 12 muffin cups and bake at 375˚ for about 35 minutes, or until golden and tops spring back when gently touched in the center.

Favorites: Patty’s Zucchini Bread

Zucchini BreadIt’s late summer, that time when gardeners discover huge zucchinis and plot how to get rid of them. No, I am not a gardener, I was on the receiving end in this monster zucchini transaction. We were headed off for a camping trip and needed a breakfast bread, and I had a hankering for zucchini bread. So both my problem and my gardener friend’s problem was solved.

My only zucchini bread recipe was in my dessert document as “Sherry Zucchini Cake”. It was cooked in a bundt pan and had an optional thin vanilla frosting. I always thought of this zucchini cake as zucchini bread, since I used to cook it in mini-loaf pans to give away at Christmas time, back in the 1990s. Just to check, I went online and found that most zucchini bread recipes are just like my zucchini cake recipe, but none of them had sherry or lemon in them. They are missing out on all that flavor!

This week, I wanted a more nutritious loaf, so I substituted whole wheat for some of the white flour. I thought brown sugar would make it even better, so I tried that too. I worked out the baking times for loaf pans instead of a bundt pan. So, I think I can call this successful recipe “Patty’s Zucchini Bread”.

Patty’s Zucchini Bread
makes 2 8×4-inch loaves

  • 1 1/2 cups all-purpose flour
  • 1 1/2 cups whole wheat pastry flour
  • 1 1/2 teaspoons baking soda
  • 1 teaspoon baking powder
  • 1 teaspoon salt
  • 2 teaspoons cinnamon
  • 1 cup oil
  • 1 cup white sugar
  • 1 cup brown sugar
  • 3 eggs
  • 2 teaspoons vanilla (use a good vanilla)
  • 2 tablespoons sherry (dry or sweet)
  • 2 cups grated zucchini
  • 1 teaspoon grated lemon peel
  • 1 1/2 cups chopped nuts
  • 1 cup raisins

Grease and flour 2 8×4-inch loaf pans and preheat the oven to 325˚.

Combine flour, cinnamon, baking soda, baking powder, and salt; set aside. Beat together oil and sugars. Add eggs, one at a time, beating well after each addition. Add vanilla and sherry. Stir in flour mixture. Add zucchini and lemon peel, stir to blend. Fold in nuts and raisins.

Turn into the two prepared loaf pans. Bake at 325° 55-60 minutes, or until it tests done with a toothpick. Let stand in pans 5 minutes before removing to a wire rack to cool.

Favorites: Applesauce-Carrot Muffins

Applesauce Carrot MuffinsThis recipe was in my short-list of muffins in my 1990s blog, as were my Lemon Poppy Seed Muffins. I made them last week and I still really like them. Not only do they taste good, but they have carrots, apples, and whole wheat flour to boost the nutrition, and are low-ish in fat.

Applesauce-Carrot Muffins

  • 1 cup flour
  • 3/4 cup whole wheat flour
  • 1 teaspoon baking soda
  • 1/2 teaspoon salt
  • 1 teaspoon cinnamon
  • 1/2 teaspoon nutmeg
  • 1 egg
  • 1/2 cup sugar
  • 1/4 cup oil
  • 1/4 teaspoon vanilla
  • 1/2 cup milk
  • 1 cup applesauce
  • 3/4 cup grated carrots

Beat egg and sugar until fluffy, then beat in oil, milk, and vanilla. Stir in applesauce. Combine flours, baking soda, salt and spices in large bowl. Stir applesauce mixture into flour mixture only until just blended. Quickly fold in carrots.

Put into 12 muffin-pan cups. Bake at 400˚ for 15 to 18 minutes until lightly browned.

Less-calorie alternative:

As written, these have about 150 calories each. You can shave the calories and still have a pretty good muffin by using 5/8 cup skim milk and only 2 tablespoons oil and using either 2 egg whites or egg substitute for the egg and using a scant 1/2 cup sugar.

Favorites: Southwestern Grilled Chicken

I clipped this recipe back in the 80s from the Colorado Daily, the campus newspaper of the University of Colorado, Boulder. Me, a seasoned cook, using a recipe from a campus newspaper, a resource that targets the 18-24 year old crowd! But this is a great dish for families too. I included it on the short list of main dishes in my 1990s blog, and I still make it today, in 2013. It is simple, low-fat, and tasty.

The original recipe suggested serving with grilled or broiled green, red, and yellow bell peppers. Instead, I always serve it with a good, chunky salsa, rice, and warmed corn tortillas.

Southwestern Grilled Chicken
serves 3-4, depending on appetites

  • 8 oz. plain yogurt (Greek yogurt works great)
  • 1/4 cup chopped green onions
  • 8 oz. chopped green chiles (canned work fine)
  • 1 teaspoon cumin
  • 1/2 teaspoon salt
  • 1 tablespoon mayonnaise
  • 1 pound boneless chicken breasts (or chicken tenders)
  • hot salsa (your choice)
  • cilantro (optional)
  • cooked rice

I generally start this in the morning and let the chicken marinade all day, but a couple hours is sufficient.

Combine the yogurt, onions, chilies, cumin, and salt. Remove about 2/3 cup of this mixture, mix it with the tablespoon of mayonnaise, and set it in the refrigerator for later use (it’s a sauce for the cooked chicken).

Put the rest of the yogurt mixture in a bowl and add the chicken pieces. You can make the chicken extra tender by piercing it a lot with a sharp fork. Cover the bowl and set the chicken-marinade mixture in the refrigerator.

About a half hour before dinner time, remove the chicken from the yogurt marinade. Cook the chicken either in a broiler or on the grill:

  • broil about 5 minutes per side 4-5″ from an oven broiler set on high OR
  • grill over medium high direct heat, about 5 minutes per side

The chicken is done when an instant-read thermometer reads about 165˚. If you don’t have a thermometer, check for doneness by cutting into one of the pieces with a knife (it should no longer be pink inside).

Slice the chicken into 1/2″ thick pieces and plate it with the cooked rice. Sprinkle with chopped cilantro if you wish. Serve it with the reserved yogurt mixture and hot salsa. Warmed corn tortillas make a great addition!

Southwestern Grilled Chicken