250 Cookbooks: Mastering the Art of French Cooking

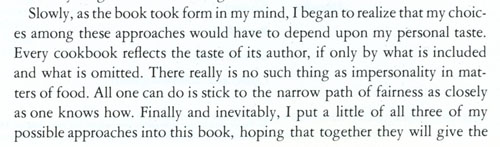
Cookbook #227: Mastering the Art of French Cooking, Julia Child, Louisette Bertholle, Simone Beck, Borzoi Books, Alfred A. Knopf, NY, 1961. Thirtieth Printing, June, 1978.

Mastering the Art of French Cooking cookbook

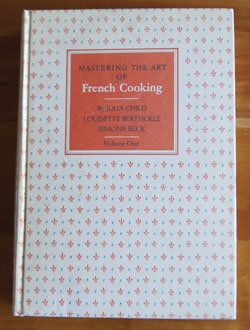
“Julie & Julia”, the 2009 film starring Meryl Streep and Amy Adams, portrays the true story of Julie Powell, a young New Yorker who took on the challenge of cooking all 524 recipes in Mastering the Art of French Cooking. She covered her experiences in a blog, and eventually a book: Julie and Julia: 365 Days, 524 Recipes, 1 Tiny Apartment Kitchen. When the movie came out, I ran upstairs to see if I had a copy of Mastering the Art of French Cooking. And yes, it was on my bookshelf!

Mastering the Art of French Cooking always intimidated me. My copy is barely wrinkled, no food stains mar the pages. In the past, no more did I want to read it that I would want to read a book on advanced physical chemistry.

I’ve grown up a bit though, and taken a class on classic French sauces. I’ve also learned how to make my own great stocks. I’ll say “I am wiser”, and am feeling this especially this week because I just turned a year older. Now as I turn the pages of Mastering the Art of French Cooking, I can understand the language and appreciate the wisdom, and I smile warmly at Julia Child’s complete love of cooking.

On my birthday this week, I got up late and decided to make an omelet. And I don’t just mean “make an omelet”, I wanted to make an omelet according to Julia’s directions. I wanted nothing else for breakfast! Just an experiment. It was, afterall, my birthday.

I open Mastering the Art of French Cooking to page 127. Julia Child says it will only take 30 seconds to make the omelette. And, “An omelette cannot be made in a sticky pan. The eggs must be able to slide around freely. This is why it is a good idea to have one pan that is reserved for omelettes only.” And the type of pan Julia Child likes the best? The French type of plain iron pan with sloping sides. Aha, I own just such a pan! I got it about a year ago. But I banished it to the basement because it is so heavy and hard to clean.

Today I jog down to the basement and retrieve the pan. I scrub it with steel wool and soap, dry it carefully, and heat it to get all the water off. Then I rub it with oil and wipe all that off. I set it on the stove.

“The individual 2- to 3-egg omelette is usually the tenderest, and by far the best size to practice making.” Perfect. “Just before heating the butter in the pan, break the eggs into a mixiing bowl and add salt and pepper. With a large table fork, beat the eggs only enough to blend the whites and yolks thoroughly. From 30 to 40 vigorous strokes should be sufficient.”

My 3 eggs mixed with 30 vigorous strokes, it’s time to heat my pan. “Place the butter [1 tablespoon] in the pan and set over very high heat . . . as the butter melts, tilt the pan in all directions to film the sides. When you see that the foam has almost subsided in the pan and the butter is on the point of coloring, it is an indication that it is hot enough to pour in the eggs.”

Next comes the short but busy omelette-cooking step. I am to hold the (heavy) pan in my left hand, pour in the eggs, and immediately start sliding the pan back and forth rapidly over the heat. And at the same time, I am supposed to stir the eggs with the bottom flat side of a fork to spread them all over the bottom of the pan. In only 3 or 4 seconds, the eggs will become a light custard, and it will be time to tilt the pan at a 45 degree angle and gather the eggs at the far lip of the pan. And give “4 or 5 sharp blows on the handle of the pan with your right fist to loosen the omelette and make the far edge curl over onto itself.”

This all happened very fast. But somehow, I poured a creamy, soft roll of eggs onto a plate. No toast, no coffee cake, no sausage, just eggs. I immediately take the hot omelette and  two forks and sit down next to my husband. He gives me this look, as if, he is supposed to share this with me? “It’s my birthday, I can do what I want!”

I took the first bite and . . . heavenly tastes and textures burst in my mouth. Dang that was a great omelette. Thank you Julia Child!

I spend several days paging through Mastering the Art of French Cooking. I took lots of notes! I really do like this classic cookbook. I suggest every serious cook buy or borrow a copy at some point in their life.

The only drawback to Julia Child’s recipes is the heavy use of butter, cream, and egg yolks. Yes, I have read The Big Fat Surprise, a book that disputes the generally accepted idea that the fats in these foods are bad for you, and instead encourages us to include them in our diet. But still, calories are calories, and stick on my body as weight when I eat too many. Just saying.

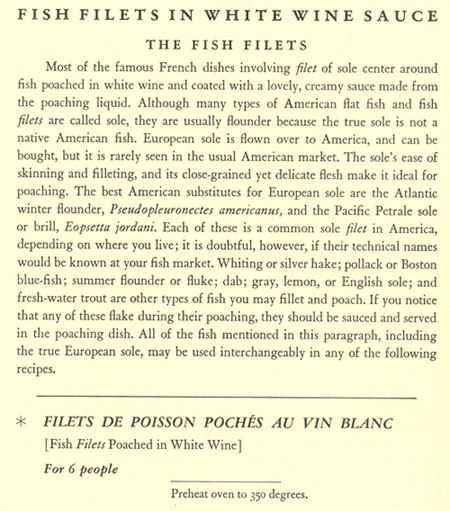
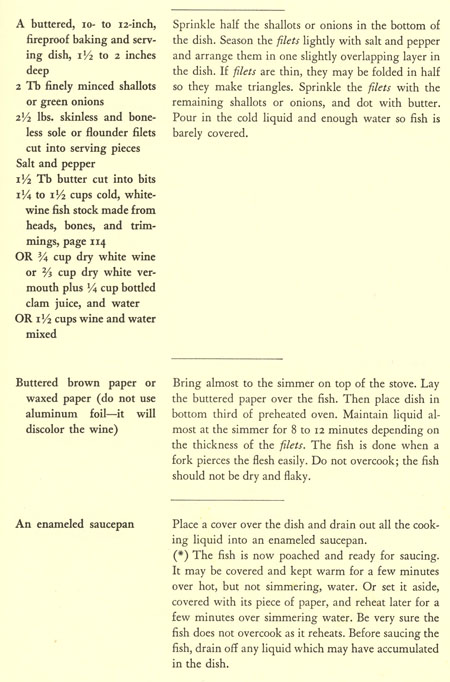
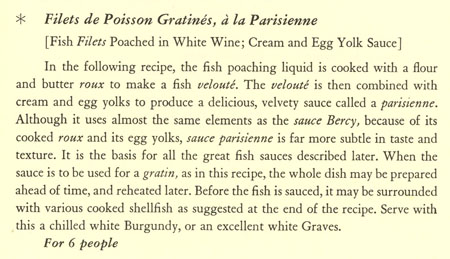
But this week, I will indulge in a Julia Child recipe: Filets de Poisson Gratinés, à la Parisienne, or “Fish Filets Poached in White Wine; Cream and Egg Yolk Sauce.” This recipe is a great example of Julia Child’s presentation style.

fishrecpage1fishrecpage2fishrecpage3fishrecpage4fishrecpage5

Below is my adaptation of this recipe. Note that you need a baking dish that you can heat on the stove top and also place in the oven. I used a LeCreuset.

Poached Sole in Velouté Sauce
serves 2

Poaching the fish:

  • 1 pound sole filets
  • 1 tablespoon minced shallots
  • butter: you need this throughout; I used unsalted butter, less than a cube in all
  • salt and pepper
  • 1/2 cup fish stock (or use water)
  • 1/2 cup white wine
  • a piece of parchment cut to fit the LeCreuset

Turn on the oven to 350˚.

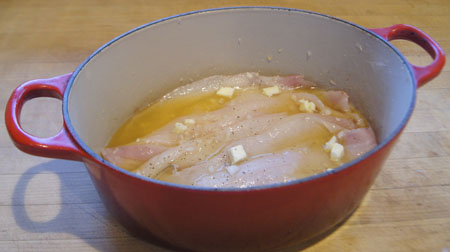
Butter the bottom of a LeCreuset. Sprinkle in half the minced shallots. Season the sole filets with salt and pepper, then place in the prepared LeCreuset, slightly overlapping the filets. Dot with 3/4 tablespoon butter cut into small chunks. Combine the fish stock and the wine and pour over the fish. Add a little more stock if necessary to barely cover the fish. Mine looked like this:

fish ready to poach

On the stovetop, bring the fish almost to simmering. Butter both sides of the piece of parchment. Place the LeCreuset in the 350˚ oven. Bake for 8 minutes, check for doneness by piercing with a fork (you should find just a slight resistance), and bake a few more minutes only if necessary. During the baking, the cooking liquid should be at a light simmer.

Drain the cooking liquid into a small saucepan, leaving the poached fish in the LeCreuset, covered with the parchment.

Boil the cooking liquid until it is reduced to 1/2 cup. This will be use in the sauce.

Veloute Sauce:

  • 1 1/2 tablespoons butter
  • 2 tablespoons flour
  • 1/2 cup reduced cooking liquid (hot)
  • 3/8 cup milk
  • 1 egg yolk
  • 1/4 cup cream
  • “drops” of lemon juice
  • 1/2 tablespoon butter
  • 1 tablespoon grated Swiss cheese

Melt the 1 1/2 tablespoons butter in a small sauce pan, then add the flour and stir until it is all mixed in. Continue cooking until it thickens but do not cook it until it browns. Off heat, beat in the hot cooking liquid and the milk. A whisk works well for this step. Put the pan back on the stove and bring to a boil, stirring constantly. Boil about a minute – the mixture will be thick.

In a bowl, blend the egg yolk with the cream, using a whisk. Add small amounts of the hot sauce and continue beating until about 1/2 cup of the hot sauce is added, then add the rest of the hot sauce in a thin stream. Put the mixture back in the pan and boil and stir 1 minute. You can thin with a little cream if it is too thick for your tastes. Add a few drops of lemon juice and salt and pepper.

Preheat the broiler.

Spoon the sauce over the poached fish (take the parchment off first), then dot the top with the 1/2 tablespoon butter and the Swiss cheese. On the stove top, over low heat, heat until it is just simmering.

Put the dish under the broiler until the top of the sauce is brown.

What is nice about this dish is that you can assemble it with the poached fish covered with sauce, and then do the stove-top heating and broiling steps just before serving. It’s important to bring this dish to the table hot and bubbly.

Here is the plated dish.

poached, sauced fish 
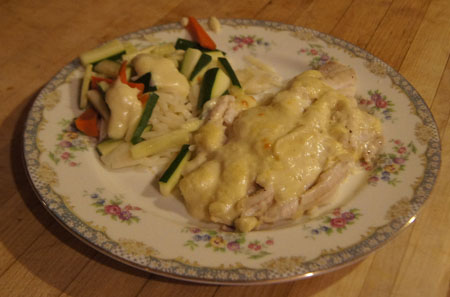
I served with a little orzo and steamed julienned zucchini and carrots on the side. I also served a loaf of my own no-knead bread. And a couple pretty green salads. For dessert? Fresh blackberries over ice cream.salads

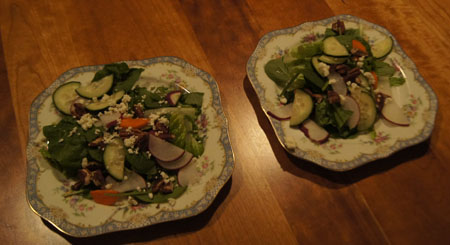
I took my first bite of the fish and then I had to set down my fork so I wouldn’t gobble up the rest too fast. This is absolutely delicious! “One of the best twenty-five meals ever in my life” was my comment.

Thank you Julia Child.

250 Cookbooks: The Chinese Cookbook

Cookbook #224: The Chinese Cookbook, Craig Claiborne and Virginia Lee, J. B. Lippincott Company, Philadelphia and New York, 1972.

The Chinese Cookbook
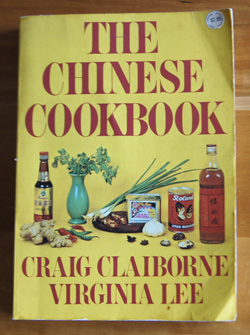
The Chinese Cookbook is one of my favorite cookbooks. I always keep it in my kitchen for ready reference!

I turn first to Craig Claiborne’s introduction. He writes “I was trained in depth in French cookery in a Swiss hotel school, and it appealed to me from the beginning as a form of cookery that could be, let us say, wholly embraced . . . it seems so logical.” But Chinese cookery? He writes:

page xivClaiborne goes on to talk about his fourteen year stint as the food news editor and restaurant critic for the New York Times, saying “I was tired. I neeeded rest and a respite from cooking. And then I met Virginia Lee.”

Virginia Lee was a renowned Chinese cook who came to the US in 1967. Claiborne interviewed her for an article, and ended up applying for her cooking class. She only taught ten students at a time! But she accepted Claiborne, and eventually they wrote this cookbook together.

I want to share another excerpt from the introduction, because it says so much about Chinese cooking.

page xviiI learned how to make most of my current repertoire of Chinese dishes from The Chinese Cookbook. The recipes are easy to follow, even though the ingredient lists might look daunting with exotic ingredients. For instance, Hot and Sour Soup:

Hot and Sour SoupHot and Sour Soup
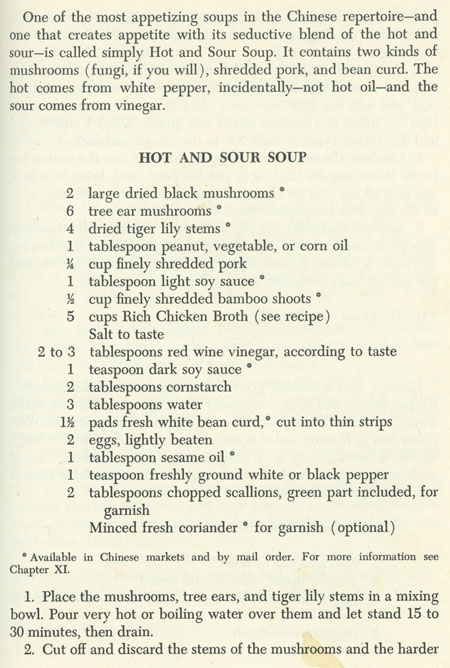
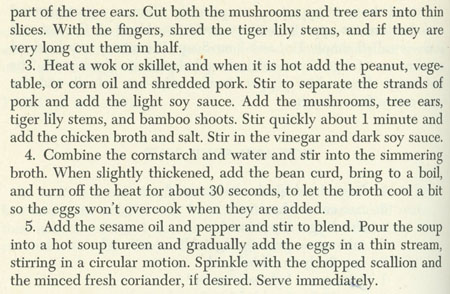
I’ve made this Hot and Sour Soup many times. Dried black mushrooms, tree ear mushrooms, and dried tiger lily stems! Ages ago, I had to go all the way to Denver to a Chinese market to find all of these ingredients. Nowadays I go to the Asian Seafood Market in Boulder. Sometimes I leave out these exotic ingredients, if I have none on hand, or I use fresh shitakes and skip the tree ear and black mushrooms tiger lilies. Not as much fun, but still a good soup.

Claiborne mentioned Fried Jao-Tze in the introduction (excerpt at the top of this page). Jao-tze (or pot stickers) are little round wonton-type skins, filled with pork and shrimp and vegetables, that are first fried to get the bottoms brown, and then doused with a bit of water and covered and steamed until done. They are served with a dipping sauce made from soy sauce, vinegar, sesame oil, ginger, garlic, sugar, and hot oil. Years ago, before I had ever heard of Jao-Tze from other than his cookbook, one adventurous day I decided to try these. And they were amazing! It was only later that I saw Jao-Tze pot stickers appearing at restaurants, at University event buffets, and even in the frozen food section of markets. I have made Claiborne and Lee’s recipe at home many, many times and they are much better than any I have had out.

Another dumpling I learned about in this cookbook are “Shiu May”. I use square wonton skins, fill with shrimp and pork and vegetables, then steam them. The Chinese Cookbook’s Kung Pao Chicken is extremely tasty and extremely easy. It calls for raw, shelled fresh unsalted peanuts, and I find them at the Asian Seafood Market. It also calls for bean sauce, hoi sin sauce, and chili paste – these ingredients are usually in supermarkets, and they have a long shelf life once opened, kind of like ketchup. If you put enough dried hot peppers in it, your Kung Pao Chicken will please a guest who really likes hot food.

I did a google search to see what others thought of The Chinese Cookbook. A couple bloggers (Undercover Caterer and Collectible Cooking) raved about “The Best Fried Rice”, so I looked it up in my copy of the book. “This fried rice is a bit of a masterpiece” state Craig Claiborne and Virginia Lee. Whoa. I am going to have to try this masterpiece soon.

A couple other recipes I’d like to try are “Beef with Oyster Sauce” and “Beef with Peas and Peanuts”.

Note: I covered another Chinese cookbook that I like in this blog: The Cooking of China, by Emily Hahn and the Editors of Time-Life Books. I put lots of photos of ingredients and one photo of my bamboo steamer in that post.

For this blog, I’ll make the Sesame Seed Pork Chops.

Sesame Seed Pork Chops recipeSesame Seed Pork Chops recipe
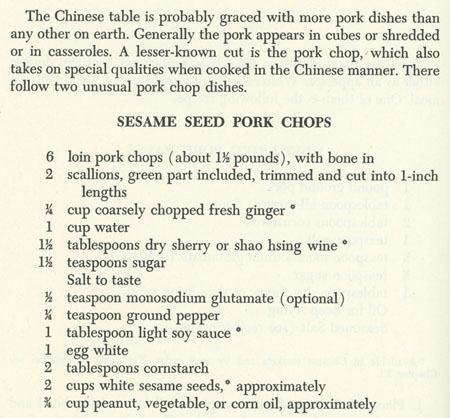
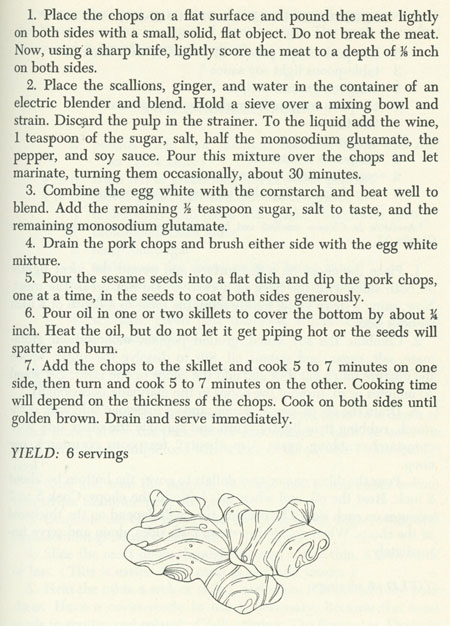
I made these pretty much as per the above recipe, except I left out the monosodium glutamate, and I halved the recipe for two people, but did not halve the amount of egg white/cornstarch mixture. I used bone-in pork sirloin chops, but actually, next time I’d prefer to use boneless pork sirloin.

Sesame Seed Pork Chops
serves 2 as a main entre

  • 2 pork chops, bone-in or boneless (about 12 ounces if boneless)
  • 1 green onion, chopped roughly
  • 2 tablespoons coarsely chopped fresh ginger
  • 1/2 cup water
  • 1 tablespoon sherry or shao hsing wine
  • 1 teaspoon sugar
  • 2 teaspoons soy sauce
  • salt and pepper to taste
  • 1 egg white
  • 2 tablespoons cornstarch
  • 1 cup sesame seeds (about)
  • vegetable oil for frying

Pound the pork chops lightly, then make cross hatches on both sides, using a sharp knife and cutting down to about 1/8 inch deep. Set aside.

Place the green onion, ginger, and water in a blender (I used a mini-processor). Blend well. Pour through a strainer into a bowl; discard the pulp. Add the sherry or shao hsing wine, sugar, soy sauce, and salt and pepper. Pour this mixture over the prepared pork chops in a flat dish or bowl. Marinate at least 30 minutes, turning occasionally.

Combine the egg white with the cornstarch and beat well to blend. Add a bit of sugar (about 1/4 teaspoon) and a little salt.

Put the sesame seeds into a flat dish. Pour oil into a skillet to cover the bottom by about 1/4 inch, then heat, but do not let it get “piping hot or the seeds will spatter and burn”.

Drain the marinade off the porkchops. Put them in the egg white mixture to coat both sides, then dip them in the sesame seeds to coat both sides generously. Put the coated chops in the heated skillet and cook 5-7 minutes (or until golden brown) on one side, then turn and cook 5-7 minutes on the other side. Cooking time will depend on the thickness of the chops.

Serve immediately.

These turned out well. I especially liked taking the green onion-ginger mixture out of the blender – it was green and smelled wonderfully of ginger. The sesame seed layer on the pork chops tended to lift off when cutting them, but it was delicious. I think that boneless pork chops would work better, because they would cut easier into pieces, although the bone-in ones were particularly juicy.

Here are my cooked sesame seed pork chops:

Sesame Seed Pork Chops
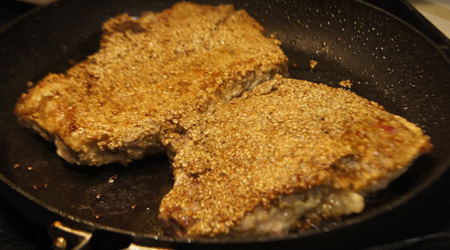
To serve, I sliced the cooked chops into large chunks. It was messy because I had to avoid the bone. But, the pork was very, very juicy and flavorful. I served with fried rice and snow peas and fresh shitakis.

Delicious!

Sesame Seed Pork Chops plated

250 Cookbooks: Weight Watchers Quick and Easy Menu Cookbook

Cookbook #223: Weight Watchers Quick and Easy Menu Cookbook, Weight Watchers International, Nal Penguin, Inc., NY, 198.

Weight Watchers Quick and Easy Cookbook
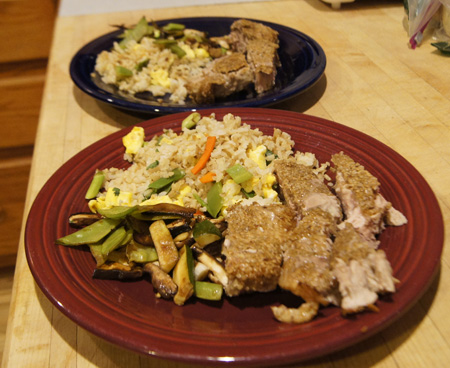
This is the second Weight Watchers book that I have covered in this blog, the other was Weight Watchers 365-Day Menu Cookbook. In general, I like Weight Watchers. My best word is “sensible” for the eating plans. Weight Watchers’ plans of the 1980s espoused foods from the entire food pyramid, and taught dieters to watch their portions, learn the foods that have the most calories, and learn the foods that have the most nutrients. They help dieters learn how to eat and enjoy a balanced diet – a “normal” diet, not a “fad” diet – and this knowledge should help them beyond the initial strict dieting phase.

I found Weight Watchers 365-Day Menu Cookbook a bit “weird” – read my post to find out why.

This Weight Watchers cookbook looks more promising. I immediately find a couple recipes I could cook for this blog. It is nicely laid out, with each page being a meal plan for one day (breakfast, lunch dinner, snacks) tucked in a column to the left, and a full recipe for one of those meal plan items on the right. As I scan the recipes, I realize that ingredients are pretty much what I already have in my pantry, so no special trips to the market to find an odd ingredient are needed. Below is a recipe I tried. It illustrated how the book is laid out.

Pork Fajita Pitas recipe

I like the large variety of fresh vegetables in the recipes. The chapters are organized by month of the year, so that you are able to use the fresh foods most abundant at the moment in the market. There are several full page color photos scattered throughout the book. And I like the way each recipe lists calories and exchanges (bread, milk, vegetable, protein, fat), kind of like the diabetic diet book I covered, The Calculating Cook.

One of the recipes I like is the “Swiss Chard Gnocchi”. It is reminescent of the dumplings of my recent blog post, the Cooking of Germany, but the Weight Watchers version incorporates a fresh vegetable (swiss chard) for a less-calorie higher-nutrient version of a dumpling. “Greek Vegetarian Pitas” include cucumber, bell pepper, fresh parsley, garbanzo beans, tahini, yogurt, mint, and feta cheese. Several recipes include kale and fennel. Muffins have raisins and freshly grated carrot. “Capered Turkey Amandine” calls for almonds, capers, and parsley. I’d like to try the “Apple Crisp with Graham Crackers”, since I am always looking for low calorie desserts, and I have lots of graham crackers at the moment, and have never thought of putting graham crackers on an apple crisp.

I like this too: almost all the main dish recipes are written for two people. So convenient for this retired couple.

I do note that most recipes lower the calorie content not only by portion size, but by including less fat. For instance, when I compare my own muffin recipe with the muffin recipes in Weight Watchers Quick and Easy Menu Cookbook, I find mine have more fat and less sugar for the same total calorie amount. This is so very common in the low-fat diet trend of the late twentieth century. (The Big Fat Surprise kind of turned my own ideas about fats entirely around.)

I marked one recipe as tried, the “Pork Fajita Pitas”.

I like this cook book well enough to keep it. For this blog, I’ll make the “Chicken ‘n’ Noodles Amandine”.

Chicken Noodles Amandine recipe

As I look over the recipe ingredients, I recall this about Weight Watcher recipes: they can be a bit nutty about the amounts of each ingredient. Of course, they are listing nutrient values per recipe, so that will only work if the cook carefully measures everything. For example, the directions say to “divide a tablespoon of margarine”, using 1 teaspoon for toasting the almonds and two teaspoons for frying the chicken. “1/4 ounce” of almonds is about a tablespoon (I weighed them and then volume-measured them).”1/2 teaspoon flour” is not going to thicken the sauce, in my opinion, and 1/2 teaspoon of flour only has 5 calories. So I’ll splurge and use a tablespoon, for a huge 37 calories. “1/2 packet” of instant chicken broth and seasoning mix? I don’t have that, so I’ll just use salt and pepper. I am to use “1 cup of cooked noodles”. (Who likes to measure cooked noodles anyway?) That is not very helpful, what I need to know is how many dry noodles to cook. From references, I find that:

  • 1 cup of cooked noodles has 210 calories
  • 1 ounce of dry pasta has 100 calories

Thus, I would weigh out 2 ounces of dry noodles for about 200 calories. I know how much pasta we like: in general, I weigh out 3-4 ounces of dry pastas like spaghetti and penne for the two of us.

I used one big boneless chicken breast, about 12 ounces, and cut it in two horizontally, and pounded it a tiny bit to flatten it. Two people can be a guy and a girl, so sometimes portion sizes have to be nudged.

Below is my version of the recipe. It may have more calories than the printed version.

Chicken Noodles Amandine
serves 2

  • 1 tablespoon sliced almonds
  • boneless chicken breast, 8-12 ounces (use 2 chicken cutlets, or slice a whole boneless chicken breast into two pieces)
  • 1/2 cup sliced mushrooms
  • 1/2 cup diagonally sliced green onions (I used green onions and some leek too)
  • salt and pepper
  • 1 tablespoon butter
  • 1 tablespoon flour
  • 1/2 cup water or chicken stock
  • 2 tablespoons sour cream (or more, if you want; I actually used half yogurt and half sour cream)
  • salt and pepper
  • cooked noodles (cook 3 ounces dry pasta)

Toast the almonds in a dry, non-stick pan until golden. Set aside.

Saute the chicken breasts in a skillet in a bit of hot olive oil. When both sides of the chicken are browned (about 3 minutes per side), remove them from the skillet and set aside.

In the same skillet, melt the tablespoon of butter. Saute the mushrooms and green onions until tender-crisp, then sprinkle the flour over them and stir. Gradually stir in the water (or stock). Stir in the sour cream and salt and pepper to taste. Turn the heat to low, and add back the chicken. Simmer about 5-10 minutes, until all is hot. Serve over noodles and sprinkle with the toasted almonds.

Here are the chicken breasts in the pan, ready to be served:

cooking the chickenAnd our plated meal:

Chicken Noodles Amandine

These were tasty and very easy to make. The sauce was a bit thin for our tastes; next time I would add more than a tablespoon of flour. But all-in-all, a success!

250 Cookbooks: Cooking of Germany

Cookbook #222: Cooking of Germany, Nika Standen Hazelton and the Editors of Time-Life Books, Time-Life Books, NY, 1969. Foods of the World series; revised 1973, reprinted 1974.

Cooking of Germany cookbookThis is the fifth and last book that I own in the Foods of the World series. Once again, I look forward to discovering another interesting author as I open Cooking of Germany, just as I discovered M. F. K. Fisher in the Cooking of Provinvial France, Emily Hahn in the Cooking of China, Joseph Wechsberg in Cooking of Vienna’s Empire, and Rafael Steinberg in the Cooking of Japan.

Nika Standen Hazelton is the author, and who is she? Let’s see what I can find. She was born in 1908, in Rome; her father was a German diplomat. She studied at the London School of Economics and began a career as a European journalist at the young age of 22, in 1930. In 1940, she emigrated to the US with her husband.

In the States, she started writing cookbooks. Her obituary states she authored 30 cookbooks, and also “was a frequent contributer to the major food magazines and for several decades wrote a column about food, wine and travel for The National Review“.  Her writing style wove memoirs into her recipes, and several of her books remain cookbook standards. Her attitude towards cooking is described as “no-nonsense”. “Searching for Nika Hazelton, the no-nonsense cook” is a delightful 2011 blog entry by Sandra Lee. I chuckled several times at Sandra’s descriptions of this apparently full-of-attitude author.

So I am a bit abashed that I was ignorant of Nika Hazelton’s writing. She belongs among the other important woman authors of food articles and books in the twentieth century, alongside M. F. K. Fisher and Emily Hahn. (And why did I not read and appreciate these female authors of the Foods of the World series when I first received the books in the mail? I have no good answer.)

Nika Hazelton begins the introduction with “when I began to think about this book, I was puzzled . . . should the book be aboutt he cooking of present-day Germany? Should it be about the cooking I grew up with between World Wars I and II? . . . each approach could be illuminating, and each had its drawbacks.” Here is the paragraph that follows these thoughts – note her philosophical tone:

page 6

Her musings continue. “Why write about a bygone age? The Germany of those days is gone forever – and good riddance to it.”

This paragraph describes her decision for the book’s focus:page 6page 7

And:

“As in any cookbook, some readers will miss their own favorites, or question ingredients or techniques that went into making a typical dish. I can only remind them that no book is all-inclusive, and that most traditional dishes of any country come in almost as many versions as there are cooks. This is an asset rather than a fault, for it gives room for pleasant speculation on the whys and wherefores of a dish – pleasant speculation, because food and cooking are pleasant and comforting in themselves.”

“Food and cooking are pleasant and comforting in themselves.” A woman after my own heart.

The introduction is followed by the first chapter: “Surprises of the German Table”. Nika Hazelton writes that the tourist (of the late 1960s) might expect to find a Germany filled with the music of Bach and Beethoven, castles perched high above the Rhine, and Hansel-and-Gretel towns nestled in dark forests. Meals would be a long succession of sausages and sauerkraut followed by sauerbraten and dumplings served with great steins of beer “hoisted by hefty maidens”. But in reality, the tourist would fly in jets over the Rhine castles, and “The Gretels are miniskirted, the Hansels long-haired, and they sway to rock ‘n’ roll in the automobile-choked streets of their age-old towns.” Those automobiles would be Volkswagens. The tourist would find all the expected dishes, but they will be different in flavor and in an incredible variety of forms. And food is sold in “supermoden supermarkets”, offering foods “premixed, freeze-dried, precooked, and, of course, temptingly packaged for impulse buying, along with fresh foods from the world over.”

Here she describes why she thinks Americans are so comfortable with German food:

Cooking of GermanyThis book has wonderful full-page photographs. The photographer was German-born Ralph Crane, who worked for the NY Times as well as Time-Life books. Here is an example of the full-page photos in this book:

Cooking of Germany

The second chapter is “How to Eat Five meals a Day”. I turn to a photo of a man in suit and tie, his wife in dark sweater and trousers. They sit at a table, under an elegant chandelier, complete with candles, flowers, and fancy dishware. She is feeding a bite of her food to the family dachshund. The photo caption tells us they are “dining informally at home”. Oh yes. Informal. (You should see my informal.)

The five-meals-a-day chapter exemplifies Nika Hazelton’s character as she describes not only the food, but the people and the traditions of German cooking. She takes us through a day in the life of a German in the mid-twentieth century, weaving the hours with people coming together and enjoying food, and compares the experiences of Germans today with those of yesteryears.

This paragraph exemplifies the chapter’s tone:

Cooking of Germany

She mentions the grape harvest:

“Incidentally, for those who think that grape harvesting is romantic, with maidens in dirndls wearing Bacchic wreaths in their hair, I have news. Grape pickers wear jeans, sweaters and high rubber boots. The pretty dresses and stupendous beehive hairdos come later, at the Winzerfeste, or local vintners’ fêtes, where the merriment is astonishing indeed.”

At the end of the second (and each) chapter are recipes. Katerfisch, or “Fish for a Hangover” with tomato sauce and pickles, and Röllmopse, or “Rollmops”, are herring rolls filled with onion and pickle, “prized as a pick-me-up on a morning after”. Ah, those Germans.

Chapter 3 is “The Pleasures of Eating Out”. Here is an example:

Cooking of Germany

Chapter 4 is “Old and New Ways of Party Giving”. Again, an example:

Cooking of GermanyCooking of Germany

Nika Hazelton ties her own past with her own present:

Cooking of Germany
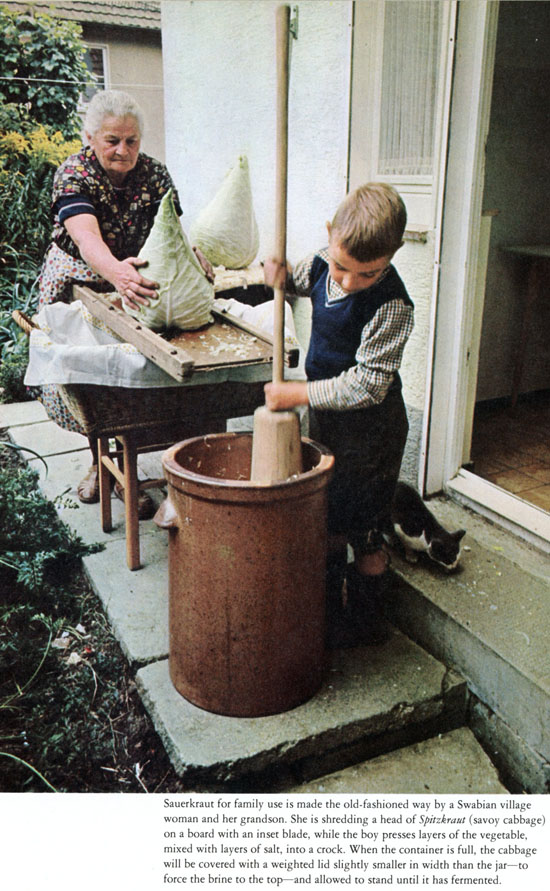
The flavor and of the Cooking of Germany continues to the end of the book. The next chapters are “A Cooking History 2,000 Years Old”, “The Northern Style: Cold-Climate Cuisine”, “The Central Style: Rich and Filling”, “The Southern Style: A lighter Touch”, “Baking Raised to a Fine Art”, and “Festive Revelry and Nostalgic Holidays”. Here are a few thoughts about these chapters.

  • There is a great photo of a potato on page 134. I learn that potatoes are a new world vegetable, and of all the Europeans, Germans were the last import them. Today, potatoes are called “The King” of German vegetables and are used for Schnaps (an alcoholic beverage), dessert dumplings, hot potato salad, potato pancakes, potato soup, and potato dumplings, among other dishes.
  • One of my favorite pages is the photo on page 154 of 26 different kinds of German wursts (sausages). “Everybody rejoices when November kills its pig” is the title of a photo caption.
  • I enjoy the “Baking Raised to a Fine Art” chapter. Wonderful photos of German yeast breads. Photos of desserts, fancy and rich, like the gingerbread house on the cover of the book.

Cooking of GermanyCooking of Germany

Need to mention

I find the recipe instructions in the hard cover and in the accompanying spiral bound booklet very well written. The “late Michael Field suprervised the adapting and writing of recipes for this book. One of America’s foremost food experts and culinary teachers, he wrote many articles for leading magazines.”

Another of the team that put together the Cooking of Germany is the consultant:

Cooking of Germany

As you can see, the consultant was Irma Rhode. Born in 1900, she earned PhD in chemistry. I can imagine that she was the only female in her classes. Heck, I was one of the few women taking chemistry in the 1960s!

Rouladen for dinner

Time to get cooking! I pick up the spiral-bound book of recipes that accompanies the hardcover. I decide to make Rouladen for this blog. These are beef rolls, and the recipe suggests to serve them with spatzle (see scan below)). I’ve made Rouladen before but wow, how long ago was that! We both remember this dish but can’t remember the last time I made it and I can’t figure out why I haven’t made it since.

Rouladen recipeAs suggested in the recipe, I’ll serve it with a little Red Cabbage with Apples.

red cabbage recipe

The rouladen recipe also suggests dumplings or spätzle, but I am going to cheat and use convenient potato dumplings, or gnocchi, sold these days in America as a shelf-stable pasta product. Below is the Cooking of Germany recipe for spätzle. You can see I used this recipe booklet, by the sticky pages at spätzle. I love spätzle! But they take a bit of time to make. (Someday I’ll make them again!)

dumplings pages

I modified the rouladen recipe a bit: I increased the onions, leeks, and parsnip in the cooking liquid, and I added some pepper. I made the sauce a bit differently, as described in my version of the recipe, below.

Braised Stuffed Beef Rolls (Rouladen)
serves 2

  • 1 pound thin sirloin (or top round) steak (my local market sells thin sirloin as “petite sirloin”)
  • 2 teaspoons mustard (I used a brown mustard with seeds, but any type would work)
  • 1/4 cup finely chopped onions
  • 2 slices bacon, each about 8 inches long
  • 1 whole dill pickle, cut lengthwise into halves
  • 1 tablespoon lard (or use butter)
  • 1/3 cup chopped celery
  • 1/3 cup thinly sliced leeks, white part only
  • 1/3 cup chopped parsnip (optional; or substitute a carrot)
  • 1/2 teaspoon salt
  • pepper to taste
  • 1 cup water
  • 1 big sprig of parsley
  • 1 tablespoon butter
  • 2 tablespoons flour

Pound the steak until it is 1/4 inch thick. (I put it in a ziplock bag and pounded with a mallet.) If you are using a single piece of round steak or sirloin steak, cut it into two rectangular pieces about 4 inches wide and 8 inches long after pounding. I found that the petite sirloin steaks worked perfectly, as they were sold already the perfect size for this dish.

Spread each rectangle with a teaspoon of mustard, then sprinkle with 2 teaspoons of onions (save the remaining onions for later). Place a piece of bacon lengthwise down the center. Lay a dill pickle half across the narrow end of each piece and beginning at the pickle end, roll the meat around it, jelly-roll fashion, into a cylinder. Tie the rolls at each end with kitchen cord.

BeefRolls layoutBeefRolls rolled
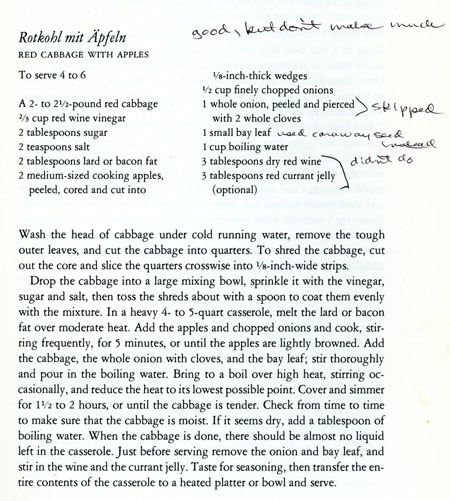
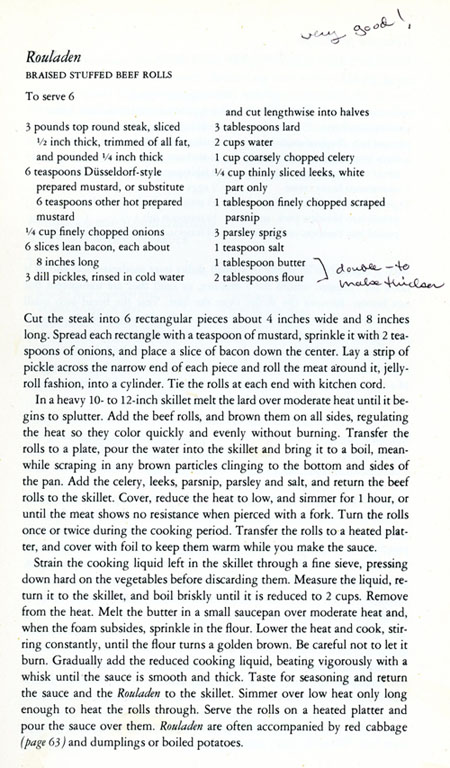
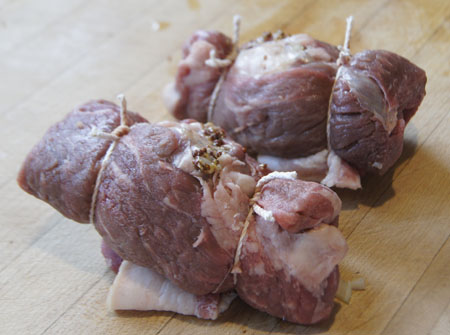
Choose a deep skillet with a heavy lid. I used my old cast-iron stewing pot; a LeCreuset or any heavy cooking pan or pot or skillet would work. Heat the skillet over moderate heat; add the lard (or butter) and heat until it begins to splutter. Add the beef rolls, and brown them on all sides, regulating the heat so they color quickly and evenly without burning. Transfer the rolls to a plate and set aside.

Add the celery, leeks, parsnip, remaining onion, and salt and pepper to the skillet and cook and stir a minute or two to soften the vegetables. Add the water and bring it to a boil, stirring and scraping in any brown particles clinging to the bottom and sides of the pan. Add the parsley. Turn the heat to low and cover the pot. Monitor the pot for awhile: you want a gentle simmer. Let it simmer for an hour or so, turning the rolls once or twice.

Remove the rolls from the pot and cover with foil to keep them from drying out while you make the sauce.

Let the sauce cool awhile in the pot, then scoop the vegetables from the pot with a slotted spoon. Pour the liquid into a gravy separator. Alternatively, if your gravy separator has a strainer-type top, pour the entire contents of the pot through the strainer into the separator. You want these cooked vegetables! Save them!

When the fat has separated from the water layer, pour the water layer into a blender or food processor, or better yet, into the cylindric container that comes with an immersion blender. Add the saved cooked veggies to the liquid, and blend or process or use an immersion blender to homogenize the mixture.

Meanwhile, melt the tablespoon of butter in the skillet until it is foaming, then slowly add the 2 tablespoons of flour, stirring constantly. When all the flour is incorporated, stir a minute or two more, but do not let it burn. Then, slowly and with constant stirring, add the blended broth-vegetable mixture. When it is nicely thickened and bubbly, add the beef rolls, cover the pot, and heat 5-10 minutes to get the rolls to serving temperature.

BeefRolls plated
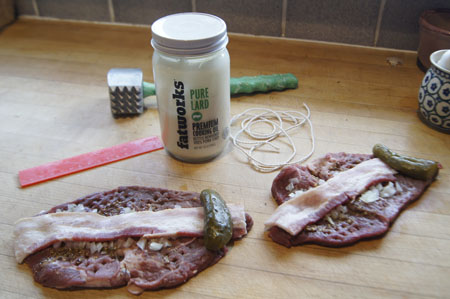
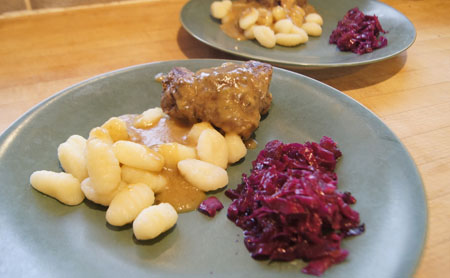
These were delicious! The gravy was amazing, thick and full of flavor. The pickle inside was fun. These remind us of one of our favorite meals, called “little piggies” by my husband’s family. It’s still about his favorite meal  – strips of bacon on strips of round steak, rolled and secured with a toothpick, cooked in a skillet and served over mashed potatoes with gravy. I like the rouladen as made above with tender sirloin steak, because there is less fuss in preparation, and the de-fatted gravy isn’t greasy.

250 Cookbooks: Original SchlemmerTopf Recipes

Cookbook #221: Original SchlemmerTopf® Recipes, Scheurich, circa 2009.

Original SchlemmerTopf Recipes cookbook
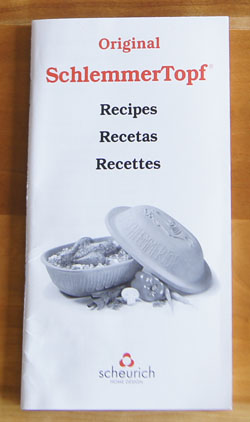
A “Schlemmertopf” is a covered clay baking pot. I wrote a lot of material on clay pots in Römertopf Cooking is Fun, and more in Original Schlemmertopf Recipes, so I won’t repeat that information here.

Original SchlemmerTopf Recipes is the instruction and recipe booklet that came with my current SchlemmerTopf. I bought this clay pot in 2009 (plus or minus a year or two) to bake no-knead breads. The back cover of Original SchlemmerTopf Recipes states that Reston Lloyd Ltd. is the exclusive US and Canada distributor for SchlemmerTopf. They suggest: “Visit our Web Site: www.restonlloyd.com” – so I did, and found that currently Reston Lloyd  offers only the Romertopf® brand of covered clay baking pots.

The bottom section of my SchlemmerTopf® is glazed; the top section is not. This makes it a lot easier to clean than the first clay pot I had. The unglazed top section needs to be soaked in water for about 10 minutes before use. After filling the bottom of the pot with recipe ingredients, the top is added, and the SchlemmerTopf® is put in a cold oven. Only then is the oven turned on, usually to a high temperature, like 425-475˚.

And yes, my last two experiences with clay pot recipes for this blog were very successful! I need to remember to use this pot more often, and no only for baking bread!

Here is the instruction page:

schlemmertopf instructionsAnd Six Golden Rules:

6 golden rules
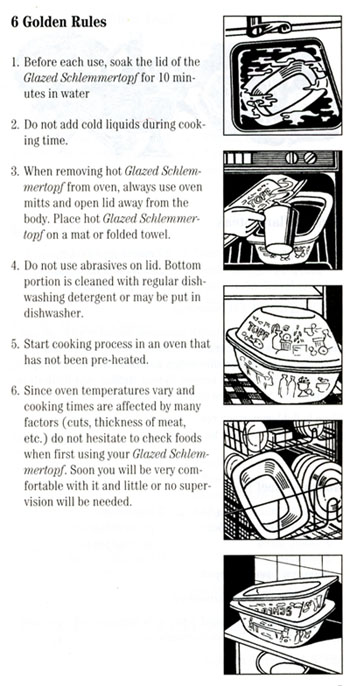
The first 23 pages of this booklet is written in English, then (as far as I can tell) the same instructions and recipes are written in Spanish and then in French. Example recipes are stuffed flank steak, beef stew, meat loaf, beef cabbage rolls, roast beef, chicken shanghai (I made this for another blog entry), chicken paprika, turkey curry, roast game hens, roast duck, and roast salmon. I find these recipes are helpful because they illustrate how to bake a variety of foods in the SchlemmerTopf. But, they are not very inspiring.

Hmmm, shall I keep this small booklet? For a while. But I know I could live without it.

For this blog I decide to make the Roast Beef. Largely because I have a small roast in the freezer!

Roast Beef recipe
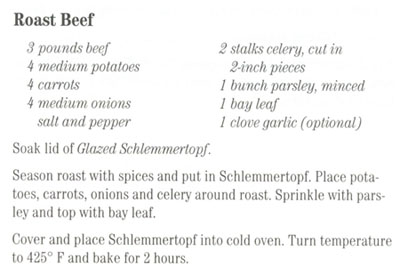
My roast is only about a pound and a half, so I will cut the recipe in half. Note how the recipe (above) does not state what cut of beef to use, nor does it tell me if the potatoes, carrots, and onions are to be peeled or chopped. It does direct the cook to cut the celery in “2-inch pieces”. I decided to peel and cut in half the potatoes, carrrots, and onions.

SchlemmerTopf® Roast Beef
serves 2, with leftovers for sandwiches

  • beef roast, about 2 pounds (I used a bottom round roast)
  • salt and pepper
  • 2 potatoes, peeled and cut in half
  • 2 carrots, peeled and cut in half
  • 2 onions, peeled and cut in half
  • 1 stalk of celery cut in 2-inch pieces
  • 1/4 cup chopped fresh parsley
  • 1 bay leaf

Soak the lid of the SchlemmerTopf® in cold water for at least 10 minutes.

Season the roast with salt and pepper and place in the base of the SchlemmerTopf®. Add the vegetables around the roast, then put the parsley and bay leaf on top.

Cover the SchlemmerTopf®.

Place in a cold oven. Turn the oven to 425˚ and bake for 2 hours. Feel free to open the lid and check for doneness at any time, it won’t affect the baking.

Here is the beef and vegetables, ready to go in the oven.

clay pot roast

And here is the finished roast.

clay pot roast
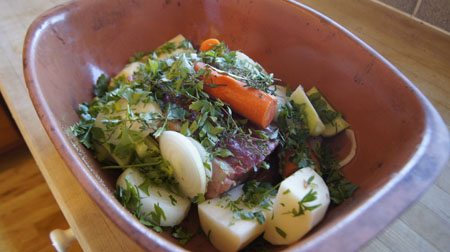
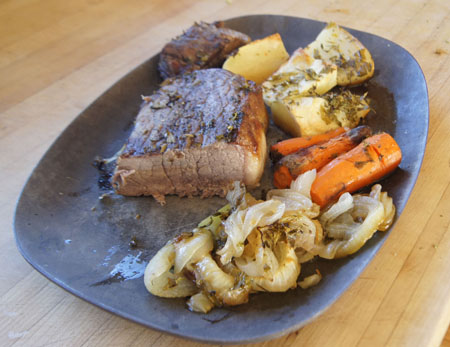
This was good. The potatoes were nicely browned and not mushy inside. I liked the onions too – browned and soft and perfect. I wasn’t able to make a gravy, so I served it with ketchup. (I liked the Römertopf Pot Roast that I made when I covered Römertopf Cooking is Fun. For that pot roast, I used a cross rib roast, lots more seasonings, and was able to make a gravy.)

The leftover beef from this Beef Roast recipe was great the next day, sliced thin in sandwiches. So I’d say the recipe was a success!

250 Cookbooks: Crockery Cookery

Cookbook #217: Crockery Cookery, Mable Hoffman, H. P. Books, Los Angeles, CA, 1975.

Crockery Cookery cookbookI just now realized: This paperback book has the same title and cover photo and publication date as my hardcover book Crockery Cookery. This paperback is from my own collection, while the hard back version was my mother’s. I didn’t mark or note any of the recipes in the paperback. The information on the use of different brands of crockpots is the same in both, but some of the recipes are different. And, the hardcover edition is better illustrated.

In all, I have eleven crockpot cookbooks in my database. See my first crockpot blog entry for a little on the history of crockpots.

Before I realized that this cookbook was a duplicate, I spent some time poring over the recipes. This time they struck me as “definitely severnties” in content. For better or worse! To me, seventies style foods can be both comfort foods and over-fatty over-packaged over-salted foods to avoid. Today I will take them as comfort foods. I choose to make “Hungarian Goulash”, with ketchup, Worcestershire sauce, brown sugar, mustard, paprika, and garlic and onion.

Hungarian Goulash recipeThe recipe calls for beef stew meat, but I have a quantity of pork loin in the freezer so I decide to use that instead of beef.

Hungarian Goulash
serves about 4

  • 2 pounds beef or pork stew meat (I used cut-up pork loin)
  • 1 large onion, sliced
  • 1 clove garlic, minced
  • 1/2 cup ketchup
  • 2 tablespoons Worcestershire sauce
  • 1 tablespoon brown sugar
  • 1 teaspoon salt
  • 2 teaspoons paprika
  • 1/2 teaspoon dry mustard
  • 1 cup water
  • 1/4 cup flour mixed into a small amount of water

Put the meat in a crockpot and then add the onion. In a bowl or measuring cup, combine the garlic, ketchup, Worcestershire sauce, sugar, salt, paprika, mustard, and 1 cup water. Stir to combine,then pour over the meat/onion mix in the crockpot.

Cover and cook on low from 9-10 hours, or on high for 4-5 hours, until the meat is very tender. Taste and add salt and pepper to your taste. Then, with the crockpot on high, add the 1/4 cup flour mixed with a small amount of water. Stir in, then cover and cook on high for 15 minutes, until the sauce is thickened.

Serve over noodles or rice.

Hungarian GoulashThis was very good. I’d make it again!

I am going to recycle this paperback, though. The hardcover version is more pleasant to use, largely because of the color photographs.

250 Cookbooks: Beard on Pasta

Cookbook #211: Beard on Pasta, James Beard, Alfred A. Knopf, NY, 1983.

Beard on Pasta cookbook

James Beard was a well-known and well-loved twentieth century American cook, author, teacher, and television personality. I covered his book Beard on Bread in my fifth 250 Cookbooks post, and he wrote many articles in my Encyclopedia of Cookery volumes. I enjoy his writing, and his wisdom. So I am happy to now cover Beard on Pasta.

“This is a book of good times to have with pasta.” So begins the introduction of Beard on Pasta. He continues: “I never get tired of pasta, any more than I get tired of bread.” I am the same way!

Noodles have a long history. Before refrigeration, wheat was mixed with water to make a paste that was dried to become “noodles”, and these could be stored at room temperature without spoiling. According to Beard, in early Bulgaria lumps of dried dough were carried by horsemen in their saddlebags and grated into pots of boiling milk at the end of the day’s ride. Records show that noodles were being sold in Greece as early as the fifth century. “Pasta in Italy probably started in the south, as part of that whole Mediterranean culture. We know that Romans grew wheat in Sicily.”

We tend to think of noodles as Italian, but pasta is a part of nearly every country’s cuisine. Noodles are made from wheat flour, rice flour, and mung bean, yam, potato, and cassava starches. Noodles are made in all shapes and sizes. Some noodles require boiling before adding to a dish, and some only need to be soaked in cold water.

A quote from Beard: “We’re Americans, with a whole melting pot of cultures behind us, and we don’t have to do things the classic Italian way. We can do as we please.” And: “this is not an Italian cookbook”.

The first chapter is “Observations”. Beard discusses commercial dried pastas, store-bought fresh pasta, equipment for making and saucing pasta, how to cook pasta, choosing portions, important ingredients (tomatoes, olive oil, cheese), and what to drink with pasta. I like the way he does not judge between store-bought or homemade pasta, and he does not judge between pasta-making methods such as hand made, manual machines, or electric pasta-extruding machines. I like to use my manual pasta maker for simple flat noodles and spaghetti and for filled pastas like ravioli. I own an electric Simac pasta machine that both kneads and extrudes the dough. I don’t use it a lot anymore, but it is great for making fresh macaroni.

Also in the “Observations” chapter is a section on flour. Me and flour have a long relationship and I pay close attention to this section. Beard writes that the recipes in this book were all prepared with all-purpose flour. But he states that the best flour for pasta is durum (hard-wheat) flour. Durum flour has more gluten in it (gluten is the sticky stuff), but was hard to find in the US when he wrote the book in 1983. All-purpose flour is a blend of hard and soft wheats. Semolina is made from durum wheat, but in the US, it is sold as a coarsely ground product, and does not make a good, pasty dough. I do use semolina when I make my own pasta dough, but I always mix it with all-purpose flour, in a ratio of about 1 part semolina to 3 parts all-purpose flour.

While it is still hard to find durum wheat and other specialty flours in my local stores, I discovered King Arthur Flour online a couple decades ago. Today I can order durum flour, artisan bread flour, french-style flour, high gluten flour, and a pasta flour blend from King Arthur Flour.

The next chapter is “Making Pasta”. This chapter describes how to roll, cook, and dry homemade pasta. (I talked a lot about how I make pasta in this post: The New Pasta Cookbook  – please refer to that post to learn about my method.) My age-old pasta dough recipe is 1 1/2 cups all-purpose flour, 1/2 cup semolina flour, 1/2 teaspoon salt, 1 tablespoon olive oil, 2 eggs, and 2-4 tablespoons water. Beard’s recipe is similar, but leaves out the semolina flour and the olive oil. He gives directions for making the dough by hand, as well as using a food processor or a mixer.

The rest of the chapters include recipes for different pasta dishes: Pastas in Broth, Mainly Vegetable, Fish and Seafood, Meats, Eggs and Cheese, Stuffed Pastas, Cold Pasta, Small Saucings, and Desserts. The only recipe I marked in this book is “Chilied Short Ribs over Corn Macaroni”. I almost made “Italian Sausage Salad” for this blog and will definitely make it some hot summer night (oddly enough, we are having a very cool August in Colorado). In the Desserts chapter, I discover a recipe for “Noodle Pudding”, with broad noodles, eggs, sugar, spices, apples, raisins, and apricots. This “famous Jewish specialty” really sounds like the elusive kuchen recipe that a college friend made for us all those years ago!

To sum up: this book is a great source for pasta recipes. It’s a keeper!

Now, what to make for this blog? Beard inspires me to be creative and trust my own judgement, to explore, to substitute ingredients, to use what is on hand in my household. So that is what I am going to do for this blog post.

First I’ll make my own pasta. I haven’t made pasta from scratch for a long time, maybe just  couple times since my December 2012 post on The New Pasta Cookbook. In that post, I show and discuss my manual pasta machine. Briefly, it rolls the dough into thin sheets, and then it cuts those sheets into flat noodles or spaghetti.

I have a bag of “Perfect Pasta flour blend” in my pantry. It is:

“a blend of golden semolina, durum flour, and King Arthur Unbleached All-Purpose Flour” (ordered online from King Arthur Flour)

Yes! It has the durum flour touted by James Beard. The problem is, the package should have been used by 2015 (and it’s 2017). It is still sealed, so I open the package and carefully look for bugs. None. I give it a big sniff: does it smell a little stale? Maybe, but I think it’s okay. The recipe on the package back is:

  • 3 cups Perfect Pasta Flour Blend
  • 4 large eggs
  • 2-4 tablespoons water
  • a little extra flour for the work surface

The directions say to mix in a food processor, bread machine, or by hand in a bowl. Bread machine?! Hey, I’ve never mixed pasta dough in a bread machine, I think I’ll try it!

I have three beautiful, delicious summer tomatoes from the local produce stand. And I have basil, oregano, and thyme in my garden. I decide to make Beard’s Fresh Tomato Sauce:

Fresh Tomato Sauce recipeThe tomatoes need to be peeled, seeded, and chopped, and Beard has directions for this on page 16. In a class at the Auguste Escoffier School of Culinary Arts in Boulder, I was taught to cut out the top stem end of the tomato, score an X on the bottom, boil for 30 seconds, chill the tomato in an ice bath, peel the tomato, cut it in half, and then scoop out the seeds. Beard’s directions on page 16 of Beard on Pasta are much simpler. The tomatoes are boiled “as is” for 30 seconds, then you slice off the top, squeeze out the juice and seeds, peel the tomato, and chop it up. I tried Beard’s method and liked it. Here is my “Fresh Tomato Sauce”.

fresh tomato sauce
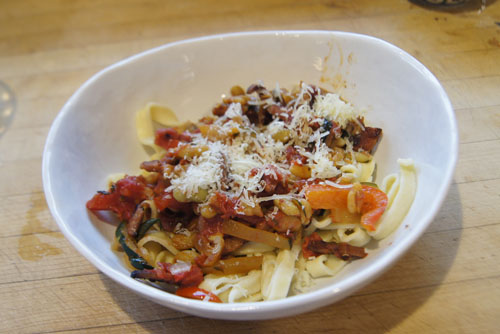
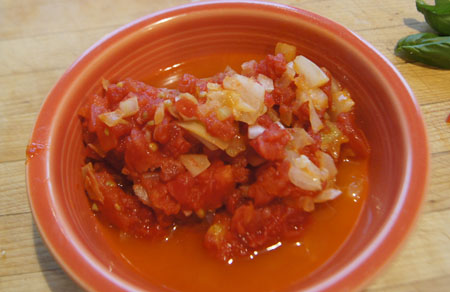
I am inspired by Beard’s “Pasta with Beans” recipe on page 90. The ingredients are: white beans, bacon, onions, carrots, herbs, canned tomatoes, and elbow macaroni. I have some great home-cooked flageolet beans in my freezer. I have leftover ham to use instead of bacon. My daughter gave me a big zucchini from her garden. I have a good red pepper. Herbs I have in abundance! I’ll use the fresh tomato sauce (above). And, of course, I will have my homemade flat noodles.

Here are the julienned zucchini and red pappers and herbs:

pasta veggies

I saute the ham with some garlic:

ham and garlic
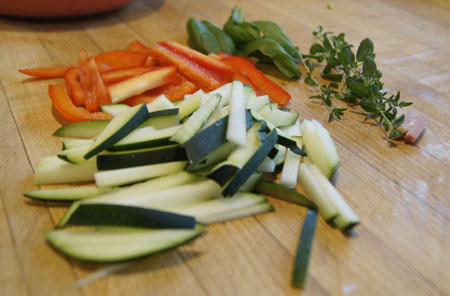
Beard is big on cheese. But, I don’t have a lot of good, chunk Parmesan cheese in my refrigerator – and I’ve decided to make this meal with what I have on hand. I sniff all my cheeses, grate up the last (hard) chunk of Parmesan, add a bit of another sharp white cheese, and use the last of my pre-shredded Parmesan.
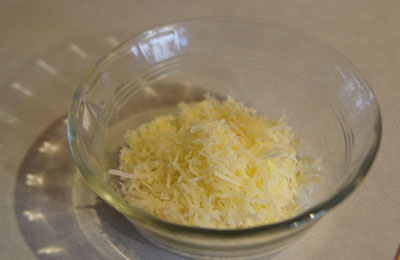
cheeseI made a loaf of My Daily Bread to go with the pasta:

wheat bread

And here is my pasta dish:

pasta dish

It was absolutely delicious! So fresh and so full of flavor. The noodles were cooked al dente, and definitely a bit thick, and had just the right amount of chewiness. Such a great meal that we decided to open a bottle of red wine. Yum, what a treat on a Thursday night.

Thank you James Beard for encouraging me to be creative.

Note: I don’t think I’ll use the bread machine to knead the dough next time. The pasta dough was a bit too wet, and fell apart if I tried to get my manual pasta machine to roll it thinner than the “4” setting (“6” is the thinnest). Next time, I’ll go back to using my trusty Kitchen Aid mixer for the dough.

250 Cookbooks: Weber Gas Grill Cookbook

Cookbook #210: Weber Gas Grill Cookbook, Weber-Stephen Products, 2005.

Weber Gas Grill cookbook
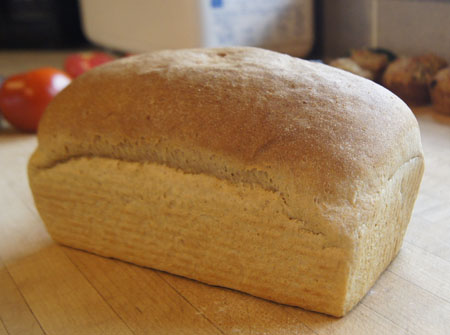
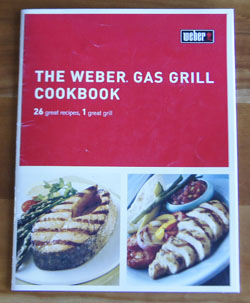
This booklet of 26 recipes must have come with our Weber gas grill. I have forgotten all about this cookbook, since soon after getting the grill I purchased Weber’s Real Grilling, a large cookbook with tons of recipes.

Today as I open this 8 1/2 x 11-inch booklet, I am so very glad I rediscovered it! It is formatted much like Weber’s Real Grilling, and I invite you to read that post for background information.

First are three recipes for grilling steak, including a recipe I’d like to try: “Marinaded Flank Steak”. Next is baby back ribs with a “spiced apple cider mop”. Onions and green peppers are doused with beer in a foil pan and grilled alongside bratwurst in “Bratwurst & Beer”.

“Gaucho Grill with Chimichurri Sauce” grills a mixture of chicken, sausages, and flank steak, all rubbed with a homemade chimichurri sauce before grilling and served with more of this sauce. “Gyros Roast” is interesting, but sounds like a lot of work. First you pound a slab of lamb and a slab of round steak, rub herbs on the lamb, top with the round steak, roll up this lamb-herb-beef sandwich, tie with string, and grill 1 1/2 hours. Both the Gaucho Grill and Gyros Roast would be good recipes if cooking for a crowd.

“Rack of Lamb” and “Leg of Lamb” are other group-sized recipes. Not sure they would work for a couple, since what would I do with the leftovers? “Spicy Lamb Kabobs” would work well for two people, though. The lamb cubes are marinaded in red wine vinegar, lemon juice, orange rind, green onion, cinnamon, and cloves . “Pecan-Stuffed Pork Chops”? Sound great – I have baked stuffed pork chops, but never done them on the grill.

“Ricotta Chicken” begins with a whole chicken. You remove the backbone and slice the chicken in half lengthwise. Then you push a mixture of ricotta cheese, Parmesan cheese, egg, and herbs under the skin. Finally, you grill it. Sounds good, but a bit of work.

“Cornish Hens with Mandarin Sauce” would probably be good. I have never grilled stuffed game hens. I marked “Tandoori Chicken” as good, and now I decide to cook this dish for this blog.

“Chicken Fajitas” and “Grilled Chicken Pitas” are nice, everyday meals. There are recipes for sea bass and tuna, if I am every able to find these expensive fishes. A recipe for salmon doesn’t inspire me, and I know I’ll never try the shrimp recipe, because it has curry in it.

I rarely grill vegetables. This book has recipes for grilled tomatoes, red peppers stuffed with fresh mozzarella, corn on the cob in the husk, stuffed potatoes, and squash with peppers. Doubt I’ll use these recipes, although I do love fresh mozzarella and red peppers.

The last recipe is for “Paradise Grilled”. This is grilled pineapple, and I love grilled pineapple! This recipe includes a glaze, which I really think is unnecessary. Grilled pineapple is great on its own, or maybe over ice cream.

At the very end of Weber Gas Grill Cookbook is a 3-page grilling guide. Weber’s Real Grilling has grilling guides, but they are scattered throughout the book. The one in Weber Gas Grill Cookbook is much more concise, and I think it is more useful.

I definitely will keep this cookbook. I am going to store it tucked inside the big Weber’s Real Grilling (my favorite grilling cookbook) so that I don’t forget about it, and also for ready access to the grilling guide.

“Tandoori Chicken” is the recipe I chose for this blog. It is the only recipe I marked in this cookbook – I marked it with a post-it as “excellent”.

Tandoori Chicken recipe

I will make it exactly like the recipe, except we’ll skip the chutney and cucumbers. I can tell this is a recipe that is “up my alley”, since I have all of the ingredients on my shelves or in my refrigerator.

Tandoori Chicken
serves 4-5

  • 2 cups plain yogurt
  • 1 tablespoon minced or grated fresh ginger
  • 2 cloves garlic, minced
  • 2 teaspoons paprika
  • 1 1/2 teaspoons cinnamon
  • 1 teaspoon cumin
  • 1 teaspoon ground coriander (or crushed coriander seed)
  • 1/4 teaspoon cloves
  • 1/2 teaspoon salt
  • 1/2 teaspoon pepper
  • 3 pounds chicken pieces

Combine all of the marinade ingredients, and then add the chicken. Refrigerate at least 6 hours or overnight.

When ready to cook the chicken, remove it from the marinade, saving the marinade. Boil the marinade for 1 minute: it will be used to baste the chicken in the last part of the grilling step.

Heat a gas grill with all burners on until it is very hot. Then, turn off half of the burners (or two-thirds, depending on the size of your grill) and let the temperature drop to about 350-375˚. Place the chicken pieces skin side up on the grill over indirect heat.

Cook for about 45 minutes, until done, as indicated by a quick read thermometer, or observing that the “juices are running clear”. Brush with the boiled marinade during the last 15 minutes or so of grilling time.

Note that this recipe does not call for turning the chicken pieces. I like grill marks on both sides, so I turned them once to skin side down for about 5 minutes. I put them over the direct heat, and I shouldn’t have! They tasted great, but were a bit blackened. Next time, I might try placing them skin side down first, over indirect heat, for a few minutes, then turn them skin side up for the remainder of the cooking.

Tandoori Chicken
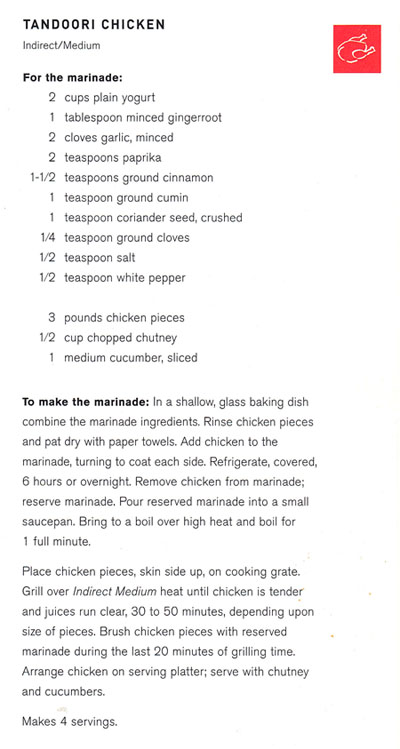
These tasted great! The yogurt marinade makes them not only well seasoned, it also makes them very tender. (I put the blackened side down for the photo. They would have been so much prettier if I hadn’t tried something experimental!)

I served the Tandoori Chicken with a fresh lettuce salad with wonderful tomatoes from our local fruit stand, fresh vinaigrette dressing using my garden’s herbs, corn on the cob, and a loaf of sourdough bread from our local Button Rock Bakery. Topped the meal off with fresh peach and apricot pie, fruits again from our local stand.

Ah, I love the days of summer with fresh local produce. And I enjoy re-discovering a good cookbook.

250 Cookbooks: Portable Electric Cookery

Cookbook #206: Portable Electric Cookery, Bonnie Brown, Sunbeam Corporation, Chicago, Illinois, 1970.

Portable Electric Cookery cookbookI wrote in my database that Portable Electric Cookery “came with my deep fat fryer”, and it has recipes written for deep fat fryers, electric fry pans, blenders, and electric mixers. I covered the deep fat fryer in Sunbeam Cooker and Deep Fryer, the fry pan in  Hamilton Beach Automatic Heat Control Appliances, and  my old portable electric Sunbeam mixer in Sunbeam Deluxe Mixmaster Mixer.

When I opened this booklet this week, I expected it to be “just another manufacturer’s cookbook”. But no, this one is written by a real person, Bonnie Brown, and her personality is reflected throughout the book. For instance, the table of contents is: Appealing Appetizers, Superb Soups, Magic with Meats, Fabulous Fish . . . you get the idea! Cutesy titles repeating first letters.

And what of the recipes? Surprisingly, I find some that are interesting. We had “Osso Buco” – braised lamb or veal shanks – at a local restaurant and I made it at home because we liked it so much. The Osso Buco recipe in Portable Electric Cookery includes lemon peel and anchovies – I think we’d like that. Savory Lamb Chops, simmered with olive oil, onion, carrots, tomatoes, sherry, and mushrooms sound good. So do the Lamb Shoulder Chops, Pizza Style (simmered in a sauce and covered with mozzarella cheese).

The Perfect Poultry chapter has a lot of recipes for bone-in chicken pieces. Several years ago, stores in my area stopped selling packages of “whole chickens, cut up”, like the “Pick of the Chix” I bought for years. Today I have to buy breasts, thighs, legs, and wings separately, which can be a pain. Or, I have to cut up a whole chicken myself. Anyway, the recipes in this chapter include old standbys like Chicken a la King and Chicken Stroganoff and Chicken with Dumplings, as well as many simmered chicken recipes with a variety of seasonings, like tarragon and ginger. “Flaming Breast of Chicken” is a recipe for boned chicken breasts in a rich egg yolk, mushroom and scallion sauce, cooked in the electric fry pan, and covered with brandy and flamed just before serving.

Candied Sweet Potatoes reminds me of the candied sweet potatoes my mother always made for Thanksgiving. I’ve lost her recipe, but the recipe in Portable Electric Cookery is probably about how she made them. Cherries Jubilee is a cooked-at-the-table recipe that would work well using the electric fry pan, in fact, the recipe says not to use a non-stick pan. Briefly, dark sweet cherries are boiled with a bit of cornstarch, then sprinkled with sugar. Then, you cover them with warmed brandy, ignite the brandy, and spoon the cherries over vanilla ice cream.

Sukiyaki is a dish I learned how to make from my Japanese college roommate, and I always make it in the electric fry pan. The recipe in ortable Electric Cookery is similar to mine. The Delectable Desserts chapter has an interesting recipe for Baked Alaska.

Guess I’ve decided to keep this cookbook. The recipes are from scratch, and include a variety of meats and seasonings influenced by different cultures. I am pleasantly surprised! Most of the recipes, though, I’d cook in my current selection of stove top pans, electric slow cookers, Kitchen Aid mixer, and a food processor rather than a blender.

I like the recipe for “Mandarin Beef” in the “Cooking with a Foreign Flavor chapter”. It has a sauce of ginger, garlic, soy sauce, and tomatoes. Tomatoes in a stir fry is a new twist, so I decide to make this recipe for this blog.

Mandarin Beef recipe
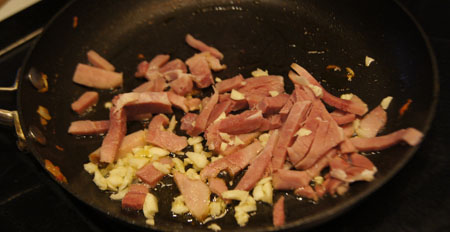
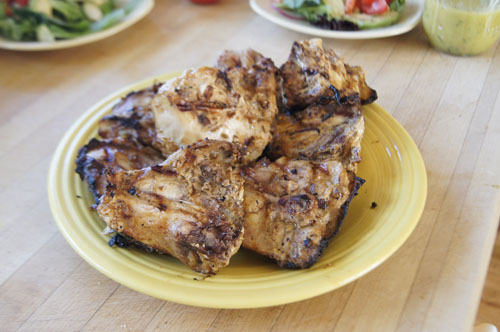
I don’t feel like pulling out my electric fry pan, so I’ll just use one of my stove-top frying pans. For the two of us, I’ll halve the recipe. Instead of the canned bean sprouts, I will substitute with julienned zucchini (I would have used fresh bean sprouts, but forgot to buy them!). I did have mushrooms, so I used them in this dish. And I’ll use fresh ginger and garlic. Tomatoes and fresh ginger and garlic remind me of the base for many dishes my daughter cooked for us in Togo. I think we will like this Mandarin Beef.

Mandarin Beef
serves 2

  • 12-16 ounces flank steak, cut across the grain into very thin strips
  • 2 cloved garlic, chopped fine
  • 1 small piece of fresh ginger, grated
  • salt and pepper to taste
  • 2 tablespoons soy sauce
  • 1/4 teaspoon sugar
  • one tomato, quartered
  • 1 small green pepper, cut into chunks
  • fresh bean sprouts, or julienned zucchini
  • sliced mushrooms (optional)
  • 1 tablespoon cornstarch dissolved in a little water

Heat a little oil in a wok or fry pan. Add the beef, garlic, ginger, and salt and pepper, and brown the beef over fairly high heat.

Turn down the heat and add the soy sauce and sugar and cook and stir about 5 minutes. Add the tomatoes, green pepper, bean sprouts (or zucchini), and mushrooms and cover and cook about 5 minutes. Add the cornstarch/water mixture, and cook and stir until the dish is slightly thickened.

Serve over rice (I used jasmine rice).

Below is a photo of the meat and vegetables ready for the stir fry.

Mandarin Beef

I totally forgot to take a photo of the cooked meal! It smelled so good and we were hungry – that’s my excuse. It was very good and I would make it again.

250 Cookbooks: Natural Cooking

Cookbook #203: Natural Cooking, Barbara Farr, Potpourri Press, Greensboro, NC, 1971.

Natural Cooking cookbookThe title page of this booklet is marked “$1.50” in very neat handwriting. My guess is that I bought it in a Boulder bookstore, way back when. Today I could buy it for $3.95 on Amazon.

The Owl & Company Bookshop comments that Natural Cooking is a “scarce and relatively early natural food cook-book”, referring to the natural food movement that the “hippie” generation took on as its own. Barbara Farr’s Natural Cooking defines natural foods as minimally processed foods, for example, whole grains instead of white flour, foods grown without pesticides, and produce brought from farm to table as soon as possible.

There was a time when all grains and produce were grown without synthetic pesticides, and produce had to be eaten (or home-canned) quickly or it would spoil. In the early twentieth century the “food industry” grew fast, offering food processed to lengthen its shelf life. Home cooks were able to buy canned and packaged foods, and wanted more. Chemists  in the same era discovered and manufactured pesticides for greater crop yield, as well as food preservatives (additives) to give processed foods a longer shelf life. Home cooks of the 40s to 50s latched on to these convenient products.

Then came the “hippie” generation, a sub-set of the “baby boom” generation. Many hippies, children of the 1940s to the 1960s, wanted to go back to nature, and eliminate pesticides and food additives from their foods, as well as eat whole grains and freshly harvested foods (preferrably home grown). (Joni Mitchell: “Give me spots on my apples but throw away the DDT”.)

The hippie generation did not invent the movement for all natural foods. My edition of the Boston Cooking-School Cook Book, published in 1906, recommends whole grains and a balanced diet including fruits and vegetables.

I found Natural Cooking in the bibliography of this book, Secret Ingredients: Race, Gender, and Class at the Dinner Table, by S. Inness. It’s in the chapter “Recipes for Revolution“.

Natural Cooking reference
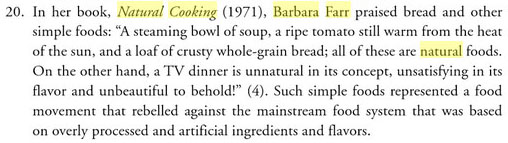
The trend for whole grains continues today (2017). I like them because they have much more flavor than plain white bread, or white rice. Whole grains have a low glycemic index, touted in The Glucose Revolution Pocket Guide to Losing Weight as being important both for dieters and diabetics. Today, I see “low glycemic index” bars and foods advertised for fitness affectionados and dieters alike.

I sit down with Natural Cooking and slowly page through. On page 4, “Introduction”, is the quote from the inset (above), “A steaming bowl of soup, a ripe tomato still warm from the heat of the sun, and a loaf of crusty whole-grain bread; all of these are natural foods. On the other hand, a T.V. dinner is unnatural in its concept, unsatisfying in its flavor and unbeautiful to behold!”. I scanned in page 5, below, because it exemplifies the tone of Barbara Farr’s book:

Natural Cooking

Here is an excerpt from page 6, Barbara Farr’s take on food faddists:

Natural Cooking

Even though this is a small collection of recipes, it is quite varied. The recipes in this book are not vegetarian and some include cuts of meat that we less commonly use today, such as oxtails, kidneys, liver, and smoked tongue. Hummus, eggplant, stuffed grape leaves, gazpacho, quiche, and bean soups show the variety of choices. I easily find three recipes I’d like to try: Swedish Limpa, a yeast bread made with beer and a larger proportion of rye flour; Turkish Swedish Meatballs made with lots of yogurt; and Apple Krisp, with raw sugar (Turbinado sugar, like I use for Creme Brulee), honey, apples, and wheat germ.

An aside: I like Barbara Farr’s paragraph on “Sweets”:

Natural Cooking

For this blog, I decide to make the Turkish Swedish Meatballs.

Turkish Swedish Meatballs recipe
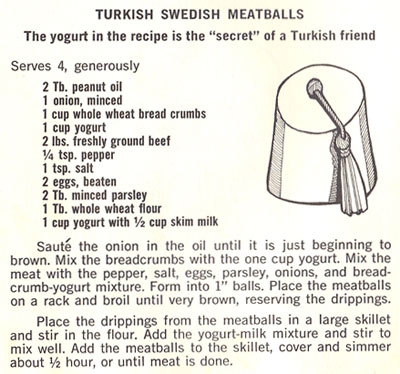
I cut the recipe in half for the two of us. I found the meatballs too sloppy as I formed them, so I added more breadcrumbs. I found it very hard to stir the whole wheat flour into the drippings, so next time I’d use white (AP) flour. (Not worth the trouble using whole grains for this small amount of flour, if it doesn’t work.) Below is my version of this recipe.

Turkish Swedish Meatballs
serves 2-3

  • 1 pound freshly ground beef; I used 90% lean beef from Whole Foods
  • 1/2 onion, chopped fine
  • 3/4 cup whole wheat bread crumbs (I used my homemade whole wheat bread)
  • 1/2 cup yogurt (I used organic, full fat plain yogurt)
  • pepper to taste
  • 1/2 teaspoon salt
  • 1 egg, beaten
  • 1 tablespoon minced fresh parsley
  • 1 tablespoon AP flour
  • 1/4 cup milk
  • 1/2 cup yogurt

Saute the onion in a little oil until it is just beginning to brown. Mix the breadcrumbs with the 1/2 cup yogurt. Mix the meat with the pepper, salt, parsley, onions; add the bread-crumb-yogurt mixture. Form into 1-inch balls. They will not form easily, as this mixture is pretty, well, sloppy:

uncooked meatball
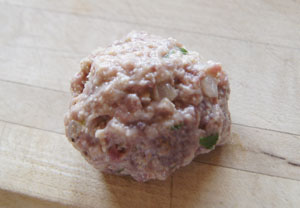
Set the meatballs to rest on a plate or breadboard. Heat your oven to broil. Find a clean broiler pan, or use a rack set over a pan to catch the drippings. Lightly oil the broiler pan or the rack, then place the meatballs on it. Broil the meatballs until they are very brown. This took me 5-10 minutes; I rotated the pan often and turned the oven to low-broil about halfway through.

Take the pan out of the oven and let it cool. Reserve any drippings for the sauce.

Transfer the drippings to a large frying pan pan and stir in the flour (I had so few drippings that I added a bit of olive oil too). Add the milk and stir until smooth. Add the 1/2 cup yogurt. Add the meatballs to the skillet, mix it all together carefully (the meatballs are delicate), then cover and simmer about 1/2 hour, or until the meat is done.

Serve over noodles, rice, or mashed potatoes, or maybe a grain like farro, freekeh, bulgur, or cracked wheat. I used whole wheat linguine.

Swedish Meatballs
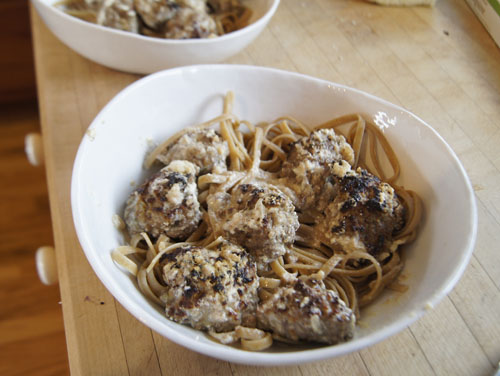
I was surprised at how well these went over! The first comment from my dining-partner was “ummmm, these are good!” I too liked them. Full of flavor and nice and moist.

Next time I might use a frying pan that goes from oven to stove top. Using the broiler was kind of useless, since very little fat came off these meatballs. But the step of browning under a broiler was nice, because it got these delicate meatballs nice and brown without causing them to fall apart. It kept the moisture of the meatballs inside, and after a good simmer in the yogurt sauce, they were absolutely delicious.

I will definitely keep this cookbook!