250 Cookbooks: Healthy Bread Recipes

Cookbook #155: Healthy Bread Recipes, Salton/MAXIM Housewares, Inc., Mt. Prospect, IL, 1998.

Healthy Bread Recipes cookbook

Healthy Bread Recipes reminds me that I purchased a Breadman breadmaker around 1998. My second breadmaker, it was highly recommended by King Arthur Flour. I recall that it eventually died – a problem with the dough bucket paddles binding up. I replaced it with another Zojirushi in 2008. The Breadman brand is currently owned by Spectrum Brands Inc. I wrote about my thoughts on yeast breads and breadmachines in the post My Daily Bread.

Healthy Bread Recipes has less than 20 recipes. But since they all have whole grains and are designed for breadmakers, each recipe is right up my alley. I’ll keep this booklet.

I decide to make “Honey Banana Whole Wheat Bread” for this blog. I’ve made banana yeast breads before, but don’t quite remember which recipe I used. I don’t expect the banana flavor to come through very strongly in this very wheat-y yeast bread, but I like the poppy seeds it calls for and it should be good for breakfast toast and as they say, for great peanut butter sandwiches!

Honey Banana Whole Wheat Bread recipe

Comments

This recipe calls for “1 banana”. Bananas do not come in one size! The banana I had sitting on the counter must have been bigger than they meant because I had to add almost a cup more flour to get the dough “right”. (I weighed one of its bunch-buddies and it was over 6 ounces.) With this big banana and the extra flour, my bread came out huge! It tasted great and had a good texture, but was not pretty in the pan. And it didn’t taste banana-y enought for me, even with all that banana.

Next time, I will slice the banana into a measuring cup, then add water (or milk) to 1 1/3 cup liquid volume. That’s much more scientific and should provide consistent results. And, it will have a higher banana to water ratio and perhaps more banana flavor. I’ve incorporated these changes into the directions below, but I haven’t tried this newer version yet.

Honey Banana Whole Wheat Bread

  • 1 banana, sliced
  • water or milk (see directions below)
  • 1 1/2 tablespoons butter
  • 1/4 cup (3 ounces) honey
  • 1 egg
  • 1 teaspoon vanilla
  • 3/4 teaspoon salt
  • 9 ounces whole wheat flour (I used whole wheat, not white whole wheat)
  • 7 ounces bread flour (I added a bit of gluten flour into this weight)
  • 2 teaspoons poppy seeds
  • 2 teaspoons yeast

Slice the banana into a 2-cup glass measure. Add water (or milk) to 1 1/3 cup volume. Dump the mixture into your bread machine. Add all of the remaining ingredients.

Choose a dough cycle that kneads and takes the dough through the first rise cycle. Watch the dough during the kneading process and add flour or liquid if it needs it (this recipe isn’t perfected yet!).

Remove the dough from the machine and form into a loaf. Place in a 9×5-inch loaf pan. Bake at 375˚ for 30-35 minutes. (When I baked my loaf, I used an instant-read thermometer and when the bread looked brown and done, it tested to 190˚.)

Honey Wheat Banana Bread

This bread is very good! I won’t say excellent (yet) because I want more banana flavor, I’m hoping my suggested revisions will do the banana flavor trick. (Adding dried banana chips might help too.)

Honey Banana Whole Wheat Bread is excellent in peanut butter sandwiches. And it’s good for toast. It might be kind of weird in deli meat sandwiches, but go ahead and experiment.

An even better idea for this bread is: French toast! I used Honey Banana Whole Wheat Bread to make French toast this week liked it so much that I’ll make this bread again just for the delicious treat.

1990s blog: Basic New York Water Bagels

I totally enjoy my own homemade bagels. I wrote this note in the 1990s and it is still true today:

I make these a lot! I like them for sandwiches. I think, but I’m not sure, that using malt syrup makes them better; you can find it in a beer brewing supply store. If you can’t find it, don’t worry about it!

These days (2016) I use malt powder that I purchase online from King Arthur Flour. It is more subtle than the malt syrup that I used to use, and not as sweet (so I add a little sugar). But no worries, if you want to try these but have no malt, just use sugar instead.

I like these bagels so much that I wrote about these in my other blog. Geeky food-obsessed me.

The following recipe is pretty much as I wrote it for my 1990s food blog. The recipe is adapted from The Best Bagels are Made at Home by Dona Z. Meliach. Please refer to my recipe for “Oat Bagels with Pumpkin Seeds” for photos of how to form bagels and a photo of the package of malt powder that I use.

Basic New York Water Bagels
makes 8-10 bagels

  • 1 1/8 cup water
  • 1 tablespoon oil
  • 2 tablespoons diastolic malt powder AND 1 tablespoon sugar OR 2 tablespoons malt syrup OR 2 tablespoons sugar
  • 3/4 teaspoon salt
  • 2 teaspoons yeast
  • 16 ounces bread flour (3 1/3 cups)*

*I highly recommend using bread flour rather than all purpose flour for all yeast breads. Please see my reference page on yeast and flours.

Mix in breadmaker on a dough cycle with a rising step. Or, by hand until you have a stiff dough, then let rise until double and punch down.

Divide into 8-10 equal pieces. (I like bigger bagels so I usually make 8.) I like to use a kitchen scale: The total weight of the dough is usually about 800 grams, so it’s 100 grams per bagel.

Form into bagels: press each piece into a flat round, poke a hole in the center, then enlarge the hole by placing one hand on the inside and one on the outside and rolling the dough between your hands until you have a big, smooth ring. (If you don’t get the inside hole quite big, when the dough rises and cooks, you won’t have a hole in your bagel. That’s why I say to put your hand inside the bagel; the hole needs to be that big.) Photos here.

Let the formed bagels rise 20 minutes. Bring some water to a boil in a saucepan and add malt syrup (2 tablespoons) or powder (1 tablespoon) or sugar (1 tablespoon) in it. Preheat the oven to 400 degrees.

When the water is boiling briskly, place the risen bagels in it a couple at a time and boil 30 seconds on each side.

(After rising, the top of the bagel is smoother than the bottom. So that the baked bagel has a smooth top, I always flip the bagel as I put it in the water. In other words, I pick up a risen bagel, turn it over and place it in boiling water. After 30 seconds, I turn it. After another 30 seconds, I take it out of the boiling water.)

Remove the boiled bagel to a rack to drain. Continue until all the bagels are boiled. Brush the bagels with egg wash (1 egg beaten with 1 T water) and sprinkle with poppy or sesame seeds. Bake 18-22 minutes at 400 degrees.

NY bagels

Read the introduction to my 1990s cooking blog for the history of this category of my blog.

breads

250 Cookbooks: The Best Bagels are Made at Home

Cookbook #144: The Best Bagels are Made at Home, Dona Z. Meilach, Bristol Publishing Enterprises, San Leandro, CA, 1995.

The Best Bagels are Made at Home cookbook

I am quite proud of my homemade bagels. Below is a 2012 photo of my “Basic New York Water Bagels“, my most-used recipe in The Best Bagels are Made at Home. I’ve made these tons of times! I modified the recipe just a bit, and will share it with you in a different post.

NY bagels

These bagels are lighter than store- or shop-bought bagels and absolutely wonderful.

Bagels are made from a yeast dough. They take a few more steps than a basic loaf of bread: instead of just slapping the dough into a bread pan and then the oven, you have to divide it into pieces, form each piece into a bagel, boil each in hot water, and glaze with an egg mixture and topping. Only then do they go into the oven.

But note: I have taken the time to make these many, many times. It’s worth it!

Who taught me how to make bagels? I learned from this cookbook. Dona Meilach clearly explains all the steps in bagel-making. I had tried to make them a few times before I got this cookbook, but met only with miss-shapen masses of baked dough – I found forming the dough into a bagel shape nearly impossible. Luckily I bought this book, studied and practiced, and now can make these any time I want!

Meilach begins with a little bagel history. What we know as the American bagel came with the Polish immigration in the late 1800s, and were popular among the Polish Jews who settled in New York. Between 1910 and 1915, the Bagel Bakers’ Local #338 union was formed. Apprentices of this union eventually moved to different parts of the US, and the popularity of bagels spread. (In one of my own 1941 cookbooks, The Bread Basket, I found a recipe for “bagles”.) In the early 1950s, bagels were handed out at the intermission of a Broadway comedy called Bagels and Yox. Soon after, popular women’s magazines ran recipes for “bageles”. And now, bagels are an institution in the US, as we all know!

Bagel history is followed by “Directions for Making Bagels”, pages 12-31. This is an especially helpful section. The six steps of bagel making – dough mixing (bread machine encouraged) and first rise, shaping, second rise, boiling, glaze, and baking – are described in detail. Next, Meilach discusses ingredients. Of note, she advises the reader to use bread flour for its high gluten content and recommends malt syrup in bagels. Her claim is that it “helps give bagels their unique appeal, malt assists with bfowning, and feeds the yeast.” Malt syrup can be hard to find. I once bought it from a store that sold beer brewing supplies; later I found it at a health food store. Currently, I use malt powder that I buy from King Arthur Flour and supplement it with a little sugar. But you can always use molasses or sugar instead.

The bulk of this book is recipes for different bagels, about 200 different kinds! The ingredients for each variety is laid out at about one per page. Useful as it is, this organization is also a tiny bit inconvenient because the recipes themselves do not give the times for the second rise and boiling and baking or even the oven temperature. Whenever I try a new recipe from this book, I have to fish back through the first 19 pages for the necessary specifics.

Okay. Critical step in bagel preparation, shaping. Meilach describes several methods for forming bagels:

  • the hole in the middle method
  • the hula hoop around the finger method
  • the rope method
  • bagel cutter method

I tried several of these before I settled on a modification of the “hula hoop around the finger” method. Photos of how I do this are below, in the recipe that I chose for this blog, I “Oat Bran Bagels with Pumpkin Seeds and Cinnamon”.

Oat Bran Pumpkin Seed Bagels recipe

My version is below, pretty much the same, with the complete directions included. Note that “Miller’s bran” is wheat bran – it’s not critical to the recipe so you can leave it out if you don’t have any.

Oat Bagels with Pumpkin Seeds
makes 8 bagels

  • 1 1/8 cups water
  • 1 tablespoon oil
  • 1 tablespoon sugar*
  • 2 tablespoons malt powder*
  • 3/4 teaspoon salt
  • 1 tablespoon cinnamon (yes, a tablespoon! or even more if you like!)
  • 1/4 cup wheat bran
  • 1/4 cup cornmeal
  • 1/2 cup oatmeal (I used the quick-cooking kind)
  • 2 1/2 cups bread flour (10 5/8 ounces)
  • 1 tablespoon gluten
  • 2 1/2 teaspoons yeast
  • 5/8 cup raw or roasted pumpkin seeds

*You can substitue the “1 tablespoon sugar plus 2 tablespoon malt powder” with 2 tablespoons molasses or 2 tablespoons sugar.

Combine all of the ingredients EXCEPT the pumpkin seeds in a breadmaker set on a dough cycle with a rising step. Add the pumpkin seeds when the machine “beeps” for additions, or mix them in after the bread has risen. (If you add them at the start, they will be ground to tiny bits.)

When the breadmaker cycle is done, take the dough out. Fold it a few times, then weigh it. Mine weighed 809 grams.

bagel dough

Divide the dough into 8 pieces – mine were about 100 grams each. (You could make 10 bagels if you want smaller bagels.) Flatten each to a circle, as shown below. I have a little flour on my breadboard in case things get sticky.

flattened bagel dough

Poke a hole in the center of the flattened circle.

poke a hole in the dough

Now, pick up the bagel dough. You can put it on your finger and swirl it around, or put a few fingers in the center and stretch and pull and smooth the dough until it is a nice bagel shape. With one hand inside the hole, I kind of roll the bagel between my palms to smooth it. Leave a hole a bit bigger than a bagel-hole that you are used to in purchased bagels. The bagel will rise in all directions in the next steps, and the hole will get smaller.

formed hole

Place the smoothed bagel on a lightly greased surface or on parchment and let rise 20-30 minutes.

formed bagel

My kitchen was a bit cool, and this dough has a lot of bubble-popping bran in it, so I let my bagels rise about 40 minutes.

bagels risen

While the bagels rise, bring a pot of water to a boil. Add a tablespoon of malt powder (or use a tablespoon of sugar). Have ready an egg wash (1 egg whisked with 1 tablespoon water) and your choice of seeds for the top (I chose poppy seeds).

Take a bagel and put it in the boiling water, flipping it so that you put the top side down (this gives smoother looking baked bagels). Set a timer and boil 30 seconds, then turn it over, add another flipped bagel, and boil another 30 seconds. Remove the first bagel and turn the second and add another – continue until all the bagels are boiled.

If the instructions in the above paragraph are hard to follow, just do this: boil each bagel 30 seconds on each side!

bagels boiling

Set each boiled bagel on a rack. Brush with the egg wash and sprinkle with seeds.

bagels ready for the oven

Bake at 400˚ for 20 minutes.

Oat Pumpkin Seed Bagels

I ate one right out of the oven! Boy was it good. Next day I had one with cream cheese and jam for breakfast. Deli meat and cheese and lettuce and tomato for lunch. Gotta make some more!


250 Cookbooks: The Bread Basket

Cookbook #119: The Bread Basket, Standard Brands Incorporated, 1941.

The Bread Basket cookbook“‘Baking day’ isn’t on the American housewife’s calendar any more. For at her bakery or grocery . . . fresh every day . . . is a profusion of breads, rolls, cakes and pastries that’s one of the world’s wonders.

“How tempting they are . . . how delicious . . . how cheap . . . and what a world of work they save!

“But there are times when women like to run up a batch of rolls of their own, or try their hand at a coffee cake, just to see if they can still do it!”

So begins this delightful 1941 cookbook. I smile as I turn the pages.

The breads in this cookbook are all yeast breads, and Fleischmann’s yeast is specified in every recipe. (Standard Brands was formed in 1929 by J. P. Morgan by a merger of Fleischmann’s and four other companies. In 1981, Standard Brands merged with Nabisco to form Nabisco Brands, Inc.)

The copy right has expired on this cookbook, so I am going to share with you a few of my favorite pages. Let the book speak for itself!

page 2page 3Bagles! And yes, the recipe below is for “bagels”, as we spell it.

page 9page 12Corn Meal Muffins recipeI always google my cookbook titles. This time I find the Fresh Loaf website has reproduced a later version of The Bread Basket. The cover is the same, the layout is the same, but the content is different and refers to war rationing.

This was one of my mother’s cookbooks, but she didn’t make any notes in it, nor are their food stains. She must have got it soon after she was married.

I decide to make “Corn Meal Muffins” for this blog. The original recipe is in the picture just above. I think it might be interesting to use yeast as the leavening in corn muffins instead of baking powder! I hope they turn out.

A couple notes. The recipe calls for “scalded milk”. This is simply milk heated to just below boiling. This kills any bacteria that might interfere with the yeast and/or the taste of the bread. With today’s pasteurized milk, most (but not all) cooks consider this an unnecessary step.

“1 cake of yeast” probably means a 2 ounce cake of wet, compressed yeast. Although caked yeast is supposedly still available, I haven’t seen it in years, so I will use my usual active dry yeast. According to the Red Star website, 1/3 of a 2 ounce yeast cake is equal to 2 1/4 teaspoons of dry yeast. I am making a half recipe, so I should use 3 3/8 teaspoons of dry yeast. (I actually used 1 1/2 teaspoons yeast but would use more next time.)

Yeast Corn Muffins
makes 10

  • 1 cup milk
  • 2 tablespoons butter
  • 7/8 cup cornmeal
  • 1 tablespoon brown sugar
  • 1/2 teaspoon salt
  • 2 1/4 teaspoons dry yeast (note added later: too yeasty, so 1 1/2 teaspoons is my suggestion)
  • 1 egg
  • 1 1/2 cup flour

Scald the milk, then stir in the butter until it melts, then stir in the cornmeal. Add the brown sugar and salt. Let cool to lukewarm, then stir in the yeast, egg, and flour.

Grease a muffin pan (you will only need 10 of the muffin cups). Fill each muffin cup half full. Let rise one hour, until light.

Bake at 375˚ for 22 minutes (or until they test done).

Comments

These turned out great! Unlike baking powder muffins, these did not crumble and fall apart a lot as we ate them. They were rough and chewy! The flavor was perfect. I think these might also be good with some cooked corn off-the-cob stirred into the batter. (Maybe with green chiles and chopped red bell pepper too.)

Here are the muffins just after I put the batter into the muffin pan:

just into panHere they are after an hours’ rise. They look a little lighter or higher:

risenAnd here they are baked:

bakedThese weren’t really tall muffins, but this might be my mistake. I made a slight calculation error and only used 1 1/2 teaspoons yeast instead of 2 1/4 teaspoons. Next time they might turn out higher – but they were dang good as is! I liked them split and toasted and spread with cream cheese and jam:

muffin with jam

250 Cookbooks: Bread Machine Favorites (Fleischmann’s Yeast)

Cookbook #106: Bread Machine Favorites (Fleischmann’s Yeast), Copyright by Specialty Brands, a Division of Burns Philp Food Inc., San Francisco, CA, 1994. Tested in the Better Homes and Garden Test Kitchen, a registered trademark of Meredith Corporation.

Bread Machine FavoritesThis is a great cookbook. I have thumbed through it many times and it shows! I keep it with my other favorite cookbooks, near the Joy of Cooking.

I like the recipes in Bread Machine Favorites because they all work. Each recipe includes a “recommended bread machine cycle”, so they work across the different brands of bread machines. There is a great “Troubleshooting Guide” if your loaves are not turning out perfect. This guide helped me hone my bread-machine-breadmaking skills. Most importantly, I learned to watch the bread in the machine and add more water or flour as necessary. (Here is my discussion of my experience with – and love of – yeast breads.)

These are the recipes I have tried and liked in Bread Machine Favorites: Blueberry-Lemon Bread, Cottage Wheat Bread, Pumpkin-Nut Bread, Zucchini-Carrot Bread, Old-Fashioned Cinnamon Rolls, and Dried Cherry-Almond Bread. The one I used to make almost weekly is Cottage Wheat Bread. It has cottage cheese in it, therefore a little added protein and calcium. Plus it’s just a darn good whole wheat bread.

Most of the loaf recipes in this cookbook call for baking the bread in the bread machine. It is my preference to bake yeast loaves in a conventional oven. I bake a small loaf (8 1/2 x 4 1/2 inches) for about 22 minutes at 385˚, or until it is nicely browned. The Bread Machine Cookbook also has recipes for rolls and braided loaves, and those are baked in a conventional oven.

About yeast. I like to know my yeast, so I buy it in two-pound packages (and I usually do not buy Fleishmann’s yeast, not that it isn’t good). By always using the same yeast, and using the bread machine to rise the loaves at a consistent temperature, I know I will get consistent results. After I acquire a two-pound package of yeast, I fill a small jar and keep it in the refrigerator, and store the rest in the freezer. Here is my discussion of bread yeast.

For this blog, I will try the “Basic Sourdough Bread”. About a year ago I purchased a sourdough starter from King Arthur Flour. Up until now, I have only used this starter to make no-knead rustic loaves. I have been very happy with the flavor and consistency of these rustic loaves loaves. They are not as sour as San Francisco sourdough bread, but I’m not sure that sort of sourness is possible in Colorado. In any case, they taste different than no-knead bread made without sourdough starter. Now I want to expand my sourdough repertoire to a kneaded loaf!

(By the way: this is the first time in my life that I have kept a sourdough starter fed and perfect for an entire year!)

Here is the sourdough recipe in Bread Machine Favorites:

Basic Sourdough Bread recipeI had to make a few changes in the recipe. As the bread kneaded, it was too dry, and I added at least 1/4 cup water to get the correct consistency. When I examine the “Sourdough Starter” directions in Bread Machine Favorites, I note that this cookbook directs to feed the starter with equal parts water and flour. My starter is fed with twice as much flour as water, therefore, 2 cups of flour in this recipe is too much. Below is my revised version, as well as directions for feeding my starter.

Sourdough Bread Machine Bread
makes one 8 1/2 x 4 1/2 loaf

  • 3/4 cup unfed sourdough starter (see directions below)
  • 1/4 cup water
  • 1 tablespoon butter
  • 1 3/4 cups bread flour
  • 1/2 teaspoon salt
  • 2 teaspoons sugar
  • 1 1/2 teaspoons yeast

Put all the ingredients in your bread machine and set to a dough cycle, or to a basic white bread cycle with medium color (baking) setting.

If you have the bread machine do the baking, you just wait until it’s baked!

If you want to bake the bread in the oven, transfer the dough to an 8 1/2 x 4 1/2-inch pan. Let rise at room temperature just until the loaf peaks a half-inch over the sides of the pan. Bake for 25 minutes at 385˚.

Sourdough LoafThis is great bread. The sourdough gives it a subtle flavor and soft texture. My only problem was that I used the original amount of flour and had to add more water, and ended up with a huge loaf. Honest: This loaf was just to the top of the pan when I put it in the oven, but it ballooned up on baking! Even so, the bread doesn’t have huge holes in it, nor a coarse texture. I made it Saturday and today is Wednesday and I am so looking forward to my lunch-time sandwich on this tasty, soft bread. (Note that my directions, above, incorporate my revision of using less flour so that the loaf should not rise as large.)

sourdough bread slicesSourdough starter note

My advice on sourdough starter is to get some from a friend or purchase from a reliable source. My starter is fed like this:

  • remove 8 ounces or about a cup and either use it or toss it
  • add 1 cup flour and 1/2 cup water and mix well
  • let stand at room temperature an hour or two, until it is bubbly
  • cover with plastic wrap and refrigerate
  • repeat once a week, whether you are baking a sourdough loaf or not!

The directions that came with my starter say to use freshly fed starter in a recipe. However, for the bread machine sourdough loaf that I make for this blog, I used unfed (just out of the refrigerator) starter and it worked great. In fact, it almost worked too well, as the bread rose a lot in the oven, as you can see in the photo of the loaf.

Note

I have an extra copy of Bread Machine Favorites! I liked it so much that I bought a copy to give away, then forgot to.

Favorites: Pita Bread

Pita breads are easy to find in stores, but they can be thick or thin or have pockets or not. I like my pitas thin and with pockets. But store ones that are thin and have pockets usually fall apart when you fill them with a lot of stuff.

I recently made Beef Steak Pitas for this blog. The thick, pocket-less pita that I bought at a local Mediterranean market reminded me: I can make my own pitas!

Sometimes you just have to do it yourself to get it right. I made these last week and they turned out perfect. I enjoy the nutty taste and chewy texture that the whole wheat flour lends these breads. I like watching them puff up in the oven. I love taking out a hot one, cutting it in half, filling it with a slice of cheddar cheese, and ooh-ing and aah-ing at the experience.

(I also like filling them with a lot of stuff. I also like that they store well, on the counter or in the freezer.)

In 1999, I wrote up my method for pita breads in my old blog (here is the history of that blog). Here is that post, along with my slightly updated recipe for pitas.

1999 post:

I was inspired to make these after a member of a news group I was reading, rec.food.baking, asked for suggestions as to how to get pita bread to bake with even crusts. No one else in the group was posting an answer, so I dug out my old recipe (it’s been at least 15 years since I tried these, back when I was baking with more whole grains than I do currently) and gave it a whirl. And yes, I did use a bread machine to do the dough, sorry, but I like the freedom it gives me, plus I’m busier than I used to be. The recipe works just as well if you do the kneading by hand, then let it rise until double, punch down and form the loaves.

I was amazed at how good they came out – nutty and chewy and utterly delightful. I get such a kick out of the way they puff up, but then I’m easily entertained. They make a great pocket for fillings, because they stay together much better than the store-bought cracker-like pitas. Most of these had even crusts top and bottom, though a couple were uneven: I have no explanation as to why, I thought I did them all the same. (Guess they were rebel pitas.)

Pita Breads
makes 10

  • 1 1/2 cups water
  • 1 teaspoon salt
  • 1/2 tablespoon sugar
  • 1 generous tablespoon olive oil (you can use any vegetable oil)
  • 2 1/4 cup all purpose flour
  • 2 tablespoons gluten flour (or regular flour)
  • 1 1/2 cups whole wheat flour (not white wheat flour)
  • 1/4 cup wheat germ
  • 2 tablespoons yeast

Mix in bread machine on the dough cycle, monitoring the dough after the first few minutes in the machine, adding a little more flour or water if necessary to keep a nice ball of dough. If you can, leave the dough a little bit wetter than you would for conventional loaves. When the cycle is complete, divide the dough into 10 pieces, knead each piece briefly, then roll each into a 6 inch circle. At this point, you may let them rise until puffy, about 20 minutes.

Put a heavy griddle on the bottom of your oven. If you have a gas oven, this really means on the BOTTOM; in an electric oven, you must use the lowest rack (take out the upper rack). Heat the oven and the grill to 425˚ for at least 15 minutes before you start baking the pitas. Place the loaves on the heated grill, a couple at a time, and bake for 6-8 minutes. They should puff up magically! If desired, you can then place them under the broiler to brown the tops.

Note: You can use a baking stone instead of a griddle.

Here are my 10 little pitas, ready for the oven.

10 little pitasHere they are magically rising when I opened the oven to take a peek!

pitas risingHere is one of the baked pitas. These actually kept their puffiness and I had to kind of squish them down before storing in plastic bags.

pita breadYum!

250 Cookbooks: Woman’s Day Encyclopedia of Cookery, Volume 5

Cookbook #104: Woman’s Day Encyclopedia of Cookery, Vol. 5, Fin-Gum. Woman’s Day, Fawcett Publications, NY, 1966.

Encyclopedia of Cookery Volume 5This is the fifth in a series of 12 food encyclopedia volumes. I discussed the first four volumes here: Volume 1, Volume 2,  Volume 3, and Volume 4.

“Finland is a land where the seasons and seasonal foods are savored. The winter is long, dark, and quiet, and people stay at home, with good music, and good books. . . . Finnish cookery is Scandinavian, but simpler and more austere.”

So begins Volume 5 of the Woman’s Day Encyclopedia of Cookery. Finnish cookery is followed by a complete section on fish, which includes great photos, a fish cook book, and forty fish sauces. James Beard contributed an article to this useful fish reference. Next comes flageolet (a small green bean), flake (a small, flat, thin loose piece of food which looks like a scale”), flan, flapjack, florentine (“a cooking method which uses spinach as its base), fluke (a fish), and flummery (a dessert). Fondue! Fondues are fun. They were very popular in the seventies and eighties, and we had beef fondue just a couple weeks ago.

Forks? In the 11th century, aristocrats used the fork more as a lark than as a method of serious eating. Frankfurters? An 8-page cookbook, including a photo of frankfurters swimming in a corn-cream sauce. The “Freeze” section includes basic rules for successful home freezing.

French cookery begins with a cute illustration and an article by James Beard. Fritters, frog’s legs (“if it is necessary to dress them, cut off the hind legs close to the body and wash them well in cold water – remove feet”). Fruits, including a good section on fruit tarts. Fudge, gallantine (boned cooked meat covered with aspic, as in “gallantine of eel”), game (bear chops, roast haunch of beaver, roast coot, Maryland muskrat, woodchuck in cream). Garnishes, German cookery, ginger, ginger beer, goulash, Greek cookery (especially, baklava), greens (kale is listed as a green to cook), guinea fowl (“the habits of guinea fowl are not always admirable, they are gregarious and polygamous, they make a lot of noise and lay their eggs in a casual and haphazard manner on the ground, they resist regimentation”), and lastly, gumdrop.

What to make for this blog? Hmmm. Under German cookery, my eyes fall on “kuchen”. Oh, that’s it! The word “kuchen” is a happy one for me. I always think first of a creamy and sweet noodle kuchen, full of eggs and cinnamon. In college a Jewish friend brought this kuchen to a party. After all these years, I still remember it with longing. (Today I can find sweet noodle kuchen recipes online, and yes, they are a traditional Jewish dish.)

The kuchen in the Encyclopedia of Cookery is not made with noodles, but I am trusting my favor with the word kuchen to draw me to a good recipe. According to this encyclopedia, kuchen means “cake” in German, and to “millions of Americans, kuchen, or coffeecake, is the basis for a typical Sunday morning breakfast. Kuchen dough is not too sweet or rich; it is rather the foil for luscious toppings.”

Here is the recipe from the book:

Kuchen RecipeThis kuchen dough recipe has eggs and butter, but not a whole lot of sugar. I agree with the Encyclopedia: it is neither too sweet nor rich.

I decide to cut the recipe in half, and I choose the apple topping variation. Then as I made the dough, I totally goofed. I read “yeast dough” and got it in my head that I would make this in my breadmaker. I had already thrown all the dough ingredients into my breadmaker before I realized my mistake. The dough was thin! Oops. I was supposed to scald the milk and use a mixer. What the heck, I’ll go for it, and see if it works. My breadmaker has a great dough cycle where it heats all the ingredients before beginning the kneading and rising cycles. Should work.

Apple Kuchen Coffeecake
makes one 9-inch cake

  • 5/8 cup milk
  • 1/4 cup melted butter
  • 1 egg yolk
  • 1/2 egg (I whisked one egg in a glass measuring cup and used half of it)
  • 2 tablespoons sugar
  • 1/2 teaspoon salt
  • 1 1/2 cups all purpose flour
  • a pinch of mace or cinnamon
  • grated rind of 1/4 lemon (approximate)
  • 1 1/2 teaspoons yeast

Add all of the ingredients to the bowl of a breadmaker. Set the cycle to “dough” with “pre-heat” and “rise”. This dough is runny: it will not form a big ball of dough.

(Non-breadmaker instructions: Heat the milk and cold butter until the butter melts, cool to lukewarm. Pour into a mixer bowl and add the rest of the ingredients. Beat for 5 minutes. Cover and let rise in a warm place for about an hour.)

Pour the dough into a buttered 9-inch cake pan. Let rise for about 30-45 minutes. (It should “double in bulk” but this is kind of hard to tell.)

Top with the topping:

  • 1 apple, peeled and thinly sliced
  • 3/8 cup sugar
  • 1 tablespoon flour
  • 1 teaspoon cinnamon
  • 1 tablespoon butter

Arrange the apple slices neatly on top of the risen dough.  Mix together the sugar, flour, and cinnamon and spread over the fruit.

Bake at 350˚ for 35 minutes.

Here is my kuchen after the second rising step, just before I put it in the oven:

kuchen unbakedAnd here it is, hot out of the oven:

Apple KuchenThis was delicious! It was good as-is, but if you like more apples on top, go for it. The original recipe says to leave the apples in quarter-apple chunks; this might be good too.

I took the above photo as soon as the kuchen came out of the oven. The real story is that as it cooled, it fell. And the falling made it even better: it had a creamy, eggy feel and sweet spicy flavor, reminding me of that noodle kuchen I had back in college.

Yum.

250 Cookbooks: The Pizza Book

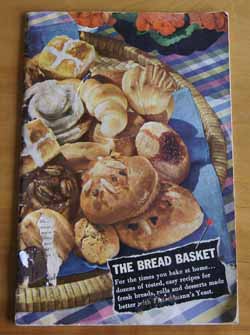
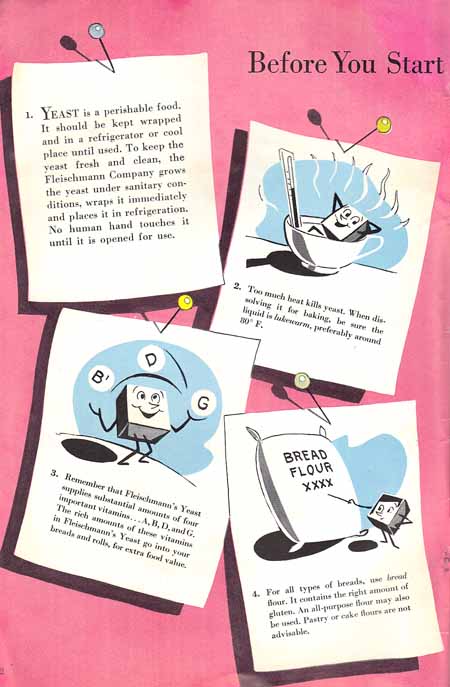
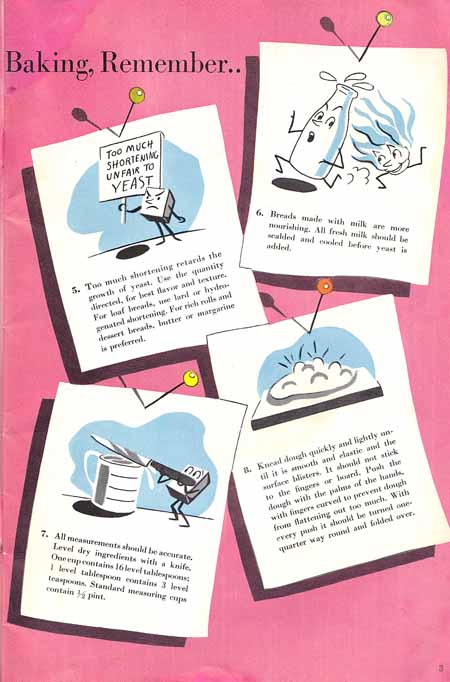
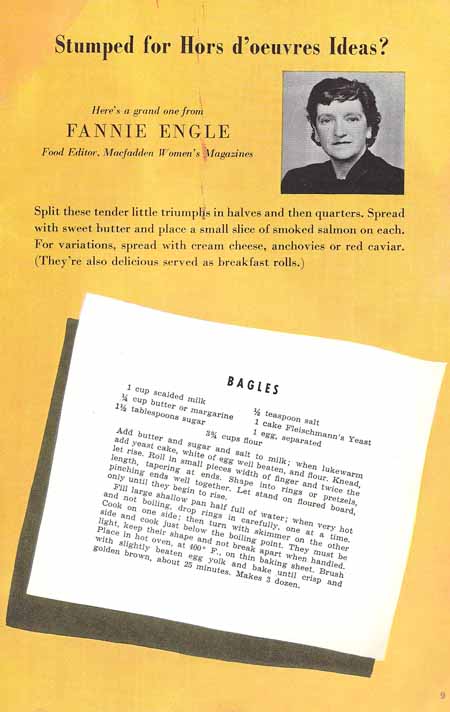
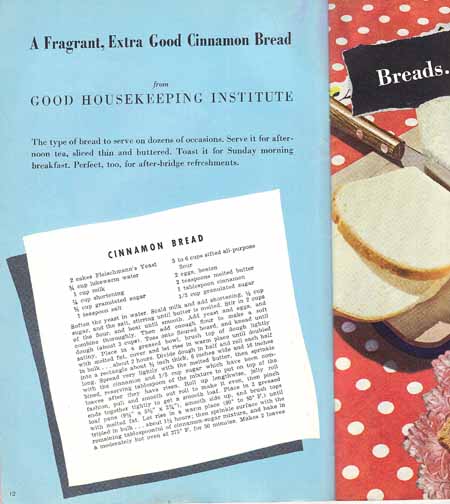
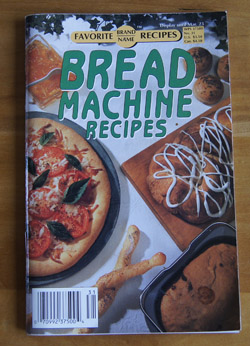
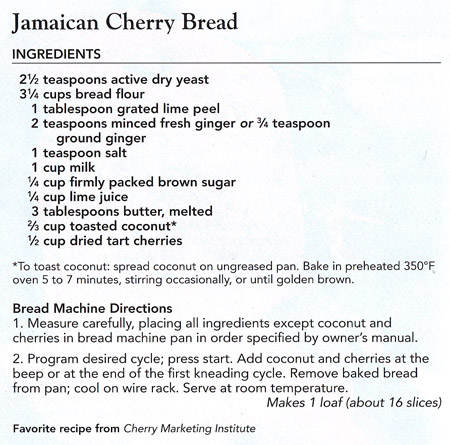
Cookbook #90: The Pizza Book, Evelyne Slomon, Times Books, NY, 1984.
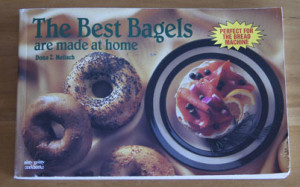
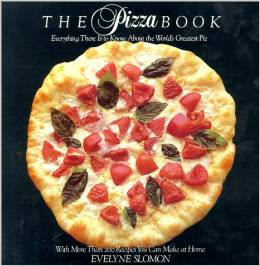
The Pizza BookI didn’t keep the book jacket, but here is what it looked like:

The Pizza Book jacket coverPicture this: Boulder, Colorado, sometime in the seventies. We are enjoying a pizza at Old Chicago Pizza, downtown. Wow, they used fresh mushrooms on this pizza! It was heavenly. I fell in love with pizzas at that point. But not the cheesy-greasy fast food pizzas, the good ones. I started making my own, and bought The Pizza Book in the eighties.

Since we live too far from a town for pizza deliveries, and since I am a cook, it’s not a stretch that I began making my own pizzas. I make one about every other week. My favorite crusts have morphed over the years, from a thick whole wheat crust to a thinner beer-based crust to a non-kneaded thin crust. I have tried many toppings, but usually come back to a tomato and cheese based pizza with sausage or pepperoni, mushrooms (fresh!), onions, and black olives. (My Mexican pizza is one of my saved variations.) I have tried several baking methods: cookie sheet, perforated round pan, baking stone, and gas grill.

And you know what? All of the crust and ingredient and baking methods work. Each type of pizza has its place in a sensible pizza-eating plan!

Evelyn Slomon tells us that pizza came to America with Italian immigrants in the late nineteenth century. Too poor to buy bread, the women would pay to bake their own dough in an oven at a bakery. They would often take a portion of the dough and flavor it with tomato sauce and bake it alongside their loaves. “In the old country it was called pizza” according to Slomon. This pizza was done before the loaves and it “appeased the appetites of hungry children.”

Slomon continues with the history of pizza in America, then presents a comprehensive guide on how to make pizza. It’s a great reference on different types of pizza doughs and the basic skills needed to prepare pizzas. And then there are about 200 recipes to choose from – enough ideas to keep any pizza cook happy. And of course, you are encouraged to come up with your own ideas. Most of Slomon’s recipes give a choice of different doughs and toppings and even baking methods.

Even though this book was published thirty years ago, it is still available either new or used. It has stood the test of time – this book is still all you need to make great pizza. I highly recommend The Pizza Book.

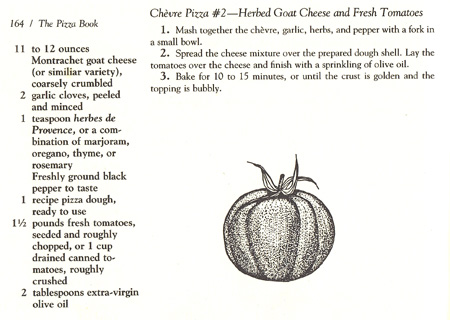
I decide to make “Chèvre Pizza”. I have the choice of 7 different crusts and 5 different toppings. I decide to use Sicilian-style dough (has a lot of olive oil) and Chèvre Pizza #2: “Herbed Goat Cheese and Fresh Tomatoes”. I am going to vary this further by adding prosciutto (from variation #3) and a few fresh basil leaves (from my garden). I’ll assemble it on a pizza peel and then bake it in a hot oven on a preheated baking stone.

The Pizza Book recipeMy version is below.

Herbed Goat Cheese, Fresh Tomato, and Prosciutto Pizza
makes two 12-inch pizzas (approximately)

Besides the ingredients below, you will need semolina flour. For equipment, you need a pizza peel and a large baking stone.

Sicilian Style Pizza Dough

  • 3/4 cup water
  • 1 package (scant tablespoon) yeast
  • 3 cups flour (I used bread flour)
  • 1/4 cup olive oil
  • 1/2 teaspoon salt

Put the dough ingredients in a breadmaker and set to the “dough” cycle (including a rising step). Or, mix and knead by hand or in a food processor, then let rise until double in bulk. During the mixing and kneading steps, you may need to add a little more flour to get a soft, smooth ball of dough. Prepare the pizza toppings while you wait for the dough to rise.

Oven

Place a baking stone in your oven 30 minutes before you want to start baking the pizzas. Turn it to 500˚, or as close to that as your oven will go.

Herbed Goat Cheese (etc.) topping

  • 11 – 12 ounces plain goat cheese
  • 2 minced garlic cloves
  • 1 teaspoon dried or 1 tablespoon chopped fresh mixed herbs – I used fresh thyme and fresh oregano
  • 8 ounces grated mozzarella cheese
  • fresh tomatoes, about 1 1/2 pounds
  • several thin slices of prosciutto, about 2-3 ounces
  • several fresh basil leaves, thinly sliced
  • 2 tablespoons olive oil (approximate)

Mix the garlic and herbs with the goat cheese, using a fork to mash them together. My goat cheese mixture was pretty crumbly. Cut the prosciutto into strips.

Peel and core the tomatoes, then chop them into rough dice. Put them in a strainer and let them drain while you roll out the pizza dough.

Assemble and bake the pizza

Note: There are many ways to roll or stretch out a pizza dough. I usually use a rolling pin. But after re-reading Slomon’s pizza book, I decided to try chilling the dough briefly before stretching it out. So below is the method I used, but feel free to use another method.

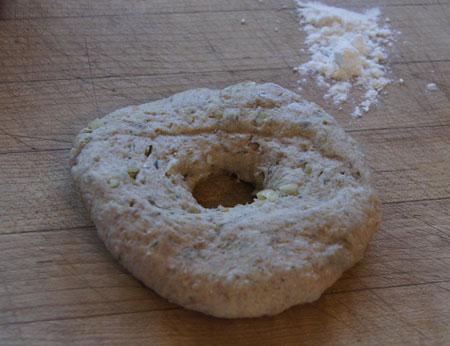
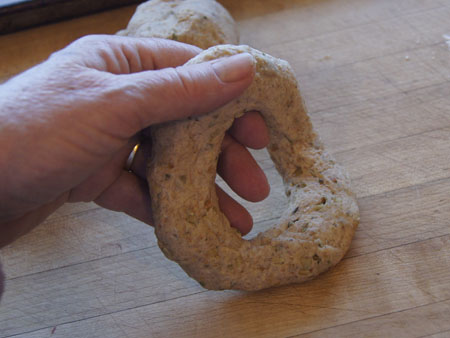
After the dough has risen, divide it into two portions. Flatten each into a disc and cover with plastic. I placed them in the refrigerator for 15 minutes or so. (This should make the dough easier to handle. It is an optional step that I might eliminate next time; see my comments below.) Next, remove from the fridge and work each disk on a breadboard, pushing and stretching into a circle. You can pick up the dough and play with letting it hang down over your knuckles to stretch it out, and even hold it by the edges and let gravity pull it down. The olive oil in this dough makes it easy to work with! I was able to get each portion stretched into a 12-inch circle.

(Is your oven hot? You need it hot before you assemble the pizza, or the dough might get soaked while you wait for the oven to heat.)

Put one of the discs onto a pizza peel that has semolina dough sprinkled on it. Sprinkle the herbed goat and mozzarella cheeses on first, then add the prosciutto and the basil leaves. Put on the tomatoes, then drop some olive oil on top of the tomatoes and on the rim of the dough.

Carefully slide the topped pizza onto the hot pizza stone, close the oven door, and bake for 15 minutes. Get the second half of the pizza dough topped while you wait for the oven, then bake it in the same manner.

I actually made one goat cheese pizza and one with prosciutto, black olive, onion, bell pepper, mozzarella, Parmesan, and fresh tomatoes. I had a feeling the goat cheese one would be “too much” for him, and I was right. I liked both toppings!

Comments

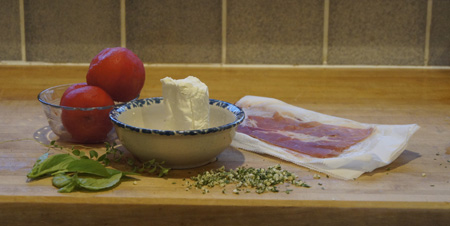
While my dough was rising, I gathered my ingredients. First, the goat cheese and herbs with the peeled tomatoes and prosciutto.

pizza ingredients
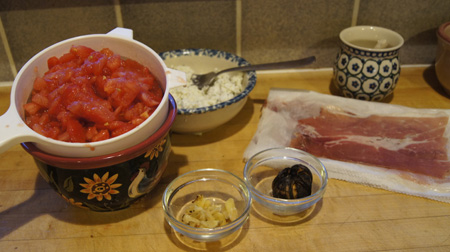
I was glad that I thought to drain the chopped tomatoes. I had some great roasted garlic from a stand in Lyons, so I used some of it on the pizza.

pizza ingredients
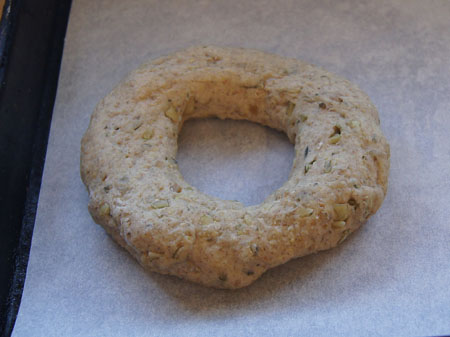
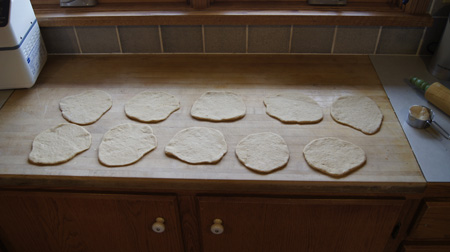
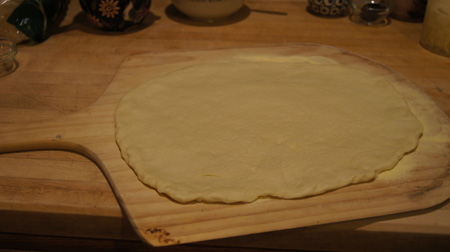
Below is half the dough on a pizza peel.

pizza dough on pizza peel
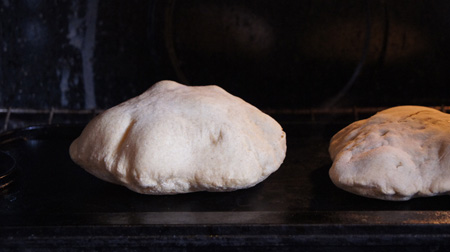
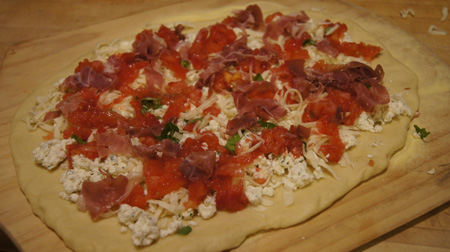
Here is the first pizza, ready for the oven.
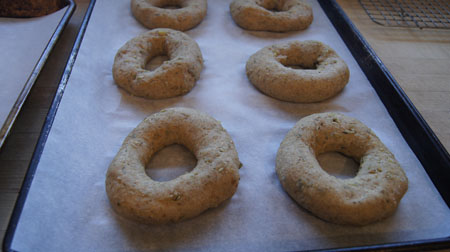
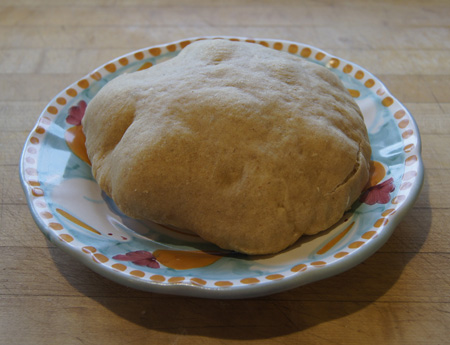
pizza before cookingBaked!

goat cheese pizza
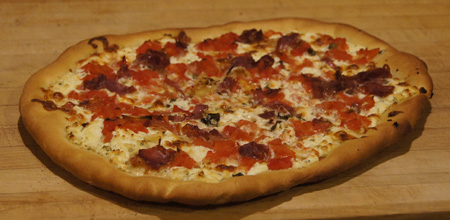
These pizzas were baked to perfection. I really, really like the simple “sauce” of just fresh, non-precooked tomatoes. It’s easy and fresh-tasting. Putting the cheese on first keeps the crust from sogging. The prosciutto tucked under the tomatoes keeps it from burning in the very hot oven. The very hot oven makes the crust crisp.

Both of us thought the crust tasted a bit like a big “cracker”. This is good or not, it depends on your preference. I will probably use less olive oil in the dough next time and eliminate the chilling step. I think the yeast in the dough didn’t have time to warm up and work its magic in rising the baking dough, or perhaps the olive oil inhibited the rising. The recipe is good as written, but . . . tweaking is part of the experiment, and that’s what cooking is about!

250 Cookbooks: Bread Machine Recipes

Cookbook #88: Bread Machine Recipes, Favorite Brand-Name Recipes, Vol. 6, March 23, 1999, No. 31, © Publications International, Ltd., 1999. Bread Machine Recipes CBI like this little recipe magazine cookbook! I bought it for myself back in 1999, and I know I have tried at least one recipe from it. Lots of fun ideas. Now that I am retired, I have more time to play with different recipes. In case you are new to my blog, I’ll tell you: I love to bake bread! This post explains my history with yeast bread.

There are so many recipes I want to try in this cookbook that I will just keep it next to my bread machine for awhile. All the recipes are from scratch, and very few “brand names” are even mentioned. Rye breads, corn breads, breads with fruits and carrots, breads cooked in muffin pans, cinnamon rolls, chocolate rolls, and pizzas galore. I like the recipe for “Savory Pull-Apart Loaves”. You make the dough, then divide it into 16 pieces, flatten them and coat with olive oil and herbs, then layer it all back together into a 9×5-inch loaf pan. Be great with a good soup or stew.

I choose to make “Jamaican Cherry Bread” for this blog. It has fresh limes and fresh ginger and tart cherries (a super food!) and coconut (I love coconut!). I like fruited yeast breads toasted for breakfast or used in peanut butter sandwiches. Here is their recipe:

Jamaican Cherry BreadThe Cherry Marketing Institute, the brand name noted at the bottom of the above recipe, has more tart cherry recipes on its website.

My version of this recipe is below. I used all-purpose flour and gluten flour instead of bread flour, I used fresh ginger, and I used purchased toasted coconut chips. I baked it in the oven in a loaf pan instead of in the breadmaker.

Ginger-Cherry-Coconut Bread

  • 3 1/4 cups flour (17 ounces): I used 1 1/4 ounce gluten flour and added all-purpose flour to 17 ounces; 17 ounces of bread flour would work well too
  • 2 1/2 teaspoons yeast
  • 1 cup milk
  • 3/4 teaspoon salt
  • 1/4 cup brown sugar
  • 3 tablespoons butter, cut into chunks (substitute vegetable oil if you prefer)
  • 2 teaspoons freshly grated ginger root
  • grated peel of one lime
  • juice of one lime
  • 1/2 cup dried tart cherries
  • 2/3 cup coconut (use toasted shredded coconut or coconut chips)

Place all ingredients EXCEPT the cherries and coconut in your breadmaker. Set to a dough cycle, preferably one with a rise cycle. If your breadmaker has an option (a beep or an automatic feeder) to add the cherries and coconut near the end of the kneading cycle, use it. If not, you can add these ingredients at the time you form it into a loaf. Briefly, if you add the cherries and coconut too soon, the breadmaker will grind them up into tiny pieces.

When the dough/rising cycle is complete, remove the dough from the breadmaker. Add the cherries and coconut if you have not already done so. Fold over a few times and form into a loaf then place in a 9×5-inch loaf pan. Bake for 30 minutes at 385˚.

Comments

Great bread!

Below is the bread dough about 10 minutes into the kneading cycle. To me, it looked like it needed a bit more flour, but I let it go and after another 10 minutes the dough was smooth and perfect.

cherry yeast doughMy breadmaker goes “beep” when it’s time to add raisins, nuts, cherries, etc. You can see it doesn’t do a great job of incorporating all of the cherries. Those ones that are poking out will just burn in the oven. I tried to get them all poked back in but it was impossible.

cherry bread doughThe photo below illustrates when it is time to put the risen loaf into the oven.

cherry yeast bread doughHere is the baked ginger-cherry-coconut bread:baked cherry breadIt tastes great. I like it with cream cheese and I like it with peanut butter – as toast and in a sandwich. Butter and jam would be great too. Why just eat boring store-bought toast in the morning, when you can have something really different?!

I’m kind of iffy on the use of coconut chips (big and made for granola or snacking), rather than flakes (the kind sold for baking). The chips gave a subtle crunch to the bread, but their coconut flavor was kind of washed out by the time the bread was baked. Next time I think I’ll use coconut flakes. The coconut-toasting step suggested in the original recipe might help bring out their color and flavor.

I plan to make this bread again!

250 Cookbooks: Hershey’s 1934 Cookbook

Cookbook #59: Hershey’s 1934 Cookbook. Hershey Foods Corporation, USA, 1971.

Hershey's 1934 CookbookI have four “Hershey’s” small cookbooks and this 1971 one is my oldest. The full title is “Hershey’s 1934 Cookbook, Revised and expanded with chocolate recipes brought up to date for use in today’s kitchen.” From the forward:

“Thirty-seven years ago, in 1934, Hershey published its own chocolate cookbook, filled with all kinds of wonderful chocolate desserts. It is from this source that many of the recipes have been taken and brought up to date for you to use today. We’ve revised some of the recipes, and added some others. Margarine wasn’t around when the first Hershey book was published. Neither were electric blenders or no-stick pans, all the things that make baking a lot easier for you than it was for your mother. Even though the method of baking has become more convenient, the end product remains essentially the same. Hershey’s test kitchens have taken painstaking care to assure the same wonderful flavor that has become a trademark of Hershey baked products throughout the years. We hope you enjoy the recipes, we hope you enjoy the book.”

The first dozen or so pages are devoted to old photos and a bit of nostalgia about the depression times: wages, the price of food, and a woman’s role in the kitchen: “nobody could bake like your mother”. It’s interesting reading. It makes me think how cooks used to have to spend hours making meals for the family, and then hours washing clothes and cleaning house. Today I can instead spend hours in the kitchen playing making flavored oils and being creative. Cooking can be now be just a hobby, not a chore.

I’ve used this cookbook for a chocolate cake recipe and as a reference when I needed to make other basic chocolate items, like chocolate sauce and brownies. I haven’t used it a lot, though, because we usually shy away from rich desserts because of calories, and when I want to make something old-fashioned and rich, I’ll look for one of my own mother’s recipes. The book is correct, nobody can bake like my mother did.

I passed over all of the rich dessert recipes and chose a recipe for a chocolate yeast bread, “Raisin-Nut Cocoa Bread”. This recipe is relatively low in fat and sugar, and is packed with the nutritional benefits of raisins (or dates), walnuts, and oatmeal. I plan to use this bread as toast for breakfasts. Ummm, should be extra good with cream cheese!

Raisin-Nut Cocoa Bread recipeOne of “all the things that make baking a lot easier for you than it was for your mother” that we have in 2014 is a breadmaker. I will use mine to knead and rise a half-recipe of this dough, then bake it in one 8 x 4-inch loaf pan. My experience tells me that this is the more appropriate size pan for this amount of dough. For the oatmeal, I will cook some of my favorite extra-thick rolled oats. To make enough for the batter, I boiled 1 1/4 cup water and added 5/8 cup oats and cooked for about 5 minutes. It makes just a little more than one cup.

Raisin-Nut Cocoa Bread
makes one 8 x 4-inch loaf

  • 1 package dry yeast (2 1/2 teaspoons)
  • 1/4 cup water
  • 1/2 cup brown sugar
  • 1 tablespoon butter
  • 1 cup cooked oatmeal (see my note in the above paragraph)
  • 1/4 cup Hershey’s Cocoa
  • 3 – 3 1/4 cups flour
  • 1/2 cup chopped nuts (I used walnuts)
  • 1/2 cup raisins, or dates cut in small pieces (I used some of each and probably more than 1/2 cup total)

Put the yeast, water, brown sugar, butter, cooked oatmeal, cocoa, and 3 cups of the flour in the pan of a breadmaker. Set to the “dough” cycle and start the process. Watch the dough as it is kneaded and add more flour if necessary. This is a heavy dough and may take awhile to come together into a ball of dough. Add a little water if it is not sticking together.

If your breadmaker automatically adds raisins (etc.), set it up to do so. Otherwise, add the nuts and raisins (and dates) during the last five minutes of the kneading cycle.

When the dough has risen, take it out of the breadmaker and form it into a loaf and put it in the loaf pan. Let it rise in a warm kitchen about 45 minutes. This dough is heavy and will never puff up a lot.

Bake at 375˚ for 35 minutes. Take out of the pan and let cool on a wire rack.

Comments

This loaf turned out fine. It’s a dense, heavy bread, and very tasty. I had it for breakfast about four days in a row – just thinking of it made me eager to get out of bed!

Here is my loaf before the rise-in-the-pan step. Note that it is just about to the rim of the pan. I know that the raisins on the outside will burn in the baking step, so I pull a few of them off:

RNB before risingHere it is after about 45 minutes, risen and ready to put in the oven:

RNB risenAnd here it is baked:

RNB bakedAnd on a rack:

RNB on rackNo, it’s not the prettiest-looking loaf I’ve made, but it sure tastes good. Here is a slice, half with whipped cream cheese, on a plate of my Nana’s depression glassware:

RNB slicedYum!